
🎃 Why You’ll Love This Recipe
🧙♀️ Ingredients
- 🥣 1 ¼ cups (145 g) confectioners’ sugar
- 🧈 1 cup (2 sticks) unsalted butter, softened
- 🥚 1 large egg
- 🌿 1 tsp almond extract
- 🍦 1 tsp pure vanilla extract
- 💚 5–6 drops green food coloring
- 🌾 2 ¾ cups (330 g) all-purpose flour
- 🧂 1 tsp kosher salt
- 🥜 ½ cup finely chopped pistachios (about 70 g), plus more for decorating
- 🥜 ¾ cup sliced almonds (about 85 g)
- 🍒 ½ cup (135 g) cherry, strawberry, or raspberry jam
🥄 Makes about 50 cookies — perfect for a crowd of ghouls and goblins.
👩🍳 Step-by-Step: How to Make Witch Finger Cookies
- Cream the base. In a large bowl, beat confectioners’ sugar and softened butter until light and fluffy, about 2 minutes. Beat in the egg until smooth, then add almond extract, vanilla, and green food coloring. Mix well — the dough should look delightfully eerie.
- Dry + wet combine. In a small bowl, whisk flour and salt. Add to the butter mixture and beat on low just until combined. Fold in the chopped pistachios. Cover and chill the dough for at least 30 minutes (or up to 2 days). This makes it easy to shape.
- Shape the fingers. Line two baking sheets with parchment. Working with a quarter of the dough at a time, scoop 12–13 balls (about 1 tablespoon each). Roll each into a finger shape — roughly 3 inches long and ½ inch thick. Place on the prepared sheet.
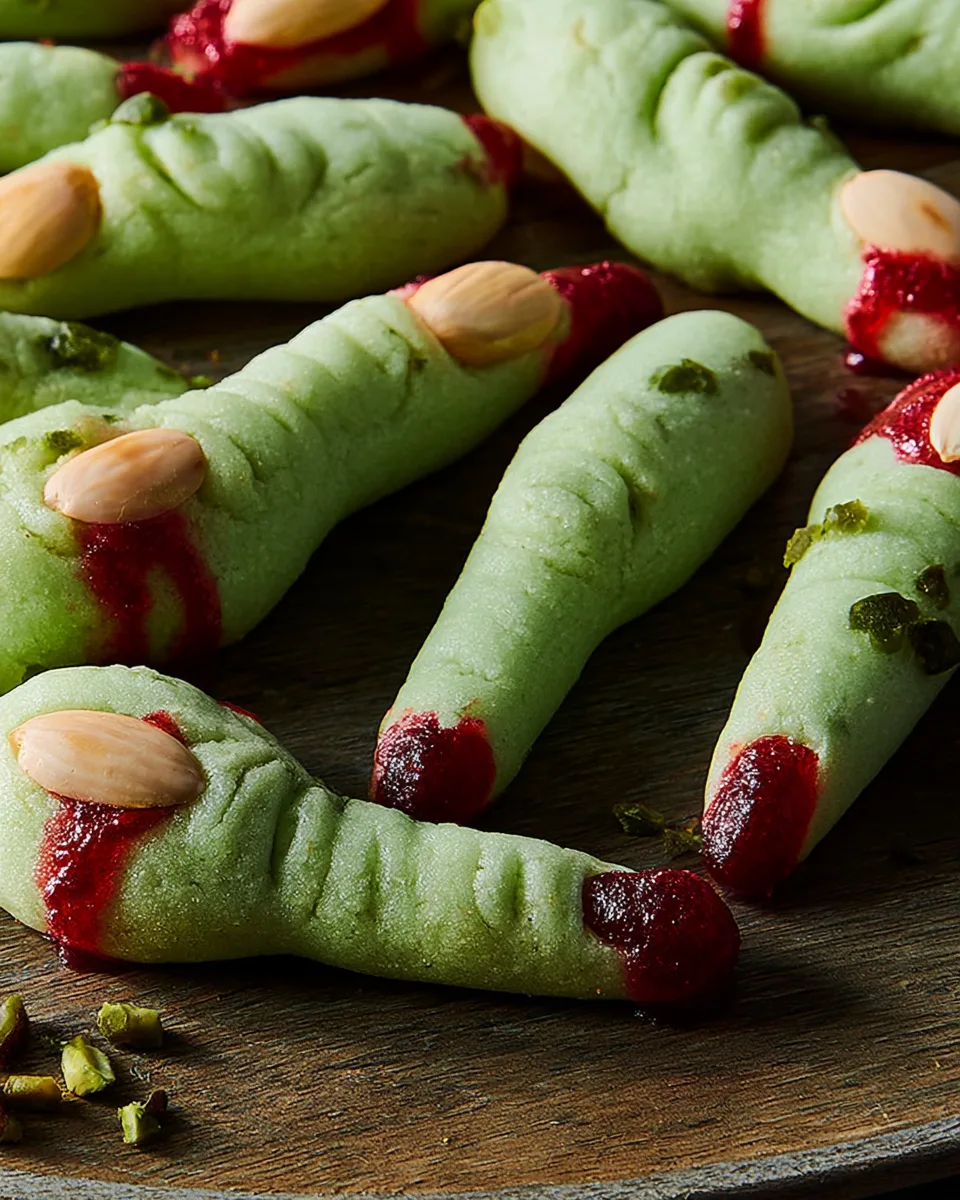
- Add nails & details. Press one sliced almond onto the tip of each finger for a nail. Pinch the dough just below the almond and again halfway down to create knuckles. Use a sharp knife to draw a few horizontal lines on the knuckles. Stick 1–2 small pistachio pieces onto the finger to look like warts. Repeat with the rest of the dough.
- Freeze for 30 minutes. This step locks in the shape so your Witch Finger Cookies keep their creepy curves while baking.
- Bake to perfection. Preheat oven to 375°F (190°C). Bake for 7–9 minutes, swapping trays halfway, until edges are firm and tops look dry. Let cool slightly on the sheets.
- Bloody finish. Gently lift off the almond “nail,” add a tiny dab of jam to the tip of the cookie, then press the almond back on so the jam oozes out a little. Spread a bit of jam along the bottom of each finger for a bloody finish. Cool completely — then serve if you dare!
🧛♀️ How to Serve & Present Your Witch Finger Cookies
On a Graveyard Platter: Arrange the fingers on a black tray or a wooden board with a few “dirt” crumbs (crushed chocolate cookies) and rosemary sprigs that look like tiny trees. Add a small pumpkin or two for extra spooky vibes.
Blood-Dipped: For extra drama, dip the whole tip of each finger in melted raspberry jam mixed with a drop of red food coloring. Let it drip like a fresh cut.
Witch’s Hand Bouquet: Bundle 5–6 fingers together and tie with a black ribbon at the base. Wrap in a cellophane bag and hand out as party favors — creepy and edible!
Paired with a Potion: Serve alongside a bubbling punch bowl (dry ice optional) or a cup of hot apple cider. The contrast of warm cookies and a chilly drink is chef’s kiss.
💡 Pro tip: Use different jams — cherry for deep red, strawberry for bright blood, or blackberry for a sinister dark purple. Mix them on the same platter for variety!
🧊 Storing Your Witch Finger Cookies
At room temperature: Store in an airtight container for up to 5 days. Place parchment between layers to keep the jam from smudging.
In the fridge: They’ll last about 1 week. Let them come to room temperature for 10 minutes before serving — the texture stays buttery and the jam stays glossy.
In the freezer: Freeze the baked cookies (without jam) for up to 3 months. Add the jam after thawing for the freshest look. Or freeze the shaped, unbaked fingers on a tray, then transfer to a bag. Bake straight from frozen — just add 2–3 extra minutes.
❄️ Always store in a cool, dry place away from sunlight. The green color stays vibrant for days!
❓ Witch Finger Cookies – FAQ
🎃 These Witch Finger Cookies are guaranteed to steal the show — and maybe a few souls. Happy Halloween, you fabulous little ghoul! 🧙♀️✨
“`
Witch Finger Cookies
Equipment
- Baking Sheets
- Parchment Paper
- Mixing Bowls
Ingredients
- 1.25 cups confectioners' sugar 145 g
- 1 cup unsalted butter softened, 2 sticks
- 1 large egg
- 1 tsp almond extract
- 1 tsp pure vanilla extract
- 5-6 drops green food coloring
- 2.75 cups all-purpose flour 330 g
- 1 tsp kosher salt
- 0.5 cup pistachios finely chopped, 70 g
- 0.75 cup sliced almonds 85 g
- 0.5 cup jam cherry, strawberry, or raspberry, 135 g
Instructions
- In a large bowl, beat the confectioners' sugar and softened butter together until light and fluffy, about 2 minutes. Beat in the egg until smooth, then add the almond extract, vanilla, and green food coloring and mix well.
- In a small bowl, whisk the flour and salt together. Add this dry mixture to the butter mixture and beat on low speed just until combined. Fold in the chopped pistachios. Cover the bowl and chill the dough in the fridge for at least 30 minutes (or up to 2 days).
- Line two baking sheets with parchment paper. Take about a quarter of the dough and scoop into 12–13 balls (about 1 tablespoon each). Roll each ball into a finger shape, roughly 3 inches long and ½ inch thick. Place on the prepared sheet. Press one sliced almond onto the tip of each "finger" to look like a nail.
- Pinch the dough just below the almond and again halfway down to create knuckles. Use a sharp knife to draw a few horizontal lines on the knuckles. Stick 1 or 2 small pistachio pieces onto the finger to look like warts. Repeat with the rest of the dough. Freeze the cookies for 30 minutes.
- Preheat your oven to 375°F (190°C). Bake the cookies for 7–9 minutes, swapping the trays halfway through, until the edges are firm and the tops look dry. Let them cool slightly on the sheets.
- Gently lift off the almond "nail," add a tiny dab of jam to the tip of the cookie, then press the almond back on so the jam oozes out a little. Spread a bit of jam along the bottom of each finger for a bloody finish. Let the cookies cool completely before serving.
Notes
Calories: 95 | Total Carbs: 10g | Net Carbs: 10g | Fats: 6g | Protein: 1g