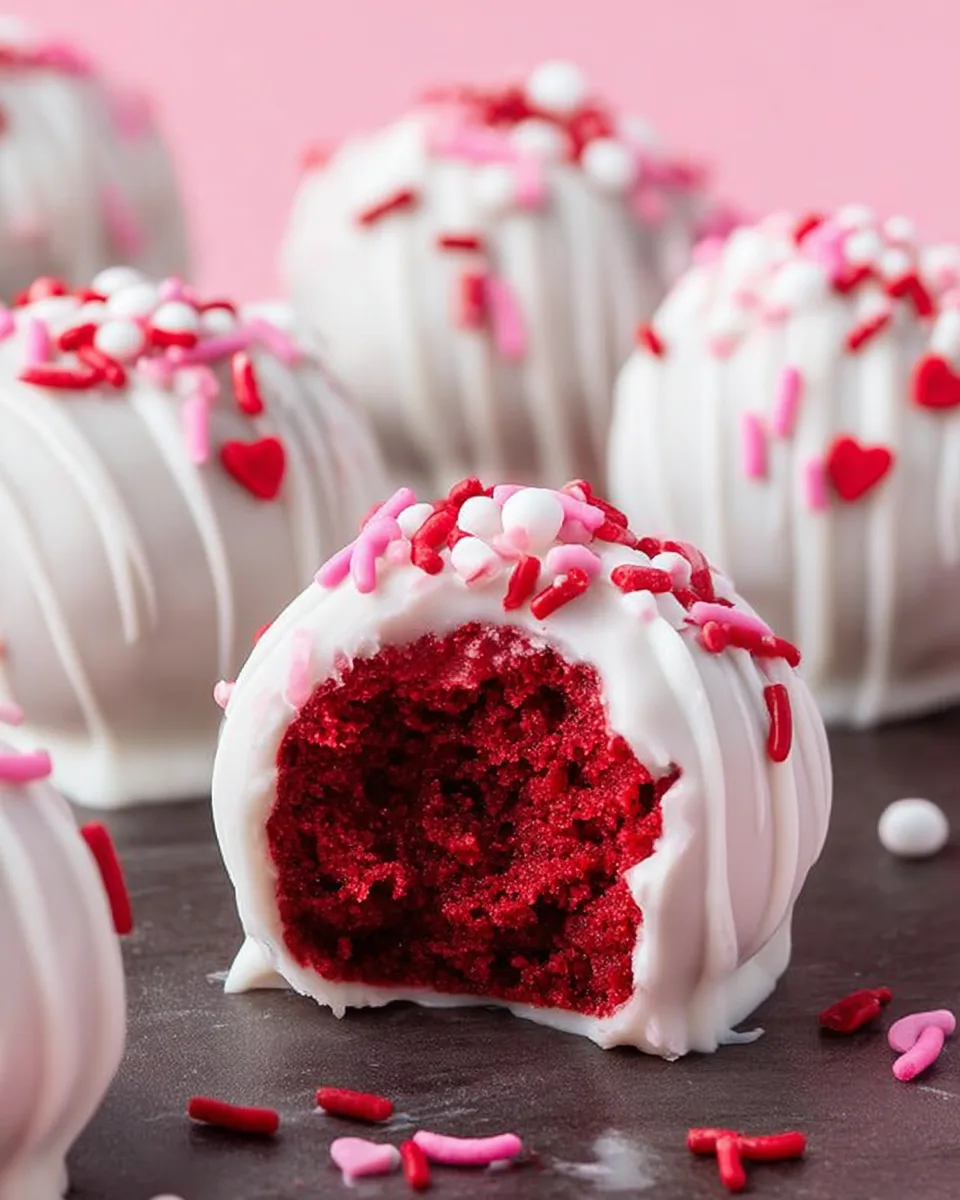
Love is in the air, and what better way to celebrate than with a treat that whispers sweet nothings right into your taste buds? Forget the same old box of chocolates this year. We’re diving headfirst into a world of vibrant red, creamy indulgence, and irresistible sweetness with our show-stopping Valentine’s Red Velvet Truffles! These aren’t just desserts; they’re tiny, edible declarations of love, perfect for your significant other, your bestie, or even a delightful self-care moment. Imagine biting into a decadent, moist red velvet cake ball, enveloped in a smooth white chocolate shell, and adorned with festive sprinkles. Sounds like magic, right? The best part? They’re surprisingly easy to make, even if your baking skills are more “enthusiastic” than “expert.” Get ready to spread some serious love, one delicious truffle at a time!
Why You’ll Love These Valentine’s Red Velvet Truffles
These delightful bites are more than just a dessert; they’re an experience! Here are four fabulous reasons why you’ll fall head over heels for this Valentine’s Red Velvet Truffles recipe:
- Effortlessly Delicious: No need to spend hours from scratch! By starting with a humble cake mix, we’ve streamlined the process without compromising on that rich, velvety flavor. You get all the “wow” factor with minimal fuss, making them perfect for busy romantics.
- Picture-Perfect Presentation: Let’s be honest, we eat with our eyes first! The vibrant red interior peeking through a crisp white chocolate shell, jazzed up with Valentine’s sprinkles, creates an undeniably gorgeous treat. They look professionally made, but your secret is safe with us!
- Customizable Fun: This recipe is a fantastic canvas for your creativity. Want to add a different drizzle? Go wild! Prefer mini heart candies over sprinkles? Absolutely! It’s a joy to personalize each truffle, making them uniquely yours – or perfectly tailored for your Valentine.
- Perfect for Gifting (or Self-Indulgence!): Whether you’re assembling a charming gift box for a loved one or simply craving a luxurious treat after a long day, these Valentine’s Red Velvet Truffles hit all the right notes. They’re portion-controlled, easy to share (or not!), and truly make any occasion feel special.
Ingredients for Your Valentine’s Red Velvet Truffles
Gather your magic makers! Here’s what you’ll need to create these enchanting Valentine’s Red Velvet Truffles:
- 🍰 1 (15.25 ounce) package Red Velvet Cake Mix
- 🥚 Ingredients needed for cake mix (water, vegetable oil, eggs)
- 🧀 10 ounces Cream Cheese, softened to room temperature
- 🍫 12 ounces White Chocolate Candy Melts or Almond Bark
- 💖 Festive Valentine’s Sprinkles
Detailed Directions: Crafting Your Valentine’s Red Velvet Truffles
Ready to get started? Follow these simple steps to bring your delicious Valentine’s Red Velvet Truffles to life:
-
Bake Your Cake to Perfection
First things first, let’s get that gorgeous red velvet cake going! Follow the instructions on your cake mix box to prepare the batter. Pour it evenly into a 9×13 inch baking pan and bake as directed until a toothpick inserted comes out clean, indicating it’s perfectly set. This is crucial! Once baked, let your cake cool down completely to room temperature. Patience is a virtue here – a cool cake is a cooperative cake for truffles!
-
Crumble & Mix for Truffle Bliss
Once your cake is completely cool, gently remove and discard any super crispy outer edges (or sneak them as a chef’s snack!). In a large mixing bowl, get your hands in there and crumble the rest of the soft cake into small, fluffy pieces. Now, add your beautifully softened cream cheese. Using your clean hands (the fun, hands-on part!), mix everything together until a smooth, dough-like mixture forms. It should be easily moldable and consistent.
-
Roll, Roll, Roll Your Truffles & Chill
Line a baking sheet with parchment paper – this prevents sticking and makes cleanup a breeze. Scoop about two tablespoons of your divine cake mixture for each truffle and roll them into uniform, neat little balls. Aim for consistency for a professional look! Place these vibrant red beauties onto your lined baking sheet and pop them into the freezer for at least 30 minutes. This chilling time is key; it helps them firm up and ensures they hold their shape perfectly when dipped.
-
Dip into Luscious White Chocolate
While your truffle balls are getting chilly, it’s time to prepare their luxurious coating! Place the white chocolate candy melts or almond bark in a microwave-safe bowl. Heat in short 30-second intervals, stirring well after each burst, until the chocolate is perfectly melted and silky smooth. Be careful not to overheat it, or it might seize!
-
Decorate, Dazzle & Set
Retrieve your firm, chilled cake balls from the freezer. Carefully dip each one into the melted white chocolate, using a fork or a dipping tool to ensure full coverage. Gently tap off any excess chocolate, allowing it to drip back into the bowl. Place them back onto the parchment-lined baking sheet. Before the chocolate fully sets, get creative! Lavishly sprinkle them with festive Valentine’s sprinkles, or add a delicate drizzle of extra white chocolate for an elegant touch.
-
Enjoy Your Masterpiece!
Allow your freshly decorated Valentine’s Red Velvet Truffles to harden at room temperature. For a quicker set, you can place them back into the freezer for a few minutes. Once set, store these delightful, bite-sized treats in an airtight container in the refrigerator. Now, get ready to share these lovely creations with your Valentine!
Presenting & Serving Your Valentine’s Red Velvet Truffles
These Valentine’s Red Velvet Truffles are already gorgeous, but with a little extra flair, you can turn them into a truly unforgettable gift or a stunning dessert centerpiece!
Creative Presentation Ideas:
- Dazzling Drizzles: Beyond sprinkles, melt a small amount of dark chocolate or even pink candy melts. Use a spoon or a piping bag with a tiny hole to drizzle patterns over the white chocolate for an artistic touch.
- Edible Glitter & Luster Dust: For an extra sparkle, lightly dust your truffles with edible glitter or luster dust in gold, silver, or pink after the chocolate has set but before it’s completely hardened.
- Mini Heart Candies: Instead of regular sprinkles, press tiny edible heart candies onto the wet chocolate for an extra Valentine’s theme.
- Custom Colors: Mix a tiny drop of food coloring into a small portion of melted white chocolate to create different colored drizzles or swirls. Think light pink or bright red!
- Decorative Liners: Place each truffle in a mini paper candy cup or truffle liner for a professional, bakery-style presentation.
Serving Suggestions:
- Elegant Gift Boxes: Arrange a selection of these truffles in a beautiful, food-safe gift box tied with a satin ribbon. They make a thoughtful, homemade Valentine’s gift!
- Dessert Platter Perfection: Serve them on a beautiful platter alongside other small treats like fresh berries, macarons, or mini cookies for a show-stopping dessert spread.
- Coffee & Tea Companion: These truffles pair wonderfully with a hot cup of coffee, espresso, or your favorite herbal tea.
- Party Favors: Individually wrap them in small cellophane bags with a personalized tag for charming party favors.
Storage & Shelf Life of Your Valentine’s Red Velvet Truffles
You’ve put love into making these amazing Valentine’s Red Velvet Truffles, so let’s make sure they stay fresh and delicious for as long as possible!
Storage: Always store your finished truffles in an airtight container in the refrigerator. The cream cheese in the cake mixture requires refrigeration to maintain freshness and food safety. Keeping them chilled also helps the chocolate coating stay firm and prevents melting.
Shelf Life: When stored correctly in the refrigerator, your homemade Valentine’s Red Velvet Truffles will last for up to 1-2 weeks. While they’re best enjoyed within the first few days for optimal flavor and texture, they will still be perfectly delicious for a longer period. For extended storage, you can also freeze the finished truffles (see FAQ below!).
FAQs About Valentine’s Red Velvet Truffles
Got questions about whipping up these delightful Valentine’s Red Velvet Truffles? We’ve got answers!
- Q1: Can I make these Valentine’s Red Velvet Truffles ahead of time?
- Absolutely! These truffles are perfect for making in advance. They need to chill anyway, and storing them in the refrigerator allows the flavors to meld beautifully. You can make them 3-5 days before serving for best results.
- Q2: What if I don’t have white chocolate candy melts or almond bark?
- You can use good quality white chocolate chips or a white chocolate bar, but be aware that tempering might be necessary for a smooth, shiny finish that doesn’t melt easily at room temperature. Candy melts or almond bark are formulated to melt smoothly and set firmly without tempering, making them ideal for dipping.
- Q3: Can I use homemade red velvet cake instead of a mix?
- Yes, you certainly can! Just ensure your homemade cake is fully cooled and has a similar moist texture to what you’d get from a mix. You’ll need about 4-5 cups of crumbled cake.
- Q4: Why are my truffles too sticky/crumbly?
- If too sticky, your cream cheese might have been too warm, or the cake mixture wasn’t thoroughly combined. If crumbly, the cake might have been too dry, or you might need a tiny bit more cream cheese (add a tablespoon at a time). Proper mixing with your hands helps achieve the right dough-like consistency.
- Q5: Can I freeze the finished Valentine’s Red Velvet Truffles?
- Yes! Once the chocolate has fully set, place the truffles in an airtight freezer-safe container, separating layers with parchment paper. They can be frozen for up to 2-3 months. Thaw in the refrigerator for a few hours before serving.
- Q6: How many truffles does this recipe make?
- Based on scooping about two tablespoons per truffle, this recipe typically yields around 15-20 truffles, depending on the exact size you roll them.
- Q7: What kind of sprinkles should I use?
- For Valentine’s Red Velvet Truffles, festive Valentine’s Day sprinkles like hearts, reds, pinks, and whites are perfect! Jimmies, nonpareils, or even edible glitter can add a lovely touch. Choose whatever makes you happy!
- Q8: Can I use dark chocolate instead of white chocolate for the coating?
- Absolutely! Dark chocolate would offer a wonderful contrast to the sweet red velvet and cream cheese. Just follow the same melting and dipping instructions.
- Q9: Is it okay if my cream cheese isn’t fully softened?
- It’s best if it is! Cold cream cheese will be very difficult to incorporate smoothly into the cake crumbs, leading to lumps and an uneven texture. If you’re in a hurry, you can carefully soften it in the microwave in 10-second bursts.
- Q10: What’s the best way to dip the truffles for a smooth coating?
- Use a fork or a dedicated candy dipping tool. Place the truffle on the fork, submerge it in the melted chocolate, lift it, and gently tap the fork against the edge of the bowl to let excess chocolate drip off. This helps achieve a thin, even coating.
Valentine's Red Velvet Truffles ❤️
Equipment
- 9x13-inch baking pan
- Large mixing bowl
- Baking Sheet
- Parchment Paper
- Microwave-safe Bowl
Ingredients
- 1 package Red Velvet Cake Mix 15.25 ounce
- Water as needed for cake mix
- Vegetable oil as needed for cake mix
- Eggs as needed for cake mix
- 10 ounces Cream Cheese softened to room temperature
- 12 ounces White Chocolate Candy Melts or Almond Bark
- Festive Valentine's Sprinkles
Instructions
- First, effortlessly prepare your red velvet cake batter following the simple instructions on the cake mix box. Pour it evenly into a 9x13 inch baking pan and bake as directed until it’s perfectly set. Once baked, allow the cake to cool down completely to room temperature – this step is key for perfect truffles!
- When your cake is completely cool, gently remove and discard the very crispy outer edges (or save them for a snack!). In a large mixing bowl, crumble the rest of the soft cake into small, fluffy pieces. Now, add your softened cream cheese and, using your clean hands, mix everything together until a smooth, dough-like mixture forms. It’s a fun, hands-on part of the process!
- Line a baking sheet with parchment paper to prevent sticking. Scoop about two tablespoons of the cake mixture for each truffle and roll them into uniform, neat little balls. Place these beautiful red balls onto your lined baking sheet and pop them into the freezer for at least 30 minutes. This chilling time helps them firm up and makes them much easier to dip.
- While your truffles are chilling, prepare your luscious white chocolate coating. Place the white chocolate candy melts or almond bark in a microwave-safe bowl. Heat in short 30-second intervals, stirring well after each, until the chocolate is perfectly melted and silky smooth.
- Take your firm, chilled cake balls and carefully dip each one into the melted white chocolate, allowing any excess chocolate to gently drip off. Place them back onto the parchment-lined baking sheet. Before the chocolate fully sets, lavishly sprinkle them with festive Valentine's sprinkles, or add a delicate drizzle of extra white chocolate for an elegant touch.
- Allow your truffles to harden at room temperature, or for a quicker set, place them back into the freezer for a few minutes. Store these delightful, bite-sized treats in an airtight container in the refrigerator. Get ready to share these lovely creations with your Valentine!
Notes
Calories: 260
Total Carbs: 12g
Net Carbs: 9g
Fats: 22g
Protein: 7g