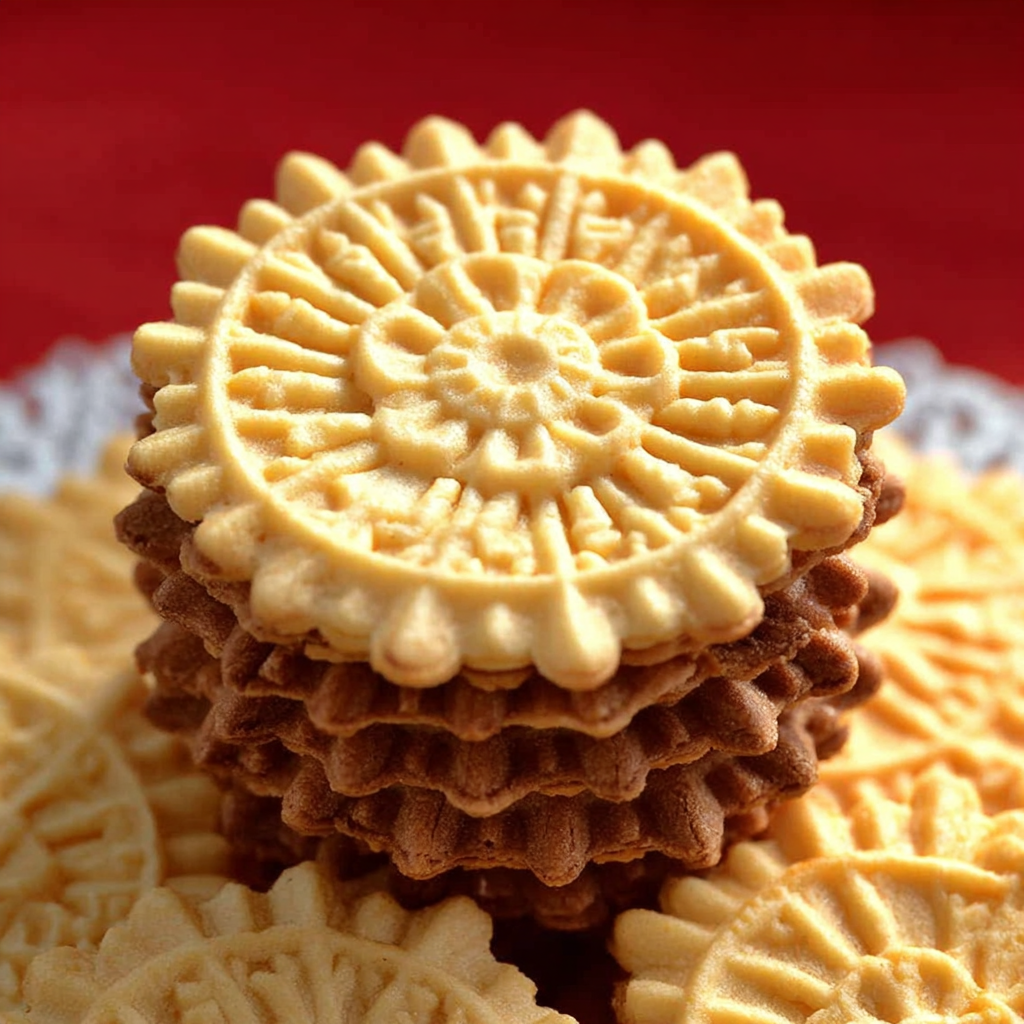
Ever walked into an Italian nonna’s kitchen? It’s a magical place filled with warmth, love, and the irresistible scent of something delicious baking. Today, we’re inviting that magic into your home with a recipe that’s stood the test of time: Nonna’s Classic Crispy Pizzelle. These delicate, waffle-like cookies are more than just a treat; they’re a bite of tradition, a whisper of Italian heritage, and a guaranteed crowd-pleaser. Forget complicated desserts – Nonna’s secret is simplicity, and we’re about to unveil it, helping you create batch after batch of perfectly crisp, subtly sweet pizzelles that will transport you straight to the heart of Italy. Get ready to impress everyone with these delightful, easy-to-make cookies!
Why You’ll Love Nonna’s Classic Crispy Pizzelle
Prepare to fall head over heels for this timeless Italian treat! Nonna’s Classic Crispy Pizzelle aren’t just cookies; they’re an experience. Here are four irresistible reasons why this recipe will become a cherished favorite in your kitchen:
- Effortlessly Elegant: Despite their delicate appearance, pizzelles are surprisingly easy to make. With simple ingredients and straightforward steps, you’ll be creating these beautiful, intricate cookies in no time, looking like a seasoned Italian baker.
- Crispy Perfection Every Time: There’s nothing quite like the satisfying crunch of a perfectly made pizzelle. This recipe is designed to give you that ideal crispness, whether you enjoy them plain, dusted with powdered sugar, or transformed into something more elaborate.
- Versatility is Key: While delicious on their own, Nonna’s Classic Crispy Pizzelle are incredibly versatile. Shape them into edible bowls for fruit or ice cream, roll them into cannoli shells, or simply enjoy them with your morning coffee. The possibilities are endless!
- A Taste of Tradition: Beyond the delightful flavor, making pizzelles connects you to a rich Italian culinary heritage. It’s a taste of nonna’s love, a celebration of simple ingredients, and a way to share a piece of history with your family and friends.
Ingredients for Nonna’s Classic Crispy Pizzelle
Gather your simple yet essential ingredients to create these beloved Italian cookies. Each component plays a crucial role in achieving the signature delicate texture and flavor of Nonna’s Classic Crispy Pizzelle:
- 🌾 1¼ cups all-purpose flour
- 🥄 ¾ teaspoon baking powder
- 🧂 Pinch of salt
- 🥚 3 large eggs, at room temperature
- 🍬 ½ cup granulated sugar
- 🍾 ¼ cup vegetable oil
- 🌿 1 teaspoon vanilla extract
- 🌱 1 teaspoon anise extract (optional, for a traditional flavor)
Detailed Step-by-Step Instructions
Creating Nonna’s Classic Crispy Pizzelle is a fun and rewarding process. Follow these detailed steps to ensure perfectly delicate and delicious cookies every time:
- Prepare Your Iron & Dry Ingredients: First, plug in your pizzelle iron and preheat it according to the manufacturer’s directions. While it’s warming up, grab a medium bowl and sift together the all-purpose flour, baking powder, and a pinch of salt. Sifting helps ensure a smooth, lump-free batter. Set this dry mixture aside for later.
- Whisk Eggs Until Frothy: In a larger mixing bowl, crack your three room-temperature eggs. Whisk them vigorously until they are nice and frothy, a process that usually takes about 2-3 minutes. This aeration is key to a light pizzelle.
- Add Sugar and Thicken: Gradually add the granulated sugar to the frothy eggs, continuing to whisk for another 3-4 minutes. The mixture should thicken slightly and become noticeably lighter in color and texture.
- Incorporate Wet Flavors: Now, pour in the vegetable oil, vanilla extract, and if you’re using it, the anise extract. Give everything a good whisk until all the wet ingredients are thoroughly combined and evenly distributed.
- Combine Wet and Dry: Slowly begin to incorporate your dry flour mixture into the wet ingredients. Mix on low speed, or gently fold by hand, until you achieve a smooth, soft, and slightly sticky batter. Be careful not to overmix, as this can lead to tough pizzelles.
- Cook Your Pizzelles: Once your pizzelle iron is hot and ready, open the lid. Place about one tablespoon of batter right in the center of each cooking plate. Gently close the lid and press down firmly. You’ll hear a gentle sizzle and see steam escaping – this is perfectly normal! Cook for approximately 30-45 seconds, or until your pizzelles reach a beautiful light golden brown color. Cooking time may vary slightly depending on your iron.
- Cool and Shape: Carefully remove the hot pizzelles from the iron using a non-metal utensil (like a wooden skewer or plastic spatula) to protect the non-stick surface. Immediately transfer them to a wire cooling rack to crisp up. If you wish to make edible bowls or cannoli shells, this is your moment! Quickly shape them while they are still warm and pliable – you only have a few precious seconds before they become brittle.
- Repeat: Continue this delightful process with the remaining batter until you’ve transformed every bit into delicious Nonna’s Classic Crispy Pizzelle!
Creative Ways to Present and Serve Nonna’s Classic Crispy Pizzelle
Nonna’s Classic Crispy Pizzelle are fantastic on their own, but their delicate nature and subtle sweetness make them perfect for creative presentations! Here are several ways to serve and impress with these delightful cookies:
- Simple Elegance: The most classic way to enjoy pizzelles is to simply dust them with a generous sprinkle of powdered sugar once they’ve cooled. Arrange them on a pretty plate for an understated yet sophisticated treat perfect with coffee or tea.
- Edible Bowls of Delight: While still warm and pliable, quickly drape a pizzelle over an inverted small cup, bowl, or even a shot glass to create a charming edible cup. Once cooled and hardened, fill these with fresh berries, a scoop of vanilla ice cream, lemon curd, or even chocolate mousse for an exquisite individual dessert.
- Cannoli Shells (Pizzelle Style!): For a lighter take on the beloved Italian cannoli, roll a warm pizzelle around a wooden dowel or a clean broomstick handle to form a cylindrical shell. Once cooled, gently slide it off and fill with your favorite ricotta cream mixture for a unique twist.
- Pizzelle Ice Cream Sandwiches: Pair two cooled pizzelles with a scoop of your favorite ice cream in between. The crispness of the pizzelle contrasts beautifully with the creamy, cold ice cream.
- Chocolate Dipped Decadence: Melt some good quality dark or white chocolate. Dip half of a cooled pizzelle into the melted chocolate, then sprinkle with chopped nuts, sprinkles, or a pinch of sea salt before the chocolate sets.
- Savory Surprises: While traditionally sweet, their neutral flavor makes pizzelles surprisingly adaptable. Shape them into cones while warm and fill with savory delights like herbed cream cheese and smoked salmon for an unexpected appetizer!
Storage and Shelf Life for Nonna’s Classic Crispy Pizzelle
To keep your Nonna’s Classic Crispy Pizzelle as fresh and delightful as the day they were baked, proper storage is key. These cookies are at their best when they maintain their signature crisp texture.
Once your pizzelles have completely cooled on the wire rack and are firm, store them in an airtight container at room temperature. A cookie tin or a plastic container with a tight-fitting lid works perfectly. Avoid refrigerating them, as the humidity can cause them to soften. Layering them gently with parchment paper can help prevent breakage, especially if you’ve made delicate shapes.
When stored correctly, Nonna’s Classic Crispy Pizzelle will maintain their crispness and delicious flavor for up to **1-2 weeks**. Beyond that, they might start to lose some of their crunch, though they’ll still be tasty. If they do soften slightly over time, you can often crisp them up again by placing them on a baking sheet in a 250°F (120°C) oven for a few minutes, watching them carefully to prevent burning. Let them cool completely again, and they should regain their snap!
FAQs About Nonna’s Classic Crispy Pizzelle
Q1: Can I make the batter ahead of time?
A1: Yes, you can! The batter for Nonna’s Classic Crispy Pizzelle can be made a day in advance and stored in an airtight container in the refrigerator. Just be sure to give it a good stir before using, as it might thicken slightly.
Q2: What if I don’t have a pizzelle iron?
A2: Unfortunately, a pizzelle iron is essential for making traditional pizzelles. It creates the thin, crispy texture and signature intricate pattern. Other waffle irons or griddles won’t achieve the same result.
Q3: My pizzelles aren’t getting crispy. What am I doing wrong?
A3: There could be a few reasons. Ensure your pizzelle iron is fully preheated. Also, cook them slightly longer, until they are a light golden brown (don’t undercook!). Make sure they cool completely on a wire rack, not on a flat surface, to allow air circulation and prevent steaming, which causes softness.
Q4: Can I use different extracts instead of vanilla or anise?
A4: Absolutely! Feel free to experiment with other flavor extracts like lemon, almond, or even orange blossom water to customize your Nonna’s Classic Crispy Pizzelle. Just remember that anise is the traditional Italian flavor.
Q5: Why are my pizzelles sticking to the iron?
A5: This usually happens if the iron isn’t properly seasoned or lightly oiled. Even non-stick irons benefit from a very light brushing of vegetable oil before the first pizzelle (and occasionally between batches if needed).
Q6: Can I freeze pizzelles?
A6: Yes, cooled pizzelles can be frozen. Place them in an airtight container, preferably with parchment paper between layers to prevent sticking and breakage. They can be frozen for up to 2-3 months. Thaw at room temperature and re-crisp in a low oven if needed.
Q7: How much batter should I use per pizzelle?
A7: About one tablespoon of batter per pizzelle is usually ideal. Too little, and you’ll have incomplete patterns; too much, and it will overflow the edges.
Q8: My pizzelles are too thick. How can I fix this?
A8: Ensure you are closing the lid of your pizzelle iron firmly. The pressure helps spread the batter thinly. If your batter is too thick, you can add a tiny bit more vegetable oil or milk (a teaspoon at a time) to thin it slightly.
Q9: Are pizzelles naturally sweet, or should I add more sugar?
A9: Nonna’s Classic Crispy Pizzelle are subtly sweet, designed to be versatile for various toppings or enjoyments. If you prefer a much sweeter cookie, you can increase the sugar by a tablespoon or two, but remember this might affect the crispness slightly.
Q10: What’s the best way to clean my pizzelle iron?
A10: Always let your iron cool completely. Never immerse it in water. Wipe down the plates with a damp cloth to remove any batter residue. For stubborn bits, a soft brush or rubber spatula can help. Avoid abrasive cleaners or metal utensils.
Nonna’s Classic Crispy Pizzelle
Equipment
- Pizzelle Iron
Ingredients
- 1.25 cups all-purpose flour
- 0.75 tsp baking powder
- Pinch salt
- 3 large eggs at room temperature
- 0.5 cup granulated sugar
- 0.25 cup vegetable oil
- 1 tsp vanilla extract
- 1 tsp anise extract (optional, for a traditional flavor)
Instructions
- First, grab your pizzelle iron and preheat it according to the manufacturer’s directions. While it’s warming up, sift together the flour, baking powder, and salt in a medium bowl; then set this dry mixture aside.
- In a larger mixing bowl, whisk your room-temperature eggs until they’re nice and frothy, which usually takes about 2-3 minutes. Next, gradually add the granulated sugar to the eggs, continuing to whisk for another 3-4 minutes until the mixture thickens slightly and becomes light.
- Now, pour in the vegetable oil, vanilla extract, and if you’re using it, the anise extract. Give everything a good whisk until it’s all well combined. Finally, slowly incorporate your dry flour mixture into the wet ingredients, mixing on low speed until you have a smooth, soft, and slightly sticky batter.
- Time for the fun part! Once your pizzelle iron is hot, place about one tablespoon of batter right in the center of each cooking plate. Gently close the lid and press down. You’ll notice steam escaping and hear a gentle sizzling—this is completely normal! Cook for about 30-45 seconds, or until your pizzelles are a lovely light golden brown.
- Carefully remove the hot pizzelles from the iron using a non-metal utensil to protect the non-stick surface. Transfer them to a cooling rack to crisp up. If you want to make edible bowls or cannoli shells, quickly shape them while they’re still warm and pliable (you only have a few seconds!). Repeat this simple process with the remaining batter until all your delicious pizzelles are made!
Notes
Calories: 54kcal
Total Carbs: 7g
Net Carbs: 6g
Fats: 2g
Protein: 1g