Why You’ll Love These Holiday Swirl Cookies
Get ready to fall head over heels for these festive treats! Our Holiday Swirl Cookies aren’t just cookies; they’re tiny works of art that taste as incredible as they look. Here are four reasons why they’ll become your new favorite holiday tradition:
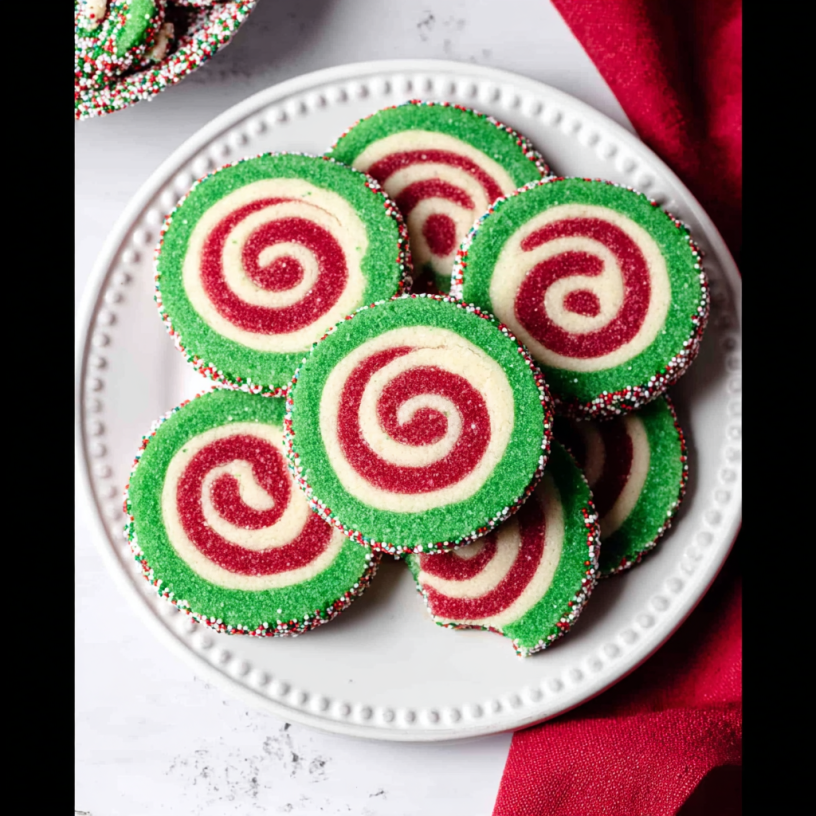
- Visually Stunning: With their vibrant red, green, and white swirls, these cookies are pure joy on a plate. The holiday nonpareils add that extra sparkle, making them perfect for any festive spread or gift box.
- Simply Delicious: Beyond their dazzling looks, these Holiday Swirl Cookies boast a tender, buttery vanilla flavor that melts in your mouth. The optional hint of peppermint or lemon zest can elevate them to another level of deliciousness!
- Fun & Rewarding to Make: The process of layering and rolling the colored dough is surprisingly therapeutic and incredibly satisfying. It’s a fantastic baking project for all skill levels, delivering impressive results every time.
- Perfect for Sharing & Gifting: Their beautiful appearance and delightful taste make them ideal for holiday cookie exchanges, hostess gifts, or simply sharing with loved ones. They travel well and are always a welcomed treat!
Unwrap the Magic: Your Guide to Dazzling Holiday Swirl Cookies!
Are you ready to sprinkle some serious magic into your holiday baking? Forget the dreary, predictable cookies of holidays past! This year, let’s create something truly spectacular that will make eyes widen and smiles appear. We’re talking about enchanting, show-stopping Holiday Swirl Cookies – those vibrant, spiraling beauties that look like they’ve spun right out of a festive dream. Imagine a symphony of red, green, and snowy white, all wrapped up in a buttery, tender bite, finished with a delightful shower of sprinkles. These aren’t just cookies; they’re edible little celebrations, surprisingly simple to create, and guaranteed to be the star of your dessert table. Get ready to roll up your sleeves, gather your cheer, and bake your way to the most visually stunning and utterly delicious holiday treats!
Gather Your Holiday Swirl Cookie Essentials
Here’s everything you’ll need to create these show-stopping Holiday Swirl Cookies. Most of these ingredients are probably already lurking in your pantry, making this a super accessible and fun baking project!
- 🧈 3/4 cup (1.5 sticks) salted butter, softened to room temperature
- 🍚 3/4 cup granulated sugar (150g)
- ❄️ 3/4 cup powdered sugar (150g)
- 🥚 2 large eggs
- 🥄 2 teaspoons vanilla extract
- 🌾 2 1/2 cups all-purpose flour (353g)
- 🌟 1/2 teaspoon baking powder
- 🧂 1/2 teaspoon salt
- 🌈 Red & green gel food coloring
- 🎉 Holiday colored nonpareils (sprinkles)
- 🍋 Optional: 1/2 to 1 teaspoon additional flavoring extract (like peppermint) or lemon zest
Crafting Your Holiday Swirl Cookies: A Step-by-Step Guide
Creating these delightful Holiday Swirl Cookies is easier than you think! Follow these detailed steps to achieve perfect, festive spirals every time:
- Cream the Base: In a large mixing bowl, beat together the softened butter, granulated sugar, and powdered sugar until the mixture is delightfully light and fluffy. This step is crucial for a tender cookie texture!
- Add Wet Ingredients: Mix in the eggs, vanilla extract, and any optional flavoring you choose (like that zingy peppermint!). Be sure to scrape down the sides and bottom of the bowl to get everything fully combined, leaving no ingredient behind.
- Combine Dry Ingredients: Gently add the flour, baking powder, and salt. Mix just until a soft, cohesive dough forms. Avoid overmixing, as this can make your cookies tough – we want them perfectly tender!
- Color the Dough: Divide your beautiful dough into three equal portions. Leave one portion plain (that’s your snowy white!). Return one-third of the dough to the bowl, add a few drops of red gel food coloring, and mix until the color is evenly distributed and vibrant. Repeat this magical step with another third of the dough and green gel food coloring.
- Chill for Firmness: Lightly flatten each of the three colorful dough portions into a disc shape. Wrap each securely in plastic wrap, and chill them in the freezer for 20 minutes (for a quick firm-up), or in the refrigerator for 1 hour, to make them super easy to roll without sticking or tearing.
- Layer and Roll: One at a time, roll out each chilled dough disc between two pieces of parchment paper. Aim for thin, even rectangles of roughly the same size – precision here helps with a great swirl! Carefully stack the colored layers on top of each other, placing the plain (white) dough in the middle, and the festive red and green doughs on the outside layers.
- Form the Swirl Log: Now for the fun part! Gently and carefully roll the stacked dough layers into a nice, tight log. Use the bottom piece of parchment paper to assist you in rolling and prevent any cracks. Wrap the log tightly in new plastic wrap and chill it in the fridge for at least 1-2 hours (or up to a week if you’re prepping ahead – perfect for busy holidays!).
- Decorate & Prep for Baking: Once the dough log is thoroughly chilled and firm, you can lightly roll it in holiday nonpareils on a baking sheet, pressing gently to ensure the sprinkles stick well and cover all sides. Preheat your oven to 350°F (175°C) and line a baking sheet with parchment paper.
- Slice and Bake: Unwrap the beautifully swirled dough log, trim off any uneven ends (chef’s treat!), then slice it into even 1/4-inch thick cookies using a sharp knife. Place them 1-2 inches apart on your lined baking sheet to give them room to breathe.
- Bake to Perfection: Bake for 10-12 minutes, or until the edges are lightly set and the cookies appear firm. They won’t brown much, keeping their vibrant colors! Allow them to cool completely on a wire rack to truly appreciate their beautiful festive swirls and achieve that perfect crisp-tender texture. Enjoy your magnificent Holiday Swirl Cookies!
Presenting and Serving Your Holiday Swirl Cookies
These gorgeous Holiday Swirl Cookies are a feast for the eyes and the palate, making them perfect for various festive occasions. Here are some fun ideas on how to present and serve them:
Dazzling Presentation Ideas:
- Holiday Cookie Platters: Arrange them artfully on a large platter with other holiday favorites like gingerbread men, snowballs, and chocolate crinkles. Their vibrant colors will make the whole platter pop!
- Individual Gift Bags: Stack a few cookies in clear cellophane bags, tie with a festive ribbon (red, green, gold!), and add a cute gift tag. They make wonderful stocking stuffers, party favors, or small gifts for neighbors and teachers.
- Stacked in Jars: Layer them in clear glass jars or cookie tins. This not only looks beautiful but also keeps them fresh and makes for an easy grab-and-go gift.
- Edible Tree Ornaments: Before baking, use a small skewer or toothpick to poke a hole near the top of each cookie. After they cool, thread a pretty ribbon or baker’s twine through the hole and hang them on your Christmas tree for a truly unique and delicious decoration!
- Hot Cocoa Bar Addition: Place a small stack of these Holiday Swirl Cookies next to your hot cocoa station. They’re perfect for dipping or enjoying alongside a warm, comforting mug of chocolate.
Serving Suggestions:
- With Warm Beverages: There’s nothing quite like a tender swirl cookie paired with a hot cup of coffee, tea, or a creamy mug of hot chocolate on a chilly winter evening.
- After Holiday Meals: Serve them as a light, sweet finish after a hearty holiday dinner. They’re satisfying without being overly heavy.
- Cookie Exchanges: These cookies are absolute show-stoppers at any holiday cookie exchange. You’ll definitely win compliments!
- Party Favors: Send guests home with a sweet memory of your gathering by offering these as delightful take-home treats.
Storing Your Holiday Swirl Cookies: Freshness That Lasts!
You’ve put in the effort to create these beautiful Holiday Swirl Cookies, so let’s make sure they stay fresh and delicious for as long as possible! Proper storage is key to maintaining their perfect texture and vibrant flavors.
Storing Baked Cookies:
- At Room Temperature: Once completely cooled, store your baked Holiday Swirl Cookies in an airtight container at room temperature. Layer them between sheets of parchment paper if stacking to prevent sticking and preserve their delicate sprinkles. They will stay wonderfully fresh for up to 5-7 days.
- Freezing Baked Cookies: For longer storage, you can freeze the baked cookies. Once completely cooled, place them in a single layer on a baking sheet and flash freeze for about 30 minutes until solid. Then, transfer the frozen cookies to a freezer-safe airtight container or heavy-duty freezer bag, again using parchment paper between layers. They will keep well for up to 2-3 months. Thaw at room temperature for a few hours before serving.
Storing Unbaked Dough:
- Refrigerator: The prepared dough log, tightly wrapped in plastic wrap, is fantastic for make-ahead baking. It can be stored in the refrigerator for up to a week. This is perfect for holiday entertaining, as you can slice and bake fresh cookies on demand!
- Freezer: For even longer storage, wrap the dough log in an additional layer of aluminum foil (over the plastic wrap) and freeze for up to 1 month. When ready to bake, thaw the dough log in the refrigerator overnight before slicing and baking as directed.
With these storage tips, you can enjoy the magic of your Holiday Swirl Cookies for days, or even weeks, after baking!
Holiday Swirl Cookies: Your FAQs Answered!
Got questions about mastering these festive Holiday Swirl Cookies? We’ve got the answers to help you bake with confidence and create truly spectacular treats!
- Can I use liquid food coloring instead of gel?
While you can, gel food coloring is highly recommended. It provides much more vibrant colors without adding excess moisture to your dough, which could alter the cookie’s texture. - Why is chilling the dough so important?
Chilling the dough makes it firm and much easier to roll out evenly without sticking or tearing. It also helps the cookies maintain their shape in the oven, preventing excessive spreading and ensuring those beautiful swirls stay intact. - Can I make the dough for Holiday Swirl Cookies ahead of time?
Absolutely! The dough log, tightly wrapped, can be stored in the refrigerator for up to a week, or frozen for up to a month. This makes holiday baking incredibly convenient! - How do I prevent the dough from cracking when rolling?
If your dough is too cold, it can crack. Let it sit at room temperature for 5-10 minutes if it feels too stiff. Working between two pieces of parchment paper also helps immensely, and try to roll evenly without too much pressure. - Can I use different color combinations for my swirl cookies?
Yes, get creative! You can use any gel food coloring combination you like. Think blue and white for a winter wonderland theme, or pastels for spring! - What if I don’t have nonpareils or sprinkles?
No problem! Your Holiday Swirl Cookies will still be beautiful without them. You can also use sanding sugar for a fine sparkle, or simply leave the edges plain for a more minimalist look. - How do I know when my Holiday Swirl Cookies are perfectly baked?
Look for the edges to be lightly set and the cookies to appear firm. They generally won’t brown much, which helps preserve their vibrant colors. Overbaking can make them dry. - Can I add different flavorings besides vanilla or peppermint?
Definitely! Almond extract, orange zest, lemon zest, or even a touch of rum extract can add wonderful variations to your Holiday Swirl Cookies. Just keep the total liquid amount similar. - My cookies spread too much in the oven; what went wrong?
Common culprits are dough not being chilled enough, an oven temperature that’s too low (or too high, which can cause butter to melt too quickly), or accidentally adding too much butter or not enough flour. Ensure your oven thermometer is accurate! - Are these Holiday Swirl Cookies good for shipping?
Yes, these cookies are quite sturdy once cooled, making them excellent candidates for shipping! Pack them tightly in an airtight container, perhaps cushioning with some crumpled parchment paper or tissue, to prevent breakage.
Holiday Swirl Cookies
Equipment
- Large mixing bowl
- Parchment Paper
- Rolling Pin
- Baking Sheet
- Wire Rack
Ingredients
Cookie Dough
- 0.75 cup salted butter softened to room temperature (1.5 sticks)
- 0.75 cup granulated sugar (150g)
- 0.75 cup powdered sugar (150g)
- 2 large eggs
- 2 tsp vanilla extract
- 2.5 cups all-purpose flour (353g)
- 0.5 tsp baking powder
- 0.5 tsp salt
- 0.5 tsp additional flavoring extract or lemon zest optional, like peppermint
Decorations
- red gel food coloring
- green gel food coloring
- holiday colored nonpareils (sprinkles)
Instructions
- In a large mixing bowl, beat together the softened butter, granulated sugar, and powdered sugar until the mixture is delightfully light and fluffy.
- Mix in the eggs, vanilla extract, and any optional flavoring you choose. Be sure to scrape down the sides and bottom of the bowl to get everything fully combined.
- Gently add the flour, baking powder, and salt. Mix just until a soft, cohesive dough forms. Avoid overmixing to keep the cookies tender.
- Divide your dough into three equal portions. Leave one portion plain. Return one-third of the dough to the bowl, add a few drops of red gel food coloring, and mix until the color is evenly distributed. Repeat this step with another third of the dough and green gel food coloring.
- Lightly flatten each of the three dough portions into a disc shape, wrap each securely in plastic wrap, and chill them in the freezer for 20 minutes, or in the refrigerator for 1 hour, to make them easy to roll.
- One at a time, roll out each chilled dough disc between two pieces of parchment paper to create thin, even rectangles of roughly the same size. Carefully stack the colored layers on top of each other, placing the plain (white) dough in the middle, and the red and green doughs on the outside layers.
- Gently and carefully roll the stacked dough layers into a nice, tight log. Use the bottom piece of parchment paper to assist you in rolling and prevent cracks. Wrap the log tightly in new plastic wrap and chill it in the fridge for at least 1-2 hours (or up to a week if you're prepping ahead!).
- Once the dough log is thoroughly chilled, you can lightly roll it in holiday nonpareils on a baking sheet, pressing gently to ensure the sprinkles stick well. Preheat your oven to 350°F (175°C) and line a baking sheet with parchment paper.
- Unwrap the dough log, trim off any uneven ends, then slice it into 1/4-inch thick cookies using a sharp knife. Place them 1-2 inches apart on your lined baking sheet.
- Bake for 10-12 minutes, or until the edges are lightly set and the cookies appear firm. Allow them to cool completely on a wire rack to truly appreciate their beautiful festive swirls!