Ever dreamed of a dessert that’s not just incredibly delicious but also fits your health-conscious lifestyle? A treat so elegant it could grace the most romantic of evenings, yet surprisingly easy to whip up? Well, prepare to fall head over heels, because you’ve just discovered your new culinary crush: the Romantic Layered Dream Dessert! This isn’t just a dessert; it’s a love story in layers, designed to impress, delight, and leave you feeling utterly satisfied without the guilt. Imagine rich chocolate, creamy cheesecake, and fluffy whipped cream, all coming together in a symphony of flavors and textures. Whether it’s for Valentine’s Day, an anniversary, or just a special ‘because I love you’ moment, this low-carb masterpiece is your ticket to a truly enchanting experience. Get ready to bake some magic!
Why You’ll Love This Romantic Layered Dream Dessert
This isn’t just another sweet treat; it’s a meticulously crafted indulgence that ticks all the boxes for a perfect dessert. Here are four irresistible reasons why the Romantic Layered Dream Dessert will become your go-to recipe:
- Guilt-Free Indulgence: With its low-carb, keto-friendly profile (only 7g net carbs per serving!), you can savor every spoonful without derailing your dietary goals. It’s the perfect way to enjoy a rich, decadent dessert with a healthy twist.
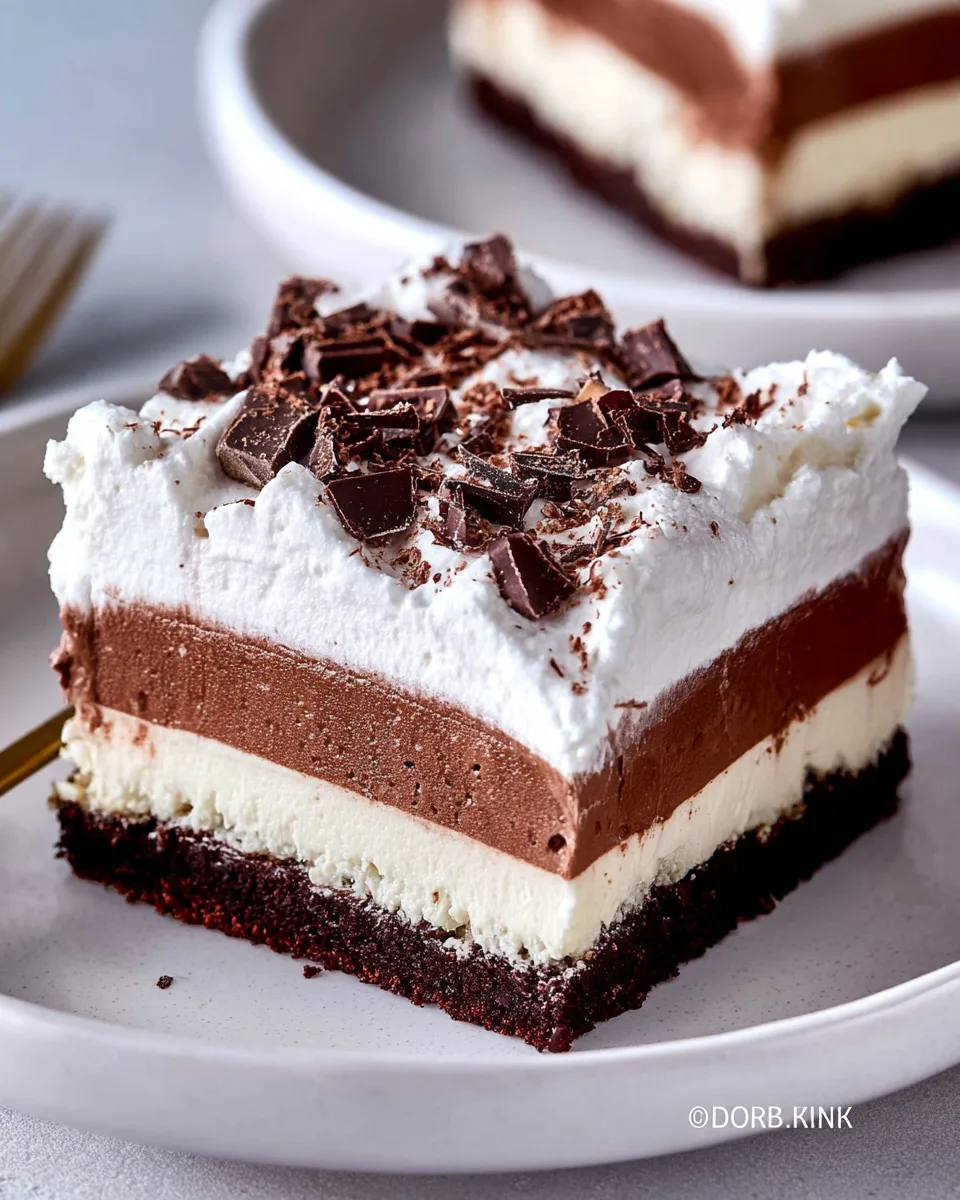
- Layers of Luxurious Flavor: From the crunchy almond crust to the velvety chocolate pudding, the tangy cheesecake, and the airy whipped cream, each layer offers a unique texture and taste that harmonizes beautifully, creating a truly unforgettable experience.
- Effortlessly Elegant Presentation: This dessert looks like it came straight from a gourmet bakery, yet the steps are surprisingly straightforward. Its stunning layered appearance makes it an ideal showstopper for any romantic occasion or special gathering.
- Make-Ahead Marvel: Prepare this delight in advance and simply chill! This means less stress on the day of your event, allowing you to relax and enjoy your time, knowing a spectacular dessert is patiently waiting to be served.
Ingredients with measurements
For the Chocolate Crust:
- 🌰 1 ½ cups blanched almond flour
- 🍫 3 tablespoons unsweetened cocoa powder
- ✨ ¼ cup powdered low-carb sweetener (like Monk Fruit or Allulose)
- 🧈 ¼ cup unsalted butter, melted
- 🍦 1 tablespoon vanilla extract
- 🧂 A pinch of salt
For the Chocolate Pudding Layer:
- 🥛 2 cups heavy cream
- 🥄 1 ½ teaspoons unflavored gelatin powder
- ✨ ⅓ cup powdered low-carb sweetener
- 🍫 ¼ cup unsweetened cocoa powder
- 🍦 1 teaspoon vanilla extract
- 🧂 ¼ teaspoon salt
For the Cheesecake Layer:
- 🧀 8 ounces full-fat cream cheese, softened
- ✨ ⅓ cup powdered low-carb sweetener
- 🍦 1 teaspoon vanilla extract
- 🥛 ½ cup heavy whipping cream, at room temperature
For the Whipped Cream Topping:
- 🥛 1 cup cold heavy cream
- ✨ 3 tablespoons powdered low-carb sweetener
- 🍦 1 teaspoon vanilla extract
- 🍫 Chocolate shavings, for garnish (optional)
Detailed step by step on direction how to make the recipe
Ready to embark on a delightful baking journey? Follow these steps to create your exquisite Romantic Layered Dream Dessert:
- Prepare the Healthy Crust: Start by preheating your oven to a gentle 320°F (160°C). Line a 9×9-inch baking dish with parchment paper, leaving an overhang for easy removal later. In a spacious bowl, whisk together the almond flour, low-carb sweetener, cocoa powder, and a pinch of salt until perfectly combined. Pour in the melted butter and vanilla extract, mixing until the mixture resembles coarse, moist sand. Press this fragrant mixture firmly and evenly into the prepared baking dish. Bake for 15 minutes, just until it’s lightly golden and set. Let it cool completely – patience is key for a perfect base!
- Make the Smooth Chocolate Pudding: While your crust cools, let’s get that dreamy chocolate pudding going. In a small bowl, sprinkle the unflavored gelatin powder over ¼ cup of heavy cream and let it sit for a few minutes to “bloom” and soften. Meanwhile, in a saucepan, whisk the remaining heavy cream, sweetener, cocoa powder, and salt over medium-low heat. Stir continuously for about 5 minutes until you see tiny bubbles dancing around the edges of the pan – but whatever you do, don’t let it boil!
- Set the Pudding: Remove the saucepan from the heat. Stir in the vanilla extract and your bloomed gelatin mixture until it’s completely dissolved and the pudding is wonderfully smooth. Let the pudding cool at room temperature for a few minutes, then pop it into the refrigerator for at least 30 minutes. This chilling time is crucial to get it perfectly set and cold, ready for its layer.
- Create the Velvety Cheesecake Layer: Now for the luscious cheesecake! In a large bowl, beat the softened full-fat cream cheese with the low-carb sweetener until it’s unbelievably creamy and smooth. Gradually mix in the room-temperature heavy whipping cream and vanilla extract until everything is beautifully combined and velvety. Carefully spread this rich layer evenly over your completely cooled crust. Place it back into the fridge to firm up while you finish the other layers.
- Whip Up the Airy Topping: In a separate large bowl, using an electric mixer, whisk the cold heavy cream, sweetener, and vanilla extract. Beat until lovely stiff peaks form – this will be your light, airy, and utterly divine topping!
- Assemble and Chill Your Dessert: It’s time for the grand finale! Retrieve the chilled crust with its cheesecake layer from the fridge. Gently spread the now-set chocolate pudding evenly over the cheesecake layer. Finally, dollop and gracefully spread the whipped cream topping over the pudding. For an extra touch of elegance and flavor, sprinkle with chocolate shavings if desired – it truly elevates the experience. Refrigerate your magnificent Romantic Layered Dream Dessert for a minimum of one hour (or up to 2-3 hours for best results) to ensure all layers are perfectly set and chilled before slicing and serving. Enjoy every guilt-free, romantic bite!
Detailed different ways you can present the recipe and how to serve it
The beauty of the Romantic Layered Dream Dessert lies not just in its taste, but also in its stunning visual appeal. Here are several ways to present and serve this masterpiece, ensuring it always makes a memorable impression:
- The Classic Slice: After fully chilling, carefully lift the dessert out of the baking dish using the parchment paper overhang. Place it on a cutting board and use a warm, sharp knife to cut precise squares or elegant rectangles. Wipe the knife clean between each cut for perfect edges. Serve each slice on a delicate dessert plate.
- Individual Parfaits: For a truly romantic and personalized touch, assemble the dessert in individual clear glasses or small mason jars. Layer the crumbled crust, then the chocolate pudding, cheesecake, and finally the whipped cream. This allows each guest to admire the layers and is perfect for portion control.
- Garnish Galore: Elevate the whipped cream topping with more than just chocolate shavings. Consider fresh berries like raspberries or sliced strawberries (which perfectly complement chocolate and cheesecake), a dusting of extra cocoa powder through a stencil for a decorative pattern, or even a sprig of fresh mint for a pop of color.
- Drizzle and Swirl: Before serving, you could lightly drizzle each slice with a sugar-free chocolate sauce or a raspberry coulis for an extra layer of flavor and visual appeal. A simple swirl across the plate before placing the dessert adds a professional touch.
- Warm Knife for Clean Cuts: No matter how you slice it, always use a long, thin, sharp knife. For the cleanest cuts, run the knife under hot water for a few seconds and wipe it dry between each slice. This melts through the creamy layers smoothly.
How you can store it and how long does it last
Once you’ve assembled your gorgeous Romantic Layered Dream Dessert, proper storage is key to maintaining its freshness, flavor, and delightful texture. This dessert is a fantastic make-ahead option, which adds to its appeal for special occasions.
- Refrigeration is Essential: Due to its dairy-rich layers (cream cheese, heavy cream, pudding), this dessert must be stored in the refrigerator at all times when not being served.
- Airtight is Best: Cover the baking dish tightly with plastic wrap or transfer individual slices into airtight containers. This prevents the dessert from absorbing any unwanted odors from the fridge and keeps it from drying out.
- How Long It Lasts: When stored correctly in an airtight container in the refrigerator, your Romantic Layered Dream Dessert will stay fresh and delicious for 3 to 4 days. The crust might soften slightly over time, but the overall flavor and texture will remain excellent.
- Freezing (Optional, with caveats): While technically possible, freezing this dessert is not highly recommended as it can affect the texture of the cream cheese and whipped cream layers, making them a bit watery or grainy upon thawing. If you must freeze, ensure it’s in an airtight container for no more than 1 month. Thaw slowly in the refrigerator overnight before serving. The crust may become softer and the layers might lose some of their distinct firmness.
- Serve Chilled: For the best experience, always serve this dessert directly from the refrigerator when it’s perfectly cold and set.
FAQs Sections
- Can I make this dessert ahead of time?
Absolutely! This Romantic Layered Dream Dessert is an ideal make-ahead treat. You can assemble the entire dessert up to 2-3 days in advance and keep it tightly covered in the refrigerator. This allows the layers to fully set and the flavors to meld beautifully.
- What if I don’t have blanched almond flour?
Blanched almond flour provides the best texture for the crust. However, if you only have almond meal (unblanched, with skins), it will work but the crust might be slightly coarser and darker. For a nut-free option, you could experiment with sunflower seed meal, but adjust the binder as its absorbency differs.
- Can I use a different low-carb sweetener?
Yes, any powdered low-carb sweetener that measures cup-for-cup like sugar (such as erythritol blends, allulose, or monk fruit blends) will work well. Granular sweeteners might leave a slightly gritty texture in the creamy layers, so powdered is preferred.
- My chocolate pudding didn’t set. What went wrong?
The most common reasons are not letting the gelatin bloom properly, or overheating the cream mixture (boiling can reduce gelatin’s effectiveness). Ensure the gelatin is fully dissolved and the mixture doesn’t boil. Also, sufficient chilling time is crucial.
- Can I make this dessert in a different sized pan?
Yes, you can. A 9×13-inch pan would yield a thinner dessert, while an 8×8-inch pan would make it thicker, requiring a longer baking time for the crust and potentially longer chilling times for the layers. Adjust your expectations for layer thickness accordingly.
- Is this dessert suitable for a keto diet?
Yes, with only 7g net carbs per serving, this Romantic Layered Dream Dessert is perfectly suited for a ketogenic diet. All ingredients are low-carb and high-fat, aligning with keto principles.
- Can I add different flavors to the cheesecake layer?
Certainly! For a twist, you could add a hint of lemon zest, a drop of almond extract, or even a tablespoon of sugar-free fruit puree (like raspberry) to the cheesecake layer before spreading it, for a different flavor profile.
- What kind of chocolate shavings should I use for garnish?
You can use any sugar-free dark chocolate bar or even a regular high-quality dark chocolate bar (if not strictly adhering to zero sugar for garnish) to make shavings. A vegetable peeler works wonders for creating beautiful curls.
- Why is it important for the heavy cream to be cold for whipping?
Cold heavy cream whips up much faster and creates a more stable, airy whipped cream. If your cream isn’t cold enough, it might take a very long time to whip or may not form stiff peaks at all.
- How do I ensure clean slices when serving?
For pristine slices of your Romantic Layered Dream Dessert, always ensure the dessert is thoroughly chilled. Use a long, sharp knife, warming it under hot water and wiping it dry between each cut. This helps to slice cleanly through the distinct layers without smudging.
Romantic Layered Dream Dessert 💝
Equipment
- 9x9-inch Baking Dish
Ingredients
For the Chocolate Crust
- 1.5 cups blanched almond flour
- 3 tablespoons unsweetened cocoa powder
- 0.25 cup powdered low-carb sweetener (like Monk Fruit or Allulose)
- 0.25 cup unsalted butter melted
- 1 tablespoon vanilla extract
- pinch salt
For the Chocolate Pudding Layer
- 2 cups heavy cream
- 1.5 teaspoons unflavored gelatin powder
- 0.33 cup powdered low-carb sweetener
- 0.25 cup unsweetened cocoa powder
- 1 teaspoon vanilla extract
- 0.25 teaspoon salt
For the Cheesecake Layer
- 8 ounces full-fat cream cheese softened
- 0.33 cup powdered low-carb sweetener
- 1 teaspoon vanilla extract
- 0.5 cup heavy whipping cream at room temperature
For the Whipped Cream Topping
- 1 cup cold heavy cream
- 3 tablespoons powdered low-carb sweetener
- 1 teaspoon vanilla extract
- chocolate shavings for garnish (optional)
Instructions
- Preheat your oven to 320°F (160°C). Line a 9x9-inch baking dish with parchment paper for easy removal. In a large bowl, whisk together the almond flour, sweetener, cocoa powder, and a pinch of salt. Pour in the melted butter and vanilla extract, mixing until a sandy texture forms. Press this healthy crust mixture firmly and evenly into the prepared baking dish. Bake for 15 minutes until lightly golden. Let it cool completely.
- While the crust cools, gently combine the gelatin powder with ¼ cup of heavy cream in a small bowl and let it sit for a few minutes to bloom. In a saucepan, whisk the remaining heavy cream, sweetener, cocoa powder, and salt over medium-low heat. Stir continuously for about 5 minutes until small bubbles appear around the edges – don't let it boil!
- Remove the saucepan from the heat. Stir in the vanilla extract and the bloomed gelatin mixture until fully dissolved and smooth. Let the pudding cool at room temperature for a few minutes, then chill it in the refrigerator for at least 30 minutes until it's perfectly set and cold.
- For the luscious cheesecake layer, beat the softened cream cheese with the sweetener in a large bowl until it's beautifully creamy. Gradually mix in the room-temperature heavy whipping cream and vanilla extract until the mixture is smooth and well combined. Carefully spread this velvety layer evenly over your cooled crust. Pop it back into the fridge.
- In a separate large bowl, whisk the cold heavy cream, sweetener, and vanilla extract until stiff peaks form – this will be your light and airy topping!
- Time to assemble your masterpiece! Retrieve the chilled crust with its cream cheese layer from the fridge. Gently spread the now-set chocolate pudding evenly over the cream cheese layer. Finish by dolloping and spreading the whipped cream topping over the pudding. For an extra touch of elegance and flavor, sprinkle with chocolate shavings if desired. Refrigerate for a minimum of one hour (or up to 2-3 hours for best results) to ensure all layers are perfectly set and chilled before slicing and serving this delightful, healthy dessert. Enjoy every guilt-free bite!
Notes
- Calories: 515 kcal
- Total Carbs: 10g
- Net Carbs: 7g
- Fats: 51g
- Protein: 9g