Ever found yourself staring longingly at a fudgy brownie, only to be swayed by the allure of a classic, chewy chocolate chip cookie? The ultimate dessert dilemma, right? Well, prepare to have your dessert dreams come true because the “Brookies Cookies Dream!” recipe is here to end your delicious indecision once and for all! This isn’t just a cookie; it’s a culinary masterpiece, a perfect marriage of the rich, intense chocolatey goodness of a brownie with the comforting, sweet chewiness of a chocolate chip cookie, all swirled into one irresistible bite. Get ready to bake something truly magical that will have everyone asking for your secret!
Why You’ll Love This Recipe
The “Brookies Cookies Dream!” isn’t just a recipe; it’s an experience. Here are four fantastic reasons why this will become your new go-to treat:
- The Best of Both Worlds: Why choose when you can have both? This recipe perfectly balances the decadent chewiness of a brownie with the soft, tender texture and classic flavor of a chocolate chip cookie. It’s a symphony of textures and tastes in every single bite!
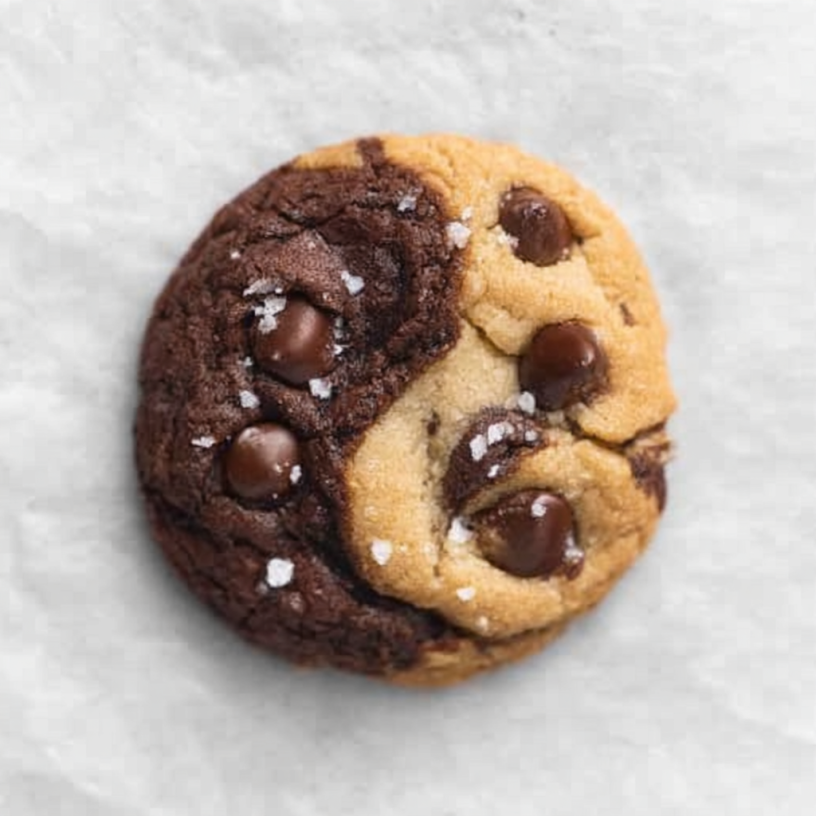
- Visually Stunning Marbling: The swirling of the two distinct doughs creates a beautiful, marbled effect that looks incredibly professional and inviting. These aren’t just delicious; they’re a feast for the eyes, guaranteed to impress anyone you share them with.
- Easy-to-Follow Fun: Don’t let the impressive outcome fool you – this recipe is surprisingly straightforward! We break down each step, making the process enjoyable and accessible for bakers of all skill levels. Plus, rolling the two doughs together is genuinely a fun, hands-on step!
- Perfect for Any Occasion: Whether it’s a casual weeknight craving, a special celebration, a potluck, or a thoughtful homemade gift, these “Brookies Cookies Dream!” fit every bill. They’re a crowd-pleaser that never disappoints and always brings smiles.
Ingredients with Measurements
Gather your ingredients and let’s get ready to create some magic!
- 🍪 1/2 cup unsalted butter, softened (room temperature) – for brownie dough
- 🌰 3/4 cup packed light brown sugar – for brownie dough
- 🍬 1/4 cup granulated sugar – for brownie dough
- 🥚 1 large egg, room temperature – for brownie dough
- 🍦 1 teaspoon vanilla extract – for brownie dough
- 🍫 1/3 cup Dutch-process cocoa powder – for brownie dough
- 🌾 1 cup all-purpose flour, spooned and leveled – for brownie dough
- 🥄 3/4 teaspoon baking soda – for brownie dough
- 🧂 1/2 teaspoon salt – for brownie dough
- 🍫 2/3 cup semi-sweet chocolate chips (for brownie dough)
- 🌾 2 3/4 cups all-purpose flour – for chocolate chip dough
- 🌟 1 teaspoon cornstarch – for chocolate chip dough
- 🥄 1 teaspoon baking soda – for chocolate chip dough
- 🧂 1 teaspoon salt – for chocolate chip dough
- 🧈 1 cup unsalted butter, cold and cubed – for chocolate chip dough
- 🌰 3/4 cup packed light brown sugar – for chocolate chip dough
- 🍬 2/3 cup granulated sugar – for chocolate chip dough
- 🥚 1 large egg, room temperature – for chocolate chip dough
- 🥚 1 egg yolk, room temperature – for chocolate chip dough
- 🍦 2 teaspoons vanilla extract – for chocolate chip dough
- 🍫 1 cup semi-sweet chocolate chips (for chocolate chip dough)
- 💎 Flakey sea salt for sprinkling (optional)
Detailed Step-by-Step Directions How to Make the Recipe
Let’s turn these ingredients into your “Brookies Cookies Dream!” with these easy-to-follow steps:
- Prepare Your Space: First things first, preheat your oven to a cozy 350°F (175°C). Line two large baking sheets with parchment paper; this will make for easy cleanup and prevent sticking. Set them aside for now.
- Build the Brownie Base: In the bowl of your trusty stand mixer (or a large bowl with a hand mixer), combine the softened butter with the brown and granulated sugars. Beat them together on medium speed for about 3 minutes until the mixture transforms into a light, fluffy cloud. Now, beat in the large egg and vanilla extract until everything is wonderfully combined.
- Dry Mix for Brownie Goodness: Grab a separate bowl and whisk together the flour, Dutch-process cocoa powder, baking soda, and salt. Gently sift these dry ingredients into your butter mixture. Mix on the lowest speed possible until everything is just barely combined. Remember, overmixing is the enemy of tenderness!
- Chocolatey Brownie Fold: With a spatula, lovingly fold in the 2/3 cup semi-sweet chocolate chips into your brownie dough. Once mixed, set this delightful fudgy dough aside.
- Whip Up the Golden Cookie Dough: Clean your mixer bowl (or grab another!). Cream together the cold, cubed butter with both the brown and granulated sugars. Beat for a good 4 minutes on medium-high speed. You’re looking for a pale, super fluffy consistency with absolutely no butter chunks visible. Don’t forget to scrape down the sides of the bowl!
- Wet Additions for Cookie Bliss: Beat in the large egg first, then the egg yolk, one at a time. After each addition, give the bowl a good scrape to ensure everything is incorporated. Finally, stir in the 2 teaspoons of vanilla extract until it’s perfectly blended.
- Dry Mix for Cookie Perfection: In a new bowl, whisk together the remaining 2 3/4 cups all-purpose flour, cornstarch, baking soda, and salt. Gradually add these dry ingredients to your butter and egg mixture in two parts, mixing on low speed until just combined. Again, resist the urge to overmix!
- More Chips for the Cookie: Using your spatula, gently fold in the 1 cup of semi-sweet chocolate chips into the cookie dough. This ensures your cookies stay wonderfully tender.
- The Fun Part – Assemble Your Brookies: Now for the creative magic! Scoop out equal portions of both the brownie and chocolate chip doughs. For the neatest look and easiest handling, roll all your brownie dough into small balls first, then do the same for all your chocolate chip dough.
- The Smoosh & Marble: Take one brownie dough ball and one chocolate chip dough ball. Place them side-by-side in the palm of your hand and gently press them together. Then, carefully roll them into one combined ball, letting the two doughs swirl and marble together beautifully. Place these “Brookies Cookies Dream!” balls onto your prepared baking sheets, leaving about 2 inches between each to allow for spreading.
- Bake to Golden Perfection: Slide your baking sheets into the preheated oven and bake for 8 to 9 minutes. You’ll know they’re done when the edges look set, but the centers still appear gloriously puffy and slightly soft. Don’t overbake! They will continue to firm up as they cool, so trust the process.
- Cool Down & Indulge: Let your freshly baked Brookies cool on the baking sheet for 5-10 minutes. This helps them set up and prevents them from breaking. Then, carefully transfer them to a wire rack to cool completely. For an extra touch of gourmet sparkle, sprinkle with flakey sea salt before serving, if you wish! Enjoy your ultimate dessert hybrid!
Detailed Different Ways You Can Present the Recipe and How to Serve It
The “Brookies Cookies Dream!” are stunning on their own, but here are some delightful ways to present and serve them, making every moment an indulgence:
- Classic & Elegant: Arrange the Brookies artfully on a simple white platter or a rustic wooden board. The beautiful marbled pattern speaks for itself! A light dusting of powdered sugar or a sprinkle of flakey sea salt (as suggested in the recipe) adds a sophisticated touch.
- Warm & Gooey: Serve your Brookies slightly warm, straight from the oven (after their initial cooling period). The chocolate chips will be melty, and the centers perfectly soft. Pair with a tall glass of cold milk or a hot cup of coffee for the ultimate comfort experience.
- Ice Cream Sandwich Deluxe: For an over-the-top dessert, take two slightly cooled Brookies and sandwich a scoop of your favorite ice cream in between. Vanilla bean, coffee, or even mint chocolate chip ice cream would be divine! Roll the edges in sprinkles or mini chocolate chips for extra flair.
- Dessert Bar Extravaganza: If you’re hosting a party, include “Brookies Cookies Dream!” as a star attraction on a dessert bar. Cut some in half to show off the interior texture and marbling, and place them alongside other treats like mini cupcakes, fruit tarts, and candies.
- Gift of Deliciousness: Package a few Brookies in a clear cellophane bag tied with a pretty ribbon, or in a decorative tin. These make fantastic homemade gifts for friends, neighbors, or as a host/hostess thank you. Everyone appreciates a delicious, handmade treat!
- Crumbled Topping: Get creative and crumble a cooled Brookie over a bowl of vanilla ice cream, a scoop of yogurt, or even a fruit salad for an unexpected texture and flavor burst.
How You Can Store It and How Long Does It Last
Once you’ve baked your batch of “Brookies Cookies Dream!”, you’ll want to make sure they stay fresh and delicious for as long as possible (which, let’s be honest, might not be very long once people discover them!).
- At Room Temperature: Store your cooled Brookies in an airtight container at room temperature. They will remain wonderfully fresh and chewy for up to 3-4 days. To maintain their soft texture, you can even place a slice of bread in the container with them – the bread will absorb moisture, keeping the cookies moist!
- In the Refrigerator: While not strictly necessary for freshness, if you prefer a firmer, chewier texture or live in a very warm climate, you can store them in an airtight container in the refrigerator for up to a week. Just be aware that refrigeration can sometimes alter the texture slightly, making them a bit denser. Allow them to come to room temperature before enjoying, or pop them in the microwave for a few seconds for a warm, gooey treat.
- Freezing Baked Brookies: These cookies freeze beautifully! Once completely cooled, place them in a single layer on a baking sheet and freeze until solid (about 1-2 hours). Then, transfer the frozen Brookies to a freezer-safe bag or airtight container, layering parchment paper between them to prevent sticking. They will last for up to 3 months in the freezer. To enjoy, simply thaw at room temperature for an hour or two, or warm them gently in the microwave or oven.
- Freezing the Dough: You can also prepare the dough balls (after the “smoosh” step) and freeze them! Place the raw dough balls on a parchment-lined baking sheet and freeze until solid. Transfer to a freezer-safe bag. When you’re ready to bake, place the frozen dough balls on a prepared baking sheet and bake for an extra 2-4 minutes (around 10-12 minutes total) without thawing. Freshly baked “Brookies Cookies Dream!” on demand – what could be better?
FAQs Sections
- What exactly is a “Brookie”?
A Brookie is the best of both worlds! It’s a delightful hybrid dessert that combines the rich, fudgy texture of a brownie with the classic chewiness and flavor of a chocolate chip cookie, often swirled together to create a marbled effect. - Can I use regular cocoa powder instead of Dutch-process cocoa?
Yes, you can, but it will slightly change the flavor and color. Dutch-process cocoa is darker and less acidic, resulting in a deeper, milder chocolate flavor and a richer color in your brownie portion. Regular cocoa will make the brownie part lighter in color and slightly more tart. - Why do you use cold butter for one dough and softened butter for the other?
The cold, cubed butter in the chocolate chip dough helps create pockets of steam during baking, contributing to a chewier, more textured cookie. Softened butter in the brownie dough allows for a denser, fudgier texture that melts into the sugar more easily, creating that classic brownie chew. - Can I use different types of chocolate chips?
Absolutely! While semi-sweet is classic, feel free to experiment with milk chocolate, dark chocolate, white chocolate, or even a mix. Chopped chocolate bars also work wonderfully for a more gourmet feel. - What’s the purpose of cornstarch in the chocolate chip cookie dough?
Cornstarch helps tenderize the cookies, giving them a softer, chewier texture and helping to prevent them from spreading too much, ensuring those perfect “Brookies Cookies Dream!” edges. - Can I make these gluten-free?
Yes, you can often substitute all-purpose flour with a 1:1 gluten-free baking flour blend that contains xanthan gum. Results may vary slightly in texture, but many bakers have success with this substitution. - How can I tell if my Brookies are done without overbaking?
Look for set edges and centers that still appear slightly puffy and soft. They will continue to bake on the hot baking sheet as they cool, firming up to the perfect texture. When in doubt, underbake slightly for a chewier result. - Can I freeze the dough to bake later?
Yes! This is a fantastic option. Roll the combined dough into balls, place them on a parchment-lined baking sheet, and freeze until solid. Then, transfer to a freezer-safe bag. Bake from frozen for an extra 2-4 minutes. - Do I need a stand mixer for this recipe?
While a stand mixer makes the process easier and quicker, a good quality hand mixer will work just as well. Just ensure you beat the butter and sugar mixtures for the recommended times to achieve the right texture. - My Brookies spread too much, what went wrong?
This can happen if your butter was too warm, your flour wasn’t spooned and leveled correctly (leading to too little flour), or your oven temperature was off. Chilling the dough balls for 15-30 minutes before baking can also help prevent excessive spreading.
PREP TIME & NUTRITION :
Prep Time : 20 minutes
Cook Time : 9 minutes
Total Time : 29 minutes
Servings : 24 cookies
Calories : 185 kcal (per cookie, estimated)
Total Carbs: 28g (per cookie, estimated)
Net Carbs: 26g (per cookie, estimated)
Fats: 10g (per cookie, estimated)
Protein: 3g (per cookie, estimated)
*Nutrition facts are estimated and may vary based on specific ingredients and portion sizes.
Brookies Cookies Dream! ✨
Equipment
- Stand Mixer
- Baking Sheets
- Parchment Paper
Ingredients
Brownie Dough
- 1/2 cup unsalted butter softened (room temperature)
- 3/4 cup packed light brown sugar
- 1/4 cup granulated sugar
- 1 large egg room temperature
- 1 tsp vanilla extract
- 1/3 cup Dutch-process cocoa powder
- 1 cup all-purpose flour spooned and leveled
- 3/4 tsp baking soda
- 1/2 tsp salt
- 2/3 cup semi-sweet chocolate chips (for brownie dough)
Chocolate Chip Dough
- 2 3/4 cups all-purpose flour
- 1 tsp cornstarch
- 1 tsp baking soda
- 1 tsp salt
- 1 cup unsalted butter cold and cubed
- 3/4 cup packed light brown sugar
- 2/3 cup granulated sugar
- 1 large egg room temperature
- 1 egg yolk room temperature
- 2 tsp vanilla extract
- 1 cup semi-sweet chocolate chips (for chocolate chip dough)
- Flakey sea salt for sprinkling (optional)
Instructions
- Preheat your oven to 350°F (175°C). Line two large baking sheets with parchment paper and set them aside.
- In a stand mixer, beat the softened butter with the brown and granulated sugars for about 3 minutes until light and fluffy. Mix in the egg and vanilla until well combined.
- In a separate bowl, whisk together the flour, cocoa powder, baking soda, and salt. Gently sift these dry ingredients into your butter mixture. Mix on low speed until just combined – don't overmix!
- Use a spatula to fold the chocolate chips into the brownie dough. Set this delightful dough aside.
- Now, in your stand mixer, cream together the cold, cubed butter with both brown and granulated sugars for about 4 minutes until the mix is pale and super fluffy, with no butter chunks. Scrape the bowl.
- Beat in the egg and then the egg yolk, one at a time, scraping the sides of the bowl after each addition. Stir in the vanilla until blended.
- In a new bowl, whisk together the flour, cornstarch, baking soda, and salt. Gradually add these dry ingredients to your butter and egg mixture in two parts, mixing on low speed until just combined.
- Gently fold in the chocolate chips with a spatula. Avoid overmixing to keep your cookies tender.
- Scoop equal portions of both brownie and chocolate chip doughs. For the best look, roll all your brownie dough into balls first, then all your chocolate chip dough.
- Take one brownie dough ball and one chocolate chip dough ball. Press them together side-by-side in your hands, then gently roll them into one combined ball. Place these magical marbled balls on your prepared baking sheets, leaving about 2 inches between each.
- Bake for 8 to 9 minutes. The edges should be set, but the centers will still look puffy and slightly soft – they'll firm up as they cool. Do not overbake!
- Let the cookies cool on the baking sheet for 5-10 minutes before moving them to a wire rack to cool completely. For an extra flourish, sprinkle with flakey sea salt before serving, if you like!
Notes
Nutrition Information (per cookie, estimated):
- Calories: 185 kcal
- Total Carbs: 28g
- Net Carbs: 26g
- Fats: 10g
- Protein: 3g