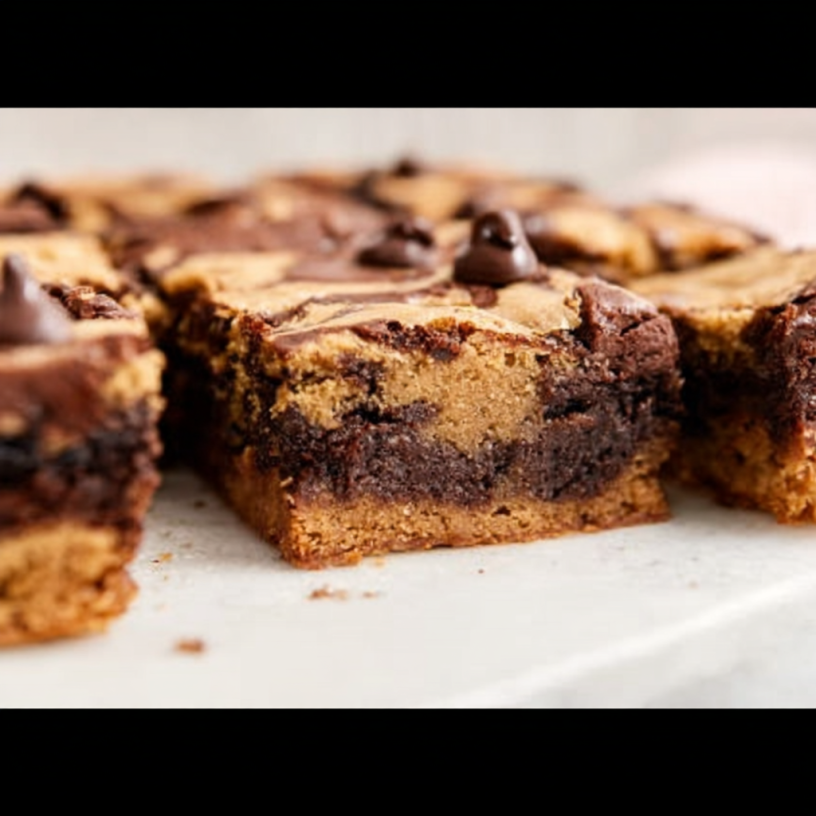
Ever found yourself in the ultimate dessert dilemma: craving the chewy comfort of a chocolate chip cookie AND the rich, fudgy embrace of a decadent brownie? Stop tearing your hair out! We’ve got the perfect solution that brings the best of both worlds together, elevated by a secret weapon that takes flavor to stratospheric levels. Get ready to meet the irresistible Brown Butter Brookies! These aren’t just any brookies; they’re a symphony of nutty brown butter, gooey chocolate chip cookie, and luscious fudgy brownie, swirled into one glorious bar. Prepare your taste buds for an unforgettable journey into dessert nirvana.
Why You’ll Love This Recipe
Once you try these Brown Butter Brookies, you’ll understand why they become an instant favorite. Here are four irresistible reasons:
- The Ultimate Flavor Fusion: Why choose between a cookie and a brownie when you can have both? This recipe perfectly marries the classic chewiness of a chocolate chip cookie with the deep, fudgy richness of a brownie, creating a harmonious blend of textures and tastes in every bite.
- Brown Butter Magic: This isn’t just butter; it’s browned butter – a culinary secret weapon! The nutty, caramel-like notes developed from browning the butter infuse the cookie layer with an incredible depth of flavor that’s both sophisticated and utterly comforting. It truly sets these brookies apart.
- Impressively Easy to Make: Don’t let the gourmet sound of “brown butter” intimidate you! While the instructions are detailed, the process is straightforward. You’ll be amazed at how simple it is to create such a show-stopping dessert that looks like it came from a professional bakery.
- Perfect for Any Occasion: Whether you’re hosting a party, looking for a special treat for your family, or simply indulging in some self-care baking, these Brown Butter Brookies fit the bill. They’re fantastic for sharing, but we won’t tell if you keep a few (or more!) for yourself.
Ingredients with Measurements
For the Cookie Layer:
- 1/2 cup unsalted butter, browned and chilled
- 1/4 cup granulated sugar
- 1/3 cup light brown sugar, packed
- 1 large egg, room temperature
- 3/4 teaspoon vanilla extract
- 1 cup plus 2 tablespoons all-purpose flour, spooned and leveled
- 1/2 teaspoon baking soda
- 1/4 teaspoon kosher salt
- 3/4 cup chocolate chips (a mix of bittersweet and semi-sweet recommended)
For the Brownie Layer:
- 5 ounces bittersweet chocolate (around 60% cacao)
- 1/4 cup unsalted butter
- 1 large egg plus 1 egg yolk, room temperature
- 1/3 cup granulated sugar
- 1/4 cup light brown sugar, packed
- 1 teaspoon vanilla extract
- 1/4 teaspoon baking powder
- 1/3 cup all-purpose flour, spooned and leveled
- 3 tablespoons Dutch process cocoa powder, sifted
- 1/4 teaspoon kosher salt
Detailed Step-by-Step Directions How to Make the Recipe
- Prepare Browned Butter (Cookie Layer): In a medium saucepan, gently melt your 1/2 cup of unsalted butter over medium heat. Stir occasionally until it melts completely, then continue stirring as it foams and crackles. Watch carefully! In about 4-5 minutes, golden-brown bits will form at the bottom, and the butter will turn amber and smell wonderfully nutty. Immediately pour the browned butter into a heat-safe bowl and place it in the refrigerator for about an hour, or until it becomes firm. This chilling step is crucial for the cookie’s texture!
- Mix Cookie Dough: Once your browned butter is firm, spoon it into the bowl of a stand mixer. Add the granulated sugar and light brown sugar. Beat on medium-high speed for 2-3 minutes until the mixture is light, airy, and fluffy. Next, mix in the room-temperature egg and vanilla extract until they are fully incorporated. In a separate medium bowl, whisk together the 1 cup + 2 tablespoons all-purpose flour, 1/2 teaspoon baking soda, and 1/4 teaspoon kosher salt. With your mixer on low speed, gradually add the dry ingredients to the wet in three additions, making sure to scrape down the sides of the bowl as needed. Mix until the ingredients are just barely combined – a few streaks of flour are perfectly fine to prevent overmixing. Remove the bowl from the mixer and gently fold in the chocolate chips with a spatula. Set the cookie dough aside.
- Prepare for Brownie Layer & Baking: Preheat your oven to 350°F (175°C). Lightly spray an 8×8 inch baking pan with non-stick spray, then line it with parchment paper. Ensure the parchment paper overhangs on two sides; this will create “handles” for easy removal of the baked brookies later.
- Make Brownie Batter: In a medium saucepan, melt the 5 ounces of bittersweet chocolate and 1/4 cup unsalted butter together over low heat, stirring continuously until the mixture is smooth and shiny. Remove the saucepan from the heat and allow it to cool slightly while you prepare the next steps. In a stand mixer fitted with the whisk attachment, beat the large egg, egg yolk, both granulated and light brown sugars, and 1 teaspoon vanilla extract on high speed for 4-5 minutes. The mixture should become thick, pale, and noticeably aerated. Reduce the mixer speed to low and slowly pour in the slightly cooled chocolate and butter mixture, mixing until it is just incorporated. In a separate bowl, whisk together the 1/3 cup all-purpose flour, 3 tablespoons sifted Dutch process cocoa powder, 1/4 teaspoon baking powder, and 1/4 teaspoon kosher salt. Remove the bowl from the mixer and gently fold these dry ingredients into the wet mixture using a spatula or wooden spoon until just combined. Again, be careful not to overmix to ensure a tender brownie.
- Layer and Swirl: Spoon about one-third of the brownie batter evenly across the bottom of your prepared 8×8 inch pan. Now, alternate spoonfuls of the chocolate chip cookie dough and the remaining brownie batter across the top of the initial brownie layer. Don’t worry about perfection! Once all the dough and batter are in the pan, gently swirl the two together with a knife or an offset spatula to create a beautiful marbled pattern. Avoid flattening the mixture too much; you want to maintain some height and texture.
- Bake to Perfection: Place the pan in your preheated oven and bake for approximately 25 minutes. The Brown Butter Brookies are ready when the edges appear golden brown and the center is mostly set with a slight wobble. If you notice the top browning too quickly, you can loosely cover the pan with a piece of aluminum foil for the remainder of the baking time. For an extra gooey center, bake a little less; if you prefer firmer bars, you can extend the baking time up to 30-35 minutes.
- Cool and Serve: Carefully remove the pan from the oven. Let your delicious Brown Butter Brookies cool completely in the pan on a wire rack before attempting to slice them. Cooling is crucial for setting. For perfectly clean, sharp edges, consider chilling them in the refrigerator for an hour before lifting them out of the pan using the parchment paper overhang and cutting them with a sharp knife. Enjoy this fantastic chocolatey treat!
Detailed Different Ways You Can Present the Recipe and How to Serve It
The beauty of Brown Butter Brookies isn’t just in their incredible taste, but also in their versatility for presentation. Here are some fun and elegant ways to serve them:
- Classic Squares: The most straightforward way is to cut them into neat squares or rectangles. For extra flair, dust lightly with powdered sugar or a sprinkle of flaky sea salt just before serving to enhance the chocolate flavor.
- Warm with Ice Cream: Serve a warm square of brookie with a scoop of vanilla bean ice cream, a drizzle of warm chocolate sauce, or a dollop of whipped cream. The contrast of warm brookie and cold ice cream is absolutely divine.
- Dessert Platter: Cut them into smaller, bite-sized pieces and arrange them on a dessert platter alongside other treats like fresh berries, mini cookies, or truffles for an impressive spread.
- Custom Shapes: For a themed party, you can use cookie cutters (once the brookies are completely cooled and firm, possibly after chilling) to cut out fun shapes like hearts for Valentine’s Day or stars for a celebration.
- Caramel Drizzle: Elevate the nutty brown butter flavor by drizzling a homemade or store-bought salted caramel sauce over the top just before serving. A few toasted pecans or walnuts could also be sprinkled on top for added crunch.
- Individual Servings: If you’re feeling fancy, cut individual squares and serve them on small plates, perhaps with a side of espresso or a glass of milk.
How You Can Store It and How Long Does It Last
Proper storage ensures your delicious Brown Butter Brookies stay fresh and delightful for as long as possible:
- At Room Temperature: Store your cooled brookies in an airtight container at room temperature for up to 3-4 days. Placing a piece of parchment paper between layers can prevent sticking, especially if they are particularly gooey.
- In the Refrigerator: For extended freshness, especially if you prefer a firmer texture, you can store them in an airtight container in the refrigerator for up to a week. Chilling can also make them easier to cut into clean squares. Allow them to come to room temperature or gently warm them in the microwave for a few seconds before serving for the best texture.
- Freezing Baked Brookies: For long-term storage, cut the cooled brookies into individual squares. Wrap each square tightly in plastic wrap, then place them in an airtight freezer-safe container or freezer bag. They can be frozen for up to 2-3 months. To enjoy, thaw them at room temperature or warm gently in the microwave or oven.
- Freezing Unbaked Dough/Batter: While possible, it’s generally best to bake these fresh. However, if you have leftover cookie dough or brownie batter, you could freeze them separately, then thaw and assemble when ready to bake. The texture might vary slightly.
FAQs
- What are Brown Butter Brookies?
Brown Butter Brookies are a delectable hybrid dessert that combines a chocolate chip cookie layer, flavored with nutty brown butter, and a rich, fudgy brownie layer, all swirled together and baked into one irresistible bar. - Why do I need to brown the butter?
Browning the butter caramelizes the milk solids, creating a complex, nutty, and slightly sweet flavor profile that adds incredible depth and a gourmet touch to the cookie layer, setting these brookies apart from standard recipes. - Can I use a different size pan?
While an 8×8 inch pan is recommended for the specified thickness and baking time, you could use a 9×9 inch pan, but the brookies will be thinner and may require a shorter baking time. A 9×13 inch pan would yield much thinner bars and would need significant adjustments to baking time. - How do I know when my brookies are done baking?
The brookies are ready when the edges are set and golden brown, and the center is mostly set but might still have a slight wobble. A toothpick inserted into the center should come out with moist crumbs, not wet batter. Remember, they will continue to set as they cool. - Can I make the dough or batter ahead of time?
Yes, you can prepare the cookie dough and brownie batter separately and store them in airtight containers in the refrigerator for up to 2-3 days. Bring them back to room temperature before layering and baking. - What kind of chocolate chips should I use for the cookie layer?
A mix of bittersweet and semi-sweet chocolate chips is recommended for a balanced chocolate flavor. You can also add milk chocolate chips or chopped chocolate for variation. - Why are my brookies dry?
Dry brookies are usually a sign of overbaking. Keep a close eye on them during the last few minutes of baking. An accurate oven thermometer can also help ensure your oven temperature is correct. Overmixing the flour can also contribute to a tougher, drier texture. - Can I freeze baked brookies?
Absolutely! Once completely cooled, cut the brookies into squares, wrap each tightly in plastic wrap, and then place them in a freezer-safe bag or container for up to 2-3 months. Thaw at room temperature before serving. - Do I really need to chill the brown butter until it’s firm?
Yes, chilling the brown butter until firm is crucial for the cookie layer. It helps to achieve the correct texture and prevents the dough from spreading too much during baking, resulting in a chewier, more substantial cookie. - What’s the difference between baking soda and baking powder in this recipe?
Baking soda (in the cookie layer) reacts with acidic ingredients (like brown sugar) to create spread and chewiness. Baking powder (in the brownie layer) provides lift and a lighter, cakier texture, which is desirable for the fudgy brownie consistency. Using both helps achieve the ideal texture for each component.
Brown Butter Brookies 🍪
Equipment
- Medium Saucepan
- Stand Mixer
- 8x8 inch baking pan
- Parchment Paper
- Heat-safe bowl
Ingredients
Cookie Layer
- 1/2 cup unsalted butter browned and chilled
- 1/4 cup granulated sugar
- 1/3 cup light brown sugar packed
- 1 large egg room temperature
- 3/4 teaspoon vanilla extract
- 1 cup plus 2 tablespoons all-purpose flour spooned and leveled
- 1/2 teaspoon baking soda
- 1/4 teaspoon kosher salt
- 3/4 cup chocolate chips a mix of bittersweet and semi-sweet recommended
Brownie Layer
- 5 ounces bittersweet chocolate around 60% cacao
- 1/4 cup unsalted butter
- 1 large egg plus 1 egg yolk room temperature
- 1/3 cup granulated sugar
- 1/4 cup light brown sugar packed
- 1 teaspoon vanilla extract
- 1/4 teaspoon baking powder
- 1/3 cup all-purpose flour spooned and leveled
- 3 tablespoons Dutch process cocoa powder sifted
- 1/4 teaspoon kosher salt
Instructions
- 1. Prepare Browned Butter (Cookie Layer): Start by gently melting your 1/2 cup of butter in a medium saucepan over medium heat. Stir it occasionally until it melts, then continue stirring as it foams and crackles. In about 4-5 minutes, you'll see golden-brown bits at the bottom, and the butter will smell wonderfully nutty and be amber in color. Immediately pour it into a heat-safe bowl and chill in the refrigerator for about an hour until it’s firm. This step adds incredible depth!
- 2. Mix Cookie Dough: Once your browned butter is firm, spoon it into a mixer. Add the granulated and brown sugars and beat on medium-high speed for 2-3 minutes until the mixture is light and fluffy. Mix in the room-temperature egg and vanilla until well combined. In a separate bowl, whisk together the 1 cup + 2 tablespoons flour, baking soda, and 1/4 teaspoon salt. With your mixer on low, gradually add the dry ingredients to the wet in three parts, scraping down the bowl as needed. Mix until just barely combined – a few streaks of flour are perfectly fine to avoid overmixing! Remove the bowl and gently fold in the chocolate chips with a spatula. Set aside.
- 3. Prepare for Brownie Layer & Baking: Preheat your oven to 350°F (175°C). Lightly spray an 8x8 inch baking pan with non-stick spray, then line it with parchment paper, allowing the edges to overhang for easy lifting later.
- 4. Make Brownie Batter: In a medium saucepan over low heat, melt the 5 ounces of bittersweet chocolate and 1/4 cup butter together, stirring until smooth and shiny. Remove from heat and let it cool slightly. In a stand mixer with the whisk attachment, beat the egg, egg yolk, both sugars, and 1 teaspoon vanilla on high speed for 4-5 minutes until the mixture is thick and pale. Reduce the speed to low and slowly add the cooled chocolate and butter mixture, mixing until just incorporated. In a separate bowl, whisk together the 1/3 cup flour, cocoa powder, baking powder, and 1/4 teaspoon salt. Remove the bowl from the mixer and gently fold these dry ingredients into the wet mixture using a spatula or wooden spoon until just combined. Again, do not overmix!
- 5. Layer and Swirl: Spoon about one-third of the brownie batter evenly across the bottom of your prepared 8x8 inch pan. Now, alternate spoonfuls of the chocolate chip cookie dough and the remaining brownie batter across the pan. Gently swirl the two together with a knife or offset spatula to create a beautiful marbled look. Be careful not to flatten the mixture too much.
- 6. Bake to Perfection: Bake in your preheated oven for approximately 25 minutes. The brookies are ready when the edges are golden brown and the center is mostly set. If you notice the top browning too quickly, loosely cover the pan with a piece of aluminum foil for the remainder of the baking time. For a super gooey center, bake a little less; for firmer bars, you can bake for up to 30-35 minutes.
- 7. Cool and Serve: Remove the pan from the oven and let your delicious brookies cool completely before slicing. For perfectly clean, sharp edges, consider chilling them in the refrigerator for an hour before cutting with a sharp knife. Enjoy this fantastic chocolatey treat!
Notes
- Calories: 280
- Total Carbohydrates: 35g
- Net Carbs: 32g
- Fats: 18g
- Protein: 4g