Why You’ll Love These Candy Cane Cupcakes
Get ready to fall head over heels for these delightful Candy Cane Cupcakes! Here are four fantastic reasons why this recipe will become your new holiday baking obsession:
- Gluten-Free & Fabulous: Yes, you read that right! These aren’t just any festive treats; they’re perfectly moist, tender, and absolutely delicious gluten-free cupcakes, ensuring everyone can enjoy the holiday cheer without compromise.
- Bursting with Holiday Cheer: From the vibrant specks of crushed candy canes baked into the cupcake to the cool, refreshing peppermint buttercream, every bite screams “Happy Holidays!” It’s the quintessential flavor of the season.
- Surprisingly Simple to Make: Don’t let their elegant appearance fool you! Our step-by-step guide makes baking these beautiful Candy Cane Cupcakes a breeze, perfect for bakers of all skill levels, even on a busy holiday schedule.
- The Ultimate Crowd-Pleaser: Whether you’re hosting a festive gathering, bringing a treat to a potluck, or simply want to spread some joy, these eye-catching and incredibly tasty cupcakes are guaranteed to put a smile on everyone’s face.
Unwrap the Magic: Dive into Delicious Candy Cane Cupcakes!
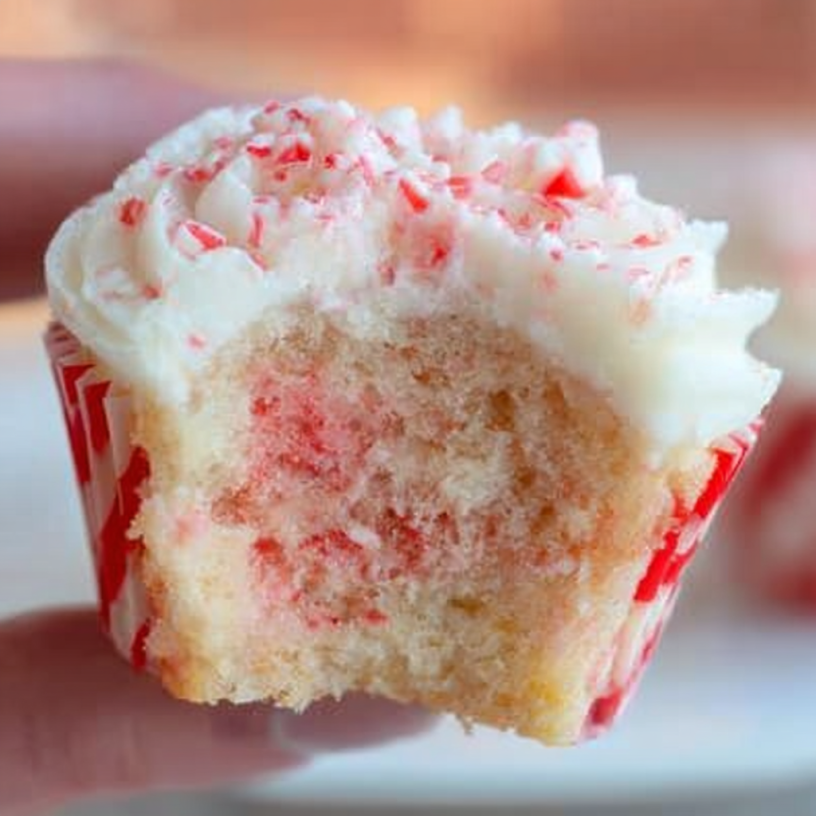
Are you ready to sprinkle a little extra holiday magic into your kitchen? Imagine the sweet, refreshing scent of peppermint filling your home, coupled with the joy of creating something truly special. These aren’t just any ordinary baked goods; we’re talking about enchanting Candy Cane Cupcakes! Picture this: a perfectly fluffy, gluten-free vanilla cupcake, studded with festive red and white candy cane bits, all crowned with a cloud of smooth, dreamy peppermint buttercream. It’s like a winter wonderland in every bite! Whether you’re a seasoned baker or just starting your culinary journey, this recipe promises fun, flavor, and a fabulous treat that’s impossible to resist. Get your aprons on, turn up the holiday tunes, and let’s create some edible festive masterpieces!
Gather Your Goodies: Ingredients for Your Candy Cane Cupcakes
Before we embark on our sweet adventure, let’s make sure you have all the essential ingredients for these spectacular Candy Cane Cupcakes. Quality ingredients are key to a truly magical result!
For the Gluten-Free Cupcakes:
- 🌾 2 ½ cups Gluten-Free All-Purpose Flour Blend (ensure it’s a 1-to-1 baking blend for best results)
- ✨ 3 teaspoons Baking Powder
- 🧂 1 teaspoon Salt
- 🧈 ½ cup Softened Unsalted Butter
- 🍚 1 cup Granulated Sugar
- 🌿 1 tablespoon Vanilla Extract
- 🥚 2 Large Eggs
- 🥛 1 ½ cups Milk (any type works well)
- 🍦 ½ cup Half-and-Half
- 🍬 1 cup Crushed Candy Canes (roughly 14 canes, plus extra for topping)
For the Smooth Peppermint Buttercream Frosting:
- 🧈 1 cup Softened Unsalted Butter
- 🌿 1 tablespoon Vanilla Extract
- ❄️ 4 cups Powdered Sugar
- 🥛 1-2 tablespoons Half-and-Half (adjust for desired consistency)
Your Sweet Journey: Crafting Perfect Candy Cane Cupcakes
Let’s turn those ingredients into delightful Candy Cane Cupcakes! Follow these steps closely for a batch of treats that are as fun to make as they are to eat.
Let’s Bake the Cupcakes:
- Get Ready: Preheat your oven to a cozy 350°F (175°C). Line a standard 12-cup muffin tin with cheerful paper liners. This makes cleanup a breeze!
- Mix Dry Goodness: In a large bowl, effortlessly whisk together the gluten-free flour blend, baking powder, and salt. Whisking ensures everything is evenly distributed. Set this aside for a moment.
- Creamy Foundation: In a stand mixer (or with a hand mixer), beat the softened butter and granulated sugar until they’re light and fluffy. This creates air pockets for a tender cupcake. Then, gently mix in the eggs and vanilla extract until everything is just combined.
- Combine Wet & Dry: With your mixer on a low speed, slowly add the dry flour mixture to the wet ingredients, mixing until just blended. Remember, don’t overmix! Overmixing can lead to tough cupcakes.
- Add Liquids: Now, pour in the milk and half-and-half, mixing until your batter is smooth and lump-free. Your batter should now look wonderfully creamy.
- Peppermint Swirl: Gently fold in the crushed candy canes – this is where the festive color and flavor truly come in! Be gentle to avoid crushing them further and ensure even distribution.
- Fill & Bake: Spoon the batter into your prepared cupcake liners, filling each about ¾ full. This leaves room for them to rise beautifully. Pop them into the preheated oven and bake for 25-30 minutes. You’ll know they’re done when a toothpick inserted into the center comes out clean.
- Cool Down: Once baked, transfer your beautiful cupcakes to a wire rack to cool completely before frosting. This step is crucial for perfect frosting adhesion and to prevent melting!
Time for the Festive Frosting:
- Buttercream Base: In your stand mixer, combine the softened butter, vanilla extract, and about half of the powdered sugar. Mix until it starts to come together into a shaggy consistency.
- Build Sweetness: Gradually add the remaining powdered sugar, about ½ cup at a time, mixing well after each addition until smooth. Scrape down the sides of the bowl often to ensure everything is incorporated.
- Perfect Consistency: To achieve a wonderfully soft and creamy frosting perfect for cupcakes, slowly add 1 to 2 tablespoons of half-and-half, mixing until it reaches your desired spreadable consistency. If it’s too thick, add a tiny bit more; if too thin, a spoonful more powdered sugar will do the trick.
- Decorate & Serve: Frost your completely cooled cupcakes using a metal spatula, the back of a spoon for a rustic look, or a piping bag with your favorite tip for a fancier touch. Finish them off by sprinkling with your reserved crushed candy canes. Enjoy your delicious, homemade holiday treat!
Presentation Perfection: Serving Your Candy Cane Cupcakes
You’ve baked these stunning Candy Cane Cupcakes, and now it’s time to show them off! The presentation can elevate your delightful treats from great to unforgettable. Here are some fun ways to present and serve your holiday masterpieces:
- The Classic Swirl: For that bakery-perfect look, use a piping bag fitted with a large star tip (like a 1M or 2D) to create elegant swirls of peppermint buttercream. Finish with a generous sprinkle of your reserved crushed candy canes right on top – the contrasting colors are gorgeous!
- Mini Candy Cane Garnish: Instead of just crushed pieces, adorn each cupcake with a tiny whole candy cane or a small broken piece standing upright. It adds a whimsical, playful touch that really emphasizes the “candy cane” theme.
- Sparkle & Shine: For extra holiday glam, lightly dust your frosted cupcakes with edible glitter or a sprinkle of white sanding sugar. It’ll catch the light beautifully and make them feel even more festive.
- Hot Cocoa Companion: Serve your Candy Cane Cupcakes alongside mugs of warm hot chocolate. The pairing of cool peppermint and rich chocolate is a match made in heaven, perfect for a cozy winter evening.
- Dessert Platter Star: Arrange your cupcakes on a decorative holiday platter, perhaps with some fresh cranberries or sprigs of evergreen for a natural, festive display. They’ll be the star of any dessert table!
- Gift of Sweetness: Individually box or bag your cupcakes with a pretty ribbon and give them as homemade holiday gifts. Who wouldn’t love a delicious, gluten-free treat?
Keeping Them Fresh: Storage Tips for Your Candy Cane Cupcakes
You’ve put so much love into making these amazing Candy Cane Cupcakes, so let’s make sure they stay fresh and delicious for as long as possible! Proper storage is key to enjoying every last crumb.
- At Room Temperature: If your home is cool and not overly humid, your frosted Candy Cane Cupcakes can be stored in an airtight container at room temperature for up to 2-3 days. Make sure they are completely cooled before placing them in the container to prevent condensation, which can make them soggy.
- In the Refrigerator: For slightly longer storage, or if your kitchen is warm, you can keep them in an airtight container in the refrigerator for up to 4-5 days. Be aware that refrigeration can sometimes slightly alter the texture of gluten-free cupcakes, making them a little firmer. To enjoy them at their best, let them come to room temperature for about 15-30 minutes before serving.
- Freezing for Later: Yes, you can freeze these delicious treats!
- Unfrosted Cupcakes: Once completely cooled, wrap individual unfrosted cupcakes tightly in plastic wrap, then place them in a freezer-safe bag or container. They will last for up to 2-3 months. Thaw at room temperature and then frost as desired.
- Frosted Cupcakes: For frosted cupcakes, first place them on a baking sheet and freeze for about an hour until the frosting is firm. Then, individually wrap each cupcake in plastic wrap and place them in an airtight freezer-safe container. This prevents the frosting from sticking to the wrap. They can be frozen for up to 1 month. Thaw in the refrigerator overnight, then bring to room temperature before serving.
- Important Note: The crushed candy canes on top might melt or become sticky over time, especially in humid conditions or if refrigerated for too long. If you plan to store them for more than a day, it’s best to add the extra crushed candy canes right before serving for the freshest look.
Sweet Inquiries: Your Candy Cane Cupcakes FAQs Answered!
Got questions about whipping up these fantastic Candy Cane Cupcakes? We’ve got answers! Here are some common queries to help you bake with confidence.
- Can I use regular all-purpose flour instead of gluten-free?
Yes, you can! If you don’t need these to be gluten-free, simply substitute the gluten-free all-purpose flour blend with an equal amount of regular all-purpose flour. The texture might be slightly different but still delicious. - What kind of gluten-free flour blend should I use?
For best results, always opt for a “1-to-1” or “cup-for-cup” gluten-free all-purpose baking blend that contains xanthan gum. This ensures the best texture and structure for your cupcakes. - Can I make the cupcakes ahead of time?
Absolutely! You can bake the cupcakes one day in advance. Store them unfrosted in an airtight container at room temperature. Frost them on the day of serving for the freshest look. - What’s the best way to crush candy canes?
Place candy canes in a sturdy zip-top bag, seal it (removing excess air), and gently crush them using a rolling pin or the flat side of a meat mallet. Don’t overdo it – some larger pieces are great for texture! - Can I adjust the amount of peppermint flavor?
Yes! The recipe uses candy canes for flavor and visual appeal. If you want a stronger peppermint kick, you can add ¼ to ½ teaspoon of peppermint extract to the cupcake batter (along with the vanilla) and an extra ¼ teaspoon to the buttercream frosting. Start small and taste! - Why do my gluten-free cupcakes sometimes turn out dry?
Gluten-free flours can absorb more moisture. Ensure you’re using a 1-to-1 blend, don’t overbake (always check with a toothpick!), and measure your ingredients accurately. The milk and half-and-half in this recipe help maintain moisture. - Is it crucial to cool the cupcakes completely before frosting?
Yes, absolutely! If you frost warm cupcakes, the buttercream will melt and slide right off, creating a messy situation. Patience is key for perfect frosting! - Can I color the buttercream frosting?
Definitely! For a festive touch, add a drop or two of red or green gel food coloring to your buttercream frosting. Mix until you achieve your desired shade. This adds another layer of holiday cheer to your Candy Cane Cupcakes. - What if I don’t have half-and-half?
You can substitute half-and-half with an equal amount of whole milk or a mix of milk and light cream (half milk, half heavy cream). For the frosting, you might need slightly less or more depending on the fat content. - Can I use sugar-free candy canes?
While you can use sugar-free candy canes, be aware that their texture can be different when crushed and baked. They may not soften or dissolve in the same way regular candy canes do, and might leave a slightly different aftertaste. Test a small batch if you’re unsure.
“`
Candy Cane Cupcakes
Equipment
- Stand Mixer
- Muffin Tin
- Wire Rack
- Large Bowl
Ingredients
For the Gluten-Free Cupcakes
- 2.5 cups Gluten-Free All-Purpose Flour Blend ensure it's a 1-to-1 baking blend for best results
- 3 teaspoons Baking Powder
- 1 teaspoon Salt
- 0.5 cup Softened Unsalted Butter
- 1 cup Granulated Sugar
- 1 tablespoon Vanilla Extract
- 2 Large Eggs
- 1.5 cups Milk any type works well
- 0.5 cup Half-and-Half
- 1 cup Crushed Candy Canes roughly 14 canes, plus extra for topping
For the Smooth Peppermint Buttercream Frosting
- 1 cup Softened Unsalted Butter
- 1 tablespoon Vanilla Extract
- 4 cups Powdered Sugar
- 1-2 tablespoons Half-and-Half adjust for desired consistency
Instructions
- Preheat your oven to a cozy 350°F (175°C). Line a standard 12-cup muffin tin with cheerful paper liners.
- In a large bowl, effortlessly whisk together the gluten-free flour blend, baking powder, and salt. Set this aside for a moment.
- In a stand mixer, beat the softened butter and granulated sugar until they're light and fluffy. Then, gently mix in the eggs and vanilla extract until everything is just combined.
- With your mixer on a low speed, slowly add the dry flour mixture to the wet ingredients, mixing until just blended. Don't overmix!
- Now, pour in the milk and half-and-half, mixing until your batter is smooth and lump-free.
- Gently fold in the crushed candy canes – this is where the festive color and flavor come in!
- Spoon the batter into your prepared cupcake liners, filling each about ¾ full. Pop them into the preheated oven and bake for 25-30 minutes. You'll know they're done when a toothpick inserted into the center comes out clean.
- Once baked, transfer your beautiful cupcakes to a wire rack to cool completely before frosting. This step is crucial for perfect frosting!
- In your stand mixer, combine the softened butter, vanilla extract, and about half of the powdered sugar. Mix until it starts to come together.
- Gradually add the remaining powdered sugar, about ½ cup at a time, mixing well after each addition until smooth.
- To achieve a wonderfully soft and creamy frosting perfect for cupcakes, slowly add 1 to 2 tablespoons of half-and-half, mixing until it reaches your desired spreadable consistency.
- Frost your completely cooled cupcakes using a metal spatula, the back of a spoon, or a piping bag for a fancier touch. Finish them off by sprinkling with your reserved crushed candy canes. Enjoy your delicious, homemade holiday treat!
Notes
- Calories: ~475 kcal
- Total Carbs: ~68g
- Net Carbs: ~65g
- Fats: ~28g
- Protein: ~6g