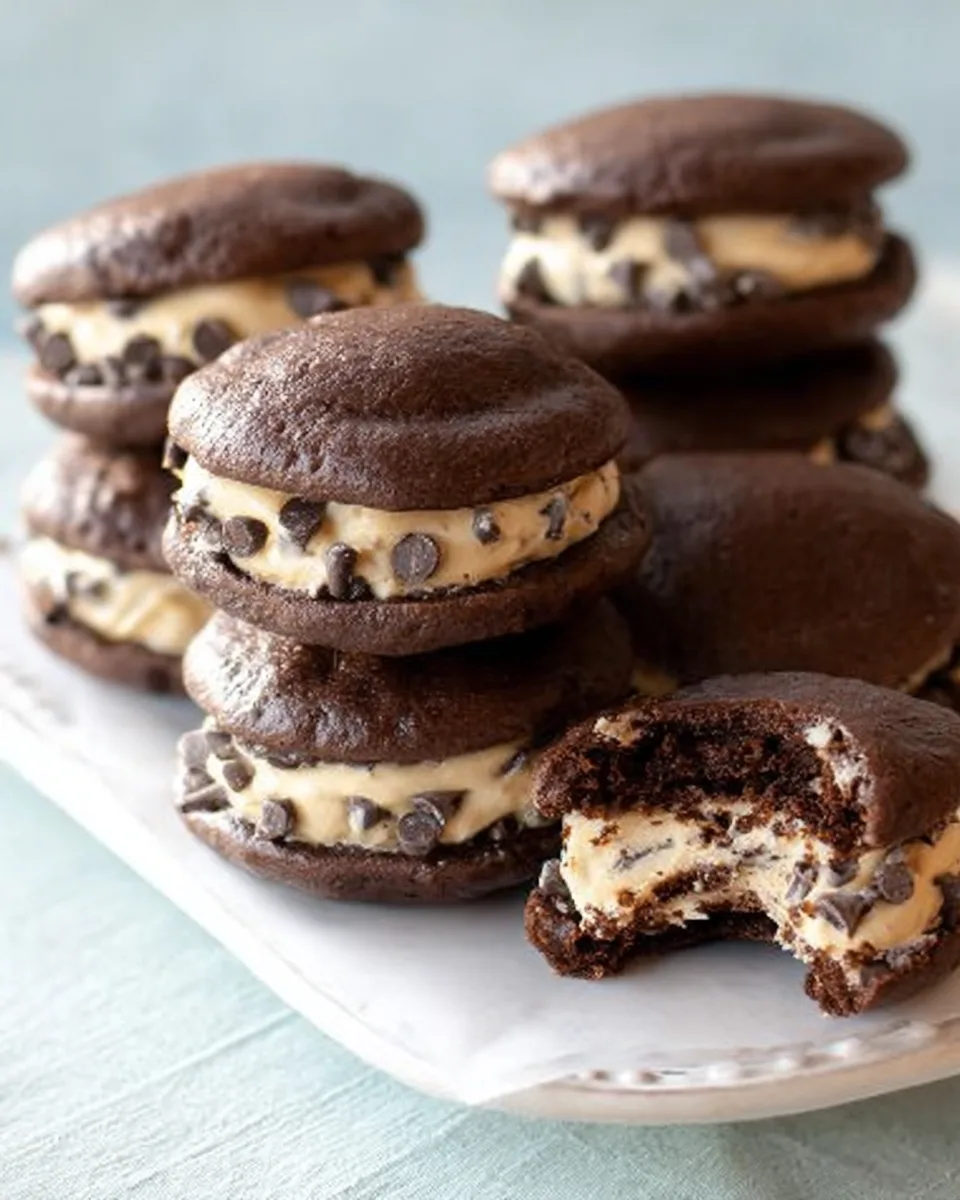
Get ready to have your mind (and taste buds!) blown, because we’re about to dive headfirst into a dessert mashup so legendary, it might just become your new obsession. Forget choosing between a rich, fudgy chocolate treat and a spoonful of irresistible cookie dough – why pick when you can have both wrapped up in one delightful package? Say hello to the ultimate homemade indulgence: Cookie Dough Whoopie Pies! These aren’t just any whoopie pies; they’re a dream come true for anyone who believes dessert should be an adventure. Imagine two soft, pillowy chocolate cakes sandwiching a generous, luscious layer of safe-to-eat, eggless cookie dough. It’s pure bliss in every bite, and trust us, you’re going to want more than just one.
Why You’ll Love These Cookie Dough Whoopie Pies
These aren’t just a recipe; they’re an experience! Here are four undeniable reasons why you’ll fall head over heels for these incredible Cookie Dough Whoopie Pies:
- The Ultimate Flavor Fusion: Why settle for one favorite when you can have two? These whoopie pies flawlessly combine the comforting richness of a soft chocolate cake with the nostalgic sweetness of classic chocolate chip cookie dough. It’s a match made in dessert heaven, offering a symphony of textures and tastes in every bite.
- Eggless & Worry-Free Cookie Dough: Indulge in that pure, unadulterated cookie dough bliss without a single worry! Our filling recipe is completely eggless, meaning you can scoop, spread, and savor every last bit of that delicious dough without any hesitation. It’s the safe way to satisfy that raw cookie dough craving!
- Surprisingly Simple to Make: Don’t let their impressive appearance fool you; these Cookie Dough Whoopie Pies are wonderfully straightforward to bake. With clear, step-by-step instructions, even novice bakers can achieve perfectly round, perfectly delicious results. You’ll be amazed at how easily these come together!
- Perfect for Sharing (or Not!): This recipe yields a generous batch of 28 whoopie pies, making them absolutely ideal for parties, potlucks, or as delightful homemade gifts. But let’s be honest, they’re so good, you might just want to keep them all to yourself. They’re crowd-pleasers that disappear fast!
Ingredients with Measurements
Gather your ingredients and let’s get ready to create some magic! All ingredients should be at room temperature unless otherwise specified for optimal mixing.
For the Chocolate Whoopie Cakes:
- 3 ½ cups all-purpose flour
- 1 ½ cups unsweetened cocoa powder
- 1 tablespoon baking soda
- 1 teaspoon salt
- 2 sticks (1 cup) unsalted butter, room temperature
- 2 cups granulated sugar
- 2 large eggs
- 2 cups buttermilk, room temperature
- 2 teaspoons pure vanilla extract
For the Eggless Cookie Dough Filling:
- 1 cup (2 sticks) unsalted butter, room temperature
- 1 cup light brown sugar, packed
- ¼ cup granulated sugar
- ¼ cup + 2 tablespoons milk
- 2 teaspoons vanilla extract
- 2 cups all-purpose flour
- 1 cup mini chocolate chips
Detailed Step-by-Step Directions How to Make Your Cookie Dough Whoopie Pies
Get your apron on and your mixers ready – let’s make some amazing Cookie Dough Whoopie Pies!
Making the Easy Chocolate Cakes:
- Get Ready to Bake: First things first, preheat your oven to a cozy 400°F (200°C). Grab two baking sheets and line them with parchment paper or silicone mats. This little trick ensures your whoopie cakes bake beautifully round and don’t spread too much.
- Whisk the Dry Goodness: In a spacious bowl, combine your all-purpose flour, cocoa powder, baking soda, and salt. Give them a good whisk to ensure everything is evenly distributed. Then, set this fantastic dry mix aside for a moment.
- Creamy Dreamy Butter & Sugar: Now, for the star of the show – your stand mixer! Add the room-temperature unsalted butter and both granulated sugars. Beat them together on medium-high speed for about 3 minutes. You’re looking for a light, fluffy, and airy consistency – this is key for tender cakes!
- Introduce the Wet Ingredients: It’s egg time! Add your large eggs one at a time, making sure to beat well after each addition. This ensures they’re fully incorporated. Next, pour in the buttermilk and pure vanilla extract. Mix until everything is smoothly combined and looks wonderfully uniform.
- Bring It All Together: With your mixer on low speed, gradually add the dry flour mixture to your wet ingredients. Mix just until everything is combined, taking care not to overmix. A quick scrape down the sides of the bowl with a spatula will catch any rogue dry spots.
- Scoop & Bake Perfection: Grab a 1.5 tablespoon cookie scoop (level it off for perfectly even cakes!) and drop about 12 rounds of batter onto each prepared baking sheet. Leave a little space between them; they’ll puff up!
- Bake Until Just Right: Slide your baking sheets into the preheated oven. Bake for approximately 8 minutes, rotating the sheets halfway through for even cooking. The cakes are ready when the tops feel gently set and soft to the touch.
- Cool Down Gracefully: Let your freshly baked whoopie cakes cool on the baking sheets for a good 10 minutes. Then, gently transfer them to a wire rack to cool completely. Don’t rush this step! Repeat with any remaining batter, allowing your baking sheets to cool between batches.
Whipping Up the Eggless Cookie Dough Filling:
- Butter & Sugar Magic (Again!): In your clean stand mixer bowl, beat the room-temperature butter with the light brown sugar and granulated sugar for about 3 minutes until it’s light, fluffy, and absolutely irresistible.
- Add the Liquid Love: Mix in the milk and vanilla extract until they are fully incorporated and the mixture is beautifully smooth.
- Fold in the Flour: Slowly, on medium speed, incorporate the all-purpose flour. Mix until the filling is smooth and well-blended. If it feels a bit too thick for piping later, you can add 1-2 extra tablespoons of milk, a little at a time, until it reaches your desired consistency.
- The Chocolatey Grand Finale: Now for the best part – gently fold in those mini chocolate chips! You’ve just created a batch of divine, safe-to-eat cookie dough filling. Try not to eat it all before assembly!
Assembling Your Whoopie Pies:
- Match & Fill: Once your chocolate cakes are completely cool (this is important!), find similar-sized halves to create perfect pairs. Scoop about 2 tablespoons of the glorious cookie dough filling onto the flat side of one cake half. For a neater look, a piping bag makes this step super easy and fun!
- The Perfect Sandwich: Gently place another cake half on top of the filling, pressing lightly to create your classic whoopie pie sandwich.
- Ready to Enjoy: Your homemade Cookie Dough Whoopie Pies are now ready for their grand debut!
Detailed Ways to Present and Serve Your Cookie Dough Whoopie Pies
These Cookie Dough Whoopie Pies are delicious on their own, but a little presentation can make them extra special! Here are some fun ideas:
- Classic Platter Presentation: Arrange your whoopie pies on a beautiful cake stand or a rustic wooden platter. A simple, elegant display allows their charming round shape and tempting filling to shine.
- Dusting of Delight: For an extra touch of sophistication, lightly dust the tops of your chocolate whoopie pies with a sprinkle of unsweetened cocoa powder or powdered sugar before serving. This adds visual appeal and a subtle extra layer of flavor.
- Sprinkle Magic: Want to make them even more festive? Before placing the top cake half, sprinkle some colorful nonpareils or chocolate sprinkles onto the exposed cookie dough filling. This is especially fun for birthdays or celebrations!
- Miniature Marvels: If you prefer smaller bites, use a smaller cookie scoop for the cakes. You’ll get more whoopie pies, perfect for a tasting party or a dessert buffet.
- Individual Wraps: For a thoughtful gift or party favor, wrap each whoopie pie individually in clear cellophane bags tied with a pretty ribbon. They make adorable, personalized treats!
- Served with a Beverage: Pair these rich delights with a tall glass of cold milk, a warm mug of coffee, or even a scoop of vanilla ice cream on the side for an ultimate dessert experience.
How You Can Store It and How Long Does It Last
To keep your delicious Cookie Dough Whoopie Pies fresh and enjoyable, proper storage is key. The good news is, they’re quite robust!
- At Room Temperature: These homemade treats are best enjoyed fresh within 3 days of baking. Store them in an airtight container at room temperature. Make sure the container is truly airtight to prevent the cakes from drying out and the cookie dough from hardening.
- Refrigeration: While not strictly necessary for short-term storage, if you live in a very warm climate or prefer your cookie dough filling to be firmer, you can store the whoopie pies in an airtight container in the refrigerator for up to 5 days. Just be aware that the cake halves might become slightly firmer when chilled. Allow them to come closer to room temperature for the best texture before serving.
- Freezing for Later: Yes, you can freeze Cookie Dough Whoopie Pies! Wrap each individual whoopie pie tightly in plastic wrap, then place them in a freezer-safe airtight container or a heavy-duty freezer bag. They can be frozen for up to 1 month. When you’re ready to enjoy, simply thaw them at room temperature for a few hours.
No matter how you store them, remember that fresher is always better for the softest cakes and creamiest cookie dough filling!
FAQs Section
Got questions about these delightful Cookie Dough Whoopie Pies? We’ve got answers!
- What exactly are whoopie pies?
Whoopie pies are a classic American dessert, often described as a “sandwich” made of two soft, cake-like cookies (or small cakes) with a sweet, creamy filling in the middle. They’re like a fluffy, decadent hug for your taste buds! - Why is the cookie dough filling eggless?
The cookie dough filling is made eggless specifically so it’s safe to consume raw. Traditional cookie dough contains raw eggs, which can carry a risk of salmonella. Our recipe allows you to enjoy all the deliciousness of raw cookie dough without any worries! - Can I use a different type of chocolate chip in the filling?
Absolutely! While mini chocolate chips are fantastic for their even distribution, feel free to use regular semi-sweet chocolate chips, milk chocolate chips, or even white chocolate chips to customize your Cookie Dough Whoopie Pies. - Can I make the whoopie cakes ahead of time?
Yes, you can! The chocolate whoopie cakes can be baked a day in advance and stored in an airtight container at room temperature. Assemble them with the fresh cookie dough filling just before serving for the best results. - What if I don’t have buttermilk?
No buttermilk? No problem! You can easily make a substitute. Add 1 tablespoon of white vinegar or lemon juice to a liquid measuring cup, then fill the rest with regular milk (any kind works) until it reaches the 2-cup mark. Stir, and let it sit for 5-10 minutes until it slightly curdles. - Can I make these Cookie Dough Whoopie Pies gluten-free?
While this recipe uses all-purpose flour, you can experiment with a 1:1 gluten-free baking flour blend that contains xanthan gum. Results may vary slightly in texture, but many people have success with such substitutions. - How do I prevent the cakes from spreading too much?
Using parchment paper or silicone mats on your baking sheets is crucial. Also, ensure your butter is at room temperature (not melted) and don’t overmix the batter. A slight chill of the scooped batter before baking can also help them hold their shape. - Can I freeze the cookie dough filling separately?
Yes! The eggless cookie dough filling can be stored in an airtight container in the refrigerator for up to a week, or frozen for up to a month. Thaw in the fridge overnight before using. - How many Cookie Dough Whoopie Pies does this recipe make?
This recipe is quite generous and yields approximately 28 individual whoopie pies, which means 56 chocolate cake halves! Perfect for sharing (or a very happy week of snacks). - Are these suitable for a party or special occasion?
Absolutely! These Cookie Dough Whoopie Pies are a showstopper. Their unique combination of flavors, delightful appearance, and ease of serving make them perfect for any gathering, big or small. They’re always a hit!
Cookie Dough Whoopie Pies
Equipment
- Baking Sheets
- Parchment Paper or Silicone Mats
- Stand Mixer
- Cookie Scoop
- Wire Rack
- Piping bag (optional)
Ingredients
For the Chocolate Whoopie Cakes
- 3.5 cups all-purpose flour
- 1.5 cups unsweetened cocoa powder
- 1 tablespoon baking soda
- 1 teaspoon salt
- 1 cup unsalted butter 2 sticks, room temperature
- 2 cups granulated sugar
- 2 large eggs
- 2 cups buttermilk room temperature
- 2 teaspoons pure vanilla extract
For the Eggless Cookie Dough Filling
- 1 cup unsalted butter 2 sticks, room temperature
- 1 cup light brown sugar packed
- 0.25 cup granulated sugar
- 0.375 cup milk
- 2 teaspoons vanilla extract
- 2 cups all-purpose flour
- 1 cup mini chocolate chips
Instructions
- Making the Easy Chocolate Cakes:
- 1. Get Ready: Preheat your oven to 400°F (200°C). Line two baking sheets with parchment paper or silicone mats – these help prevent spreading for perfectly round whoopie pies!
- 2. Dry Mix: In a large bowl, whisk together the flour, cocoa powder, baking soda, and salt. Set this aside.
- 3. Cream It: In a stand mixer, beat the room-temperature butter and both sugars together on medium-high speed until the mixture is light and fluffy, about 3 minutes.
- 4. Add Wet Ingredients: Add the eggs one at a time, beating well after each. Then, mix in the buttermilk and vanilla until everything is smoothly combined.
- 5. Combine All: Gradually add the dry flour mixture to the wet ingredients on low speed, mixing just until combined. Scrape down the bowl to ensure no dry spots remain.
- 6. Scoop & Bake: Using a 1.5 tablespoon cookie scoop (level it off for even sizes), drop about 12 rounds of batter onto each prepared baking sheet.
- 7. Perfect Pies: Bake for about 8 minutes, rotating the sheets halfway through. The tops should feel gently set and soft to the touch.
- 8. Cool Down: Let the whoopie cakes cool on the baking sheets for 10 minutes, then carefully transfer them to a wire rack to cool completely. Repeat with any remaining batter, allowing baking sheets to cool between batches.
- Whipping Up the Eggless Cookie Dough Filling:
- 1. Cream Butter & Sugar: In your stand mixer, beat the room-temperature butter and both sugars for about 3 minutes until light and fluffy.
- 2. Flavor Boost: Mix in the milk and vanilla until well combined.
- 3. Add Flour: Slowly incorporate the flour on medium speed until the mixture is smooth and well-blended. If it seems a little thick for piping, you can add 1-2 extra tablespoons of milk.
- 4. Chocolatey Finish: Gently fold in the mini chocolate chips – now you have delicious, eggless cookie dough!
- Assembling Your Whoopie Pies:
- 1. Match & Fill: Once the cakes are completely cool, find similar-sized halves. Scoop about 2 tablespoons of the cookie dough filling onto the flat side of one cake half (a piping bag makes this super easy!).
- 2. Assemble: Gently place another cake half on top, pressing lightly to create your whoopie pie sandwich.
- 3. Enjoy or Store: These homemade treats are best enjoyed fresh within 3 days. Store them in an airtight container at room temperature.