Why You’ll Love These Festive Meringue Christmas Trees
Get ready to fall head over heels for our delightful Festive Meringue Christmas Trees! Here are four fantastic reasons why this recipe will become your new holiday go-to:
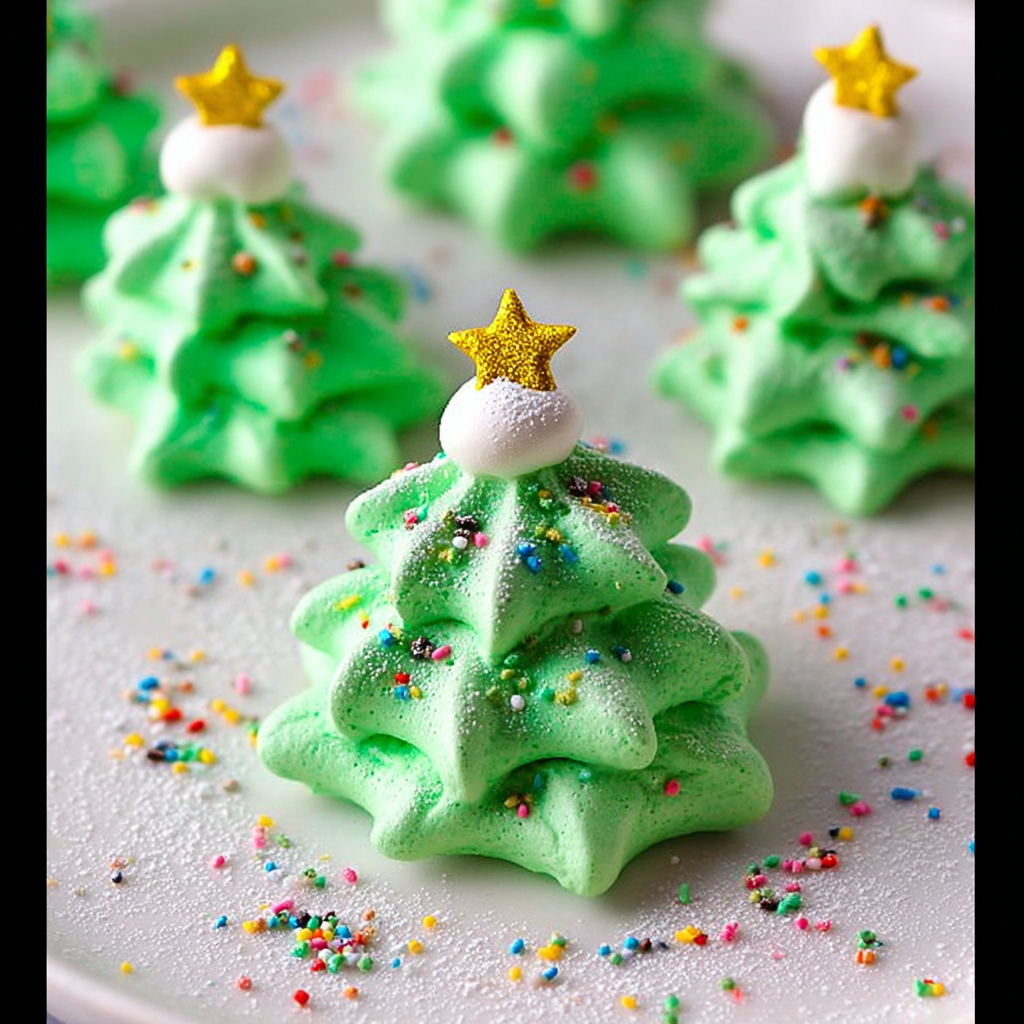
- Pure Holiday Magic: These aren’t just cookies; they’re edible little works of art that scream “Christmas!” Their vibrant green hue, sparkling sprinkles, and adorable star toppers make them an instant festive favorite, bringing joy to every table.
- Surprisingly Simple & Stress-Free: Don’t let their elegant appearance fool you! With a few common pantry staples and our easy-to-follow steps, you’ll be whipping up these impressive treats with absolute confidence. The process is forgiving, making it perfect for bakers of all skill levels.
- Light, Airy & Guilt-Free: In a season often filled with rich indulgences, these meringues offer a wonderfully light and crisp alternative. They’re famously fat-free and low in calories, so you can enjoy a sweet treat without any holiday guilt.
- The Perfect Gift & Showstopper: Whether you’re assembling a holiday dessert platter, looking for a unique edible gift, or simply want to impress your guests, these Festive Meringue Christmas Trees deliver! They hold their shape beautifully and are always a conversation starter.
Unwrap the Magic: Your Guide to Festive Meringue Christmas Trees!
The holidays are here, and what better way to sprinkle some magic than with a batch of treats that look as enchanting as they taste? Imagine delicate, melt-in-your-mouth cookies, shaped like tiny Christmas trees, shimmering with sprinkles and crowned with a star. Sounds like a dream, right? Well, wake up and get ready to bake because we’re about to show you how to create the most adorable and delicious Festive Meringue Christmas Trees! These aren’t just a dessert; they’re a tiny celebration, a burst of festive cheer in every bite. They’re light as a snowflake, crisp as winter air, and guaranteed to bring smiles all around. Forget the heavy holiday bakes; this year, let’s float into the festive season with something truly special, something wonderfully simple, and something utterly irresistible. Get your aprons on, because the holiday baking adventure begins now!
Gather Your Sparkly Ingredients!
Ready to make some magic? Here’s everything you’ll need for your enchanting batch of Festive Meringue Christmas Trees. Remember, fresh ingredients are key for the best meringue!
- 🥚 4 large egg whites, at room temperature (this is crucial for volume!)
- 🍬 1 cup granulated sugar
- 🥄 Pinch of cream of tartar (your secret weapon for stable peaks!)
- 🌰 1/8 teaspoon almond extract (for that subtly sweet, festive flavor)
- 🎨 Green gel food coloring (gel is best for vibrant color without adding extra liquid)
- 🌈 Multi-color sprinkles (the more festive, the better!)
- 🌟 Star sprinkles (the crowning glory for your tiny trees!)
- 🍦 A tiny bit of frosting, for decoration (optional, but perfect for attaching stars)
Your Step-by-Step Guide to Meringue Perfection
Follow these detailed steps to create your beautiful Festive Meringue Christmas Trees. Precision is your friend, but don’t forget to have fun!
- Prepare Your Oven & Meringue Base: Preheat your oven to a gentle 200°F (95°C). In a clean, heat-proof bowl of your stand mixer, combine the egg whites, granulated sugar, and cream of tartar. Set this bowl over a pot of simmering water (ensure the water doesn’t touch the bottom of the bowl!). Whisk continuously and vigorously until all the sugar crystals have completely dissolved and the mixture feels smooth to the touch. This step, known as the Swiss meringue method, is absolutely key for a stable and glossy meringue! Remove the bowl from the heat and stir in the almond extract.
- Whip It Up & Color: Using the whisk attachment on your stand mixer, beat the mixture on medium-high speed. Continue mixing until the egg whites become brilliantly white, incredibly glossy, and form firm, stiff peaks that hold their shape beautifully when you lift the whisk. Now, carefully fold in your green gel food coloring. Start with a small amount and add more until you achieve your desired festive shade of green. Be gentle to maintain the meringue’s airiness.
- Pipe & Decorate Your Trees: Prepare a baking sheet by lining it with parchment paper or a silicone mat. Transfer your fluffy green meringue mixture into a piping bag fitted with a large star tip. Gently pipe small Christmas tree shapes onto your lined baking sheet, aiming for about 1 inch wide at the base and 2 inches high, leaving about an inch of space between each tree. To create the tree shape, pipe a small base, then gradually pipe upwards, reducing pressure slightly as you go to form a point. Sprinkle generously with the multi-color sprinkles for an extra festive touch!
- Bake & Rest for Perfection: Place your baking sheet into the preheated oven and bake for 2 hours. After the baking time, turn off the oven completely. Prop the oven door open slightly (a wooden spoon works perfectly!) and allow the cookies to cool and dry out in the oven for an additional 2 hours. This gentle, slow cooling and drying process is vital—it prevents cracking and ensures they are perfectly crisp on the outside and wonderfully melt-in-your-mouth light on the inside!
- Final Touches & Enjoy: Once your meringue trees are completely cool and dry, carefully remove them from the baking sheet. To finish, add a tiny dab of frosting to the very top of each “tree” and gently place a star sprinkle on it. Serve these delightful, airy, and truly fat-free treats and spread some serious holiday cheer!
Presenting & Serving Your Festive Meringue Christmas Trees
These adorable Festive Meringue Christmas Trees are not just a treat for the taste buds, but also a feast for the eyes! Their charming appearance makes them incredibly versatile for presentation and serving during the holiday season.
- The Grand Platter: Arrange them artfully on a large, festive platter with other holiday cookies. Their vibrant green color will pop against traditional reds and whites, creating a stunning centerpiece for your dessert table.
- Enchanting Edible Gifts: Package small handfuls in clear cellophane bags tied with a pretty ribbon. They make thoughtful, homemade gifts for neighbors, teachers, or friends, spreading personalized holiday cheer.
- Hot Cocoa Toppers: Float one or two on top of a mug of steaming hot chocolate. As they slowly dissolve, they add a delicate sweetness and a beautiful visual touch to your cozy winter beverage.
- Mini Cake/Cupcake Decor: Use them as charming toppers for cupcakes or small cakes, instantly elevating simple desserts into festive masterpieces. Just place them gently on top of frosting.
- Holiday Dessert Bar Star: Incorporate them into a larger holiday dessert spread. Their unique texture and light profile offer a delightful contrast to richer desserts, ensuring there’s something for everyone.
- Simply Serve: Enjoy them on their own with a cup of coffee, tea, or a glass of sparkling cider. Their delicate crunch and sweet almond flavor are perfect for a light after-dinner treat or a festive snack.
Storing Your Christmas Tree Treasures
To keep your beautiful Festive Meringue Christmas Trees crisp, dry, and delicious for as long as possible, proper storage is key. Meringues are delicate and sensitive to humidity, so a little care goes a long way!
Once completely cooled and adorned with their star sprinkles, store your meringue trees in an airtight container at room temperature. It’s best to keep them in a cool, dry place away from direct sunlight and any sources of moisture. You can layer them between sheets of parchment paper if needed, to prevent them from sticking or breaking. Avoid storing them in the refrigerator, as the moisture inside can make them soft and sticky, losing their signature crispness. When stored correctly, these delightful Festive Meringue Christmas Trees can last for up to 2-3 weeks. They make excellent make-ahead treats, allowing you to get a head start on your holiday baking without any last-minute stress!
FAQs About Festive Meringue Christmas Trees
Here are some common questions to help you master your Festive Meringue Christmas Trees:
- What exactly is a meringue cookie? A meringue cookie is a light, airy confection made primarily from whipped egg whites and sugar, often baked at a low temperature to dry them out until crisp.
- Why do I whisk the egg white mixture over simmering water? This technique (Swiss meringue) gently heats the egg whites and sugar, dissolving the sugar crystals completely, which creates a very stable, glossy, and smooth meringue that holds its shape beautifully.
- Can I use liquid food coloring instead of gel? Gel food coloring is highly recommended. Liquid food coloring can add too much moisture to your meringue, potentially deflating it or making it less stable.
- What if my meringue isn’t forming stiff peaks? Ensure your bowl and whisk are perfectly clean and free of any grease. Also, make sure no egg yolk has contaminated your egg whites. Room temperature egg whites also whip up better.
- Why did my meringues crack during baking or cooling? Cracking is often due to too high an oven temperature or cooling them too quickly. The slow bake and even slower cooling in the oven are essential to prevent this.
- Can I make these Festive Meringue Christmas Trees ahead of time? Absolutely! Meringues store very well in an airtight container for up to 2-3 weeks, making them perfect for preparing in advance.
- Are these Festive Meringue Christmas Trees gluten-free? Yes, they are naturally gluten-free, as they contain no flour.
- Can I substitute the almond extract for another flavor? Certainly! Peppermint extract is a popular choice for a festive twist, or vanilla extract for a classic flavor.
- What if I don’t have a star tip for piping? You can use a round tip and pipe small mounds, or even snip the corner off a piping bag/zip-top bag for a rustic look. They’ll still be delicious!
- Are they truly fat-free? Yes, as per the nutrition facts provided and the ingredients (egg whites are fat-free), these meringues are a wonderfully fat-free holiday treat!
Festive Meringue Christmas Trees 🎄
Equipment
- Stand Mixer
- Heat-proof Bowl
- Pot of simmering water
- Whisk Attachment
- Piping bag
- Large Star Tip
- Baking Sheet
- Parchment Paper or Silicone Mat
- Wooden Spoon
Ingredients
- 4 large egg whites at room temperature
- 1 cup granulated sugar
- Pinch cream of tartar
- 1/8 teaspoon almond extract
- Green gel food coloring
- Multi-color sprinkles
- Star sprinkles
- tiny bit frosting for decoration (optional)
Instructions
- Preheat your oven to a gentle 200°F (95°C). In a clean, heat-proof bowl of your stand mixer, combine the egg whites, granulated sugar, and cream of tartar. Set this bowl over a pot of simmering water (make sure the water doesn't touch the bottom of the bowl). Whisk continuously and vigorously until all the sugar crystals have completely dissolved and the mixture feels smooth to the touch. This step is key for a stable meringue! Remove the bowl from the heat and stir in the almond extract.
- Using the whisk attachment on your stand mixer, beat the mixture on medium-high speed. Continue mixing until the egg whites become brilliantly white, glossy, and form firm, stiff peaks that hold their shape beautifully. Now, carefully fold in your green gel food coloring until you achieve your desired festive shade of green.
- Prepare a baking sheet by lining it with parchment paper or a silicone mat. Transfer your fluffy green meringue mixture into a piping bag fitted with a large star tip. Gently pipe small Christmas tree shapes onto your lined baking sheet, aiming for about 1 inch wide and 2 inches high, leaving about an inch of space between each tree. Sprinkle generously with the multi-color sprinkles for a festive touch!
- Place your baking sheet into the preheated oven and bake for 2 hours. After the baking time, turn off the oven completely. Prop the oven door open slightly (you can use a wooden spoon) and allow the cookies to cool and dry out in the oven for an additional 2 hours. This gentle, slow cooling prevents cracking and ensures they are perfectly crisp and melt-in-your-mouth light!
- Once your meringue trees are completely cool, carefully remove them from the baking sheet. To finish, add a tiny dab of frosting to the very top of each "tree" and gently place a star sprinkle on it. Serve these delightful, airy, and fat-free treats and spread some holiday cheer!
Notes
Calories: 34 kcal
Total Carbs: 8g
Net Carbs: 8g
Fats: 0g
Protein: 1g