Unleash Your Inner Elf with Easy Snowman Cake Pops!
Picture this: a dusting of snow, twinkling lights, and the irresistible aroma of something sweet baking in your kitchen. As the holidays approach, there’s nothing quite like gathering in the warmth of home to create magical memories. And what better way to add a sprinkle of joy than with treats that are as delightful to look at as they are to eat? Get ready to unwrap the secret to making the most adorable, fuss-free confections that will have everyone smiling. We’re talking about **Easy Snowman Cake Pops for Festive Fun** – the perfect bite-sized ambassadors of holiday cheer! Forget complicated desserts; these charming little snowmen are here to prove that festive baking can be wonderfully simple and incredibly rewarding. So grab your apron and let’s dive into a world where cake, frosting, and a dash of creativity transform into an edible winter wonderland!
Why You’ll Love These Easy Snowman Cake Pops for Festive Fun
- **Effortlessly Adorable:** Who knew such cuteness could be so simple? These cake pops take the stress out of holiday baking, allowing you to create picture-perfect treats with minimal fuss. They’re guaranteed to be the star of any dessert table!
- **Perfect for All Ages:** From crumbling the cake to decorating the little snowman faces, this recipe offers fun for the whole family. Kids will love helping to bring these festive characters to life, making it a wonderful holiday activity.
- **Customizable Creations:** While our snowman design is undeniably charming, the basic cake pop recipe is a blank canvas. Feel free to get creative with sprinkles, different candy melt colors, or even unique hat designs to match your holiday theme.
- **Irresistibly Delicious:** Beyond their charming exterior, these cake pops are a delectable blend of moist cake and creamy frosting, enrobed in a crisp candy shell. Each bite is a little parcel of pure joy, making them a crowd-pleaser for every palate. Truly an **Easy Snowman Cake Pops for Festive Fun** delight!
Gather Your Goodies: Ingredients for Easy Snowman Cake Pops
- 🍰 1 box vanilla or chocolate cake mix (plus required ingredients listed on the box) or your favorite homemade cake recipe
- 🧈 ½ cup softened unsalted butter
- 🍚 1½ cups powdered sugar
- 🥛 2 tablespoons heavy cream or milk
- ✨ ½ teaspoon vanilla extract
- 🍫 16 ounces white candy melts or good quality white chocolate
- 🎩 Mini Reese’s peanut butter cups
- 👀 Mini chocolate chips or brown M&M minis
- 🥕 Orange candy melts or orange sprinkle rods
- 🥢 Lollipop sticks
- 🌈 Optional sprinkles
- 🖌️ Small piping bag or sturdy sandwich bag
Step-by-Step Magic: Crafting Your Easy Snowman Cake Pops
- **Bake Your Base:** First things first, let’s get that cake baked! Follow the instructions on your cake mix box or your favorite homemade recipe. The key here is to let it cool completely – a patient baker makes the best cake pops!
- **Whip Up the Frosting Dream:** In a bowl, grab your softened butter and beat it until it’s wonderfully light and fluffy. Gradually add the powdered sugar, heavy cream (or milk), and that lovely vanilla extract. Beat until you have a smooth, creamy frosting that’s ready to mingle.
- **Crumble, Mix, and Roll:** Now for the truly fun part! Crumble your cooled cake into a large bowl. Add about three-quarters of your freshly made frosting. Mix it all together until it feels like soft cookie dough – pliable and holding its shape. Roll this magical mixture into neat 1½-inch balls. Line a baking sheet with parchment paper, pop your balls on it, and chill them for 2 hours in the fridge, or a speedy 30 minutes in the freezer. This step is crucial for perfect **Easy Snowman Cake Pops for Festive Fun**!
- **Stick ‘Em Up!** Melt a small amount of your white candy coating. Dip one end of a lollipop stick into the melted coating, then gently push it halfway into a chilled cake ball. This creates a secure “glue” so your snowmen stay put! Return them to the fridge for just 10 minutes to firm up.
- **Dip into Snowman Perfection:** Melt the rest of your white candy coating. Do this in short bursts in the microwave, stirring until it’s silky smooth – no lumps allowed! Dip each chilled cake pop into the coating, letting any excess drip off with a gentle tap. Place them upright in a stand or a styrofoam block to set completely.
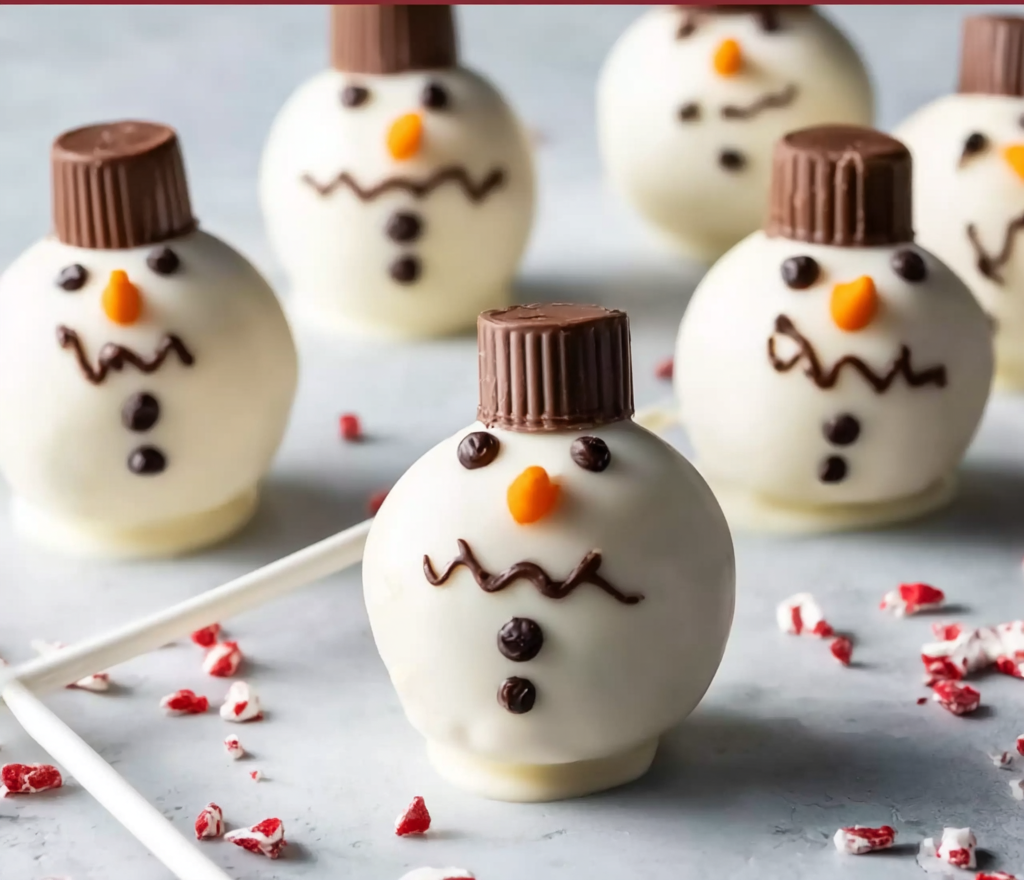
- **Decorate Your Winter Wonderland:** Before the white coating completely hardens (act fast!), press two mini chocolate chips for eyes and three down the front for buttons. Add an orange sprinkle rod or a small piece of orange candy for their cute carrot noses. Once the white coating is fully dry, gently press an upside-down mini Reese’s peanut butter cup on top for their charming hats. Feeling artistic? Use a small piping bag (or a sandwich bag with the corner snipped) filled with a little melted chocolate to draw on happy smiles or cozy scarves. Voilà, your delightful **Easy Snowman Cake Pops for Festive Fun** are complete!
Presenting & Serving Your Adorable Snowman Cake Pops
Once your delightful **Easy Snowman Cake Pops for Festive Fun** are complete, the next joy is presenting them! Their adorable design makes them naturally eye-catching, but with a few creative touches, you can turn them into a true showstopper.
Here are some ideas for presentation and serving:
- **Festive Centerpiece:** Arrange your snowman cake pops upright in a block of floral foam covered with fake snow, glitter, or cotton batting. This creates an enchanting winter scene perfect for your holiday table.
- **Edible Bouquet:** For a charming gift or party favor, tie a small ribbon around each stick and place them in a decorative jar or vase. It’s a sweet bouquet that’s sure to bring smiles!
- **Dessert Platter Perfection:** Lay them flat on a beautiful serving platter amidst other holiday cookies and treats. A dusting of powdered sugar (like fresh snow!) around them can add an extra magical touch.
- **Party Favors:** Individually wrap each cake pop in a small cellophane bag tied with a festive ribbon. They make perfect take-home treats for holiday parties or school events.
- **Hot Chocolate Companion:** Serve them alongside mugs of warm hot chocolate with whipped cream. The combination is pure winter bliss!
- **Gift Toppers:** Use a snowman cake pop as a whimsical decoration on top of a wrapped present for that extra special touch.
These charming snowmen are fantastic for Christmas parties, winter birthdays, school bake sales, or simply as a delightful treat to enjoy with family during the festive season. They’re bite-sized portions of joy, making them easy to grab and enjoy without needing plates or forks!
Keeping Your Snowman Cake Pops Fresh: Storage Tips
To ensure your **Easy Snowman Cake Pops for Festive Fun** stay as delicious and delightful as the day you made them, proper storage is key!
- **At Room Temperature:** If your cake pops are going to be devoured within 1-2 days, you can store them in an airtight container at cool room temperature. Make sure they are away from direct sunlight or heat sources, which could cause the chocolate coating to melt. While the cake itself is relatively stable, the quality of the chocolate coating is best maintained in a cool environment.
- **Refrigeration for Longer Freshness:** For maximum freshness and to extend their shelf life, store your snowman cake pops in an airtight container in the refrigerator. They will last wonderfully for up to 1 week when chilled. Just be sure to bring them to room temperature for about 15-20 minutes before serving for the best texture and flavor. The cold can make the cake a bit dense, but warming up slightly will restore its moistness.
- **Freezing (Yes, You Can!):** If you’re planning ahead or have leftovers (unlikely with these!), cake pops can actually be frozen. Place them in a single layer on a parchment-lined baking sheet until solid, then transfer them to an airtight, freezer-safe container or bag. They can be frozen for up to 1 month. Thaw them overnight in the refrigerator, then bring to room temperature before enjoying.
Always remember to keep them covered to prevent them from drying out or absorbing any unwanted odors from your fridge.
FAQs: Your Questions About Easy Snowman Cake Pops Answered!
- 1. Can I use store-bought frosting instead of making my own?
- Absolutely! While the homemade frosting recipe provided is delicious, using about 1 cup of store-bought vanilla frosting is a fantastic shortcut for these **Easy Snowman Cake Pops for Festive Fun**. Just make sure it’s not too thin; if it is, you might need a little less.
- 2. My cake balls are too sticky to roll. What went wrong?
- This usually means there’s too much frosting. Try adding a little more crumbled cake to absorb the excess moisture. Alternatively, chill the mixture for an extra 15-30 minutes; a colder dough is easier to handle.
- 3. How do I prevent my cake pops from falling off the stick?
- The trick is in chilling the cake balls thoroughly and using a dab of melted candy coating to “glue” the stick in place (Step 4). Ensure the cake balls are firm before dipping, and the stick is pushed halfway in and allowed to set.
- 4. My candy coating is too thick for dipping. How can I thin it?
- Add a very small amount of coconut oil or a specialized candy melt thinning agent (like paramount crystals) to the melted coating, stirring until it reaches the desired consistency. Do not add water or milk, as this will cause the chocolate to seize.
- 5. Can I use regular chocolate chips instead of candy melts for coating?
- You can, but regular chocolate chips often need tempering to achieve a smooth, non-streaky finish that hardens well at room temperature. Candy melts are formulated to melt smoothly and harden quickly without tempering, making them much easier for cake pops, especially for an **Easy Snowman Cake Pops for Festive Fun** recipe.
- 6. What if I don’t have lollipop sticks?
- No problem! You can serve them as “cake truffles” without sticks, using small paper cupcake liners. Or, use sturdy paper straws cut in half, or even small pretzel sticks for a rustic touch (though they might not hold as well).
- 7. How can I make these gluten-free?
- Simply use a gluten-free cake mix and ensure all other ingredients (like candy melts and sprinkles) are certified gluten-free. The rest of the instructions remain the same for your gluten-free **Easy Snowman Cake Pops for Festive Fun**.
- 8. Can I prepare the cake balls in advance?
- Yes! The rolled cake balls can be prepared a day or two in advance and stored in an airtight container in the refrigerator. This makes the assembly process even quicker on decorating day.
- 9. My snowman’s features aren’t sticking to the coating. What should I do?
- You need to apply the decorative elements (eyes, nose, buttons) while the white coating is still wet. If it has hardened, you can dab a tiny bit of fresh melted white candy coating onto the back of the decorations before pressing them on.
- 10. What other flavors can I make for cake pops?
- The possibilities are endless! You can use chocolate, red velvet, lemon, or funfetti cake mixes. Pair them with complementary frosting flavors (e.g., cream cheese frosting for red velvet) and different colored candy coatings and sprinkles for endless variations of delightful cake pops!
Easy Snowman Cake Pops for Festive Fun ⛄
Equipment
- Baking Sheet
- Lollipop Sticks
- Stand or Styrofoam Block
- Small Piping Bag
Ingredients
Cake & Frosting
- 1 box vanilla or chocolate cake mix (plus required ingredients listed on the box) or your favorite homemade cake recipe
- 1/2 cup unsalted butter softened
- 1 1/2 cups powdered sugar
- 2 tablespoons heavy cream or milk
- 1/2 teaspoon vanilla extract
Coating & Decorations
- 16 ounces white candy melts or good quality white chocolate
- Mini Reese’s peanut butter cups
- Mini chocolate chips or brown M&M minis
- Orange candy melts or orange sprinkle rods
- Lollipop sticks
- Sprinkles optional
- Small piping bag or sturdy sandwich bag
Instructions
- First, bake your chosen cake, whether it’s from a mix or your special homemade recipe. Let it cool completely – this is key for a great texture and easy handling!
- Next, whip up the creamy frosting. In a bowl, beat the softened butter until it’s light and fluffy. Gradually add the powdered sugar, heavy cream, and vanilla extract, beating until wonderfully smooth and creamy.
- Now for the fun part: crumble the cooled cake into a big bowl. Mix in about three-quarters of your delicious frosting until it feels like soft cookie dough that holds its shape. Roll this mixture into neat 1½-inch balls and pop them onto a baking sheet lined with parchment paper. Chill these for 2 hours in the fridge, or speed it up with 30 minutes in the freezer.
- Melt a little of your white candy coating. Dip one end of each lollipop stick into the melted coating, then gently push it halfway into a cake ball. This little trick ensures your cake pops stay perfectly on their sticks! Return them to the fridge for just 10 minutes to firm up.
- Time to coat! Melt the rest of your white candy coating in short bursts in the microwave, stirring until it’s silky smooth. Dip each chilled cake pop into the coating, letting any extra drip off with a gentle tap. Place them upright in a stand or styrofoam block to set completely.
- Quickly decorate your adorable snowmen! Before the white coating hardens, press in two mini chocolate chips for eyes and three for buttons. Add an orange sprinkle rod or a small piece of orange candy for their cute carrot noses. Once the coating is completely dry, gently press an upside-down mini peanut butter cup on top for their charming hats. If you’re feeling extra creative, use a small piping bag with melted chocolate to draw on smiles or scarves!
Notes
- Calories: 240
- Total Carbs: 40g
- Net Carbs: 39g
- Fats: 9g
- Protein: 2g