Unwrap the Magic of Chocolate Mint Dream Buttons!
Are you ready to dive headfirst into a world where cool, refreshing mint meets decadent, rich chocolate? Prepare yourselves, sweet tooth adventurers, because we’re about to introduce you to the ultimate no-bake confection: Chocolate Mint Dream Buttons! These bite-sized marvels are not just a treat; they’re an experience. Perfect for holidays, parties, or simply satisfying that sudden craving for something truly special, these buttons are ridiculously easy to make and even easier to devour. Get ready to impress with minimal effort and maximum flavor!
Why You’ll Absolutely Adore These Chocolate Mint Dream Buttons
- No-Bake Bliss: Forget turning on the oven! These delightful treats come together with just a mixer and a little chilling time, making them perfect for hot days or when you just don’t feel like baking.
- Irresistibly Fresh Flavor: The combination of vibrant mint (spearmint for that classic taste!) and silky semi-sweet chocolate is a match made in dessert heaven. Each bite is a refreshing escape.
- Perfectly Portioned & Shareable: Yielding a whopping 72 buttons, this recipe is ideal for feeding a crowd, creating delightful party favors, or simply having plenty on hand for those daily cravings.
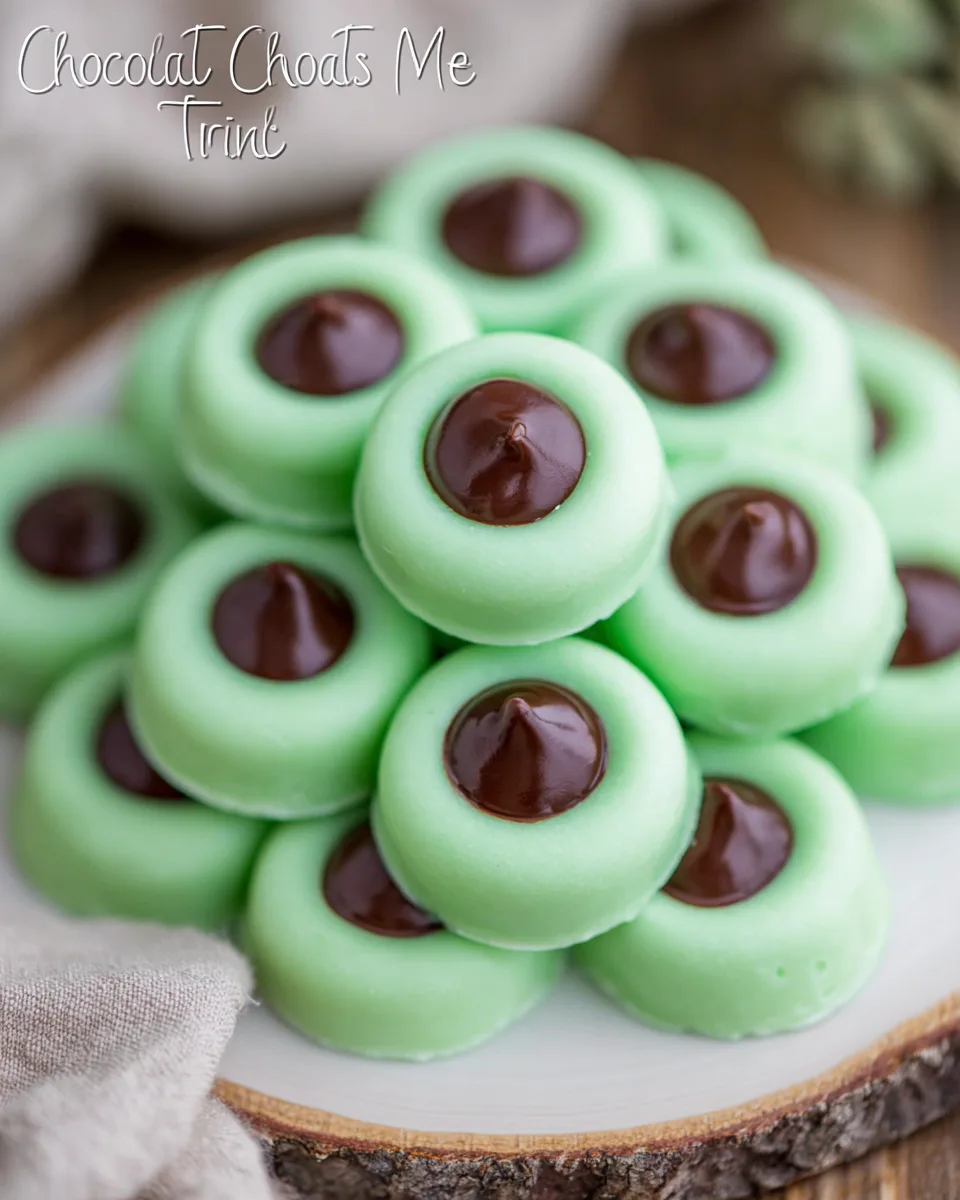
- Simply Stunning: With their beautiful green centers and glossy chocolate tops, these Chocolate Mint Dream Buttons are as pretty to look at as they are delicious to eat, making them a showstopper on any dessert platter.
Gather Your Ingredients for Chocolate Mint Dream Buttons
Here’s what you’ll need to create these little nuggets of joy:
- 4 ounces cream cheese, softened
- 🍬 4 ½ cups powdered sugar
- 🌱 ½ teaspoon mint extract (spearmint recommended!)
- 🟢 A few drops of green gel food coloring (optional, but fun!)
- 🥛 1 cup heavy whipping cream
- 🍫 10 ounces semi-sweet chocolate chips
Prep Time: 30 minutes | Cook Time: 0 minutes | Total Time: 3 hours (includes chilling) | Servings: 72 buttons
Your Step-by-Step Guide to Crafting Chocolate Mint Dream Buttons
- For the Mint Buttons: In a large bowl, combine the softened cream cheese with 1 cup of powdered sugar. Mix with a stand mixer or hand mixer until it’s wonderfully smooth – no lumps allowed!
- Add Flavor & Color: Stir in the mint extract and your green food coloring (if you’re using it) until the color is evenly distributed and lovely. It’s like painting with deliciousness!
- Build the Dough: Gradually add the remaining 3 ½ cups of powdered sugar, mixing until just combined. Don’t be shy – use your hands to finish mixing the dough; it’s the quickest way to get a smooth, uniform consistency that’s just perfect.
- Roll into Buttons: Line a large baking sheet with parchment paper. Scoop out about a teaspoon of the dough for each button and gently roll it into a neat little ball in your palms. Place these on your prepared baking sheet.
- Make the Indentations: Using the end of a wooden spoon or a small measuring spoon (dust it with a little powdered sugar if it tends to stick), make a small indentation in the center of each dough ball. These will be the cozy homes for your chocolate ganache.
- Chill Out: Chill your mint buttons in the refrigerator for about 1 hour until they are nice and firm. This helps them hold their shape.
- For the Chocolate Ganache: Place the semi-sweet chocolate chips in a heat-proof bowl.
- Heat the Cream: Heat the heavy whipping cream in a small saucepan until it just begins to simmer – watch for tiny bubbles around the edges.
- Combine & Stir: Pour the hot cream over the chocolate chips. Let it sit undisturbed for 2 minutes (the magic is happening!). Then stir gently until the chocolate is completely melted and the mixture is silky smooth and irresistible.
- Thicken the Ganache: Transfer the ganache to a Ziploc bag. Let it cool and thicken for about 30 minutes at room temperature, or pop it in the fridge briefly (keep a close eye on it!) until it reaches a thick, yogurt-like consistency – perfect for piping.
- Assemble Your Buttons: Snip a small corner off the Ziploc bag. Pipe the thickened ganache carefully and generously into the indentations of your chilled mint buttons.
- Final Chill: Chill for another hour, or until the ganache is fully set. Store these delightful Chocolate Mint Dream Buttons in the refrigerator. Enjoy every single bite!
Dressing Up Your Chocolate Mint Dream Buttons: Serving Suggestions
These Chocolate Mint Dream Buttons are already gorgeous, but with a few extra touches, you can make them truly shine! Here are some fun ways to present and serve your delightful treats:
- Elegant Platter: Arrange them on a pristine white platter for a simple yet sophisticated display. The green and brown contrast beautifully!
- Festive Sprinkles: Before the ganache sets, sprinkle a few festive green or holiday-themed sprinkles over the chocolate centers for an extra pop of color and texture.
- Dust of Sweetness: Lightly dust the finished buttons with a touch of extra powdered sugar for a snowy, elegant look, especially perfect for winter holidays.
- Mini Mint Leaves: Garnish each button with a tiny fresh mint leaf right on top of the ganache for a professional touch and an added burst of mint aroma.
- Gift Boxes: Package a dozen or so in small, decorative boxes lined with parchment paper. They make charming, homemade gifts for friends, neighbors, or teachers!
- Dessert Bar Star: Place them in mini cupcake liners or paper bonbon cups on your dessert table. They’re sure to be one of the first treats to disappear!
Storing Your Chocolate Mint Dream Buttons
Given their creamy, no-bake nature, proper storage is key to keeping your Chocolate Mint Dream Buttons fresh and delicious!
- Refrigeration is a Must: Always store these buttons in an airtight container in the refrigerator. The cream cheese base and ganache require cool temperatures to maintain their texture and freshness.
- How Long Do They Last? When stored correctly in the fridge, your delightful buttons will stay fresh for up to 1 week.
- Freezing for Later: For longer storage, you can freeze the finished buttons. Place them in a single layer on a parchment-lined tray until firm (about 30 minutes), then transfer them to an airtight freezer-safe container or freezer bag. They can be frozen for up to 1 month. Thaw them in the refrigerator before serving.
- Make Ahead Magic: These are fantastic for making ahead! Prepare them a day or two before your event, and store them in the fridge until showtime.
Frequently Asked Questions About Chocolate Mint Dream Buttons
- Can I skip the green food coloring? Absolutely! The food coloring is purely for fun and visual appeal. Your Chocolate Mint Dream Buttons will taste just as amazing without it.
- What if my mint dough is too sticky? If the dough is too sticky, gradually add another tablespoon or two of powdered sugar until it’s easier to handle. Humidity can affect dough consistency.
- What if my mint dough is too dry/crumbly? If your dough feels too dry, add a tiny bit (half a teaspoon at a time) of heavy cream or milk until it comes together.
- Can I use different types of chocolate for the ganache? Yes! While semi-sweet is recommended for balance, you can experiment with dark chocolate for a richer, less sweet ganache, or milk chocolate for a sweeter, creamier profile.
- Is spearmint extract essential? Spearmint gives that classic mint chocolate flavor profile, but peppermint extract can be used for a stronger, more intense minty kick. Start with a smaller amount (¼ teaspoon) and add more to taste, as peppermint can be very potent.
- My ganache isn’t thickening. What can I do? Ensure your ganache has enough time to cool. If it’s still too runny after 30 minutes at room temperature, pop it back in the fridge for 10-15 minute intervals, stirring occasionally, until it reaches the desired consistency.
- Can I use a microwave for the ganache? You can, but be very careful! Heat the cream in 30-second intervals, stirring, until simmering. For the chocolate, microwave chips with the hot cream in 30-second bursts, stirring well after each, until smooth. Overheating chocolate can cause it to seize.
- How can I make the buttons uniform in size? Using a small cookie scoop or a measuring spoon (like a ½ teaspoon or 1 teaspoon) is the best way to ensure all your Chocolate Mint Dream Buttons are perfectly uniform.
- Are these Chocolate Mint Dream Buttons gluten-free? Yes, based on the ingredients listed, this recipe is naturally gluten-free. Always double-check ingredient labels for any hidden gluten if you have severe sensitivities.
- Can I make these vegan? This recipe contains cream cheese and heavy whipping cream, so it is not vegan as written. However, you might be able to adapt it using vegan cream cheese, plant-based heavy cream, and vegan chocolate chips, though results may vary.
Nutrition per Button (approx.)
- Calories: 65
- Total Carbs: 10g
- Net Carbs: 9g
- Fats: 4g
- Protein: 1g
“`
Chocolate Mint Dream Buttons 🍫🌿
Equipment
- Stand mixer (or hand mixer)
- Small Saucepan
- Heat-proof Bowl
- Baking Sheet
- Parchment Paper
- Ziploc Bag
Ingredients
Mint Buttons
- 4 ounces cream cheese softened
- 4.5 cups powdered sugar
- 0.5 tsp mint extract spearmint recommended!
- green gel food coloring A few drops, optional
Chocolate Ganache
- 1 cup heavy whipping cream
- 10 ounces semi-sweet chocolate chips
Instructions
- For the Mint Buttons: In a large bowl, combine the softened cream cheese with 1 cup of powdered sugar. Mix with a stand mixer or hand mixer until it's wonderfully smooth.
- Stir in the mint extract and your green food coloring (if you're using it) until the color is evenly distributed and lovely.
- Gradually add the remaining 3 ½ cups of powdered sugar, mixing until just combined. Use your hands to finish mixing the dough; it's the quickest way to get a smooth, uniform consistency.
- Line a large baking sheet with parchment paper. Scoop out about a teaspoon of the dough for each button and gently roll it into a neat little ball in your palms. Place these on your prepared baking sheet.
- Using the end of a wooden spoon or a small measuring spoon (dust it with a little powdered sugar if it tends to stick), make a small indentation in the center of each dough ball.
- Chill your mint buttons in the refrigerator for about 1 hour until they are nice and firm.
- For the Chocolate Ganache: Place the semi-sweet chocolate chips in a heat-proof bowl.
- Heat the heavy whipping cream in a small saucepan until it just begins to simmer.
- Pour the hot cream over the chocolate chips. Let it sit undisturbed for 2 minutes, then stir gently until the chocolate is completely melted and the mixture is silky smooth.
- Transfer the ganache to a Ziploc bag. Let it cool and thicken for about 30 minutes at room temperature, or pop it in the fridge briefly (keep a close eye on it!) until it reaches a thick, yogurt-like consistency – perfect for piping.
- Assemble Your Buttons: Snip a small corner off the Ziploc bag. Pipe the thickened ganache carefully into the indentations of your chilled mint buttons.
- Chill for another hour, or until the ganache is fully set. Store these delightful treats in the refrigerator. Enjoy!
Notes
Nutrition per button:
- Calories: 65
- Total Carbs: 10g
- Net Carbs: 9g
- Fats: 4g
- Protein: 1g