Get ready to weave a web of deliciousness this Halloween with our incredibly fun and utterly irresistible Spooky Spider Krispie Bites! Forget the tricks; these treats are all about the crispy, chewy, peanut butter, and chocolate blend that will have everyone reaching for more. Imagine biting into a rich, gooey Rice Krispie base, topped with smooth chocolate, and then encountering a cute, creepy mini Reese’s spider – it’s a fang-tastic experience that’s as delightful to make as it is to devour. Perfect for parties, ghoulish gatherings, or just a cozy night in, these spider treats are sure to be the star of your spooky spread!
Why You’ll Love These Spooky Spider Krispie Bites!
-
1. Spooktacular Fun for Everyone!
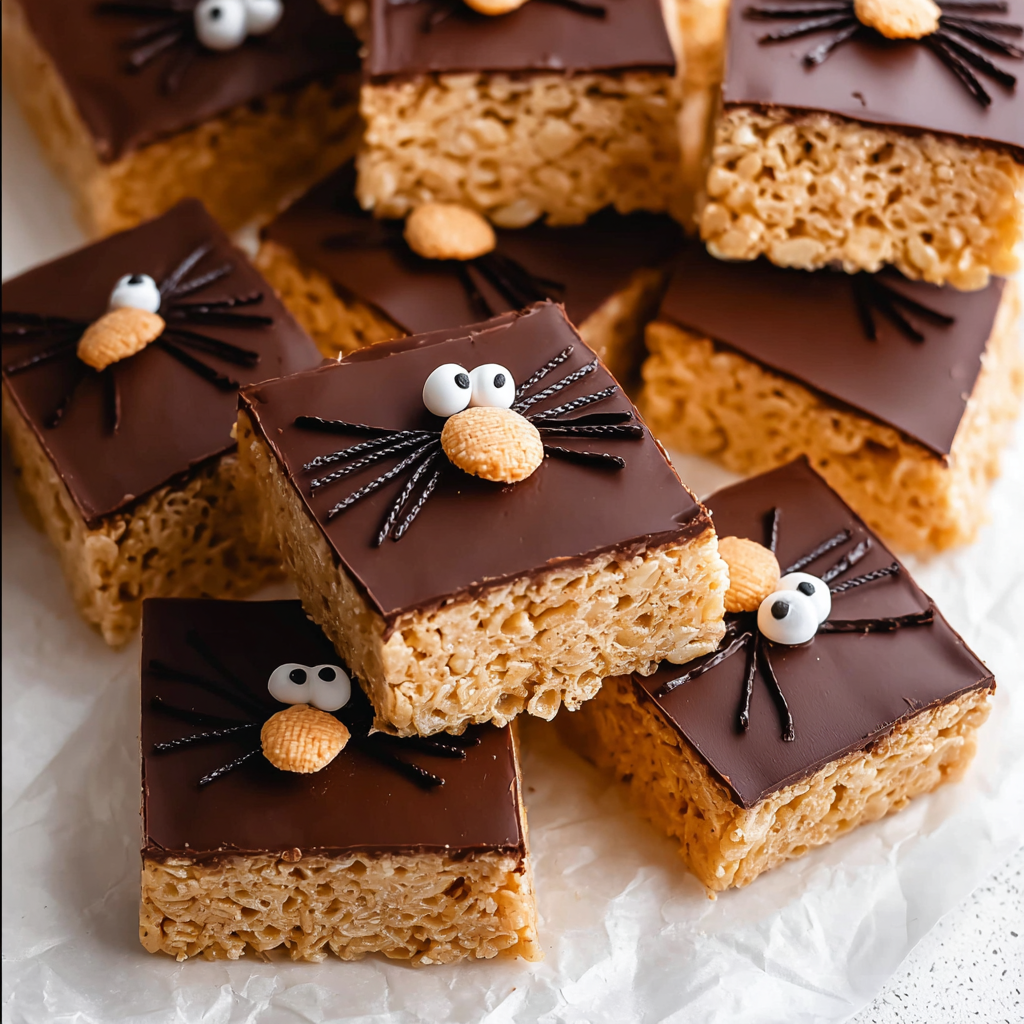
These aren’t just any treats; they’re an edible art project! The mini Reese’s peanut butter cup spiders with their wobbly candy eyes and piped legs turn a simple dessert into a charmingly creepy centerpiece. Kids and adults alike will adore the playful presentation, making your Halloween spread unforgettable. It’s an excellent way to get into the spirit of the season!
-
2. An Irresistible Flavor Combination
Prepare your taste buds for pure bliss! The classic combo of creamy peanut butter and rich chocolate is elevated with the satisfying crunch of Rice Krispies and the gooey sweetness of marshmallows. Each bite of these Spooky Spider Krispie Bites! delivers a harmonious blend of salty, sweet, crispy, and chewy that’s simply addicting.
-
3. Super Easy & Quick to Make
No need for complicated baking techniques or endless hours in the kitchen! With a prep time of just 15 minutes and a cook time of 11 minutes, you can whip up a batch of these impressive treats in under half an hour. It’s the perfect last-minute addition to any party or when you need a quick, delicious dessert that looks like you spent all day on it.
-
4. Kid-Friendly & Customizable
Involve the little monsters in your kitchen! The decorating process, from placing the Reese’s cups to sticking on the candy eyes, is incredibly fun for children. Plus, you can easily customize the look – try different colored candy melts for the legs to create a rainbow of spiders, or add sprinkles for extra pizzazz. The possibilities for creative expression are endless!
Ingredients for Your Spooky Spider Krispie Bites!
- 🧈 6 tablespoons salted butter
- ☁️ 16 ounce package mini marshmallows
- 🥜 ⅔ cup creamy peanut butter (not natural)
- 🍚 7 cups Rice Krispies cereal
- 🍫 8 ounces semisweet chocolate chips
- 🥥 1 teaspoon coconut oil
- 🍭 2 cups light cocoa candy melts
- 🍮 20 mini Reese’s peanut butter cups (unwrapped)
- 👀 40 candy eyes
Detailed Step-by-Step Directions to Make Spooky Spider Krispie Bites!
- Prepare Your Pan: Begin by lightly coating a 9×13-inch baking pan with nonstick spray. This will ensure your treats slide out easily later. Set it aside for now.
- Melt the Butter: In a large, sturdy pot, gently melt the salted butter over low heat. Patience is key here; keeping the heat low prevents the butter from browning, which could affect the flavor.
- Add Marshmallows: Once the butter is completely melted, add the entire package of mini marshmallows to the pot. Stir them gently until they begin to soften and melt.
- Stir in Peanut Butter: As the marshmallows are melting, stir in the creamy peanut butter. Continue stirring constantly until the marshmallows and peanut butter are completely melted and smoothly combined into a luscious, gooey mixture.
- Remove from Heat: Take the pot off the heat as soon as the mixture is smooth. This prevents overcooking and ensures a perfectly chewy texture.
- Fold in Cereal: Add the 7 cups of Rice Krispies cereal to the pot. Using a rubber spatula, gently fold the cereal into the peanut butter-marshmallow mixture until it’s evenly coated. Be careful not to crush the cereal!
- Press into Pan: Transfer the cereal mixture to your prepared 9×13-inch pan. Using the back of the spatula or a piece of wax paper, gently and evenly press the mixture into the pan. Don’t press too hard, or your bars will be too dense.
- Prepare Chocolate Topping: For the topping, place the semisweet chocolate chips in a microwave-safe dish. Microwave for 30 seconds, then stir. Stir in the coconut oil – this helps make the chocolate smooth and shiny. Continue microwaving and stirring in 15-second bursts until the chocolate is completely melted and smooth.
- Spread Topping: Carefully spread this melted chocolate evenly over the pressed Rice Krispies bars.
- Set the Topping: Allow the chocolate topping to set for at least 30 minutes, or until it’s firm to the touch. You can speed this up by placing the pan in the refrigerator.
- Cut into Squares: Once the topping is firm, remove the entire slab from the pan and place it on a cutting board. Cut it into 20 even squares. Set them aside, ready for their spooky transformation.
- Melt Candy Melts for Legs: To create the spider legs, place the light cocoa candy melts in a microwave-safe bowl. Microwave at 50% power for 30 seconds, then stir. Repeat in 30-second intervals, stirring after each, until the candy melts are completely smooth and fluid.
- Prepare Piping Bag: Transfer the melted candy melts to a piping bag fitted with a small, round tip. If you don’t have a piping bag, a Ziploc bag with a tiny corner snipped off will work just as well!
- Assemble Spiders: Place one unwrapped mini Reese’s peanut butter cup in the center of each Rice Krispie square. This is your spider’s body!
- Pipe the Legs: Using the piping bag, pipe four “legs” from each side of the peanut butter cup outwards onto the Krispie square. Aim for eight legs per spider.
- Add the Eyes: Dab two small dots of melted candy melt on the front of the peanut butter cup (this acts as glue). Gently press on two candy eyes for each spider.
- Allow to Set: Let your finished Spooky Spider Krispie Bites! sit and cool completely so the candy melt legs and eyes can set firmly. Once firm, they’re ready to serve and delight!
Presentation and Serving Suggestions
These Spooky Spider Krispie Bites! are a treat for the eyes as much as they are for the taste buds! To make them truly shine at your Halloween gathering, consider these presentation tips:
- Themed Platter: Arrange your spider bites on a dark-colored platter, like black or deep purple, to make the cocoa spiders pop. Add some plastic spiderwebs, decorative plastic spiders, or dried leaves around the platter for an extra spooky touch.
- Individual Wraps: For a party, consider wrapping each spider bite individually in clear cellophane bags tied with orange or black ribbons. This makes them easy for guests to grab and go, and also doubles as a fantastic party favor!
- Graveyard Scene: Create a mini graveyard scene on a large tray. Use crushed chocolate cookies as “dirt” and stand up small graham cracker “tombstones” at the back. Place your spider bites among the graves as if they’re crawling out!
- Spiderweb Decor: Drizzle a thin web design using melted white chocolate or frosting across a large serving board before placing your spider bites on top.
- Serving Temperature: These bites are best served at room temperature, allowing the Krispie base to remain perfectly chewy and the chocolate topping to be firm but not rock-hard.
Storage and Shelf Life
To keep your Spooky Spider Krispie Bites! fresh and delicious, proper storage is key. Once they’re completely set and cooled, store them in an airtight container at room temperature. Layer them between sheets of parchment paper to prevent them from sticking together, especially if you have a lot of candy melt legs. They will maintain their best quality for up to 3-4 days. While you could technically refrigerate them, the refrigerator can sometimes make the Rice Krispies a bit harder, so room temperature storage is generally preferred for optimal texture. If you do refrigerate them, let them come to room temperature for about 15-20 minutes before serving for the best chewy experience.
FAQs About Spooky Spider Krispie Bites!
- Can I use natural peanut butter for this recipe?
No, it’s recommended to use creamy peanut butter (not natural). Natural peanut butter tends to separate and has a different consistency, which might affect the texture and setting of the Krispie treats. - Can I substitute mini marshmallows for large marshmallows?
Yes, you can! You’ll need about 10 ounces of large marshmallows for every 16 ounces of mini marshmallows. Just make sure they are fully melted and smooth before adding the cereal. - Is the coconut oil essential for the chocolate topping?
The coconut oil helps to thin the chocolate slightly, making it smoother to spread and giving it a nice, glossy finish. While you might be able to omit it, the topping might be thicker and less smooth. - Can I make these Spooky Spider Krispie Bites! ahead of time?
Absolutely! These treats are perfect for making a day or two in advance. Store them in an airtight container at room temperature, and they’ll be ready for your Halloween celebration. - What if I don’t have a piping bag for the spider legs?
No problem! You can use a small Ziploc bag. Simply snip a tiny bit off one corner with scissors, and you have an instant piping bag. - My chocolate topping isn’t setting. What should I do?
Ensure your kitchen isn’t too warm. If it’s still soft after 30 minutes, place the pan in the refrigerator for 10-15 minutes to help it firm up. - Can I use different colored candy melts for the spider legs?
Yes, definitely! Get creative! Black, orange, purple, or even green candy melts would look fantastic and add more vibrant Halloween flair to your spiders. - Are these treats suitable for school parties?
They are a fantastic party treat, but always check with the school regarding peanut allergies before bringing them, as they contain peanut butter. - How many calories are in one Spooky Spider Krispie Bite?
According to the recipe’s nutrition facts, each serving (one bite) contains approximately 344 kcal. - How can I make the spider legs look more realistic?
Use a very fine, small round tip on your piping bag. Pipe the legs in slight curves rather than straight lines, and make them slightly thinner towards the ends. Practice on parchment paper first if you’re nervous!
Spooky Spider Krispie Bites! 🕷️
Equipment
- 9×13-inch baking pan
- Large Pot
- Microwave
- Piping bag
Ingredients
- 6 tablespoons salted butter
- 16 ounce package mini marshmallows
- ⅔ cup creamy peanut butter not natural
- 7 cups Rice Krispies cereal
- 8 ounces semisweet chocolate chips
- 1 teaspoon coconut oil
- 2 cups light cocoa candy melts
- 20 mini Reese’s peanut butter cups unwrapped
- 40 candy eyes
Instructions
- Lightly coat a 9×13-inch baking pan with nonstick spray; set aside.
- In a large pot, gently melt butter over low heat to prevent browning.
- Once melted, add the mini marshmallows.
- As marshmallows start to melt, stir in the peanut butter. Continue stirring constantly until completely melted and smoothly combined.
- Take off the heat.
- Fold in the Rice Krispies cereal.
- Press the cereal mixture gently and evenly into the prepared pan.
- For the topping, place chocolate chips in a microwave-safe dish.
- Microwave for 30 seconds, then stir.
- Stir in coconut oil, then continue microwaving and stirring in 15-second bursts until smooth.
- Spread this melted chocolate evenly over the bars.
- Allow to set for 30 minutes, or until firm, before slicing and decorating.
- Remove from pan, cut into squares, and set aside.
- To create spiders, microwave candy melts at 50% power for 30 seconds. Stir. Repeat in 30-second intervals until completely smooth.
- Transfer melted candy to a piping bag with a small tip.
- Place a mini Reese’s peanut butter cup in the center of each square.
- Pipe “legs” from the peanut butter cup outwards using the piping bag.
- Dab two small dots of melted chocolate on the front of the peanut butter cup, then gently press on the candy eyes.
- Let decorations set and cool completely before serving.
Notes
- Calories: 344 kcal
- Total Carbs: 45g
- Net Carbs: 43g
- Fats: 17g
- Protein: 4g