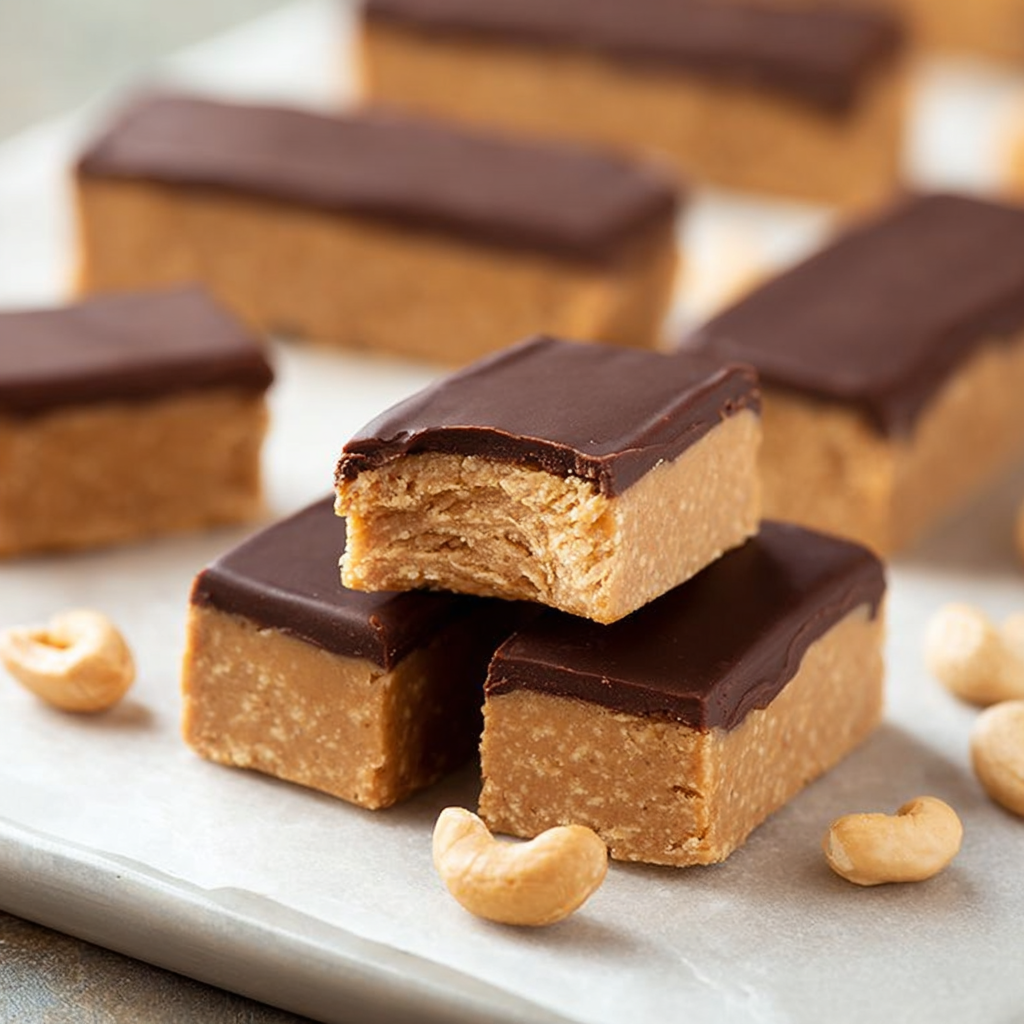
Ever find yourself staring into the abyss of your snack pantry, desperately searching for something that’s both delicious AND good for you? Or perhaps you’re tired of shelling out big bucks for store-bought protein bars filled with ingredients you can’t pronounce? Well, darling, your snack dilemma is officially over! Get ready to unleash your inner kitchen wizard because we’re diving into the delightful world of Easy Homemade Protein Power Bars! These aren’t just any bars; they’re a no-bake, no-fuss, flavor-packed powerhouse designed to satisfy your cravings, fuel your body, and make your taste buds sing. Forget complicated recipes and long ingredient lists – this is pure, unadulterated snack bliss, ready in mere minutes. Let’s get mixing!
Why You’ll Love This Recipe
Prepare to fall head over heels for these Easy Homemade Protein Power Bars for more reasons than just their irresistible taste. Here are four fantastic reasons why they’re about to become your new favorite go-to:
- Unbelievably Easy & No-Bake: Seriously, if you can stir, you can make these bars. With a prep time of just 5 minutes and zero cooking required, you’ll be chilling (literally!) your way to deliciousness in no time. No oven, no fuss, just pure snack-making simplicity.
- Protein-Packed Power: Each bar delivers a mighty 12g of protein, making them the ultimate companion for post-workout recovery, a satisfying midday boost, or simply keeping those hunger pangs at bay. Fuel your muscles and keep energized with every wholesome bite.
- Customizable & Delicious: The base recipe is fantastic, but it’s also a blank canvas for your creativity! Swap nut butters, vary your protein powder flavor, or add your favorite mix-ins. You’re in control of the taste, ensuring every bar is perfectly tailored to your palate.
- Budget-Friendly & Wholesome: Say goodbye to expensive store-bought bars with hidden sugars and preservatives. Making your own means you know exactly what goes into them, using simple, wholesome ingredients you likely already have. Your wallet and your body will thank you!
Ingredients with Measurements
Gather your simple, wholesome ingredients! You’ll be amazed at how a few pantry staples can transform into these incredible Easy Homemade Protein Power Bars.
- 🥜 1 1/2 cups peanut butter (or your preferred allergy-friendly butter like almond, cashew, or sunflower seed butter)
- 🥛 3/4 cup protein powder (approximately 90g – choose a flavor you love, as it’s key!)
- 🍁 1/4 cup pure maple syrup (or honey, for that touch of natural sweetness)
- 🧂 1/2 teaspoon salt (enhances all the flavors beautifully)
- 🍫 4 ounces melted chocolate chips (optional, but highly recommended for an extra layer of deliciousness!)
Detailed Step-by-Step Directions How to Make the Recipe
Get ready for the easiest recipe you’ve ever made! Whipping up these Easy Homemade Protein Power Bars is a breeze. Follow these simple steps for snack perfection:
- Taste Test Your Protein Powder: Before you begin, a quick note: your protein powder’s flavor will be prominent, so make sure it’s one you genuinely enjoy! This is crucial for the overall deliciousness of your bars.
- Combine the Core Ingredients: Grab a large mixing bowl. Add your creamy peanut butter (or preferred nut butter), protein powder, pure maple syrup (or honey), and that touch of salt.
- Mix Until Cohesive: Now for the fun part! Stir vigorously. At first, it might seem a bit crumbly, but keep stirring and pressing the ingredients together. Soon, they will magically come together to form a thick, cohesive dough. You might need to use a sturdy spoon or even your clean hands to get everything perfectly combined.
- Shape or Press: You have two fantastic options here! You can either take portions of the mixture and hand-roll them into individual bar shapes, or for a more uniform look, press the entire mixture evenly into an 8×8 inch pan. If using a pan, line it with parchment paper first – this makes removal and cutting incredibly easy.
- Chill Out: Pop your shaped bars or pan into the refrigerator. Let them chill until they are completely firm and set. This usually takes about 30 minutes to an hour. Don’t rush this step; chilling is key to firm, sliceable bars.
- Optional Chocolate Coating (for an extra flourish!): If you’re adding chocolate, melt your chocolate chips. For a super smooth, pourable coating, stir in 2 teaspoons of coconut oil (or another neutral oil) until well combined.
- Coat Your Bars: Once the mixture is chilled, you can either spread the melted chocolate evenly over the entire surface of the mixture in the pan before cutting, or if you shaped individual bars, dip each one into the chocolate for a full coating.
- Set the Chocolate & Enjoy: Return the chocolate-coated bars (or pan) to the refrigerator for a brief moment, just until the chocolate coating is firm. Once set, if you used a pan, lift the parchment paper and cut the large slab into 10 evenly sized bars. Now, go on, enjoy your delicious and healthy homemade snack!
Detailed Different Ways You Can Present the Recipe and How to Serve It
While cutting these into classic bars is fantastic, these Easy Homemade Protein Power Bars offer surprising versatility in presentation and serving! Get creative with your healthy snack:
- Classic Bars: The most straightforward way! Cut them into neat rectangles after chilling. Perfect for grabbing on the go, tucking into lunchboxes, or a quick pre/post-workout refuel.
- Energy Bites/Balls: Instead of pressing into a pan, roll the mixture into small, bite-sized balls (about 1-inch diameter). These are fantastic for portion control, sharing, or a pop of energy throughout the day. You can even roll them in shredded coconut, cocoa powder, or chopped nuts for extra texture and flavor.
- Crumble Topping: Roughly crumble a portion of the mixture over yogurt, oatmeal, or a smoothie bowl for an instant protein boost and delightful crunch. It’s like granola, but with an extra protein punch!
- Dessert Squares: If you’ve gone all out with the chocolate coating, consider cutting them into smaller, more decadent squares. Serve them as a healthier “brownie” alternative after dinner or with a cup of coffee.
- Layered Parfait: For a visually appealing snack, layer crumbled protein bar pieces with Greek yogurt and fresh berries in a clear glass. A delicious and satisfying mini-meal!
Serve them up whenever you need a boost: as a quick breakfast, a satisfying afternoon snack, a post-gym treat, or even a healthy dessert. Their portability makes them perfect for busy lifestyles!
How You Can Store It and How Long Does It Last
Keeping your Easy Homemade Protein Power Bars fresh and delicious is, well, easy! Proper storage ensures they maintain their texture and taste for longer.
Once your bars are cut and the optional chocolate coating has set, transfer them to an airtight container. It’s crucial to store these protein bars in the refrigerator. Due to the fresh ingredients like peanut butter and the no-bake nature, they thrive in a cool environment.
When stored correctly in the fridge, your homemade protein bars will last comfortably for **1 to 2 weeks**. For best quality, try to consume them within this timeframe. If you notice any changes in smell, taste, or texture before then, it’s always best to discard them.
Can you freeze them? Absolutely! If you’ve made a large batch or want to extend their shelf life even further, these bars freeze beautifully. Place individual bars in a single layer on a baking sheet lined with parchment paper and freeze until solid. Once frozen, transfer them to a freezer-safe bag or airtight container, separated by parchment paper to prevent sticking. They’ll keep well in the freezer for up to 1-2 months. When you’re ready to enjoy, simply grab a bar and let it thaw at room temperature for a few minutes, or pop it in the fridge overnight.
FAQs Sections
- What kind of protein powder should I use for these bars?
The best protein powder is one whose flavor you genuinely enjoy! Whey, casein, or plant-based protein powders (like pea or soy) all work well. Vanilla or chocolate flavors are popular choices that blend seamlessly with peanut butter.
- Can I use a different nut butter?
Yes, absolutely! Almond butter, cashew butter, sunflower seed butter (for nut allergies), or even a mixed nut butter can be substituted for peanut butter. Just ensure it’s a creamy, natural butter for the best texture.
- Is maple syrup essential, or can I use other sweeteners?
Maple syrup or honey works wonderfully, but you can also use agave nectar or a sugar-free liquid sweetener if preferred. The key is a liquid sweetener to help bind the ingredients.
- Can I make these bars vegan?
Yes! Ensure your protein powder is plant-based (e.g., pea, rice, soy protein), use pure maple syrup (not honey), and opt for dairy-free chocolate chips for the coating. All other ingredients are typically vegan-friendly.
- How can I make these bars less sticky?
Ensure you have enough protein powder, as it helps absorb moisture. Chilling the bars thoroughly is also key. If they’re still too sticky, you can try adding a tiny bit more protein powder (1-2 tablespoons) or even a spoonful of oat flour to the mixture.
- Can I add mix-ins to the bars?
Definitely! Get creative with add-ins like chopped nuts, seeds (chia, flax, hemp), dried fruit, shredded coconut, or mini chocolate chips. Mix them in with the main ingredients before pressing or shaping.
- How do I get the chocolate coating to set smoothly?
For a smoother, glossier finish, stir in 1-2 teaspoons of coconut oil (or another neutral oil) into your melted chocolate chips. This makes the chocolate more fluid and easier to spread, and it sets with a nice snap.
- What if my mixture is too dry/crumbly or too wet?
If too dry, add a tiny bit more maple syrup or a splash of milk (dairy or non-dairy), 1 teaspoon at a time, until it comes together. If too wet, add a tablespoon or two more of protein powder until it reaches a dough-like consistency.
- Are these bars good for meal prepping?
They are perfect for meal prepping! Make a batch at the beginning of the week, store them in the fridge, and you’ll have healthy, protein-packed snacks ready to grab and go whenever hunger strikes.
- Can I freeze these protein bars?
Yes, these bars freeze beautifully! Store them in an airtight, freezer-safe container for up to 1-2 months. Thaw at room temperature for a few minutes or overnight in the refrigerator before enjoying.
Easy Homemade Protein Power Bars! 💪
Equipment
- Mixing Bowl
- 8×8-inch Pan
- Parchment Paper
Ingredients
- 1 1/2 cups peanut butter or your preferred allergy-friendly butter
- 3/4 cup protein powder approx. 90g
- 1/4 cup pure maple syrup or honey
- 1/2 teaspoon salt
- 4 ounces melted chocolate chips optional, for coating
- 2 teaspoons oil like coconut oil (optional, for smoother finish)
Instructions
- Ensure you like the taste of your protein powder, as it’s key to the bar’s flavor.
- In a bowl, combine the peanut butter, protein powder, maple syrup (or honey), and salt.
- Stir vigorously until the ingredients come together and form a cohesive dough.
- You can either shape this mixture into individual bars by hand or press it evenly into an 8×8 inch pan lined with parchment paper.
- Refrigerate the mixture until it’s completely chilled and firm, typically about 30 minutes to an hour.
- For an optional chocolate coating, melt the chocolate chips. For a smoother finish, you can stir in 2 teaspoons of oil (like coconut oil).
- Spread the melted chocolate over the entire surface of the chilled mixture in the pan before cutting, or dip each bar individually into the chocolate.
- Return the bars to the refrigerator briefly to allow the chocolate coating to set. Once firm, cut into 10 bars and enjoy your healthy snack!