Ever find yourself scrolling through old photos of Girl Scout cookie boxes, a pang of longing hitting you right in the sweet spot? You’re not alone! That iconic, cool burst of mint paired with rich, dark chocolate is a flavor combination that practically screams perfection. But if you’re living the low-carb life, those little green boxes are usually a no-go. Well, get ready to do a happy dance because we’re about to bring that nostalgic magic back into your life, keto-style! Say hello to the Easy Peasy Keto Thin Mints – a recipe so simple, so delicious, and so spot-on, you’ll wonder where they’ve been all your keto journey. Ditch the carb guilt, embrace the minty bliss, and prepare for your taste buds to sing!
Why You’ll Love This Recipe
These Easy Peasy Keto Thin Mints aren’t just a dessert; they’re a revelation! Here are four fantastic reasons why you’re about to fall head over heels for them:
- Keto-Friendly & Guilt-Free Goodness: Finally, a Thin Mint that fits your low-carb lifestyle! Made with almond flour and erythritol, these cookies deliver all the flavor without derailing your diet. Enjoy a classic treat without the sugar crash or carb overload.
- Taste Bud Time Travel: Prepare for a serious dose of nostalgia! This recipe perfectly captures the signature crisp cookie and vibrant mint chocolate coating you remember, but without the traditional high-sugar ingredients. It’s like tasting your childhood, but better for you!
- Easy Peasy by Name, Easy Peasy by Nature: True to their name, these Thin Mints are remarkably simple to whip up. With straightforward steps and common keto pantry staples, even beginner bakers can achieve cookie perfection. No complicated techniques, just pure delicious fun!
- The Perfect Treat for Any Occasion: Whether you’re hosting a holiday party, need a thoughtful homemade gift, or simply crave a sweet and refreshing treat after dinner, these Keto Thin Mints are always a hit. They store beautifully and are a crowd-pleaser for keto and non-keto friends alike!
INGREDIENTS :
For the Cookies:
- 🍫 1 ¾ cups almond flour
- ☕ ⅓ cup cocoa powder
- 🍬 ⅓ cup erythritol sweetener (like Swerve)
- 🍚 1 teaspoon baking powder
- 🧂 ¼ teaspoon salt
- 🥚 1 large egg, lightly beaten
- 🧈 2 tablespoons butter, melted
- 🌿 ½ teaspoon vanilla extract
For the Mint Chocolate Coating:
- 🥥 ½ ounce cocoa butter, or 1 tablespoon coconut oil
- 🍫 7 ounces sugar-free dark chocolate (like Lily’s), chopped
- 🌱 1 teaspoon peppermint extract
Detailed Step-by-Step Directions: How to Make Easy Peasy Keto Thin Mints
Ready to create some magic? These Easy Peasy Keto Thin Mints come together with surprising simplicity. Follow these steps for perfect, low-carb cookie bliss:
Making the Cookies:
- Get Ready: First, preheat your oven to a gentle 300°F (150°C). This lower temperature helps ensure an even bake and prevents burning. Line two baking sheets with parchment paper; this crucial step makes transferring cookies a breeze and prevents sticking.
- Mix Dry Ingredients: In a generously sized bowl, combine your almond flour, cocoa powder, erythritol sweetener, baking powder, and salt. Give them a good whisk until everything is thoroughly combined – you want no lumps here!
- Add Wet Ingredients: Now, it’s time to bring the dough to life! Pour in the lightly beaten egg, melted butter, and vanilla extract. Stir everything with a sturdy spatula or spoon until the mixture comes together, forming a soft, cohesive dough. It might seem crumbly at first, but keep mixing, and it will bind.
- Roll the Dough: This is a fun part! Place your dough between two sheets of parchment paper. Using a rolling pin, roll it out evenly. The key to that signature “Thin Mint” crispiness is thickness – aim for no more than ¼ inch. The thinner you go, the crisper your cookies will be when baked.
- Cut Out Shapes: Carefully peel off the top layer of parchment paper. Grab a 2-inch round cookie cutter and get stamping! Cut out as many circles as you can. Gently transfer these delicate cutouts to your prepared baking sheets, leaving a little space between each one.
- Reroll Scraps: Don’t let any dough go to waste! Gather any leftover scraps, gently press them back together, roll them out again between parchment paper, and cut more cookies until all the dough is used up.
- Bake Until Firm: Pop those baking sheets into your preheated oven. Bake for approximately 20 to 30 minutes, or until the cookies feel firm to the touch. Remember, baking time can vary depending on how thin you rolled your dough, so keep an eye on them. They might not seem super crisp right out of the oven, but trust the process – they’ll continue to crisp up beautifully as they cool!
- Chill the Wafers (Pro-Tip!): Patience is a virtue here. Once your baked cookies are completely cool to the touch, transfer them to the freezer. Freezing them for at least 30 minutes (or even longer) before dipping is a game-changer. It helps the chocolate coating set almost instantly and ensures a much cleaner, smoother dipping process.
Creating the Mint Chocolate Coating:
- Melt the Chocolate: Set up a double boiler. Place a heatproof bowl over a pot of gently simmering water, ensuring the bottom of the bowl doesn’t touch the water. Add your chopped sugar-free dark chocolate and cocoa butter (or coconut oil) to the bowl. Stir frequently with a dry spatula until the mixture is beautifully smooth and fully melted – no lumps allowed!
- Infuse with Mint: Once the chocolate mixture is perfectly melted, remove the bowl from the heat. Stir in the peppermint extract until it’s thoroughly and evenly distributed. Give it a taste (carefully!) to ensure the mint intensity is just right for you.
- Dip the Cookies: Now for the fun part! Retrieve your well-chilled cookie wafers from the freezer. Carefully dip each cookie one by one into the glorious melted mint chocolate. Use two forks – one to lower, one to gently turn – ensuring the entire cookie is completely coated in that luscious chocolate.
- Remove Excess: This step ensures a professional finish. Lift out each coated cookie with a fork and gently tap the fork against the side of the bowl. This allows any excess chocolate to drip off, preventing thick, uneven puddles on your finished cookies.
- Set & Enjoy: Place the perfectly coated cookies onto a waxed paper-lined baking sheet. The waxed paper prevents sticking. Transfer the baking sheet to the refrigerator and chill until the chocolate coating is completely set and firm. This usually takes about 15-30 minutes. Once firm, they’re ready to be devoured!
Serving & Presentation Ideas for Your Easy Peasy Keto Thin Mints
Your Easy Peasy Keto Thin Mints are not just delicious; they’re also incredibly versatile when it comes to serving and presentation. Make them shine at any gathering or simply elevate your personal treat time:
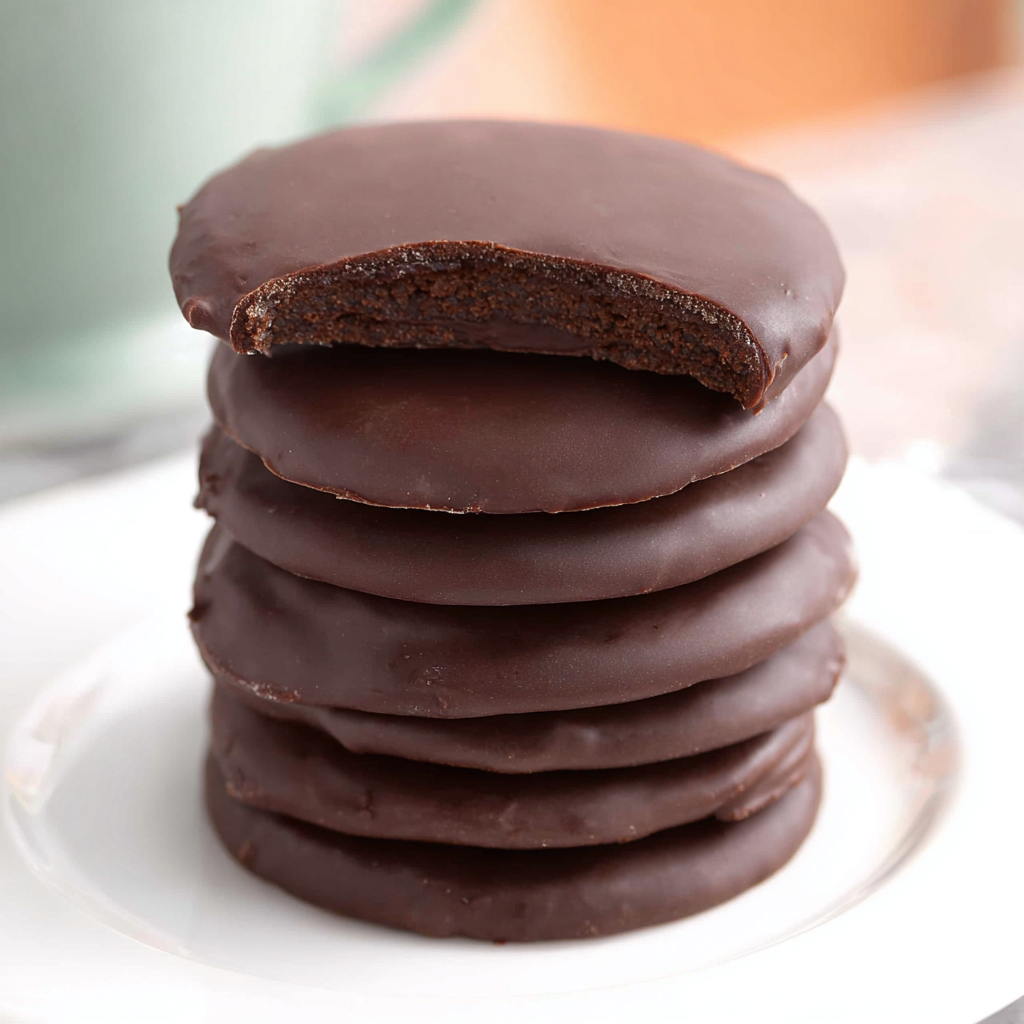
- Classic Stack: For a clean, elegant look, simply stack your cooled Thin Mints on a small dessert plate. A tall stack is always impressive!
- Coffee & Tea Companion: Pair these minty delights with a hot cup of unsweetened coffee, a keto bulletproof coffee, or a refreshing peppermint tea for a perfect afternoon pick-me-up or after-dinner treat.
- Crumbled Topping: Crush a few Easy Peasy Keto Thin Mints and sprinkle them over a bowl of your favorite keto-friendly ice cream or a dollop of whipped cream. The texture contrast and minty crunch are divine!
- Holiday Platter Perfection: Arrange them on a festive platter with other keto Christmas cookies (like shortbread or gingerbread fat bombs) for an eye-catching and delicious holiday spread. A dusting of finely crushed erythritol “snow” can add a magical touch.
- Gift Giving: Package your Thin Mints in a clear cellophane bag tied with a pretty ribbon, or layer them in a decorative tin. They make thoughtful, homemade gifts for friends and family who appreciate healthy, delicious treats.
- Mini Dessert Bites: Serve them alongside other small keto desserts like chocolate truffles or berry parfaits for a diverse and satisfying dessert bar.
Storage & Shelf Life of Easy Peasy Keto Thin Mints
You’ve put in the effort to create these delightful Easy Peasy Keto Thin Mints, so let’s make sure they stay fresh and delicious for as long as possible! Proper storage is key:
- Countertop (Not Recommended): Due to the chocolate coating, storing these Thin Mints at room temperature, especially in warmer climates, is not ideal as the chocolate may soften or melt.
- Refrigerator: This is the best place for your coated Thin Mints. Store them in an airtight container in the refrigerator. This will keep the chocolate firm and the cookies crisp. They will last beautifully for up to 2 weeks.
- Freezer: For longer storage, the freezer is your friend! Once the chocolate coating is completely set, transfer the cookies to an airtight, freezer-safe container. You can place parchment paper between layers to prevent sticking. They will maintain their quality and flavor for up to 2-3 months. When you’re ready to enjoy them, simply take them out and let them thaw for a few minutes at room temperature, or enjoy them straight from the freezer for an extra-cold treat!
Pro Tip: To prevent the cookies from absorbing other odors in your fridge or freezer, ensure your container is truly airtight.
FAQs About Easy Peasy Keto Thin Mints
- Can I use a different sweetener besides erythritol?
Yes, you can. Other granulated sugar-free sweeteners like allulose, monk fruit blend, or a stevia blend can work. However, adjust the quantity as per the specific sweetener’s potency, as some are sweeter than erythritol. - What if I don’t have cocoa butter for the coating?
The recipe offers coconut oil as an excellent substitute, which works perfectly. Cocoa butter provides a slightly firmer snap, but coconut oil will still yield a delicious and smooth coating. - Are these truly low carb and suitable for a keto diet?
Absolutely! Made with almond flour, sugar-free sweetener, and sugar-free dark chocolate, these cookies are designed specifically for a keto diet. The nutrition information provided confirms their low net carb count. - Can I make the cookie dough ahead of time?
Yes, you can! You can prepare the dough and store it wrapped tightly in plastic wrap in the refrigerator for up to 2-3 days. Let it come closer to room temperature for easier rolling before baking. - Why are my cookies not crisp?
The main reason cookies might not be crisp is if they were rolled too thick or underbaked. Ensure you roll the dough to ¼ inch or thinner. Also, bake until they are firm to the touch; they will continue to crisp as they cool. - Can I make these cookies thicker if I prefer a chewier texture?
While traditional Thin Mints are thin and crisp, you can certainly roll the dough slightly thicker if you prefer a softer, chewier cookie. Just be aware that the baking time might need to be adjusted slightly longer. - Can I use a different extract instead of peppermint?
Yes, get creative! You could try almond extract, orange extract, or even a touch of coffee extract for different flavor profiles. However, for a true “Thin Mint” experience, peppermint is key. - How do I prevent the chocolate coating from seizing?
Ensure your bowl and utensils are completely dry, as even a tiny drop of water can cause chocolate to seize. Also, avoid overheating the chocolate; melt it gently over simmering (not boiling) water. - What if my dough is too crumbly or too sticky?
If too crumbly, add an extra ½ teaspoon of melted butter or a tiny bit of water/egg (start with ¼ teaspoon) until it comes together. If too sticky, add a tablespoon more almond flour until it’s manageable. - Are these Easy Peasy Keto Thin Mints gluten-free?
Yes, this recipe is naturally gluten-free as it uses almond flour instead of traditional wheat flour. This makes them suitable for those with gluten sensitivities or celiac disease.
Easy Peasy Keto Thin Mints
Equipment
- Baking Sheets
- Parchment Paper
- 2-inch round cookie cutter
- Heatproof Bowl
- Pot (for double boiler)
- Two forks
- Waxed paper-lined baking sheet
Ingredients
For the Cookies
- 1.75 cups almond flour
- 0.33 cup cocoa powder
- 0.33 cup erythritol sweetener (like Swerve)
- 1 teaspoon baking powder
- 0.25 teaspoon salt
- 1 large egg lightly beaten
- 2 tablespoons butter melted
- 0.5 teaspoon vanilla extract
For the Mint Chocolate Coating
- 0.5 ounce cocoa butter or 1 tablespoon coconut oil
- 7 ounces sugar-free dark chocolate (like Lily’s), chopped
- 1 teaspoon peppermint extract
Instructions
- Get Ready: First, preheat your oven to 300°F (150°C) and line two baking sheets with parchment paper. This helps prevent sticking.
- Mix Dry Ingredients: In a large bowl, whisk together the almond flour, cocoa powder, erythritol sweetener, baking powder, and salt until they’re well combined.
- Add Wet Ingredients: Now, pour in the lightly beaten egg, melted butter, and vanilla extract. Stir everything thoroughly until the mixture forms a soft, cohesive dough.
- Roll the Dough: Place your dough between two pieces of parchment paper. Roll it out evenly to your desired thickness, ideally no more than ¼ inch thick for that signature crispiness. The thinner you roll it, the crisper your cookies will be!
- Cut Out Shapes: Gently peel off the top layer of parchment paper. Use a 2-inch round cookie cutter to stamp out circles of dough. Carefully transfer these cutouts to your prepared baking sheets.
- Reroll Scraps: Gather any leftover dough scraps, gently press them together, roll them out again, and cut more cookies until you’ve used up all the dough.
- Bake Until Firm: Pop the baking sheets into your preheated oven. Bake for about 20 to 30 minutes, or until the cookies are firm to the touch. Baking time can vary based on how thin you rolled your dough. They’ll continue to crisp up as they cool!
- Chill the Wafers (Pro-Tip!): Once the baked cookies are completely cool, place them in the freezer. Freezing them before dipping helps the chocolate coating set faster and makes the dipping process much cleaner.
- Melt the Chocolate: Set a heatproof bowl over a pot of gently simmering water (this is called a double boiler, and it melts chocolate smoothly). Add the chopped sugar-free dark chocolate and cocoa butter (or coconut oil). Stir frequently until the mixture is smooth and fully melted.
- Infuse with Mint: Remove the bowl from the heat and stir in the peppermint extract until evenly distributed.
- Dip the Cookies: Take your chilled cookie wafers and carefully dip them one by one into the melted mint chocolate. Use two forks to gently turn them over, ensuring each cookie is fully coated.
- Remove Excess: Lift out each coated cookie with a fork and gently tap the fork against the side of the bowl to let any extra chocolate drip off. This prevents thick, uneven coatings.
- Set & Enjoy: Place the chocolate-coated cookies onto a waxed paper-lined baking sheet. Refrigerate them until the chocolate coating is completely set and firm.
Notes
- Calories: 127
- Total Carbs: 7.1g
- Net Carbs: 3.4g
- Fats: 11.5g
- Protein: 3.3g