Why You’ll Love This Recipe
- Guilt-Free Indulgence: With only 5 calories per cookie and practically zero net carbs, these are the ultimate treat for staying on track with your healthy eating goals this holiday season.
- Effortlessly Elegant: Despite their sophisticated appearance and delightful melt-in-your-mouth texture, these Sparkling Snow Meringue Cookies are surprisingly simple to make, perfect for any baker!
- Festively Versatile: Easily customize with vibrant food colors and delightful extracts like peppermint or almond to match any holiday theme or personal preference.
- Allergen-Friendly Joy: Naturally gluten-free and sugar-free, these meringues are a fantastic option for sharing with guests who have various dietary needs.
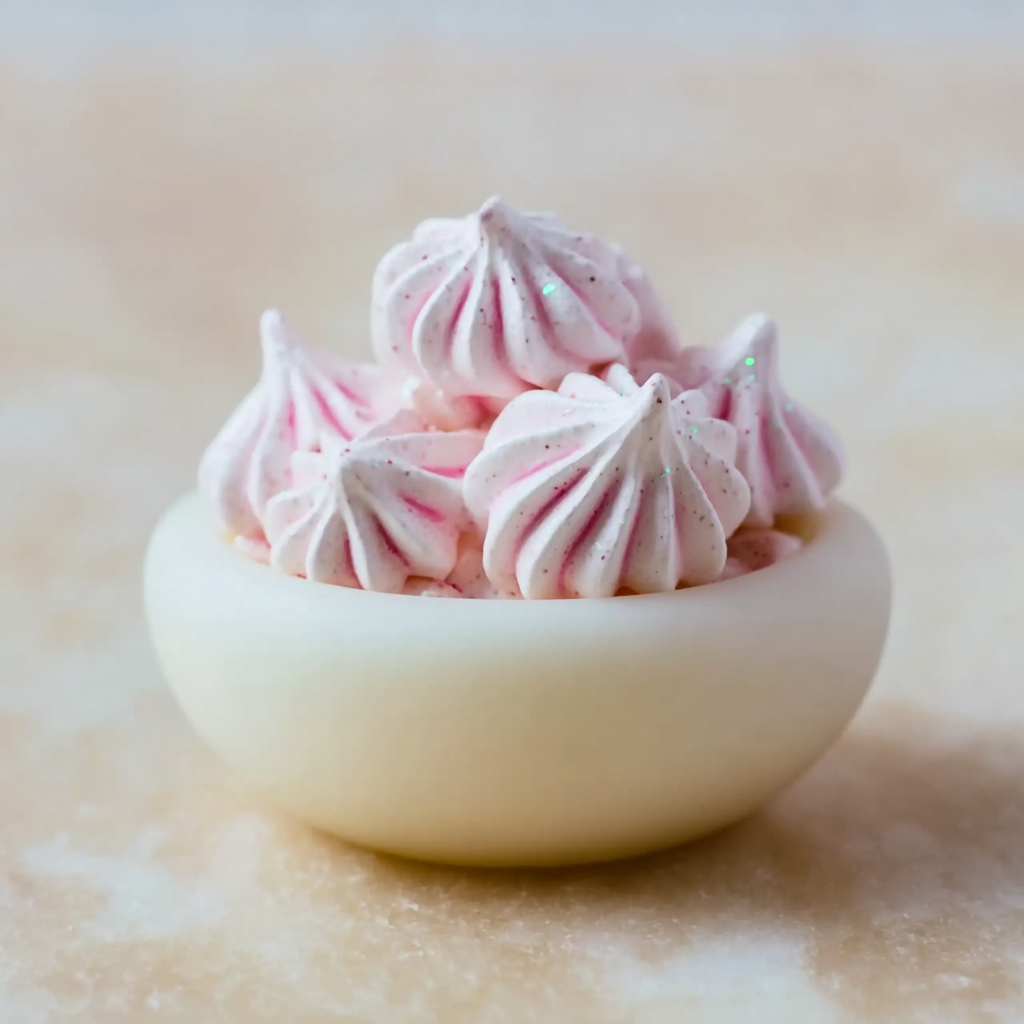
Unleash Winter Magic with Sparkling Snow Meringue Cookies!
Imagine biting into a cloud – ethereal, airy, and delicately sweet, melting on your tongue like a snowflake on a warm mitten. Sounds like a dream, right? Well, wake up and smell the magic, because we’re about to whisk you away to a winter wonderland right in your own kitchen! This holiday season, transform simple ingredients into dazzling, light-as-air confections that are as beautiful to look at as they are delightful to devour. Get ready to sprinkle some joy and a touch of sparkle with our incredible recipe for Sparkling Snow Meringue Cookies – the perfect guilt-free treat that tastes like pure holiday enchantment!
Gather Your Winter Wonderland Essentials
To create your own batch of these delightful Sparkling Snow Meringue Cookies, you’ll need just a few simple ingredients. Make sure your egg whites are at room temperature – it makes a world of difference for that perfect whip!
- 🥚 4 large egg whites (at room temperature for best results)
- 🥄 1/4 teaspoon cream of tartar (or a tiny squeeze of lemon juice if you don’t have it)
- 🧂 Pinch of salt
- sweetener 1/2 cup powdered sugar-free sweetener (like erythritol or monk fruit blend)
- 🌈 Optional: A few drops of food coloring (red or green for Christmas!) or 1/2 to 1 teaspoon of flavor extract (like vanilla, peppermint, or almond)
Your Journey to Meringue Perfection: Step-by-Step
Creating these delicate Sparkling Snow Meringue Cookies is a fun and rewarding process. Follow these steps carefully for the best results!
- Oven Prep & Pan Lining: Begin by preheating your oven to a very gentle 200°F (about 93°C). This low temperature is key for drying out the meringues without browning them. Line a large baking sheet with parchment paper, ensuring no sticking and easy cleanup.
- The Whisking Starts: In a large, impeccably clean and completely dry mixing bowl, combine your room temperature egg whites, cream of tartar, and a pinch of salt. Using an electric mixer, start beating on medium speed. Watch as the mixture transforms, becoming wonderfully foamy and light. Remember, any trace of grease or water in your bowl can prevent your egg whites from whipping properly!
- Sweeten, Flavor & Stiffen: Gradually, spoonful by spoonful, sprinkle in the powdered sugar-free sweetener while continuing to beat. If you’re adding any festive food coloring or your chosen flavor extract (like a refreshing peppermint for the holidays!), mix them in now. Continue beating for about 3-5 minutes, or until the meringue forms very stiff, glossy peaks. A great test is to carefully tilt your bowl upside down – if nothing moves, you’ve achieved perfect stiffness!
- Pipe Your Snowy Shapes: Gently spoon your stiff meringue into a piping bag. Fit the bag with your favorite tip; a star tip creates beautiful, intricate shapes perfect for festive meringues. Pipe small, bite-sized cookies onto your prepared baking sheet, leaving approximately 1/2 inch of space between each. Unleash your creativity – think mini Christmas trees, delicate snowflakes, or simple elegant swirls!
- The Gentle Bake & Chill: Place your baking sheet into the preheated oven and bake for exactly 1 hour. Once the hour is up, turn off the oven, but here’s the crucial part: DO NOT open the oven door! Let the meringue cookies remain inside the cooling oven, completely undisturbed, for another full hour (or even longer, overnight is great!). This slow cooling process is vital for allowing them to dry out thoroughly, ensuring they become perfectly crisp and dry all the way through, just like true Sparkling Snow Meringue Cookies should be.
- Time to Enjoy: Once your meringues are completely cooled and crisp, carefully transfer them from the parchment paper. They are now ready to be enjoyed or stored!
Presenting Your Sparkling Snow Meringue Cookies: A Feast for the Eyes!
These beautiful Sparkling Snow Meringue Cookies are not just delicious; they’re also incredibly versatile for presentation and serving, making them perfect for any festive occasion!
- Color & Shape Play: Experiment with different food colorings – vibrant reds, deep greens, or even icy blues for a truly “snow” effect. Use various piping tips: a star tip for classic rosettes, a round tip for simple drops, or a petal tip for delicate flower shapes.
- Sparkle & Shine: Before baking, lightly dust them with edible glitter for an extra magical “sparkling snow” effect. After baking, a light dusting of additional powdered sweetener or finely crushed, sugar-free candy canes can add a festive touch.
- Dips & Drizzles: For an indulgent twist, once cooled, dip the base of the meringues in melted sugar-free chocolate (dark or white) and let it set. You can also drizzle melted chocolate or a sugar-free caramel sauce over the top for an elegant finish.
- Elevate Desserts: Use these meringues as gorgeous garnishes for other desserts. Crush them and sprinkle over sugar-free mousse, incorporate them into a deconstructed trifle, or serve alongside a bowl of fresh berries and sugar-free whipped cream.
- Gift-Giving Joy: Package your Sparkling Snow Meringue Cookies in pretty cellophane bags tied with festive ribbons, or arrange them in a decorative tin. They make thoughtful, homemade gifts that cater to health-conscious friends and family.
- Holiday Platter Perfection: Arrange a colorful assortment of these meringues on a holiday dessert platter alongside other treats. Their light texture and vibrant colors will stand out beautifully.
Storage & Shelf Life: Keeping Your Snowflakes Crisp
The key to enjoying your Sparkling Snow Meringue Cookies at their best is proper storage, as humidity is their arch-nemesis! Once completely cooled and crisp, transfer them to an airtight container. Make sure the container is sealed tightly to protect them from moisture in the air. Store them at room temperature in a cool, dry pantry or cupboard. Avoid refrigerating meringues, as the damp environment will make them soft and chewy.
When stored correctly, your beautiful sugar-free meringues can last for 2-3 weeks, maintaining their delicate crunch and delicious flavor. This makes them an excellent make-ahead treat for holiday entertaining!
FAQs About Your Sparkling Snow Meringue Cookies
Have questions about perfecting your batch of Sparkling Snow Meringue Cookies? We’ve got answers!
- Why did my meringues turn chewy instead of crisp?
This usually indicates they weren’t fully dried out. Ensure they bake for the full hour and cool undisturbed in the oven for at least another hour (or longer). Humidity in the air during baking/cooling can also contribute to chewiness.
- Can I use granulated sugar instead of sugar-free sweetener?
While traditional meringues use granulated sugar, the ratios and beating times differ for sugar-free sweeteners. For best results with regular sugar, it’s recommended to follow a recipe specifically designed for it.
- What if I don’t have cream of tartar?
A tiny squeeze of lemon juice (about 1/4 teaspoon) can be used as a substitute. Both act as acid stabilizers, helping the egg whites whip up faster and maintain their structure.
- My meringue didn’t form stiff peaks. What went wrong?
The most common culprits are grease or water in your mixing bowl or on your beaters, or a speck of egg yolk in the whites. Ensure all equipment is impeccably clean and dry, and that your egg whites are pure.
- Can I add other flavor extracts?
Absolutely! Vanilla, almond, lemon, coffee, or even a touch of rum extract can add wonderful variations. Just remember a little goes a long way with extracts.
- Are these truly suitable for a keto diet?
Yes, since they use sugar-free sweetener and have virtually no carbs or fats, these Sparkling Snow Meringue Cookies are an excellent keto-friendly treat.
- Why did my meringues crack or turn brown?
Cracking can happen if the oven temperature is too high or if they cool too quickly. Browning occurs if the temperature is too hot. Sticking to the gentle 200°F and slow cooling is essential.
- Can I make these ahead of time?
Yes, they store beautifully! Make them a few days to a week in advance and keep them in an airtight container for stress-free holiday entertaining.
- What piping tip should I use for festive shapes?
A closed star tip (like Wilton 1M or 21) is fantastic for producing pretty rosettes and swirls. A simple round tip works for smooth, dome-shaped cookies, and an open star tip (like Wilton 4B) creates beautiful ridged shapes.
- Can I freeze meringue cookies?
Freezing is generally not recommended for meringues as it can introduce moisture, causing them to become soft and chewy upon thawing. They are best stored at room temperature in an airtight container.
Sparkling Snow Meringue Cookies ✨
Equipment
- Electric Mixer
- Large mixing bowl
- Baking Sheet
- Parchment Paper
- Piping bag
- Star Tip (optional)
Ingredients
Meringue Base
- 4 large egg whites (at room temperature for best results)
- 1/4 tsp cream of tartar (or a tiny squeeze of lemon juice if you don't have it)
- salt Pinch
- 1/2 cup powdered sugar-free sweetener (like erythritol or monk fruit blend)
Optional Add-ins
- food coloring A few drops (red or green for Christmas!)
- 1/2 tsp flavor extract to 1 tsp (like vanilla, peppermint, or almond)
Instructions
- Preheat your oven to a gentle 200°F (about 93°C). Line a baking sheet with parchment paper to prevent sticking.
- In a large, perfectly clean and dry mixing bowl, combine the egg whites, cream of tartar, and a pinch of salt. Beat with an electric mixer on medium speed until the mixture becomes wonderfully foamy. Remember, a clean, dry bowl is essential for super fluffy meringues!
- Gradually sprinkle in the powdered sugar-free sweetener while continuing to beat the mixture. If you're adding any festive food coloring or flavor extracts, mix them in now. Keep beating for about 3-5 minutes until the meringue forms very stiff, glossy peaks. You should be able to hold the bowl upside down without anything moving!
- Carefully spoon your stiff meringue into a piping bag fitted with your favorite tip (a star tip makes beautiful, festive shapes!). Pipe small, bite-sized cookies onto your prepared baking sheet, leaving about 1/2 inch between each one.
- Bake in your preheated oven for 1 hour. After baking, turn off the oven, but do not open the door! Let the meringue cookies stay inside the cooling oven, undisturbed, for another hour. This slow cooling process helps them become perfectly crisp and dry all the way through.
- Once completely cooled, transfer your healthy, sugar-free meringue cookies to an airtight container. They're perfect for guilt-free holiday snacking or sharing!
Notes
Nutrition Information (per cookie):
- Calories: 5
- Total Carbs: 1.8g
- Net Carbs: 0.3g
- Fats: 0g
- Protein: 0.2g