Why You’ll Love These Sweetheart Pavlova Nests with Berries
Get ready to fall head over heels for these delightful Sweetheart Pavlova Nests with Berries! They’re not just a dessert; they’re a little piece of edible magic, perfect for celebrating love, friendship, or just treating yourself. Here are four irresistible reasons why this recipe will capture your heart:
- Light-as-Air Perfection: Imagine biting into a cloud! These pavlova nests boast a delightfully crisp shell that gives way to a soft, marshmallowy interior. It’s a texture symphony that’s surprisingly light, leaving you feeling satisfied, not stuffed.
- Visually Stunning & Elegant: With their delicate meringue swirls, vibrant berries, and a dollop of snowy whipped cream, these nests are pure artistry on a plate. They’re guaranteed to impress your guests and make any occasion feel extra special and romantic.
- Fresh & Flavorful Harmony: The subtle sweetness of the pavlova beautifully complements the tangy burst of fresh mixed berries. Add the rich, creamy whipped topping, and you have a perfect balance of flavors and textures that dance on your palate.
- Surprisingly Simple to Master: Don’t let their elegant appearance fool you! While they look gourmet, the steps to create these Sweetheart Pavlova Nests with Berries are straightforward and incredibly rewarding. With a little patience, you’ll achieve dessert perfection every time.
Looking to sprinkle a little extra romance or simply elevate your dessert game? ✨ Well, darling, you’ve stumbled upon the secret to pure, unadulterated sweet bliss! Forget the usual chocolates and predictable cakes; this year (or any day you feel like celebrating something sweet!), we’re talking about something truly enchanting: **Sweetheart Pavlova Nests with Berries**.
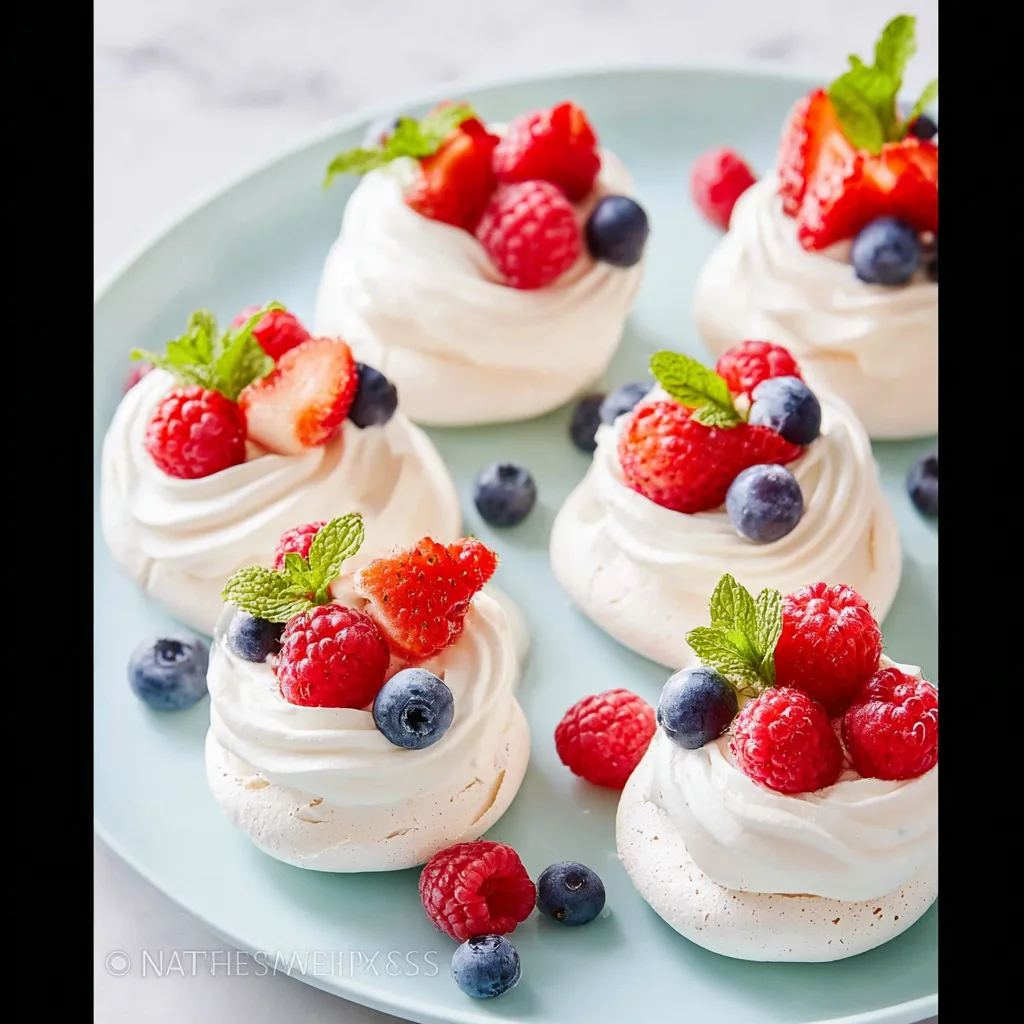
Picture this: delicate, cloud-like meringue shells, impossibly crisp on the outside and wonderfully chewy and soft within. Each perfect “nest” cradles a generous dollop of velvety, sweetened whipped cream, crowned with a vibrant cascade of the freshest, juiciest mixed berries. It’s light, it’s dreamy, it’s bursting with fresh flavor, and it looks like it just stepped off the cover of a fancy magazine. Prepare to fall in love with making and eating this show-stopping dessert that promises smiles, sighs, and pure joy with every single bite!
Ingredients for Your Sweetheart Pavlova Nests
For the Pavlova Nests:
- 🥚 6 large egg whites, at room temperature
- 🍚 1 ½ cups granulated sugar
- 🌽 2 teaspoons cornstarch
- 🍋 ½ Tablespoon fresh lemon juice
- 🍦 ½ Tablespoon vanilla extract
For the Cream Topping:
- 🥛 1 ½ cups very cold heavy whipping cream
- 🍚 2 Tablespoons granulated sugar
For Topping & Garnish:
- 🍓 4-5 cups fresh mixed berries (like strawberries, raspberries, blueberries)
- 🌿 15 fresh mint leaves, for garnish (optional)
Detailed Directions: Crafting Your Sweetheart Pavlova Nests with Berries
Ready to create some magic? Follow these steps closely, and you’ll have perfect, tender-crisp Sweetheart Pavlova Nests with Berries in no time!
- Prepare Your Oven & Sheet: Gently preheat your oven to 225°F (107°C). Line a large baking sheet with parchment paper – this ensures your pavlovas lift off beautifully!
- Whip the Whites: In a clean stand mixer bowl (or using a hand mixer), beat your room-temperature egg whites on high speed for about 1 minute until they form soft, airy peaks.
- Gradually Add Sweetness: With the mixer still running, slowly add the granulated sugar, a little at a time. Continue beating on high for about 10 minutes until the mixture is glossy, smooth, and forms stiff, firm peaks. This creates the perfect, stable meringue base!
- Fold in Flavors: Using a spatula, gently fold in the lemon juice and vanilla extract. Then, carefully mix in the cornstarch until everything is just blended. Be gentle to keep that lovely airy volume!
- Shape Your Nests: Pipe the meringue mixture into charming 3 to 3.5-inch wide “nests” onto your prepared parchment paper. You can use a piping bag with a large star tip (like Wilton 1M) or simply spoon it on. Make a little indent in the center of each nest with the back of a spoon – this is where your creamy topping will go!
- Bake to Perfection: Bake your pavlova nests in the preheated oven for 1 hour and 15 minutes. After this time, turn off the oven, but do not open the door. Let the pavlovas dry out in the warm oven for another 30 minutes. This creates that lovely crisp shell and soft, marshmallowy inside.
- Cool Down: Once dried, transfer the pavlovas (still on their parchment paper) to a wire rack and allow them to cool completely to room temperature. This is crucial for their delicate structure.
- Whip the Cream Topping: In a very cold mixing bowl, combine your chilled heavy whipping cream with the 2 tablespoons of sugar. Beat on high speed for 2 to 2.5 minutes or until it’s light, fluffy, and holds its shape – perfect for piping!
- Assemble & Serve: Just before serving, pipe the sweetened whipped cream onto the cooled pavlova nests. Then, generously top with your fresh mixed berries and an optional sprig of mint. Enjoy these delightful, light treats!
Presentation & Serving Ideas for Your Sweetheart Pavlova Nests
The beauty of these Sweetheart Pavlova Nests with Berries lies not only in their taste but also in their stunning visual appeal. Here are some enchanting ways to present and serve them:
- Classic Individual Elegance: For a sophisticated touch, plate each pavlova nest individually. A dusting of powdered sugar around the plate, perhaps a drizzle of raspberry coulis, and that fresh mint sprig will elevate it to restaurant-quality presentation.
- Party Platter Perfection: Hosting a gathering? Arrange all 15 nests on a large, beautiful serving platter. Vary the berries for a rainbow effect, and scatter a few whole mint leaves around for freshness. Your guests will flock to this gorgeous display!
- Mini Marvels: For bite-sized appetizers or a dessert buffet, pipe smaller 1.5-2 inch nests. These “mini Sweetheart Pavlova Nests with Berries” are adorable and perfectly portioned for mingling.
- Themed Touches: For Valentine’s Day, use a heart-shaped piping tip for the meringue or arrange strawberry slices into little hearts on top of the cream. Pink-tinted whipped cream (using a drop of food coloring) can also add a romantic flair.
- Beyond Berries: While berries are classic, feel free to experiment! A drizzle of chocolate sauce, a sprinkle of toasted almonds, or a few edible flowers can add extra charm and flavor.
Serve these dreamy desserts alongside a sparkling rosé, a warm cup of coffee, or a delightful herbal tea for an unforgettable treat at any time of day!
Storage Tips for Your Sweetheart Pavlova Nests
To ensure your Sweetheart Pavlova Nests with Berries remain as delightful as possible, proper storage is key! The components have different shelf lives, especially once assembled.
- Unassembled Pavlova Shells: The cooled meringue nests are quite robust before assembly. Store them in an airtight container at room temperature, away from any humidity. They will remain crisp and fresh for up to 3 days. Do NOT refrigerate them without cream, as the moisture can make them soft.
- Whipped Cream Topping: The sweetened heavy whipping cream is best made fresh just before serving. If you must prepare it ahead, store it in an airtight container in the refrigerator for no more than 1 day. Re-whisk briefly if it separates slightly.
- Fresh Berries: Wash and thoroughly dry your fresh mixed berries just before you’re ready to assemble. Store unwashed berries in the refrigerator for 3-4 days.
- Assembled Pavlovas: Once the pavlova nests are assembled with cream and berries, they are best enjoyed immediately. The moisture from the cream and berries will quickly start to soften the delicate meringue shell. If you have any leftovers, they can be refrigerated for a maximum of 1-2 hours, but expect the meringue to lose some of its crispness. Freezing assembled pavlovas is not recommended.
FAQs About Sweetheart Pavlova Nests with Berries
Have questions about perfecting your Sweetheart Pavlova Nests? We’ve got answers!
- Q: Why do my egg whites need to be at room temperature?
A: Room temperature egg whites whip up with much greater volume and stability, leading to a lighter, airier meringue. - Q: What do cornstarch and lemon juice do for the pavlova?
A: Cornstarch helps to create that soft, marshmallowy center and prevents the meringue from weeping. Lemon juice (an acid) helps stabilize the egg whites, ensuring they whip up firmly. - Q: My pavlova cracked during baking or cooling. What went wrong?
A: Cracking is usually due to the oven temperature being too high, causing the exterior to set too quickly, or a sudden change in temperature when removed from the oven. - Q: Can I make the pavlova shells ahead of time?
A: Absolutely! The baked and completely cooled pavlova shells can be stored in an airtight container at room temperature for up to 3 days. Assemble just before serving. - Q: How do I know when my meringue has reached “stiff, firm peaks”?
A: When you lift the whisk, the peaks should hold their shape without collapsing, and the meringue should look glossy and smooth. If you rub a little between your fingers, you shouldn’t feel sugar granules. - Q: Can I use different fruits for my Sweetheart Pavlova Nests?
A: Yes! While berries are classic, feel free to experiment with kiwi, peaches, passion fruit, or sliced mango. Just ensure the fruit isn’t overly watery. - Q: Is this Sweetheart Pavlova Nests with Berries recipe gluten-free?
A: Yes, this recipe is naturally gluten-free, making it a wonderful option for those with dietary restrictions. - Q: What if I don’t have a piping bag to shape the nests?
A: No problem! You can simply spoon the meringue onto the parchment paper and use the back of a spoon to create the nest shape with an indent in the center. - Q: My assembled pavlova became soggy quickly. How can I prevent this?
A: Always assemble your pavlovas just before serving. The moisture from the whipped cream and berries will naturally soften the meringue over time. - Q: Can I freeze pavlova shells for longer storage?
A: Yes, fully cooled and dried pavlova shells can be frozen in an airtight container for up to 2 weeks. Thaw them at room temperature before assembling.
Sweetheart Pavlova Nests with Berries
Equipment
- Stand Mixer
- Baking Sheet
- Parchment Paper
- Piping bag (optional)
- Spatula
- Wire Rack
Ingredients
For the Pavlova Nests
- 6 large egg whites at room temperature
- 1.5 cups granulated sugar
- 2 teaspoons cornstarch
- 0.5 Tablespoon fresh lemon juice
- 0.5 Tablespoon vanilla extract
For the Cream Topping
- 1.5 cups very cold heavy whipping cream
- 2 Tablespoons granulated sugar
For Topping & Garnish
- 4-5 cups fresh mixed berries (like strawberries, raspberries, blueberries)
- 15 fresh mint leaves for garnish (optional)
Instructions
- 1. Prepare Your Oven & Sheet: Gently preheat your oven to 225°F (107°C). Line a large baking sheet with parchment paper – this ensures your pavlovas lift off beautifully!
- 2. Whip the Whites: In a clean stand mixer bowl (or using a hand mixer), beat your room-temperature egg whites on high speed for about 1 minute until they form soft, airy peaks.
- 3. Gradually Add Sweetness: With the mixer still running, slowly add the granulated sugar, a little at a time. Continue beating on high for about 10 minutes until the mixture is glossy, smooth, and forms stiff, firm peaks. This creates the perfect, stable meringue base!
- 4. Fold in Flavors: Using a spatula, gently fold in the lemon juice and vanilla extract. Then, carefully mix in the cornstarch until everything is just blended. Be gentle to keep that lovely airy volume!
- 5. Shape Your Nests: Pipe the meringue mixture into charming 3 to 3.5-inch wide "nests" onto your prepared parchment paper. You can use a piping bag with a large star tip (like Wilton 1M) or simply spoon it on. Make a little indent in the center of each nest with the back of a spoon – this is where your creamy topping will go!
- 6. Bake to Perfection: Bake your pavlova nests in the preheated oven for 1 hour and 15 minutes. After this time, turn off the oven, but do not open the door. Let the pavlovas dry out in the warm oven for another 30 minutes. This creates that lovely crisp shell and soft, marshmallowy inside.
- 7. Cool Down: Once dried, transfer the pavlovas (still on their parchment paper) to a wire rack and allow them to cool completely to room temperature. This is crucial for their delicate structure.
- 8. Whip the Cream Topping: In a very cold mixing bowl, combine your chilled heavy whipping cream with the 2 tablespoons of sugar. Beat on high speed for 2 to 2.5 minutes or until it's light, fluffy, and holds its shape – perfect for piping!
- 9. Assemble & Serve: Just before serving, pipe the sweetened whipped cream onto the cooled pavlova nests. Then, generously top with your fresh mixed berries and an optional sprig of mint. Enjoy these delightful, light treats!
Notes
- Calories: 210 kcal
- Carbohydrates: 32g
- Fat: 9g
- Protein: 2g