💖 Love is in the air, and what better way to celebrate than with a treat that’s as sweet and charming as your special someone? Forget complicated desserts; this Valentine’s Day, we’re making magic with these unbelievably simple and utterly delightful Valentine’s Day Oreo Truffles! Imagine rich, creamy vanilla Oreo goodness enrobed in a delicate shell of white chocolate, perfectly tinted pink and adorned with festive sprinkles. They’re quick, they’re no-bake, and they’re guaranteed to melt hearts. Get ready to whip up a batch of edible affection that screams “I love you” in every bite!
Why You’ll Love These Valentine’s Day Oreo Truffles
Prepare to fall head over heels for this recipe, and here’s why these Valentine’s Day Oreo Truffles will become your new go-to for all things sweet and celebratory:
- Super Simple & No-Bake Bliss: No oven required, no complicated steps! If you can crush cookies and mix, you can make these. It’s the ultimate hassle-free dessert for busy romantics.
- Irresistibly Delicious: The classic combination of vanilla Oreos and creamy cheese creates a rich, decadent filling, perfectly balanced by the sweet snap of white chocolate. They’re a true crowd-pleaser!
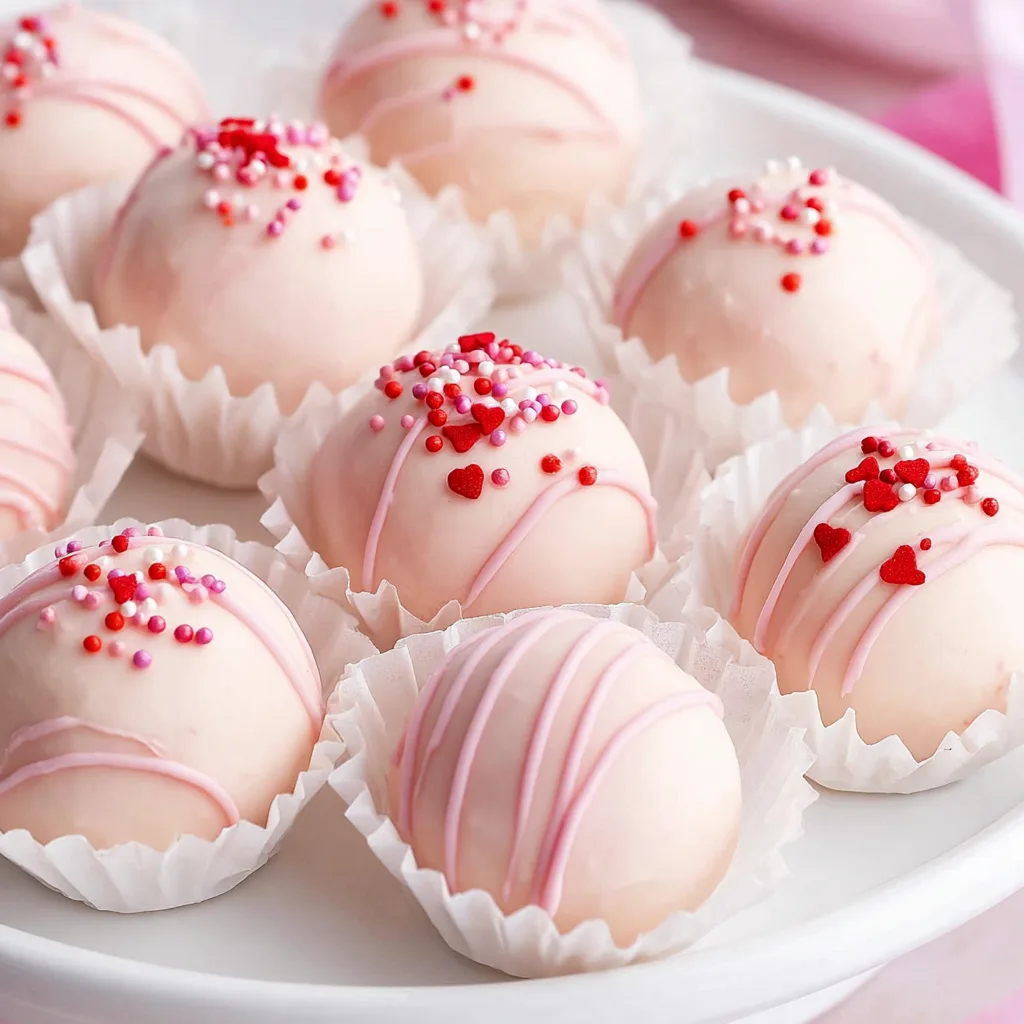
- Perfectly Festive for Valentine’s Day: With just a tiny drop of red food coloring, you can transform these truffles into beautiful pink gems. Add some sprinkles, and you’ve got a dessert that screams “Valentine’s Day” with every bite.
- Impressive Yet Easy Gifting: These truffles look like they came straight from a gourmet bakery, yet they’re so easy to make at home. They’re the ideal homemade gift to show appreciation to friends, family, or your significant other.
Ingredients for Your Sweet Valentine’s Day Oreo Truffles
Gather your simple ingredients to create these magical Valentine’s Day Oreo Truffles. You won’t need anything fancy, just a few pantry staples and a whole lot of love!
- 🍪 36 Vanilla Oreos (about 15 ounces): The star of our show, providing that iconic sweet crunch.
- 🧀 1 (8-ounce) block cream cheese, softened: The secret to that unbelievably creamy, smooth texture. Make sure it’s soft for easy mixing!
- 🍫 14-16 ounces white chocolate melts: For that perfect, glossy coating. Melts are great as they temper easily.
- 🎨 Red oil-based food coloring (optional): Essential for achieving that lovely Valentine’s Day pink! Make sure it’s oil-based to prevent the chocolate from seizing.
- ✨ Sprinkles (optional): For an extra touch of festive sparkle and fun!
Detailed Step-by-Step Directions to Make Valentine’s Day Oreo Truffles
Ready to create some edible masterpieces? Follow these easy steps to bring your delightful Valentine’s Day Oreo Truffles to life!
- Prepare Your Truffle HQ: First things first, grab a baking sheet and line it with parchment paper. This will be the comfy chilling spot for your truffles later.
- Crush Those Cookies: Time for some fun! Pop the Vanilla Oreos into your food processor and pulse away until they transform into fine, uniform crumbs. No food processor? No problem! A sealed bag and a rolling pin work wonders too.
- Mix the Dreamy Filling: Transfer your cookie crumbs to a spacious mixing bowl. Now, add the softened cream cheese. Dive in with your hands (they’re the best mixing tools!) and combine everything thoroughly until you have a smooth, well-blended, and uniform mixture.
- Form the Perfect Balls: Grab your 1.5-tablespoon cookie scoop to ensure uniform sizes. Scoop out the mixture, then gently roll each portion into a smooth, perfectly round ball. Place these beauties onto your prepared parchment-lined baking sheet.
- Chill Out, Truffles! This step is crucial! Pop the baking sheet with your truffle balls into the freezer for 30 minutes, or if you have more time, the refrigerator for at least 1 hour. This firming-up stage prevents them from falling apart during dipping.
- Melt the Chocolate Magic: Now for the coating! Gently melt your white chocolate. You can use a microwave (heat in 20-second bursts, stirring diligently after each) or a double boiler over simmering water, stirring until you have a luxuriously smooth, lump-free consistency.
- Pink Power (Optional): If you’re going for that iconic Valentine’s Day vibe, add a *tiny* drop of red oil-based food coloring to your melted white chocolate. Stir, stir, stir until you achieve your desired lovely pink shade. Remember, a little goes a long way!
- Dip & Coat with Love: Using a fork, carefully submerge each chilled truffle completely into the melted chocolate. Gently tap the fork against the edge of the bowl to let any excess chocolate drip off, ensuring a sleek and even coating.
- Decorate & Set: Place the newly coated truffles back onto the parchment-lined sheet. If you’re adding sprinkles, do it immediately while the chocolate is still gloriously wet. For a fancy chocolate drizzle, let them chill for about 10 minutes first, then drizzle with a bit more melted chocolate.
- The Grand Finale: Allow your stunning truffles to set at room temperature for about 2 hours, or until the chocolate coating is completely firm and beautifully glossy. Now, prepare to enjoy your delightful homemade Valentine’s Day Oreo Truffles!
Creative Ways to Present and Serve Your Valentine’s Day Oreo Truffles
These beautiful Valentine’s Day Oreo Truffles are already a treat for the eyes, but with a little extra flair, you can turn them into a stunning centerpiece or an unforgettable gift. Here are some ideas:
- Elegant Arrangement: Place each truffle in a mini cupcake liner or a petit four paper cup. Arrange them artfully on a tiered dessert stand or a lovely platter for an upscale presentation.
- Gift of Love: Pack a few truffles into small, decorative boxes or clear cellophane bags tied with a pretty ribbon. Attach a handmade tag with a sweet message. They make perfect homemade Valentine’s gifts for teachers, friends, or neighbors.
- Dessert Charcuterie Board: Combine your truffles with fresh berries (strawberries, raspberries), small cookies, pretzels, and other chocolates on a large board for a stunning and shareable Valentine’s Day dessert spread.
- Coffee & Tea Companion: Serve a couple of truffles alongside a freshly brewed coffee or a soothing herbal tea for a sophisticated after-dinner treat or a delightful afternoon pick-me-up.
- Festive Centerpiece: Arrange them on a cake stand or a decorative plate, perhaps surrounded by rose petals or small Valentine’s Day candies, to create an eye-catching edible centerpiece for your romantic dinner.
How to Store Your Valentine’s Day Oreo Truffles and How Long They Last
Once you’ve created your batch of delightful Valentine’s Day Oreo Truffles, you’ll want to keep them fresh and delicious for as long as possible. Good news – they store beautifully!
- Refrigerator Storage: Store your finished truffles in an airtight container in the refrigerator. This is essential to keep the cream cheese filling fresh and the chocolate coating firm. They will stay fresh and delicious for up to 1-2 weeks in the fridge.
- Room Temperature: While they can sit out for a couple of hours for serving, it’s best not to leave them at room temperature for extended periods, especially in warm environments, due to the cream cheese.
- Freezer Storage: For longer enjoyment, you can freeze these truffles! Place them in a single layer on a baking sheet to freeze until solid (about 1-2 hours), then transfer them to an airtight, freezer-safe container or bag. They’ll keep well in the freezer for up to 1-2 months. Thaw them in the refrigerator for a few hours or at room temperature for about 30 minutes before serving.
These Valentine’s Day Oreo Truffles are perfect for making ahead, so you can focus on enjoying the special day!
FAQs About Valentine’s Day Oreo Truffles
- 1. Can I use different Oreo flavors for these Valentine’s Day Oreo Truffles?
- Absolutely! While vanilla is specified for a lighter base for pink coloring, feel free to experiment with classic chocolate Oreos, red velvet, or even mint for a different twist. Just remember the flavor will impact the final taste!
- 2. What if I don’t have a food processor?
- No problem! Place the Oreos in a sturdy zip-top bag, seal it, and crush them with a rolling pin, meat mallet, or even the bottom of a heavy glass until fine crumbs are formed.
- 3. Why do I need oil-based food coloring? Can I use liquid food coloring?
- Oil-based food coloring is crucial because it blends smoothly with chocolate without seizing it. Water-based liquid food coloring can cause melted chocolate to thicken, become lumpy, and unusable.
- 4. How can I prevent the white chocolate from seizing?
- Ensure your bowl and utensils are completely dry, use oil-based food coloring, and avoid overheating the chocolate. Melt slowly and gently, stirring frequently.
- 5. Can I use milk or dark chocolate instead of white chocolate?
- Yes, you can! Milk or dark chocolate will give the truffles a different flavor profile and color, but the dipping process remains the same. You won’t be able to color them pink, of course.
- 6. How far in advance can I make these Valentine’s Day Oreo Truffles?
- You can make these truffles up to 1-2 weeks in advance and store them in an airtight container in the refrigerator. They also freeze well for up to 1-2 months.
- 7. Are these truffles gluten-free?
- This recipe is not inherently gluten-free, as standard Oreos contain wheat. However, you can make them gluten-free by using gluten-free sandwich cookies instead of regular Oreos.
- 8. What’s the best way to dip the truffles for a smooth coating?
- Ensure your truffle balls are well-chilled. Use a fork (not a toothpick) to dip, letting excess chocolate drip off by gently tapping the fork against the bowl’s rim. Work quickly as the cold truffle will set the chocolate fast.
- 9. Can I skip the chilling step for the truffle balls?
- It’s not recommended. Chilling makes the truffle balls firm, preventing them from crumbling or melting into the warm chocolate during dipping, ensuring a smooth, beautiful coating.
- 10. How many Valentine’s Day Oreo Truffles does this recipe make?
- This recipe yields approximately 25 delicious Valentine’s Day Oreo Truffles, perfect for sharing or enjoying over time!
“`
Valentine's Day Oreo Truffles
Equipment
- Baking Sheet
- Parchment Paper
- Food Processor
- Cookie Scoop
Ingredients
- 36 Vanilla Oreos (about 15 ounces)
- 1 block cream cheese 8-ounce, softened
- 14-16 ounces white chocolate melts
- red oil-based food coloring optional
- sprinkles optional
Instructions
- Line a baking sheet with parchment paper and set it aside; this will be for chilling your truffles later.
- Place the Vanilla Oreos into a food processor and pulse until they become fine crumbs. If you don't have a food processor, you can put them in a sealed bag and crush them with a rolling pin!
- Transfer the cookie crumbs to a mixing bowl. Add the softened cream cheese and mix thoroughly until well combined. Using your hands can help achieve a perfect, smooth blend.
- Scoop out the mixture using a 1.5-tablespoon cookie scoop. Roll each scoop into a smooth, round ball and place them on your prepared baking sheet.
- Pop the baking sheet with the truffle balls into the freezer for 30 minutes, or into the refrigerator for at least 1 hour. This step is key to making them firm for dipping!
- Gently melt the white chocolate. You can do this in a microwave-safe bowl by heating in 20-second bursts, stirring well after each, or use a double boiler over a pot with simmering water, stirring until smooth.
- If you desire a festive look, add a tiny drop of red oil-based food coloring to the melted white chocolate and stir until you reach your desired pink shade.
- Using a fork, dip each chilled truffle completely into the melted chocolate. Gently tap the fork against the edge of the bowl to remove any excess chocolate, ensuring a smooth coating.
- Place the coated truffles back on the parchment-lined sheet. If adding sprinkles, do so immediately while the chocolate is still wet. For a chocolate drizzle design, let them chill for about 10 minutes first, then drizzle with a bit more melted chocolate.
- Allow the truffles to set at room temperature for about 2 hours, or until the chocolate coating is firm and glossy. Enjoy your delightful homemade treats!