Are you ready to dive spoon-first into a dessert that’s both decadently rich and surprisingly guilt-free? Imagine the perfect marriage of deep, dark chocolate and invigorating espresso, all whipped into a cloud of creamy mousse and nestled in its own edible chocolate shell. Stop imagining, because the dream is real! These Espresso Chocolate Mousse Cups are here to revolutionize your dessert game, offering an elegant treat that’s easy to make and utterly irresistible.
Why You’ll Love These Espresso Chocolate Mousse Cups
- Guilt-Free Indulgence: Say goodbye to sugar crashes and hello to a truly satisfying treat! These Espresso Chocolate Mousse Cups are crafted with sugar-free ingredients, making them a fantastic option for keto enthusiasts and anyone looking to cut down on sugar without sacrificing flavor.
- Effortlessly Elegant: Don’t let their sophisticated appearance fool you – these mousse cups are surprisingly simple to whip up. They look like they came straight from a gourmet patisserie, but require minimal fuss, making them perfect for impressing guests or simply treating yourself.
- The Ultimate Flavor Fusion: The robust notes of espresso perfectly complement the rich, bittersweet chocolate, creating a symphony of flavors that will awaken your taste buds. It’s a match made in dessert heaven for coffee and chocolate lovers alike!
- Quick & Easy Prep: With only 10 minutes of active prep time, you can have these beauties chilling in the fridge in no time. The simple steps ensure a smooth, enjoyable baking (or rather, no-baking) experience, even for novice dessert makers.
Ingredients You’ll Need
Gather your magic makers for these delightful Espresso Chocolate Mousse Cups:
- 🍫 4 ounces sugar-free semi-sweet chocolate chips
- 🥥 1 teaspoon coconut oil
- 🧀 8 ounces cream cheese, softened
- 🥛 1 cup heavy cream
- sweetener 2/3 cup monk fruit/allulose, powdered
- 🍫 1/4 cup unsweetened cocoa powder
- ☕ 2 teaspoons instant espresso powder
- 💧 2 teaspoons hot water
- 🍦 1 teaspoon vanilla extract
Step-by-Step Directions to Mousse Perfection
Get ready to create some dessert magic with these easy steps for your Espresso Chocolate Mousse Cups:
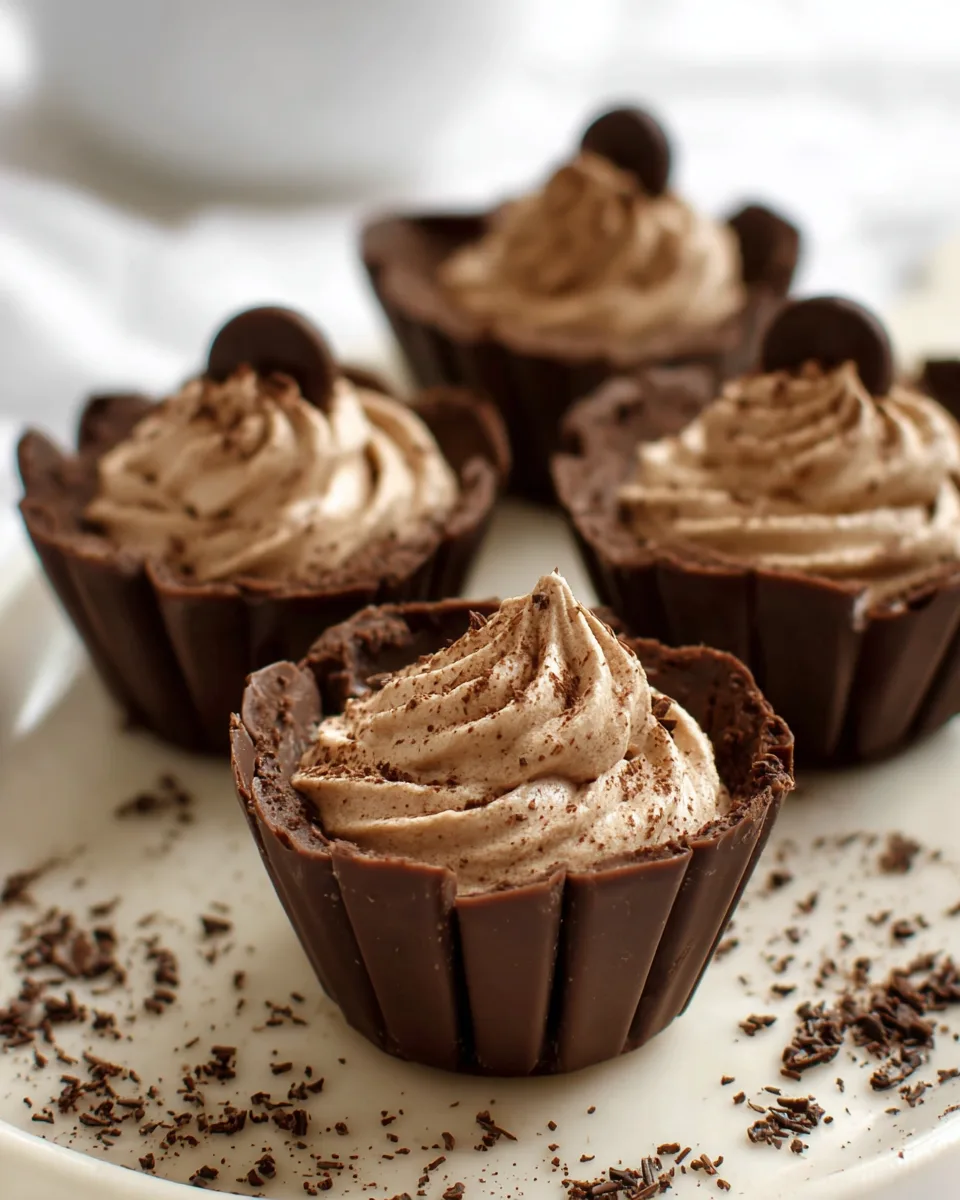
- Chocolate Cup Creation: First, let’s get those edible cups ready! In a microwave-safe bowl, combine your sugar-free chocolate chips and coconut oil. Pop it in the microwave for 1 minute, then give it a good stir until it’s smooth and glossy. If it needs a little more coaxing, heat in 20-second bursts, stirring vigorously after each, until it’s perfectly melted.
- Form the Cups: Now for the fun part! Carefully pour the melted chocolate into 6 paper or silicone cupcake liners, snugly nestled in a muffin pan. Using the back of a spoon or a small brush, gently spread the chocolate evenly around the bottom and up the sides of each liner. This creates your beautiful chocolate cups. Once formed, send them off to the refrigerator for 1-2 hours to chill and firm up. Patience, young Jedi, for perfect chocolate shells await!
- Espresso Boost: While your chocolate is chilling, grab a small dish and dissolve the instant espresso powder in the hot water. Give it a quick stir and set it aside; this will be the heart of our espresso kick!
- Whip It Good (Cream): Make sure you have a chilled mixing bowl for this step – it helps the cream whip better! Pour in your heavy cream and whip it with an electric mixer until lovely, soft peaks form. Be gentle with it and set it aside.
- Cream Cheese Fluff: In yet another mixing bowl (yes, we love our bowls!), take your softened cream cheese and give it a quick beat with a hand mixer until it’s light, airy, and super fluffy.
- Flavor Infusion: Now, add the powdered sweetener, unsweetened cocoa powder, your dissolved espresso magic, and the vanilla extract to the fluffy cream cheese. Mix it all up until everything is beautifully combined and the mixture is silky smooth.
- The Grand Fold: This is where the mousse gets its signature lightness! Gently, ever so gently, fold the whipped cream into the cream cheese mixture. Use a spatula and fold until just combined. The key is not to overmix, as we want to keep that mousse wonderfully light and airy.
- Fill ‘Em Up & Chill: Once your chocolate cups are firm and ready, transfer your dreamy mousse into a piping bag (or if you’re feeling rustic, just spoon it in!). Fill each chilled chocolate cup generously. Pop them back into the refrigerator until you’re ready to serve and indulge in these elegant, healthy Espresso Chocolate Mousse Cups!
Serving & Presentation Ideas
These Espresso Chocolate Mousse Cups are already a showstopper, but with a few extra touches, you can elevate them even further!
- Elegant Garnish: A dusting of unsweetened cocoa powder or a sprinkle of finely grated sugar-free chocolate shavings instantly adds a professional touch. For an extra coffee kick, place a whole roasted coffee bean on top of each mousse cup.
- Fresh Berry Burst: While the primary flavors are chocolate and coffee, a few fresh raspberries or sliced strawberries can add a beautiful pop of color and a delightful tart counterpoint.
- Mini Whipped Cream Swirl: For ultimate indulgence, pipe a small swirl of extra whipped heavy cream (sweetened if you like) on top of each mousse cup just before serving.
- Chocolate Drizzle: A delicate drizzle of melted sugar-free chocolate over the top can create a beautiful visual appeal.
- Serving Platter Panache: Arrange your finished Espresso Chocolate Mousse Cups on a elegant platter, perhaps with a sprig of mint or a few chocolate-covered espresso beans scattered around. They make a fantastic individual dessert for dinner parties or a special treat for yourself.
- No Cups? No Problem!: If you’re short on time or just want the mousse, skip the chocolate cups! Spoon the mousse into small dessert bowls, ramekins, or even shot glasses for a different presentation.
Storage & Shelf Life
So, you’ve mastered the art of making Espresso Chocolate Mousse Cups, but how do you keep them fresh?
Once assembled, these delightful mousse cups should be stored in an airtight container in the refrigerator. This will help prevent them from absorbing any unwanted fridge odors and keep the chocolate cups from softening too much. They are best enjoyed within 3-4 days. While the mousse itself might last a bit longer, the chocolate cups are at their crispest and most appealing within this timeframe. We do not recommend freezing them, as the mousse can change texture and the chocolate cups may become brittle and prone to cracking when thawed.
FAQs About Espresso Chocolate Mousse Cups
- Can I use regular chocolate chips instead of sugar-free?
Yes, you can, but be aware that the nutritional information (especially carbs and sugar content) will change significantly, and it will no longer be a keto-friendly dessert. - What if I don’t have coconut oil for the chocolate cups?
You can substitute a tiny bit of unsalted butter or simply melt the chocolate chips on their own. The coconut oil helps make the chocolate a bit smoother and easier to spread. - Can I skip the espresso powder?
Absolutely! If you’re not a fan of coffee, you can omit the espresso powder and hot water. You’ll still have a delicious, rich sugar-free chocolate mousse cup. - Is there a dairy-free option for this recipe?
Unfortunately, this recipe relies heavily on dairy (heavy cream and cream cheese). While there are some dairy-free cream cheeses and heavy cream substitutes available, the texture and flavor might differ significantly. - Can I use a liquid sweetener instead of powdered monk fruit/allulose?
Yes, you can. However, liquid sweeteners can sometimes affect the consistency of the mousse, making it a bit thinner. Start with less and add to taste, as liquid sweeteners are often more concentrated. - How do I ensure my chocolate cups don’t crack?
Ensure you spread the chocolate evenly, without any very thin spots. Also, make sure they are fully set in the fridge before attempting to peel away the liners. Silicone liners are often easier to remove than paper. - Can I make these Espresso Chocolate Mousse Cups ahead of time for a party?
They are the perfect make-ahead dessert! You can prepare them 1-2 days in advance and keep them chilled in the refrigerator. This allows the flavors to meld beautifully. - What’s the best way to get the mousse into the cups without making a mess?
A piping bag with a wide opening (or even just the tip snipped off a zip-top bag) is your best friend here. It gives you control and a neat finish. If you don’t have one, a spoon works, just be a little more careful! - Can I substitute other instant coffee for espresso powder?
Yes, you can use regular instant coffee, but you might need to use a bit more (or less, depending on desired strength) as espresso powder typically has a more concentrated flavor. - My mousse isn’t setting, what went wrong?
This usually happens if the heavy cream wasn’t whipped to soft peaks, or if the cream cheese wasn’t softened enough, leading to lumps. Ensure all ingredients are at the right temperature and whip the cream adequately. Overmixing the whipped cream into the cream cheese can also deflate the mousse.
Espresso Chocolate Mousse Cups
Equipment
- Muffin Pan
- Microwave-safe Bowl
- Hand Mixer
- Mixing Bowl
- Piping bag (optional)
Ingredients
Mousse Cups Ingredients
- 4 ounces sugar-free semi-sweet chocolate chips
- 1 tsp coconut oil
- 8 ounces cream cheese softened
- 1 cup heavy cream
- 2/3 cup monk fruit/allulose powdered
- 1/4 cup unsweetened cocoa powder
- 2 tsp instant espresso powder
- 2 tsp hot water
- 1 tsp vanilla extract
Instructions
- Gently melt the sugar-free chocolate chips and coconut oil in a microwave-safe bowl. Heat for 1 minute, then stir until smooth. If needed, heat in 20-second bursts, stirring in between, until completely melted.
- Pour the melted chocolate into 6 paper or silicone cupcake liners set in a muffin pan. Carefully spread the chocolate around and up the sides of each liner to form cups. Chill in the refrigerator for 1-2 hours until the chocolate is firm.
- In a small dish, dissolve the instant espresso powder in the hot water and set aside.
- In a separate, chilled mixing bowl, whip the heavy cream until soft peaks form. Set this aside gently.
- In another mixing bowl, briefly beat the softened cream cheese with a hand mixer until it's light and fluffy.
- Add the powdered sweetener, unsweetened cocoa powder, dissolved espresso, and vanilla extract to the cream cheese mixture. Mix until everything is well combined and smooth.
- Gently fold the whipped cream into the cream cheese mixture until just combined. Be careful not to overmix, keeping the mousse light and airy.
- Transfer the mousse to a piping bag (or simply spoon it in) and fill the chilled chocolate cups. Refrigerate the mousse cups until you're ready to serve and enjoy this elegant, healthy dessert!
Notes
Calories: 284kcal
Total Carbs: 6g
Net Carbs: 5g
Fats: 26g
Protein: 3g