The air is crisp, carols are playing, and the scent of holiday baking fills your home. What could be more delightful than a treat that embodies the festive spirit, is easy to make, and utterly delicious? Introducing our charming Christmas Brownie Trees!
These aren’t just any brownies; they’re fudgy, rich, and transformed into adorable edible Christmas trees, complete with green “garlands” and sparkling “ornaments.” They’re perfect for holiday parties, gifting, or simply enjoying by the fireplace with a mug of hot cocoa. Get ready to spread some serious holiday cheer, one delightful brownie tree at a time!
Why You’ll Love These Christmas Brownie Trees
- Festive & Fun: Transform classic brownies into whimsical holiday trees with simple decorations, making them a showstopper on any dessert table. The triangular shape and green drizzle are instantly recognizable and bring a smile to everyone’s face.
- Effortlessly Delicious: These aren’t just pretty; they’re incredibly fudgy, rich, and packed with deep chocolate flavor. The simple ingredients combine to create a brownie texture that’s moist on the inside with that perfect crackle on top.
- Kid-Friendly Activity: The decorating stage is where the real fun begins! Kids (and adults!) will love drizzling the green chocolate and sprinkling the ornaments, making it a wonderful holiday baking project for the whole family.
- Perfect for Gifting & Parties: Individually decorated, these Christmas Brownie Trees make thoughtful homemade gifts for friends and neighbors. They’re also an ideal addition to holiday potlucks, cookie exchanges, or festive gatherings, offering a unique and memorable dessert.
Ingredients for Your Christmas Brownie Trees
Gather your festive arsenal! Here’s what you’ll need to create these magical holiday treats:
- ✨ 2 large eggs
- 🤎 ¾ cup packed brown sugar (or granulated sugar)
- 🧈 6 tablespoons salted butter (or unsalted + a pinch of salt)
- 🍫 5.5 ounces bittersweet chocolate (or semi-sweet)
- 🌰 1 tablespoon cocoa powder (Dutch-processed preferred)
- 🌾 ½ cup all-purpose flour
- 🍬 Optional mix-ins: ¼ cup chopped nuts, extra chocolate chips, or cookie pieces
- ⚪ White chocolate, melted (for decorating)
- 💚 Green food coloring
- 🌟 Christmas sprinkles
- 🍭 Popsicle sticks (optional)
Step-by-Step Directions to Bake Your Christmas Brownie Trees
Get ready to infuse your kitchen with the irresistible aroma of chocolate! Follow these simple steps to create perfect Christmas Brownie Trees:
- Get Ready: Preheat your oven to a cozy 350°F (175°C). Lightly grease an 8×8 inch (20cm) square baking pan, then line it with parchment paper, making sure to leave an overhang on two sides. This little trick makes lifting your cooled brownies a breeze!
- Melt & Mix: In a microwave-safe bowl (heat in 30-second intervals, stirring in between) or using a double boiler, gently melt the bittersweet chocolate and butter together. Stir them patiently until you have a gloriously smooth and glossy mixture.
- Sweeten It Up: Whisk the brown sugar into your melted chocolate mixture until it’s perfectly combined. Then, add the eggs one at a time, mixing thoroughly after each addition. Keep whisking until your batter transforms into a thick, shiny, and wonderfully cohesive base.
- Fold in Dry: Sift the all-purpose flour and cocoa powder directly over your wet ingredients. With a gentle hand, carefully fold them in until just barely combined. Remember, the secret to fudgy brownies is to avoid overmixing! If you’re adding any delightful mix-ins like nuts or extra chocolate chips, stir them in now.
- Bake to Perfection: Pour your luscious brownie batter evenly into your prepared pan. Slide it into the preheated oven and bake for about 40 minutes. You’ll know it’s done when a toothpick inserted into the center comes out with just a few moist crumbs clinging to it – that’s the sign of a wonderfully fudgy interior.
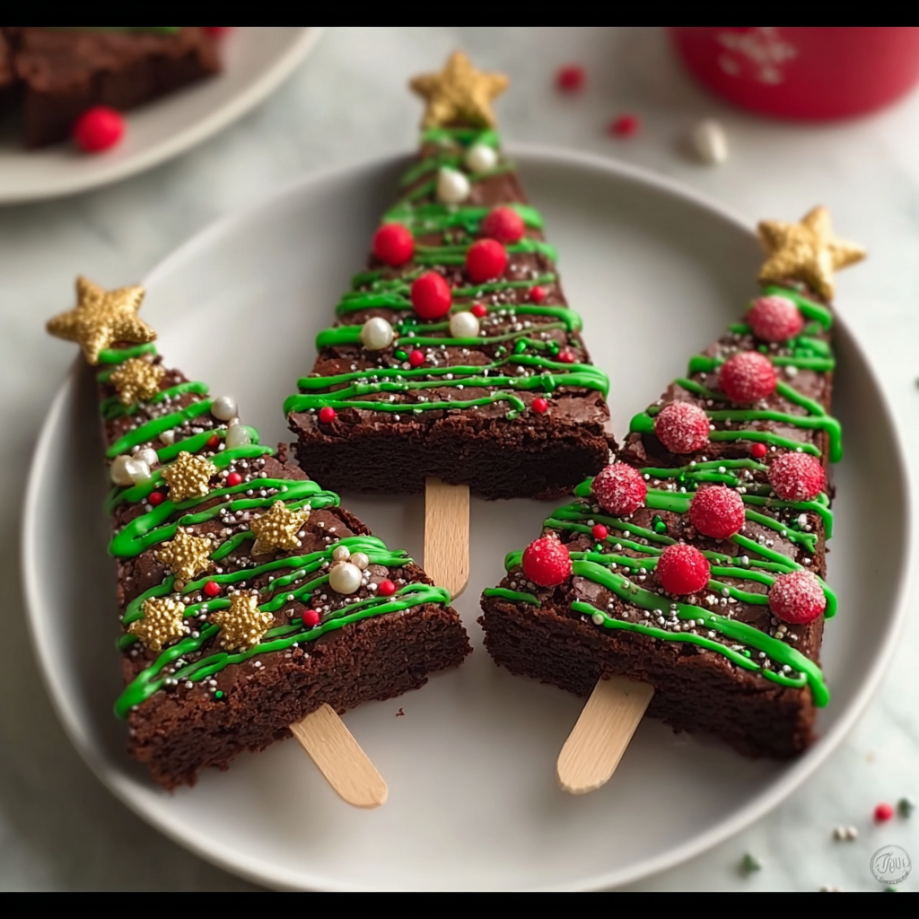
- Cool & Cut: This part requires patience! Let the brownies cool completely in the pan. Rushing this step can lead to crumbly trees. Once fully cooled, use the parchment paper overhang to carefully lift the entire brownie slab out of the pan. Now comes the fun part: cut them into festive triangle shapes that look just like little Christmas trees.
- Decorate with Joy: Melt your white chocolate according to package directions. Take a portion of the melted white chocolate and tint it with green food coloring. Drizzle the vibrant green chocolate in cheerful zigzag patterns over each brownie tree, creating charming “garlands.”
- Sparkle & Serve: While the green chocolate is still soft and tacky, generously add your favorite Christmas sprinkles. These will be your festive “ornaments.” Let the chocolate set completely. For a fun, handheld treat perfect for parties, insert popsicle sticks into the base of each tree. Enjoy your adorable and delicious holiday dessert!
Creative Ways to Present and Serve Your Christmas Brownie Trees
These delightful Christmas Brownie Trees are already a treat for the eyes and palate, but with a little extra flair, you can make them truly unforgettable. Here are some presentation and serving ideas:
- The Edible Forest: Arrange your brownie trees on a large platter, standing them upright (if using popsicle sticks) or laying them down to create a charming “winter forest.” Dust lightly with powdered sugar to mimic a fresh snowfall.
- Star Toppers: Before the green chocolate sets, place a tiny edible star sprinkle or a small piece of yellow candy on top of each tree to represent the star of Bethlehem.
- Individual Gift Bags: Once completely set, carefully place each brownie tree into clear cellophane bags, tie with a festive ribbon, and add a small gift tag. They make wonderful homemade gifts for teachers, neighbors, and friends.
- Dessert Board Centerpiece: Incorporate your brownie trees into a larger holiday dessert board alongside cookies, candies, fruit, and other festive treats. They will undoubtedly be the star of the show.
- Hot Cocoa Companion: Serve a brownie tree alongside a steaming mug of hot cocoa, perhaps with a dollop of whipped cream and a sprinkle of mini marshmallows. It’s the ultimate cozy pairing.
- Mini Ornaments: Instead of traditional sprinkles, use small silver or gold dragees, edible glitter, or even mini M&Ms to create diverse “ornaments” on your trees.
- Interactive Decorating Station: If entertaining, prepare the plain brownie trees and set out various colored melted chocolates (green, white, red), different sprinkles, and edible glitter. Let guests decorate their own!
Storage and Shelf Life for Your Christmas Brownie Trees
To ensure your delightful Christmas Brownie Trees remain fresh and delicious, proper storage is key. Here’s how to keep them at their best:
- At Room Temperature: Once the chocolate decorations have fully set, store your brownie trees in an airtight container at room temperature. They will stay wonderfully fudgy and fresh for about 3-4 days. Placing a piece of parchment paper between layers can prevent sticking if stacking.
- In the Refrigerator: For a slightly longer shelf life, you can store the brownies in an airtight container in the refrigerator for up to a week. Be aware that refrigeration can sometimes alter the texture of brownies, making them a bit firmer. If you prefer a softer brownie, let them come to room temperature for 15-30 minutes before serving.
- Freezing for Later: These brownies freeze exceptionally well! After the decorations have completely set, individually wrap each brownie tree tightly in plastic wrap, then place them in an airtight freezer-safe bag or container. They can be frozen for up to 2-3 months.
- Thawing Frozen Brownies: To thaw, simply remove the desired number of brownies from the freezer and let them sit at room temperature for a few hours, or overnight in the refrigerator.
Christmas Brownie Trees FAQs
Got questions about these festive treats? We’ve got answers!
- Q1: Can I use different types of chocolate for the brownies?
A1: Yes, while bittersweet is recommended for a rich, deep flavor, semi-sweet chocolate chips or bars work beautifully as well. For a sweeter brownie, you could even try milk chocolate, but it might change the overall fudginess. - Q2: Is Dutch-processed cocoa powder essential?
A2: Dutch-processed cocoa powder gives a darker color and a mellower chocolate flavor. Regular unsweetened cocoa powder can be used, but the color might be slightly lighter, and the flavor a bit more intense. - Q3: My brownies are too cakey. What went wrong?
A3: Most likely, they were overmixed or overbaked. Overmixing develops gluten in the flour, leading to a cake-like texture. Overbaking removes too much moisture, also resulting in a drier, cakey brownie. Stick to the “just a few moist crumbs” toothpick test! - Q4: How do I cut perfect triangles for the trees?
A4: Once the cooled brownies are out of the pan, cut the 8×8 inch square into 9 squares (3×3 grid). Then, cut each square diagonally from corner to corner to create two triangles. You’ll end up with 18 smaller triangles, or you can make them larger by cutting into fewer squares first. - Q5: Can I make these gluten-free?
A5: Yes! You can substitute the all-purpose flour with a 1:1 gluten-free baking flour blend that contains xanthan gum. The baking time should remain similar. - Q6: Can I skip the green food coloring?
A6: Absolutely! You can drizzle plain melted white chocolate in zigzag patterns for a “snowy” or minimalist look, or use red melted chocolate for another festive color. - Q7: What kind of sprinkles work best for “ornaments”?
A7: Any festive Christmas sprinkles work! Stars, pearls, jimmies, nonpareils, or even edible glitter will look fantastic. Choose ones that stand out against the green chocolate. - Q8: How do I prevent the white chocolate drizzle from cracking?
A8: Ensure your brownies are completely cool before drizzling. Also, don’t apply the melted chocolate too thickly. If the brownies are cold and the chocolate is warm, a sudden temperature change can cause cracking. - Q9: Can I add other mix-ins besides nuts?
A9: Of course! Mini marshmallows, crushed candy canes (add after baking for best results), M&Ms, or even dried cranberries can be folded into the batter. - Q10: Are these good for shipping as a gift?
A10: Yes, they are! Once the chocolate decorations are fully set, wrap each brownie tree individually in plastic wrap, then pack them snugly in an airtight container or sturdy box. Place cushioning material (like tissue paper or bubble wrap) around them to prevent shifting during transit.
Christmas Brownie Trees 🎄
Equipment
- 8×8 inch (20cm) square baking pan
- Parchment Paper
- Microwave-safe Bowl
- Whisk
- Sifter
- Popsicle sticks (optional)
Ingredients
Brownie Ingredients
- 2 large eggs
- 3/4 cup packed brown sugar (or granulated sugar)
- 6 tablespoons salted butter (or unsalted + a pinch of salt)
- 5.5 ounces bittersweet chocolate (or semi-sweet)
- 1 tablespoon cocoa powder (Dutch-processed preferred)
- 1/2 cup all-purpose flour
Optional Mix-ins
- 1/4 cup chopped nuts
- extra chocolate chips
- cookie pieces
Decorations
- white chocolate melted (for decorating)
- green food coloring
- Christmas sprinkles
- Popsicle sticks (optional)
Instructions
- Get Ready: Preheat your oven to 350°F (175°C). Lightly grease an 8×8 inch (20cm) square baking pan and line it with parchment paper, leaving an overhang to easily lift the brownies later.
- Melt & Mix: In a microwave-safe bowl or using a double boiler, gently melt the bittersweet chocolate and butter together until smooth and glossy. Stir them well to combine.
- Sweeten It Up: Whisk in the brown sugar until combined, then add the eggs one at a time, mixing thoroughly after each addition until the batter looks thick and shiny.
- Fold in Dry: Sift the flour and cocoa powder directly into the wet ingredients. Carefully fold them in until just barely combined – be sure not to overmix! If you’re adding nuts or other mix-ins, stir them in now.
- Bake to Perfection: Pour the batter evenly into your prepared pan. Bake for about 40 minutes, or until a toothpick inserted into the center comes out with just a few moist crumbs, ensuring a wonderfully fudgy brownie.
- Cool & Cut: Let the brownies cool completely in the pan before removing them. Once cooled, carefully lift them out and cut them into festive triangle shapes that look like little Christmas trees.
- Decorate with Joy: Melt white chocolate and tint a portion of it with green food coloring. Drizzle the green chocolate in cheerful zigzag patterns over each brownie tree, creating charming ‘garlands.’
- Sparkle & Serve: While the chocolate is still soft, generously add Christmas sprinkles as ‘ornaments.’ Let the chocolate set completely. For a fun, handheld treat, insert popsicle sticks into the base of each tree. Enjoy your adorable and delicious holiday dessert!
Notes
Calories: 210 kcal
Total Carbohydrates: 21g
Net Carbohydrates: 19g
Fats: 13g
Protein: 2g