Get ready to sprinkle some serious magic and pure joy onto your holiday dessert table this year! Forget the same old cookies and pies; it’s time to unveil a showstopper that will have everyone reaching for their phones to snap a picture. Imagine the creamy, dreamy texture of a classic cheesecake, but with a secret, nostalgic surprise baked right inside and a dazzling festive finish. We’re talking about a dessert that not only tastes like a Christmas dream but looks like one too. If you’re looking to elevate your holiday baking game and create a truly memorable treat, then prepare to meet your new obsession: the Festive Christmas Tree Cheesecake Delight! It’s decadent, delightful, and downright irresistible.
Why You’ll Love This Recipe
This isn’t just another cheesecake recipe; it’s a celebration in itself! Here are four compelling reasons why the Festive Christmas Tree Cheesecake Delight! will become your go-to holiday showstopper:
- Unforgettable Flavor Fusion: Experience the luxurious marriage of rich, velvety smooth cheesecake with the comforting, nostalgic sweetness of Little Debbie Christmas Tree Cakes hidden within. Each bite is a delightful surprise, combining classic elegance with playful holiday cheer.
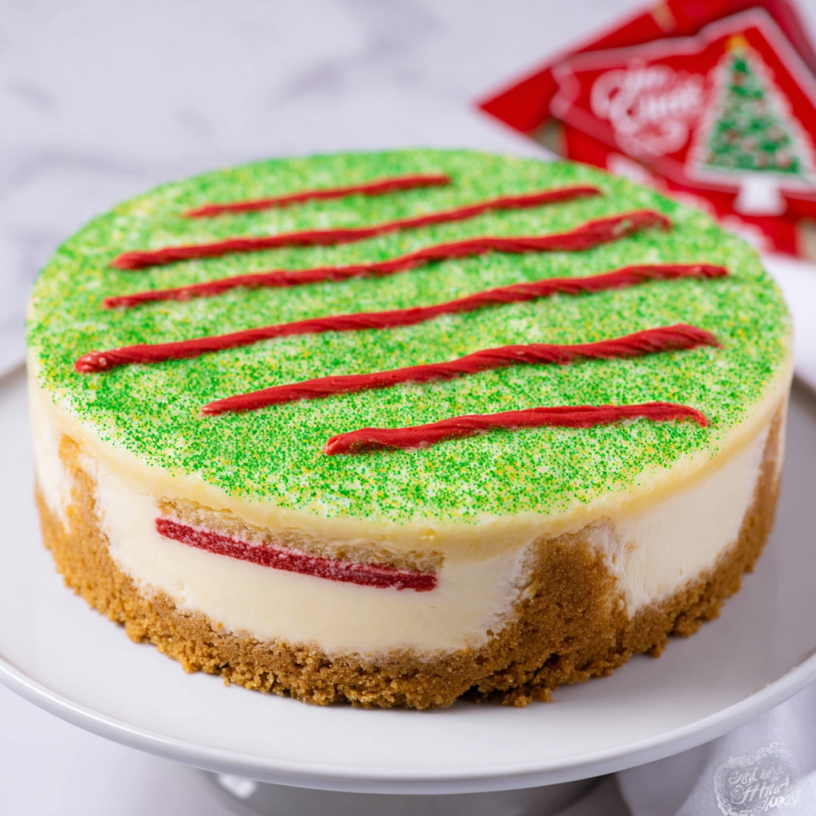
- Showstopping Presentation: Visually stunning, this cheesecake is a true masterpiece that will instantly become the centerpiece of your holiday spread. The vibrant green sanding sugar and iconic red frosting lines mimic a decorated Christmas tree, making it as beautiful to look at as it is delicious to eat.
- Surprisingly Simple Elegance: Don’t let its grand appearance intimidate you! While it looks incredibly impressive, the detailed instructions make this recipe surprisingly manageable for home bakers of all skill levels. You’ll achieve professional-looking results without the stress.
- Pure Holiday Cheer, Baked In: This dessert embodies the spirit of Christmas. It’s festive, fun, and designed to bring smiles and warmth to your gatherings. Serving this cheesecake isn’t just serving dessert; it’s serving a slice of pure holiday magic.
Ingredients for Your Festive Christmas Tree Cheesecake Delight!
Gather your festive ingredients and get ready to create some holiday magic!
- For the Crust:
- 1 ½ cups Graham Cracker Crumbs
- 6 tablespoons Melted Butter
- For the Cheesecake Filling:
- 3 (8-ounce) packages Softened Cream Cheese
- ½ cup Granulated Sugar
- 3 tablespoons All-Purpose Flour
- 1 teaspoon Vanilla Extract
- ½ cup Heavy Whipping Cream
- 2 Large Eggs (room temperature is best!)
- 7 Little Debbie Christmas Tree Cakes
- For the White Chocolate Ganache & Decoration:
- 1 cup White Chocolate Chips or Chopped White Chocolate
- ⅓ cup Heavy Whipping Cream (for ganache)
- Green Sanding Sugar or Sprinkles
- Red Tube Frosting or Buttercream
Step-by-Step Directions to Bake Your Holiday Masterpiece
Follow these easy steps to bring your Festive Christmas Tree Cheesecake Delight! to life, from crust to beautiful decoration:
- Prep the Pan & Oven: First things first, preheat your oven to 350°F (175°C). Grab a 9-inch springform pan and give it a light spray with non-stick spray.
- Make the Crust: In a food processor, pulse your graham crackers until they’re fine, uniform crumbs (you’ll need about 1 ½ cups). Drizzle in the melted butter and pulse again until just combined and moistened.
- Press & Bake Crust: Pour this crumbly mixture into your prepared pan. Using the back of a spoon or your fingers, press it firmly and evenly into the bottom. Pop it into the oven for 10 minutes until it’s lightly golden. Set it aside to cool slightly.
- Cream the Cheese: In the bowl of a stand mixer (with a paddle attachment), beat the softened cream cheese on high speed. You want it super smooth, light, and fluffy – no lumps allowed!
- Mix in Sweetness: Reduce the speed to low. Add the granulated sugar, flour, and vanilla extract. Mix until everything is just combined and beautifully smooth. Don’t forget to stop and scrape down the sides and bottom of the bowl to ensure everything is incorporated.
- Add Cream: Pour in the heavy whipping cream and mix on low speed until it’s blended. Then, increase the speed to high for about 1 minute to lighten the batter further.
- Incorporate Eggs Gently: Add the eggs one at a time, mixing on low speed just until each egg is incorporated. Remember, gentleness is key here! Overmixing can introduce too much air, which might lead to cracks later.
- First Layer of Filling: Pour half of your glorious cheesecake batter over the baked graham cracker crust. Gently smooth it out with an offset spatula.
- Add the Christmas Cakes: This is where the magic happens! Carefully arrange the Little Debbie Christmas Tree Cakes in a circle over the batter. Gently press them down slightly into the filling.
- Top with Remaining Batter: Pour the rest of the cheesecake batter over the cakes, smoothing the top to completely cover them.
- Bake to Perfection: Bake at 350°F (175°C) for 15 minutes. WITHOUT opening the oven door, reduce the heat to 200°F (95°C) and continue baking for an additional 50-53 minutes. The cheesecake is ready when the edges are set, but the very center still has a slight, gentle jiggle when you carefully nudge the pan.
- Slow Cool Down: Turn off the oven, crack the oven door open slightly, and let the cheesecake cool slowly inside for about 15 minutes. This gradual cooling helps prevent cracks.
- Chill Out: Remove the cheesecake from the oven and let it cool completely to room temperature on a wire rack. Once fully cool, transfer it to the refrigerator and chill overnight (or at least 4-6 hours). This critical step ensures the best texture and firmness.
- Prepare Ganache: Once your cheesecake is fully chilled and firm, heat ⅓ cup of heavy whipping cream in a microwave-safe bowl in 30-second increments until it’s hot but not boiling.
- Mix Ganache: Pour the hot cream over the white chocolate chips. Let it sit undisturbed for about 3 minutes, then whisk until the ganache is perfectly smooth and glossy.
- Decorate: Pour the luxurious white chocolate ganache over the top of the chilled cheesecake and spread it evenly to the edges. Sprinkle generously with green sanding sugar or festive sprinkles. Then, use your red tube frosting to create those iconic decorative lines on top, mimicking the classic Little Debbie Christmas Tree Cake design.
- Serve & Store: Slice into beautiful wedges and enjoy your incredible, festive creation!
Presenting and Serving Your Festive Christmas Tree Cheesecake Delight!
You’ve baked a masterpiece, now let’s make sure it shines! The Festive Christmas Tree Cheesecake Delight! is designed to be a visual and culinary star. Here are some ideas for presenting and serving:
- The Classic Slice: After chilling overnight, carefully release the springform pan. Use a sharp, warm knife (run under hot water and wiped dry between cuts) to get perfectly clean slices. The cross-section will reveal the delightful surprise of the Christmas Tree Cakes!
- Dessert Bar Hero: If you’re hosting a larger gathering, consider cutting smaller squares or rectangles. Arrange them artfully on a large platter amidst other holiday treats.
- Garnish Galore: Elevate each serving! A dollop of freshly whipped cream, a few sugared cranberries, or a sprig of fresh mint can add extra elegance and flavor. A light dusting of powdered sugar over the plate before placing the slice can also create a beautiful “snow” effect.
- Individual Plating: For a more formal presentation, serve each slice on a festive holiday plate. You can drizzle a bit of extra melted white chocolate (or even dark chocolate for contrast) around the plate.
- Serving Temperature: This cheesecake is best served chilled. Remove it from the refrigerator about 15-20 minutes before serving to allow it to slightly soften, enhancing its creamy texture, but don’t let it get too warm.
Storage and Shelf Life
Ensuring your Festive Christmas Tree Cheesecake Delight! stays fresh and delicious is key. This impressive dessert can be enjoyed for several days after baking:
- Refrigerator Storage: Store any leftover cheesecake in an airtight container in the refrigerator. This will keep it fresh and delicious for up to 3-5 days. Make sure it’s well-covered to prevent it from absorbing any odors from other foods in your fridge.
- Freezing for Later: For longer storage, you can freeze your cheesecake! It’s best to freeze it *before* applying the ganache and decorations. Wrap the chilled cheesecake (still in the springform base, or removed carefully) tightly in several layers of plastic wrap, then an additional layer of aluminum foil. It can be frozen for up to 1-2 months.
- Thawing Frozen Cheesecake: When you’re ready to enjoy, transfer the frozen cheesecake to the refrigerator and let it thaw overnight. Once thawed, you can then prepare and apply the ganache and decorations as per the recipe. This makes it a fantastic make-ahead option for busy holiday entertaining!
Festive Christmas Tree Cheesecake Delight! FAQs
Got questions? We’ve got answers to help you perfect your Festive Christmas Tree Cheesecake Delight!!
- Q1: Can I use a different type of crust?
A: Absolutely! While graham cracker is classic, you could use crushed shortbread cookies, ginger snaps, or even chocolate wafers for a different flavor profile. Just ensure you have about 1 ½ cups of crumbs and enough melted butter to bind them. - Q2: What if I can’t find Little Debbie Christmas Tree Cakes?
A: No problem! You can substitute them with other small, festive snack cakes (like Twinkies or similar holiday-themed treats), or even cut up a plain pound cake into tree shapes (if you’re feeling ambitious!). The idea is to have a soft cake surprise in the middle. - Q3: How do I prevent my cheesecake from cracking?
A: Several steps in the recipe help with this: using room temperature ingredients, not overmixing the batter (especially after adding eggs), using a slow oven temperature reduction, and the gradual cooling process in the oven. Cracks often occur from sudden temperature changes. - Q4: Can I make this cheesecake ahead of time?
A: Yes, and we highly recommend it! Cheesecakes benefit greatly from chilling overnight. You can bake it a day or two in advance and keep it chilled in the refrigerator, adding the ganache and final decorations on the day of serving. - Q5: Can I freeze this cheesecake?
A: Yes, you can! For best results, freeze the cheesecake *before* adding the ganache and decorations. Wrap it tightly in plastic wrap and then foil. Thaw in the refrigerator overnight before decorating and serving. - Q6: What’s the best way to cut clean slices?
A: For super clean slices, use a very sharp, thin knife. Dip the knife in hot water and wipe it dry between each cut. This prevents the cheesecake from sticking and dragging. - Q7: Can I use different chocolate for the ganache?
A: Certainly! If you prefer, you can use milk chocolate or dark chocolate chips for the ganache. The color scheme will change, but the flavor will still be delicious. Adjust the heavy cream amount slightly if needed, as different chocolates have varying consistencies. - Q8: Is room temperature cream cheese and eggs really important?
A: Yes! Room temperature ingredients emulsify much better, resulting in a smoother, lump-free batter. Cold cream cheese will be difficult to beat smoothly, leading to lumps, and cold eggs can cause the mixture to seize. - Q9: My ganache isn’t smooth, what went wrong?
A: This usually happens if the cream wasn’t hot enough, or if the chocolate didn’t sit long enough to melt properly before whisking. If it’s grainy, try gently reheating it over a double boiler or in short microwave bursts, stirring constantly, until smooth. - Q10: Can I make this in a smaller/larger pan?
A: This recipe is scaled for a 9-inch springform pan. If you use a smaller pan (e.g., 8-inch), you might have leftover batter or need to adjust baking time (likely longer). For a larger pan, you’d need to scale up the ingredients significantly. We recommend sticking to the 9-inch for optimal results.
Festive Christmas Tree Cheesecake Delight!
Equipment
- 9-inch Springform Pan
- Food Processor
- Stand Mixer
- Offset Spatula
- Wire Rack
Ingredients
For the Crust
- 1 1/2 cups Graham Cracker Crumbs
- 6 tablespoons Melted Butter
For the Cheesecake Filling
- 3 packages Softened Cream Cheese (8-ounce each)
- 1/2 cup Granulated Sugar
- 3 tablespoons All-Purpose Flour
- 1 teaspoon Vanilla Extract
- 1/2 cup Heavy Whipping Cream
- 2 Large Eggs room temperature is best!
For the Layer & Toppings
- 7 Little Debbie Christmas Tree Cakes
- 1 cup White Chocolate Chips or Chopped White Chocolate
- 1/3 cup Heavy Whipping Cream (for ganache)
- Green Sanding Sugar or Sprinkles
- Red Tube Frosting or Buttercream
Instructions
- 1. Prep the Pan & Oven: Preheat your oven to 350°F (175°C). Lightly spray a 9-inch springform pan with non-stick spray.
- 2. Make the Crust: In a food processor, pulse graham crackers until you have fine crumbs (about 1 ½ cups). Add the melted butter and pulse until just combined.
- 3. Press & Bake Crust: Pour the crumb mixture into the prepared pan and press it firmly and evenly into the bottom. Bake for 10 minutes until lightly golden. Set aside.
- 4. Cream the Cheese: In the bowl of a stand mixer with a paddle attachment, beat the softened cream cheese on high speed until it's super smooth and fluffy.
- 5. Mix in Sweetness: Add the granulated sugar, flour, and vanilla extract. Mix on low speed until everything is just combined and smooth. Don't forget to scrape down the sides and bottom of the bowl!
- 6. Add Cream: Pour in the heavy whipping cream and mix on low speed until it's blended. Increase the speed to high for about 1 minute.
- 7. Incorporate Eggs Gently: Add the eggs one at a time, mixing on low speed just until each egg is incorporated. Be careful not to overmix, as too much air can cause cracks.
- 8. First Layer of Filling: Pour half of the cheesecake batter over your baked graham cracker crust. Gently smooth it out with an offset spatula.
- 9. Add the Christmas Cakes: Carefully arrange the Little Debbie Christmas Tree Cakes in a circle over the batter, gently pressing them down slightly into the filling.
- 10. Top with Remaining Batter: Pour the rest of the cheesecake batter over the cakes, smoothing the top to cover them completely.
- 11. Bake to Perfection: Bake at 350°F (175°C) for 15 minutes. Without opening the oven door, reduce the heat to 200°F (95°C) and continue baking for an additional 50-53 minutes. The cheesecake is ready when the edges are set and the center still has a slight, gentle jiggle.
- 12. Slow Cool Down: Turn off the oven, crack the oven door open, and let the cheesecake cool slowly inside for about 15 minutes.
- 13. Chill Out: Remove the cheesecake from the oven and let it cool completely to room temperature on a wire rack. Once cool, transfer it to the refrigerator and chill overnight (or at least 4-6 hours) for the best texture and firmness.
- 14. Prepare Ganache: Once the cheesecake is fully chilled, heat ⅓ cup of heavy whipping cream in a microwave-safe bowl in 30-second increments until it's hot, but not boiling.
- 15. Mix Ganache: Pour the hot cream over the white chocolate chips. Let it sit for about 3 minutes, then whisk until the ganache is perfectly smooth and glossy.
- 16. Decorate: Pour the white chocolate ganache over the top of the chilled cheesecake and spread it evenly. Sprinkle generously with green sanding sugar. Use your red tube frosting to create decorative lines on top, mimicking the iconic Little Debbie Christmas Tree Cake design.
- 17. Serve & Store: Slice and enjoy your festive creation! Store any leftover cheesecake in an airtight container in the refrigerator for up to 3-5 days.