Get ready to whisk your taste buds away on a sleigh ride of deliciousness with a dessert that’s as easy to make as it is enchanting to behold! Are you dreaming of a show-stopping holiday treat that doesn’t demand hours in a hot kitchen? Imagine a dessert that’s vibrant, creamy, and oh-so-satisfying, yet light enough to enjoy guilt-free. Stop dreaming and start creating, because the **Festive Green Dream No-Bake Cheesecake** is here to make your holiday season brighter, bolder, and absolutely delectable!
This isn’t just any cheesecake; it’s a delightful fusion of convenience, festive charm, and a healthier twist, ensuring your celebrations are filled with joy without the extra fuss. Perfect for Christmas, New Year’s, or any gathering where a touch of magic is desired, this **Festive Green Dream No-Bake Cheesecake** is your secret weapon for effortless entertaining.
Why You’ll Love This Festive Green Dream No-Bake Cheesecake
- No-Bake Bliss: Forget turning on the oven! This recipe keeps your kitchen cool and stress-free, making it perfect for busy holiday preparations. Just mix, spread, and chill – it’s that simple to create this **Festive Green Dream No-Bake Cheesecake**.
- Healthier Holiday Twist: With options for lower-sugar cookies, light butter/coconut oil, erythritol, and light whipped topping, this cheesecake offers a delightful way to indulge without overdoing it. You can even use spinach powder for natural coloring!
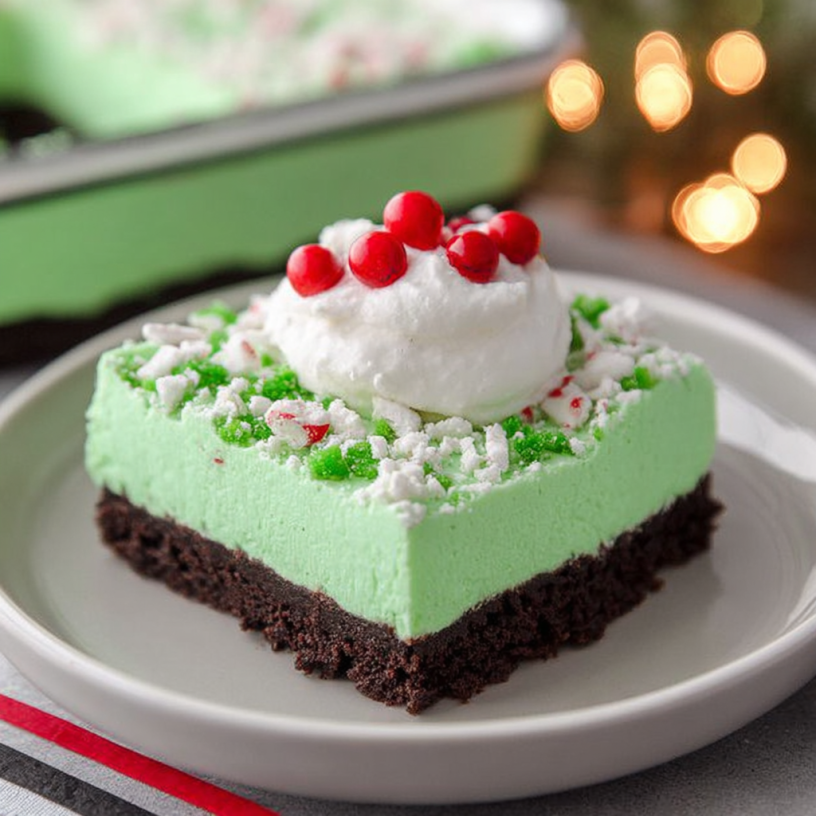
- Effortlessly Festive & Fun: The vibrant green hue makes this dessert a cheerful centerpiece, instantly adding a pop of holiday spirit to your table. It’s a visual treat that promises a taste sensation.
- Creamy, Dreamy Texture: Prepare for an incredibly smooth, rich, and velvety filling perfectly complemented by a delightful chocolate cookie crust. Each bite of this **Festive Green Dream No-Bake Cheesecake** is pure, unadulterated pleasure.
Ingredients for Your Festive Green Dream No-Bake Cheesecake
- 🍪 2.5 cups crushed chocolate sandwich cookies (opt for lower-sugar or whole-grain varieties for a healthier twist)
- 🧈 1/2 cup light butter or coconut oil, melted
- 🧀 4 (8 oz) blocks light cream cheese, softened
- 🥄 1.5 cups powdered erythritol or a reduced-sugar powdered sweetener blend (or regular powdered sugar, adjusted to taste)
- 🍦 16 oz light whipped topping, thawed (e.g., Cool Whip Lite)
- 🟢 A few drops natural green food coloring (or a pinch of spinach powder for a subtle, natural hue)
- 🍓 Fresh berries or a dollop of extra light whipped topping for garnish (optional)
Detailed Directions: How to Make Your Festive Green Dream No-Bake Cheesecake
- Prepare the Healthy Crust: Gently pulse the crushed chocolate sandwich cookies in a food processor until fine crumbs form. In a medium bowl, combine these crumbs with the melted light butter or coconut oil, mixing until well incorporated. Press this mixture firmly and evenly into the bottom of a 9×13 inch baking pan. Set aside.
- Whip the Creamy Filling: In a large mixing bowl, beat the softened light cream cheese with the powdered erythritol (or your chosen sweetener) until the mixture is smooth and delightfully creamy. Gently fold in the light whipped topping until everything is fully combined.
- Add Your Festive Color: Carefully add a few drops of natural green food coloring (or the spinach powder for a more natural approach) to the cheesecake mixture. Stir gently until your desired cheerful green shade is reached.
- Assemble & Chill to Perfection: Evenly spread the vibrant green cheesecake mixture over your prepared cookie crust. Cover the pan loosely with plastic wrap and refrigerate for at least 4 hours, or ideally overnight, to allow the cheesecake to set beautifully and firm up.
- Serve with Holiday Cheer: Before serving, feel free to add a cheerful dollop of extra light whipped topping or garnish with some fresh berries for a bright, seasonal touch. Slice and savor this wonderfully easy and healthier holiday treat!
Presenting and Serving Your Festive Green Dream No-Bake Cheesecake
The beauty of this **Festive Green Dream No-Bake Cheesecake** isn’t just in its taste, but also in its presentation versatility! For a classic holiday look, a simple dollop of extra light whipped topping in the center of each slice, perhaps sprinkled with a few red cranberries or pomegranate seeds, creates a stunning contrast. You could also arrange a mix of fresh raspberries and blueberries around the edges of the whole cheesecake before slicing for a patriotic or traditionally festive red-and-green theme. For an extra touch of decadence, finely grate some dark chocolate over the top or sprinkle with mini chocolate chips. A sprig of fresh mint leaf can also add a natural, elegant touch. For individual servings, consider pressing the crust into muffin liners before adding the filling, then chill and serve mini cheesecakes for a charming party treat!
Storing Your Festive Green Dream No-Bake Cheesecake
To keep your **Festive Green Dream No-Bake Cheesecake** tasting fresh and fabulous, store it properly. Cover the baking pan loosely but securely with plastic wrap or aluminum foil, ensuring it’s airtight to prevent it from absorbing refrigerator odors. Place the covered cheesecake in the refrigerator. It will stay fresh and delicious for up to 3-5 days. While technically you *can* freeze no-bake cheesecakes, the texture of the whipped topping can sometimes become a bit watery or icy upon thawing, so it’s generally best enjoyed fresh from the fridge within the recommended storage time.
FAQs About the Festive Green Dream No-Bake Cheesecake
- Can I use full-fat cream cheese and regular sugar?
Yes, absolutely! The recipe provides healthier options, but you can certainly use full-fat cream cheese and regular powdered sugar if you prefer a richer, more traditional cheesecake. Adjust sweetener to taste. - What if I don’t have a food processor for the crust?
No problem! Place the cookies in a large Ziploc bag and crush them with a rolling pin or the bottom of a heavy glass until fine crumbs form. - Can I make this cheesecake ahead of time?
Yes, it’s highly recommended! This cheesecake needs at least 4 hours to set, but chilling it overnight allows it to firm up perfectly and makes for easier slicing. - How can I get a truly natural green color without artificial dyes?
A pinch of spinach powder (available online or in health food stores) works beautifully for a subtle, natural green. You can also blend a small amount of steamed spinach (about 1/4 cup) into the cream cheese mixture for a more vibrant, natural hue, but ensure it’s very finely pureed. - Can I use a different type of cookie for the crust?
Certainly! Graham crackers, vanilla wafers, or even gluten-free chocolate cookies would work wonderfully for the crust. - My cheesecake filling seems too soft. What went wrong?
Ensure your cream cheese was softened but not warm, and your whipped topping was thawed but still cold. Proper chilling time is also crucial for the cheesecake to set firmly. Don’t skip the overnight chill if possible! - Is this recipe suitable for those on a low-carb diet?
With the suggested modifications (lower-sugar cookies, erythritol, light whipped topping), this recipe is designed to be lower in carbs than traditional cheesecake, making it a good option for those managing carb intake. - How many servings does this recipe yield?
The recipe is designed to yield 12 generous servings, perfect for a gathering. - What are some alternative toppings for serving?
Beyond berries and whipped topping, consider chocolate syrup drizzle, a sprinkle of toasted coconut flakes, crushed peppermint candies for extra holiday cheer, or a caramel drizzle. - Can I make this in a different size pan?
You can use a 9×9 inch pan for a thicker cheesecake, but you might need to adjust chilling time. A larger pan might result in a thinner cheesecake, but the proportions should still work.
Festive Green Dream No-Bake Cheesecake 💚
Equipment
- Food Processor
- Large Mixing Bowls
- 9x13-inch baking pan
Ingredients
Crust
- 2.5 cups crushed chocolate sandwich cookies opt for lower-sugar or whole-grain varieties for a healthier twist
- 0.5 cup light butter or coconut oil melted
Cheesecake Filling
- 4 blocks light cream cheese 8 oz, softened
- 1.5 cups powdered erythritol or reduced-sugar powdered sweetener blend or regular powdered sugar, adjusted to taste
- 16 oz light whipped topping thawed (e.g., Cool Whip Lite)
- natural green food coloring a few drops (or a pinch of spinach powder for a subtle, natural hue)
Garnish
- fresh berries or extra light whipped topping for garnish (optional)
Instructions
- Gently pulse the crushed chocolate sandwich cookies in a food processor until fine crumbs form. In a medium bowl, combine these crumbs with the melted light butter or coconut oil, mixing until well incorporated. Press this mixture firmly and evenly into the bottom of a 9x13 inch baking pan. Set aside.
- In a large mixing bowl, beat the softened light cream cheese with the powdered erythritol (or your chosen sweetener) until the mixture is smooth and delightfully creamy. Gently fold in the light whipped topping until everything is fully combined.
- Carefully add a few drops of natural green food coloring (or the spinach powder for a more natural approach) to the cheesecake mixture. Stir gently until your desired cheerful green shade is reached.
- Evenly spread the vibrant green cheesecake mixture over your prepared cookie crust. Cover the pan loosely with plastic wrap and refrigerate for at least 4 hours, or ideally overnight, to allow the cheesecake to set beautifully and firm up.
- Before serving, feel free to add a cheerful dollop of extra light whipped topping or garnish with some fresh berries for a bright, seasonal touch. Slice and savor this wonderfully easy and healthier holiday treat!
Notes
- Calories: ~290
- Total Carbs: ~35g
- Net Carbs: ~30g
- Fats: ~20g
- Protein: ~6g