Are you ready to make your heart grow three sizes this holiday season, not from sorrow, but from pure dessert joy? Get ready to channel your inner Grinch – the sweet, dessert-loving one, of course – with these absolutely delightful Festive No-Bake Grinch Cheesecakes! Forget the oven stress and complicated techniques; we’re diving headfirst into a world where creamy, dreamy, green-hued goodness meets a simple, crunchy crust, all topped with a cheerful red heart. Perfect for dazzling your guests or simply treating yourself, these mini cheesecakes are the ultimate embodiment of holiday cheer without the holiday hassle. So grab your mixing bowls and let’s whip up some Grinchy magic that’s as easy as it is enchanting!
Why You’ll Love This Recipe
Prepare to fall head over heels for these charmingly mischievous Grinch Cheesecakes. Here are four fantastic reasons why this recipe is about to become your new holiday favorite:
- Effortlessly Festive Fun: Ditch the baking anxiety! These cheesecakes require absolutely no oven time, making them a stress-free addition to your busy holiday schedule. Their vibrant green hue and cheerful red heart scream Christmas spirit without any complicated artistry.
- Quick & Easy Prep: With only 20 minutes of active prep time, you can have these beauties assembled and chilling in no time. It’s perfect for when you need an impressive dessert but are short on time.
- Irresistibly Delicious: A perfect balance of sweet, tangy cream cheese filling, a crunchy graham cracker crust, and a hint of vanilla makes these cheesecakes utterly scrumptious. The optional lime zest adds a fantastic fresh twist that brightens every bite.
- Perfectly Portioned & Shareable: Serving 12 individual mini cheesecakes means no slicing, no mess, and everyone gets their own adorable treat. They’re ideal for holiday parties, potlucks, or as a special individual dessert after a festive meal.
Ingredients with Measurements
Gather your ingredients to create these enchanting Festive No-Bake Grinch Cheesecakes!
- 🍪 1 ½ cups graham cracker crumbs
- 🧈 5 tablespoons melted butter
- 🍚 2 tablespoons sugar
- 🧀 16 ounces cream cheese, softened
- ❄️ ¾ cup powdered sugar
- 🥛 1 cup cold heavy whipping cream
- 🌿 1 teaspoon vanilla extract
- 🟢 1-2 drops green food coloring (or matcha powder for a natural green hue)
- 🍋 1 teaspoon lime zest (optional, for a fresh twist)
- 🍦 Extra whipped cream for topping
- ❤️ Red candy hearts (or red fondant hearts) for decoration
Detailed Step-by-Step Directions How to Make the Recipe
Let’s get those hands busy and create some holiday magic with these Festive No-Bake Grinch Cheesecakes!
- Craft the Crumbly Crust: In a medium-sized bowl, combine your finely crushed graham cracker crumbs, granulated sugar, and the golden melted butter. Mix everything together thoroughly until the mixture resembles damp sand – cohesive enough to hold together when pressed.
- Press and Chill the Base: Divide this delightful crumb mixture evenly among 12 mini cheesecake molds or muffin cups that have been lined with paper liners. Using the back of a spoon or your fingers, press the mixture firmly and evenly into the bottom of each cup. This creates a sturdy foundation for your cheesecake. Pop these into the freezer for about 10 minutes; this quick chill helps the crust set perfectly.
- Whip Up the Velvety Filling: In a large mixing bowl, take your softened cream cheese and beat it with an electric mixer until it’s wonderfully smooth and completely free of lumps. Gently incorporate the powdered sugar and vanilla extract, mixing until everything is just combined and luscious.
- Create Fluffy Peaks: In a separate, clean, and chilled bowl, pour your cold heavy whipping cream. Using an electric mixer on high speed, beat the cream until it forms stiff peaks – meaning when you lift the beaters, the peaks hold their shape beautifully.
- Fold in the Festive Green: Carefully and gently fold the whipped cream into your cream cheese mixture. This step is crucial for achieving that light, airy texture. Once combined, add just one or two drops of green food coloring (or a pinch of matcha powder) and fold it in until you reach that iconic Grinchy green hue. If you’re a fan of a little citrus zing, now’s the time to fold in your optional lime zest!
- Assemble Your Grinchy Delights: Retrieve your chilled crusts from the freezer. Spoon your vibrant green cheesecake filling evenly over each crust. Use a small spatula or the back of a spoon to smooth out the tops, creating a neat finish.
- The Grand Chill: Loosely cover your mini cheesecakes with plastic wrap, being careful not to disturb the filling. Transfer them to the refrigerator to chill for a minimum of 3 hours. For the very best results and a perfectly set cheesecake, chilling them overnight is highly recommended. Patience is key here!
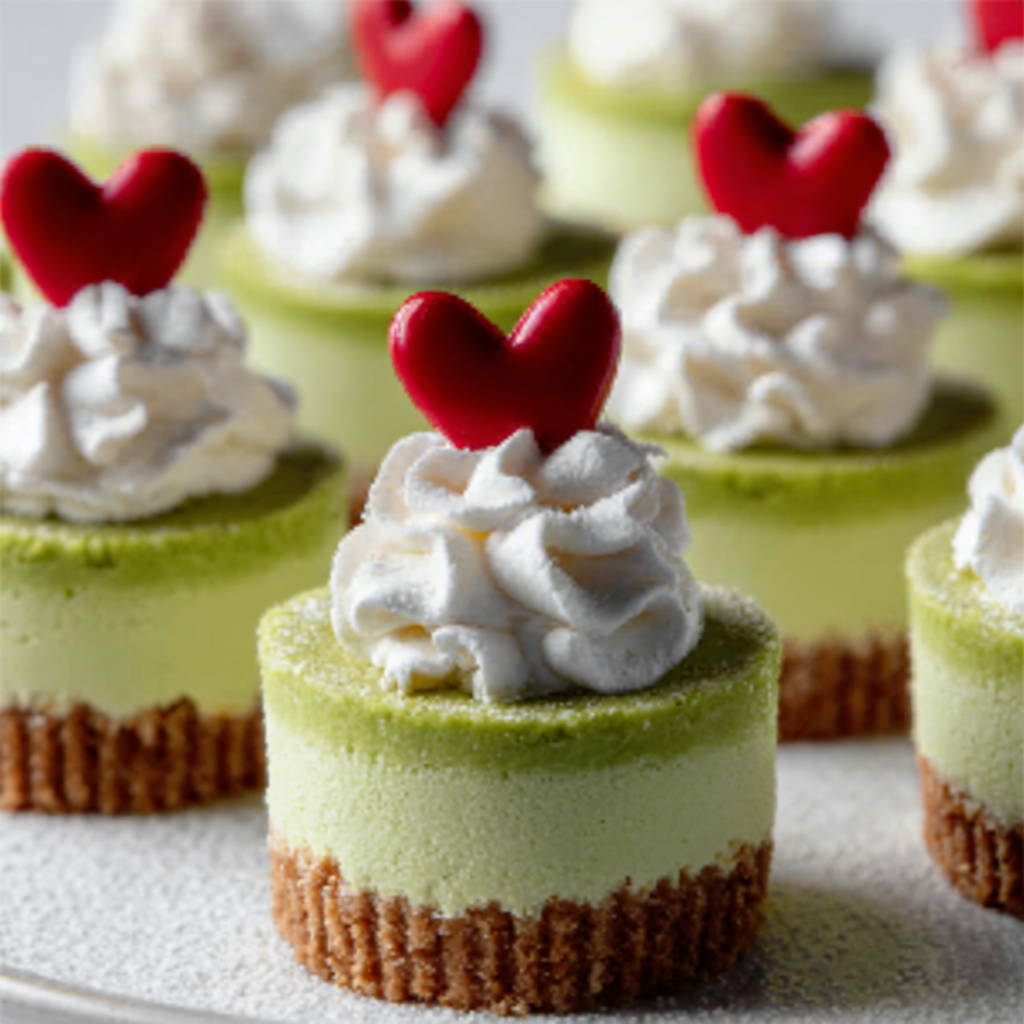
- Decorate and Serve with Glee: Once your cheesecakes are perfectly firm and chilled, it’s time for the final, festive flourish! Pipe or dollop a generous amount of extra whipped cream on top of each cheesecake. Finish by gently placing a bright red candy heart (or a cute red fondant heart) on each one. Serve them cold and watch as these delightful Festive No-Bake Grinch Cheesecakes bring smiles and holiday cheer to everyone!
Detailed Different Ways You Can Present the Recipe and How to Serve It
These Festive No-Bake Grinch Cheesecakes are already adorable, but with a few creative touches, you can elevate their presentation and serving style to truly impress!
- Mold Magic: While mini cheesecake molds or lined muffin cups work perfectly, consider using mini tart pans with removable bottoms for an even more professional look. Small glass jars or shot glasses can also be layered with crust and filling for a charming “Grinch Parfait” presentation.
- Topping Extravaganza: Beyond the classic whipped cream and red candy heart, let your imagination run wild!
- Sparkle & Shine: Dust with edible glitter (red or green!) or Christmas-themed sprinkles for extra sparkle.
- Berry Bright: A single fresh raspberry or a few pomegranate arils can mimic the red heart and add a burst of fresh flavor.
- Chocolate Charm: Drizzle with melted white chocolate tinted red, or finely grated dark chocolate for contrast.
- Mini Santa Hat: A dollop of whipped cream with a small strawberry tip on top makes a cute mini Santa hat!
- Grinch’s Finger: A green candy melt “finger” with a red almond “nail” can add a quirky, fun touch for those who like a bit of whimsy.
- Serving Suggestions:
- Dessert Platter Perfection: Arrange them on a festive platter with sprigs of holly (non-edible, of course!) or pine needles for a beautiful holiday centerpiece.
- Individual Delights: Present each cheesecake on a small decorative plate, perhaps with a dusting of powdered sugar around the base for a “snowy” effect.
- Holiday Brunch Addition: These mini cheesecakes aren’t just for after dinner; they make a fantastic, light, and festive addition to a holiday brunch spread.
- Edible Gift: Package a few in small decorative boxes with a ribbon for a thoughtful, homemade holiday gift.
How You Can Store It and How Long Does It Last
Keeping your delightful Festive No-Bake Grinch Cheesecakes fresh and delicious is simple with proper storage!
- Refrigeration is Key: Once assembled and chilled, these cheesecakes must be stored in the refrigerator. Place them in an airtight container to prevent them from absorbing any odors from other foods in your fridge and to maintain their creamy texture.
- How Long Do They Last in the Fridge? When stored correctly in an airtight container, these no-bake cheesecakes will stay fresh and delicious for up to 3-4 days in the refrigerator. The longer they sit, the softer the crust might become, but the filling will remain delightful.
- Freezing for Later: Yes, you can freeze these cheesecakes! For best results, freeze them *before* adding the extra whipped cream and candy heart toppings. Place the set cheesecakes (without toppings) on a baking sheet and freeze until solid, about 1-2 hours. Once solid, transfer them to a freezer-safe airtight container or individually wrap them in plastic wrap, then place them in a freezer bag. They can be stored in the freezer for up to 1 month.
- Thawing Frozen Cheesecakes: When you’re ready to enjoy a frozen cheesecake, simply transfer it from the freezer to the refrigerator and let it thaw for a few hours or overnight. Once thawed, add your fresh whipped cream and red candy heart just before serving for the best presentation and texture.
FAQs
Got questions about these enchanting Festive No-Bake Grinch Cheesecakes? We’ve got answers!
1. Can I make these cheesecakes ahead of time?
Absolutely! In fact, making them ahead of time is recommended. They need a minimum of 3 hours to chill and set, but chilling them overnight yields the best results. You can prepare them up to 2-3 days in advance and store them in an airtight container in the refrigerator.
2. What if I don’t have mini cheesecake molds?
No problem! You can use a 12-cup muffin tin lined with paper liners. The liners make it easy to remove the cheesecakes once set. Alternatively, you can make them in small dessert glasses or jars for a “Grinch Parfait” style dessert.
3. Can I use other types of crumbs for the crust?
Yes! While graham cracker crumbs are traditional, you could experiment with crushed Oreos (for a darker, more dramatic crust), shortbread cookies, or even vanilla wafers. Adjust the amount of melted butter as needed to get that “damp sand” consistency.
4. What if I don’t have green food coloring?
If you prefer a natural approach, matcha powder works wonderfully to create a lovely green hue and adds a subtle earthy flavor. Start with ½ teaspoon and add more to achieve your desired shade. You can also skip the coloring entirely for a classic white cheesecake that you can still top with a red heart for a festive look.
5. Can I make a larger cheesecake instead of individual ones?
Yes, you can! This recipe can be adapted to make one 8 or 9-inch no-bake cheesecake. Press the crust into the bottom of a springform pan. The chilling time might need to be extended slightly to ensure it sets properly.
6. How do I get the cheesecakes out of the molds easily?
If using muffin tins with paper liners, simply lift them out. For mini cheesecake molds, ensure they have removable bottoms. If using a solid mold, you can gently run a thin, warm knife around the edge before carefully pushing them out, or line the mold with plastic wrap before pressing the crust in, creating “handles” to lift them out.
7. Can I use sugar substitutes?
Yes, you can substitute the granulated sugar in the crust and the powdered sugar in the filling with your preferred sugar substitutes. Just ensure they are suitable for baking/no-bake recipes and adjust quantities according to the product’s instructions for equivalency.
8. Why did my filling not set properly?
The most common reasons for a filling not setting are: 1) The cream cheese wasn’t softened enough, leading to lumps and poor emulsion. 2) The heavy cream wasn’t whipped to stiff peaks. Stiff peaks are crucial for the structure. 3) Insufficient chilling time. Make sure you chill them for at least 3 hours, preferably overnight!
9. Are these Grinch cheesecakes kid-friendly to make?
Absolutely! Kids can help with crushing graham crackers, mixing the crust ingredients, pressing the crust into molds, and especially adding the green food coloring and decorating with the whipped cream and candy hearts. It’s a fun holiday activity!
10. What’s the best way to get stiff peaks for whipped cream?
For the best stiff peaks, ensure your heavy whipping cream is very cold. Chilling your mixing bowl and whisk attachment for 10-15 minutes in the freezer before whipping can also make a significant difference. Start on medium speed and gradually increase to high as the cream thickens.
Festive No-Bake Grinch Cheesecakes 🎄
Equipment
- Mini Cheesecake Molds
- Muffin cups
Ingredients
Simple Crust
- 1.5 cups graham cracker crumbs
- 5 tablespoons melted butter
- 2 tablespoons sugar
Creamy Filling & Decoration
- 16 ounces cream cheese softened
- 0.75 cup powdered sugar
- 1 cup cold heavy whipping cream
- 1 teaspoon vanilla extract
- 1-2 drops green food coloring or matcha powder for a natural green hue
- 1 teaspoon lime zest optional, for a fresh twist
- Extra whipped cream for topping
- Red candy hearts or red fondant hearts, for decoration
Instructions
- Make the Simple Crust: In a bowl, combine your graham cracker crumbs, sugar, and melted butter until it looks like damp sand. Press this mixture firmly into the bottom of 12 mini cheesecake molds or lined muffin cups. Pop them into the freezer for about 10 minutes to chill and set.
- Whip Up the Creamy Filling: Get your softened cream cheese and beat it in a large bowl until it's wonderfully smooth and fluffy. Gently mix in the powdered sugar and vanilla extract until everything is well combined. In a separate, clean bowl, whip the cold heavy cream until it forms stiff peaks. Carefully fold this whipped cream into your cream cheese mixture to make it light and airy. Now, add just a drop or two of green food coloring to get that perfect Grinchy hue. Feel free to stir in a little lime zest if you like a fresh, zesty kick!
- Assemble & Chill: Spoon your vibrant green cheesecake filling evenly over the chilled crusts. Smooth out the tops with a spatula. Cover them loosely with plastic wrap and place them in the refrigerator to chill for at least 3 hours, or even better, overnight. This step is key for them to set beautifully!
- Decorate & Serve: Once your cheesecakes are perfectly set, it's time for the final touch! Pipe a dollop of extra whipped cream on top of each cheesecake. Finish by gently placing a red candy heart on each one – they're now ready to bring festive cheer! Serve them cold and enjoy these delightful bites.
Notes
Calories: 250
Total Carbs: 20g
Net Carbs: 19g
Fats: 18g
Protein: 3g