The air is crisp, the leaves are falling, and spooky season is officially here! If you’re looking for a dessert that’s as fun to make as it is to eat, then you’re in for a treat. Look no further than our incredible Halloween Dirt Cups – a classic spooky treat that are super fun and easy to make! They’re essentially layered chocolate pudding and crushed cookies, ready to be transformed into edible graveyards, wormy wonders, or ghastly ghost scenes. Forget complicated baking; these delightful dirt cups are all about layering, chilling, and letting your imagination run wild. Perfect for kids and adults alike, they’re the ultimate crowd-pleaser for any Halloween bash.
Why You’ll Love These Spooky Dirt Cups
There are countless reasons why these Halloween Dirt Cups will become your go-to festive treat. Here are just four to get you excited:
- Effortlessly Easy & No-Bake: Ditch the oven and complex techniques! This recipe is incredibly straightforward, involving simple mixing and layering. It’s perfect for beginners, busy parents, or anyone who wants a spectacular dessert without the stress.
- Fantastically Fun & Fully Customizable: This isn’t just a recipe; it’s an edible craft project! Kids will adore helping to crush the “dirt” and, most importantly, decorating their very own spooky creations. From ghoulish gravestones to slithering gummy worms, the possibilities for personalization are endless.
- Irresistibly Delicious: With rich chocolate pudding, sweet whipped topping, and crunchy Oreo “dirt,” every spoonful is a delight. The combination of textures and flavors is a guaranteed hit, satisfying even the most discerning sweet tooth.
- Party-Perfect Portions: Our recipe makes a generous 18 servings, making it ideal for large Halloween parties, school functions, or simply having plenty to go around. You can prepare them ahead of time, freeing you up to enjoy the festivities!
Gather Your Ghastly Goodies: Ingredients
Get ready to conjure up some magic with these simple ingredients. You’ll be amazed at how easily these come together to create such a show-stopping treat for your Halloween celebration. This recipe is designed to make approximately 18 servings, so adjust accordingly if you need more or less!
- For the Creamy Chocolate Base:
- 2 (3 oz) packages instant chocolate pudding mix
- 4 cups cold milk (dairy or non-dairy, as per pudding package)
- 16 oz frozen whipped topping, thawed (like Cool Whip)
- ½ cup chocolate syrup, divided (for pudding and moist dirt)
- For the “Dirt” Layer:
- 2 (19 oz) packages of Oreos (about 36 cookies, including cream filling)
- For the Spooky Decorations (Mix & Match Your Favorites!):
- Milano cookies or Pirouette cookies (for gravestones)
- Black decorator icing or edible food marker (for “RIP” on gravestones)
- Ghost Peeps, pumpkin candies, Halloween sprinkles
- Gummy worms, centipedes, or spiders (for creepy crawlies)
- Small chocolate or gummy eyeballs
- White chocolate chips or melting wafers (for ghosts or bones)
- Pretzel sticks (for spider legs or rustic gravestones)
- Green food coloring + shredded coconut (for “moss” effect)
- Small plastic spiders or other non-edible Halloween props (for display)
Summoning the Spookiness: Step-by-Step Directions
Creating your Halloween Dirt Cups is a breeze! Follow these simple steps, and you’ll have a graveyard full of deliciousness ready in no time. Precision isn’t as important as creativity here, so have fun with it!
- Prepare the Pudding Base: In a large mixing bowl, combine the instant chocolate pudding mix and cold milk. Whisk vigorously for 2-3 minutes until the mixture starts to thicken. Let it sit for 5 minutes to fully set. Gently fold in the thawed whipped topping until just combined. Mix in half of the chocolate syrup (¼ cup) into the pudding mixture, stirring gently until it creates a streaky, marbled effect. Cover the bowl and refrigerate while you prepare the “dirt.”
- Make the Oreo “Dirt”: Place the entire Oreo cookies (filling included) into a food processor. Pulse until finely crushed and it resembles dark, crumbly dirt. If you don’t have a food processor, place the cookies in a large resealable bag and crush them with a rolling pin. Transfer the crushed Oreos to a large bowl.
- Assemble Your Dirt Cups: Grab your clear individual dessert cups. Spoon about 2 tablespoons of the crushed Oreo “dirt” into the bottom of each cup. Follow with approximately ¼ cup of the chilled chocolate pudding mixture. Repeat these layers – Oreo dirt, then pudding – until your cups are nearly full. Finish with a final layer of about 1 tablespoon of plain Oreo “dirt” on top, resembling freshly turned earth.
- Create Moist Grave Dirt (Optional but Recommended!): In a separate small bowl, mix the remaining ¼ cup of chocolate syrup with a handful of the reserved Oreo crumbs. Stir until you have a moist, clumpy mixture that looks like dense, wet soil. This is perfect for creating grave mounds!
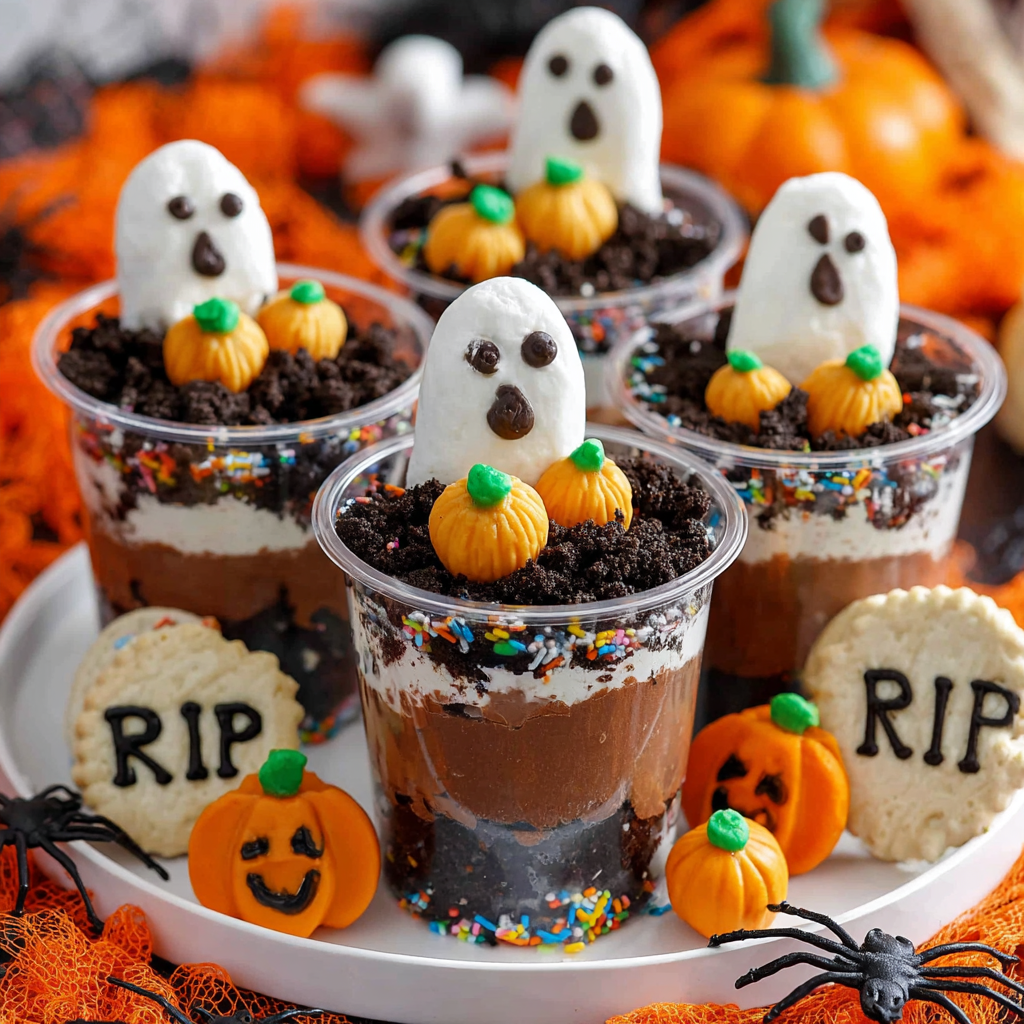
- Chill & Decorate: For best results, chill the assembled dirt cups for at least 30 minutes to an hour to allow the pudding to firm up completely. Just before serving, unleash your inner ghoul and get decorating! Use black icing to write “RIP” on Milano cookies and stand them upright in the dirt. Add ghost Peeps, mini pumpkin candies, and Halloween sprinkles. Then, go wild with gummy worms crawling out, white chocolate ghosts peeking over, or pretzel stick “bones.” Top with your moist grave dirt mixture around gravestones for a more realistic cemetery effect.
Serving & Presentation: Your Graveyard Glam
These Halloween Dirt Cups aren’t just delicious; they’re a canvas for your spooky creativity! The way you present them can elevate them from a simple dessert to a show-stopping center-piece. Here are some fun ideas:
- Individual Clear Cups: The classic approach! Using clear plastic cups, small mason jars, or even glass tumblers allows guests to admire the distinct layers of “dirt” and pudding. This also makes for super easy portion control and serving at a party.
- The Grand Graveyard Trifle: For a dramatic centerpiece, assemble the entire recipe in a large trifle bowl or a clear punch bowl. This creates one massive “graveyard” scene that everyone can serve themselves from. Arrange gravestones, worms, and ghosts across the top for a truly epic display.
- Terracotta Pots: For an extra authentic touch, consider using new, clean, small terracotta pots (lined with parchment paper or plastic wrap for food safety). These perfectly mimic planters, making your “dirt” cups even more convincing.
- Mini Shovels & Spoons: Serve with small plastic shovels or themed Halloween spoons to enhance the “digging for treasure” experience.
- Themed Tablescape: Arrange your decorated dirt cups on a black tablecloth, surrounded by faux cobwebs, plastic spiders, and flickering LED candles for an ultimate eerie ambiance.
Keeping the Spooks Fresh: Storage & Shelf Life
One of the best things about Halloween Dirt Cups is that they can be prepared ahead of time, taking some stress out of party planning! Knowing how to properly store them will ensure they taste just as good as they look.
- Make Ahead Magic: You can absolutely assemble the pudding and cookie layers of your dirt cups a day in advance. Prepare them as directed, but hold off on adding the delicate decorations like Milano cookies, Peeps, or gummy worms until just a few hours before serving. This prevents the cookies from getting too soggy and keeps your decorations looking fresh and vibrant.
- Refrigeration is Key: Always store your dirt cups in the refrigerator. The pudding base needs to stay cold to maintain its texture and freshness.
- Cover Up: If you’re storing them, cover the individual cups loosely with plastic wrap to prevent them from absorbing fridge odors and to keep the top layer of “dirt” from drying out.
- How Long Do They Last?: When properly covered and refrigerated, your Halloween Dirt Cups will stay delicious for 3-4 days. While they are still safe to eat beyond this, the Oreos might start to soften significantly, losing some of their delightful crunch.
- Not Freezer Friendly: We do not recommend freezing dirt cups. The texture of instant pudding and whipped topping can become watery and grainy once thawed, diminishing the overall enjoyment.
Frequently Asked Questions About Halloween Dirt Cups
Got questions about whipping up these spooky treats? We’ve got answers!
- Can I make Halloween Dirt Cups ahead of time?
Yes, absolutely! You can assemble the pudding and cookie layers up to 24 hours in advance. Just cover them and refrigerate. Add the delicate decorations like gravestones and gummy worms closer to serving time to keep them looking their best.
- What if I don’t have a food processor for the Oreos?
No problem! Place the Oreo cookies in a large, sturdy zip-top bag, seal it, and then crush them with a rolling pin, meat mallet, or the bottom of a heavy pan until they reach a fine crumb consistency.
- Can I use a different pudding flavor?
Of course! While chocolate is classic, feel free to experiment with other dark flavors like dark chocolate or cookies & cream. Vanilla pudding tinted green can also create a fun “swamp” effect!
- How many servings does this recipe make?
This recipe, as listed, yields approximately 18 individual Halloween Dirt Cups, perfect for a party!
- Can I make these dairy-free or gluten-free?
Yes! Look for gluten-free Oreo-style cookies and use dairy-free milk alternatives (like almond or soy milk) that are compatible with instant pudding mixes. Also, ensure your pudding mix and whipped topping are dairy-free.
- My pudding seems a bit watery. What went wrong?
This can happen if the pudding wasn’t whisked long enough (2-3 minutes is key!) or if the milk wasn’t cold enough. Make sure to use very cold milk and whisk until it starts to visibly thicken before letting it set for 5 minutes. Over-folding the whipped topping can also thin it out, so fold gently.
- Are these just for kids, or can adults enjoy them too?
Absolutely for adults! These Halloween Dirt Cups are a nostalgic and delicious treat for all ages. For an adult-only version, you can even add a splash of coffee liqueur (like Kahlua) or Irish cream to the pudding mixture before chilling!
- What are some other creative decoration ideas?
Think outside the box! You could make edible spiderwebs with melted white chocolate, use mini candy bones, add crushed graham crackers for a sandier “dirt” look, or even create tiny marshmallow ghosts with edible marker faces.
- Can I add a cream cheese layer?
Yes, for an even richer dessert! Beat 8 oz of softened cream cheese with ½ cup powdered sugar and 1 tsp vanilla extract until smooth. Then, fold in about 1 cup of thawed whipped topping. You can alternate this cream cheese mixture with the pudding and cookie layers.
- Can I use homemade whipped cream instead of frozen whipped topping?
You can, but be aware that homemade whipped cream is less stable than frozen whipped topping and may not hold up as well over time, especially if made ahead. If using, make sure it’s very stiffly whipped and fold it in gently.
Halloween Dirt Cups 🎃
Equipment
- Large Bowl
- Whisk
- Food Processor
- Dessert Cups
Ingredients
Main Ingredients
- 2 packages Oreos (19 oz each, about 36 cookies)
- 4 cups milk
- 2 packages instant chocolate pudding mix (3 oz each)
- 16 oz frozen whipped topping thawed
- 0.5 cup chocolate syrup divided
For Decorating
- Milano cookies
- black decorator icing
- ghost Peeps
- pumpkin candies
- Halloween sprinkles
Instructions
- Combine pudding mix and milk in a large bowl, whisk for 2-3 minutes, then let sit for 5 minutes. Gently fold in the whipped topping.
- Mix ½ cup of chocolate syrup into the pudding mixture, stir until streaky, then cover and refrigerate.
- In a food processor, blend Oreos until crumbly, then transfer to a large bowl.
- In dessert cups, layer 2 tablespoons of Oreo dirt, ¼ cup of pudding, repeat layers, finishing with 1 tablespoon of dirt on top.
- Mix remaining chocolate syrup with Oreo crumbs to create a moist, clumpy mixture.
- Decorate Milano cookies with black icing to spell “RIP” and add to cups.
- Place ghost Peeps in some cups.
- Top with Oreo dirt mixture to resemble graves, then add mini pumpkin candies and sprinkles.
- Serve immediately or chill until ready.