The holiday season is here, and with it comes the delightful challenge of creating festive treats without succumbing to baking-induced stress. Imagine a world where you can whip up adorable, delicious, and utterly charming Santa cookies in mere minutes, no oven required! Sounds like a dream, right? Well, wake up and smell the frosting because this “Quick & Easy Santa Sugar Cookies!” recipe is about to make your holiday baking dreams a reality. Perfect for busy elves, eager little hands, or anyone who wants maximum festive cheer with minimal effort, these cookies are a guaranteed hit at any gathering. Get ready to sprinkle some magic and draw some smiles!
Why You’ll Love This Recipe
- Super Simple, No-Bake Fun: Forget complicated doughs and endless baking sheets! This recipe uses store-bought sugar cookies, transforming them into festive masterpieces with just a few simple decorating steps. It’s truly a no-fuss holiday treat.
- Lightning-Fast Creation: In just 15 minutes from start to finish, you can have a dozen delightful Santa cookies ready to impress. The “Quick & Easy Santa Sugar Cookies!” live up to their name, making them perfect for last-minute party contributions or an impromptu cozy evening activity.
- Perfect for All Ages: This decorating project is a fantastic way to get kids involved in holiday preparations. From attaching candy eyes to sprinkling coconut beards, there are plenty of tasks suitable for little helpers, making it a fun family bonding experience.
- Irresistibly Adorable & Delicious: Not only are these Santa cookies incredibly cute and festive, but they’re also tasty! The combination of classic sugar cookies, sweet vanilla frosting, and fun candies creates a treat that looks as good as it tastes, bringing smiles to everyone who sees and eats them.
Ingredients with Measurements
- 🍪 Twelve store-bought sugar cookies
- 🧁 One 16-ounce can of vanilla frosting
- 👀 Twenty-four candy eyes
- 🍬 Twelve small cinnamon candies (like Red Hots)
- ✨ Red sugar sprinkles
- 🥥 Approximately 1/4 cup sweetened shredded coconut
- ⚪ Twelve miniature marshmallows
- 🖊️ One black edible food marker
Detailed Step-by-Step Directions on How to Make the Recipe
Creating these “Quick & Easy Santa Sugar Cookies!” is as simple as 1-2-3! Let’s walk through each step to ensure your Santa army is perfectly charming.
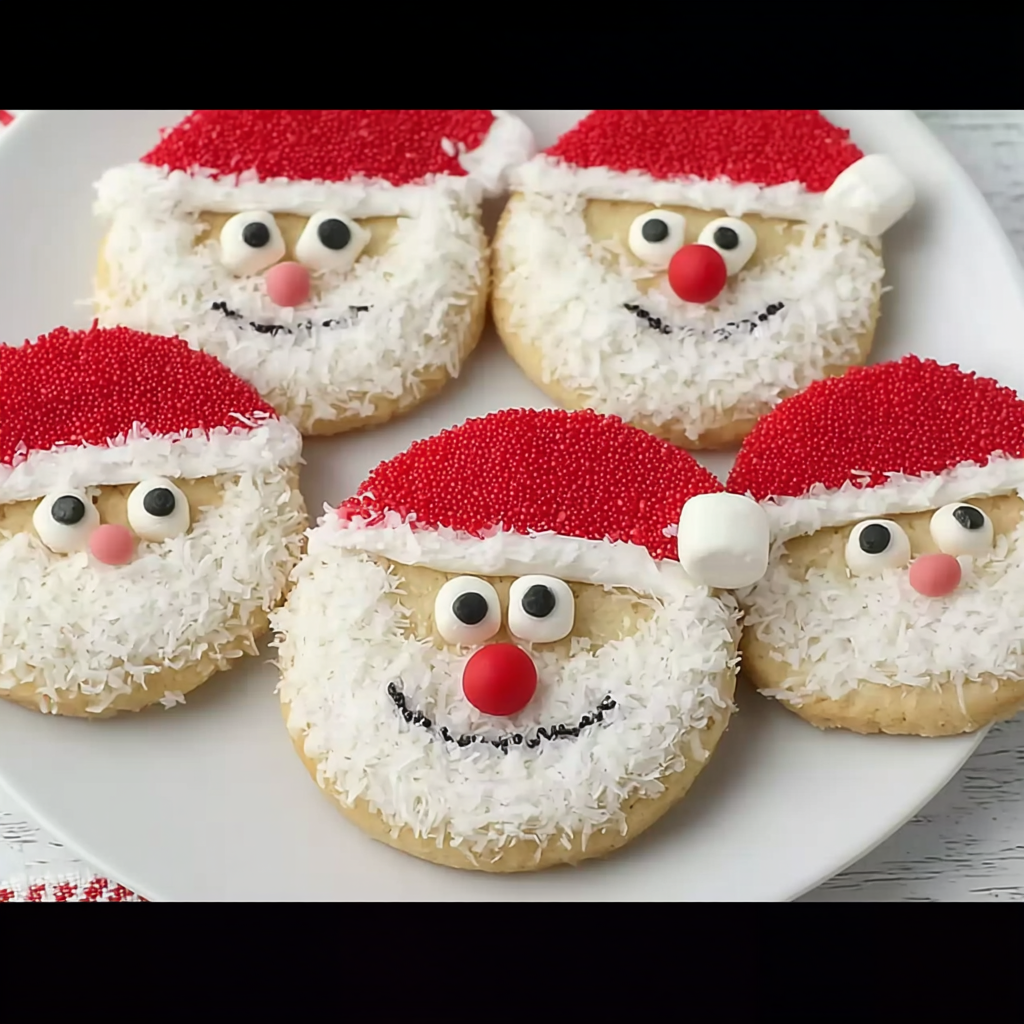
- Assemble Santa’s Face: Begin by carefully placing two candy eyes on the upper middle section of each sugar cookie. Then, position one small cinnamon candy just below the eyes for Santa’s rosy nose. To make sure these little details stay put, apply a tiny dab of vanilla frosting to the back of each candy before pressing them gently onto the cookie. This will help them adhere perfectly.
- Frost Santa’s Hat Base: Now, grab your vanilla frosting and spread a thin, even layer over just the top third of each cookie. This frosted area will serve as the vibrant red base for Santa’s iconic hat. Be mindful to keep the line clean, leaving the middle section (where the face is) clear of frosting for now.
- Add the Red Hat Sparkle: With the top third frosted, it’s time for the festive red! Carefully sprinkle your red sugar sprinkles generously over the frosted top third. Gently press them down to ensure good coverage. Make sure to leave a distinct, unfrosted line below, separating the hat from where Santa’s jolly face will be, or you can even leave a thin line of plain cookie if you prefer.
- Create the Fluffy Beard Foundation: Next, move to the bottom third of the cookie. Spread another even layer of vanilla frosting over this entire section. This area is designated for Santa’s magnificent, fluffy beard!
- Fashion the Coconut Beard: Immediately after frosting the bottom third, gently press sweetened shredded coconut onto the freshly frosted area. Use your fingers to cover the entire section, creating a soft, snowy white beard for Santa. Don’t be shy; a good amount of coconut makes for a wonderfully full beard!
- Crown Santa with a Pom-Pom: Almost done! Attach one miniature marshmallow right at the very top of each cookie, directly above the red sprinkle hat. A tiny bit of frosting on the marshmallow or hat can help it stick firmly, forming Santa’s classic hat pom-pom.
- Draw a Cheerful Smile: For the final touch, pick up your black edible food marker. Carefully draw a cheerful, curving smile on each Santa’s face, positioned below the cinnamon candy nose. Voila! Your festive and fun “Quick & Easy Santa Sugar Cookies!” are now complete and ready to bring holiday cheer!
Detailed Different Ways You Can Present the Recipe and How to Serve It
These “Quick & Easy Santa Sugar Cookies!” are not just a treat to eat; they’re a joy to display! Here are several ways to present and serve your adorable creations:
- Festive Platter Display: Arrange your Santa cookies on a beautiful holiday-themed platter. You can intersperse them with fresh cranberries, sprigs of rosemary, or other small holiday candies for an extra pop of color and festive touch. This makes a stunning centerpiece for any dessert table.
- Charming Individual Gifts: Wrap each cookie individually in small, clear cellophane bags, tied with a festive red or green ribbon. They make perfect party favors, small gifts for teachers, neighbors, or colleagues, and wonderful additions to holiday treat baskets.
- Cookie Exchange Star: Heading to a holiday cookie exchange? These “Quick & Easy Santa Sugar Cookies!” are guaranteed to be a crowd-pleaser due to their unique look and ease of preparation. Package them beautifully and watch them disappear!
- Kid’s Decorating Station: While the recipe is for pre-decorated cookies, you can set up a “Santa’s Workshop” station at a party. Prepare the cookies with just the eyes and nose, then let kids add the frosting, sprinkles, coconut, and marshmallows themselves. It’s an interactive and memorable activity!
- Serving Suggestions: Serve these delightful Santa cookies alongside a warm mug of hot cocoa topped with whipped cream, a glass of cold milk, or a festive holiday coffee. They are the perfect accompaniment to cozy winter evenings or lively holiday gatherings. They also pair wonderfully with other simple holiday treats like peppermint bark or chocolate-dipped pretzels for a diverse dessert spread.
How You Can Store It and How Long Does It Last
Once you’ve crafted your charming “Quick & Easy Santa Sugar Cookies!”, you’ll want to ensure they stay fresh and delicious for as long as possible. Here’s how to store them effectively:
- Airtight Container is Key: The most crucial step is to store your decorated cookies in an airtight container. This prevents them from drying out and keeps the frosting and decorations fresh.
- Room Temperature Storage: These cookies are best stored at room temperature, away from direct sunlight or heat sources. There’s no need to refrigerate them, as refrigeration can sometimes alter the texture of the cookies and the frosting.
- Layer with Parchment Paper: If you’re stacking multiple layers of cookies in your container, place a sheet of parchment paper or wax paper between each layer. This will prevent the frosting from sticking together and smudging Santa’s cheerful face.
- Longevity: When stored properly in an airtight container at room temperature, your “Quick & Easy Santa Sugar Cookies!” will typically stay fresh and delightful for about 3 to 5 days. The store-bought cookies and canned frosting hold up quite well.
- Freezing (Optional): While not strictly necessary for this short shelf life, you can freeze undecorated sugar cookies if you made them from scratch or have extra. However, for these decorated Santa cookies, it’s generally best to enjoy them within the recommended fresh period to maintain the integrity of the decorations and the texture of the coconut and marshmallows.
FAQs Sections
- Q1: Can I make my own sugar cookies instead of buying store-bought ones?
A1: Absolutely! While the “Quick & Easy Santa Sugar Cookies!” recipe emphasizes convenience, feel free to use your favorite homemade sugar cookie recipe. Just ensure they are fully cooled before decorating. - Q2: Can I use different color sprinkles for Santa’s hat?
A2: You certainly can! While red is traditional for Santa, feel free to experiment with white, silver, or even a mix of holiday colors for a unique touch. - Q3: Where can I find candy eyes?
A3: Candy eyes are readily available in the baking aisle of most grocery stores, craft stores like Michael’s or Jo-Ann Fabrics, and online retailers like Amazon, especially during the holiday season. - Q4: What if I don’t have an edible food marker for the smile?
A4: No problem! You can use a tiny bit of black gel food coloring applied with a toothpick for the smile, or even a small chocolate sprinkle if you’re feeling creative. - Q5: Can kids help with this “Quick & Easy Santa Sugar Cookies!” recipe?
A5: This recipe is perfect for kids! They can help attach the candy eyes and noses, sprinkle the coconut, and even draw the smiles (with supervision), making it a fun family activity. - Q6: How far in advance can I make these cookies?
A6: For best freshness and appearance, it’s recommended to make these “Quick & Easy Santa Sugar Cookies!” 1-2 days before you plan to serve them. They will last up to 3-5 days when stored properly. - Q7: Can I substitute the Red Hots for Santa’s nose?
A7: Yes! Small red candies like M&M’s minis, a tiny dot of red gel frosting, or even a small round red sprinkle can work as alternatives for Santa’s nose. - Q8: What if I don’t like coconut or have an allergy?
A8: If coconut isn’t your preference, you can substitute it with white sanding sugar, finely crushed white nonpareil sprinkles, or even just leave the frosting plain white for a smooth beard effect. - Q9: How do I prevent the miniature marshmallows from falling off the hat?
A9: Ensure you apply a small dab of frosting directly to the top of the hat before gently pressing the marshmallow onto it. Hold it in place for a few seconds to help it adhere. - Q10: Are these cookies suitable for a large party or school event?
A10: Absolutely! Their quick prep time, appealing look, and individual serving size make them ideal for large gatherings, school functions, or any holiday celebration where you need a festive and easy treat.
Quick & Easy Santa Sugar Cookies! 🎅
Ingredients
- 12 store-bought sugar cookies
- 1 16-ounce can vanilla frosting
- 24 candy eyes
- 12 small cinnamon candies (like Red Hots)
- red sugar sprinkles
- 1/4 cup sweetened shredded coconut approximately
- 12 miniature marshmallows
- 1 black edible food marker
Instructions
- Gently attach two candy eyes and one small cinnamon candy to the upper middle part of each sugar cookie. A tiny dab of frosting can help them stick perfectly.
- Spread a thin, even layer of vanilla frosting over just the top third of each cookie. This will be the base for Santa’s hat.
- Carefully sprinkle red sugar over the frosted top third, leaving a clear line of plain cookie or frosting below it for the face.
- Frost the bottom third of the cookie. This area will become Santa’s fluffy beard.
- Gently press sweetened shredded coconut onto the frosted bottom section to create a soft, white beard for Santa.
- Attach a miniature marshmallow right at the very top of the cookie, above the red sprinkle hat, for Santa’s hat pom-pom.
- Use your black edible marker to draw a cheerful smile on each Santa’s face. Voila! Festive and fun cookies are ready!
Notes
Calories: Not provided
Total Carbs: Not provided
Net Carbs: Not provided
Fats: Not provided
Protein: Not provided These festive cookies are a perfect activity for kids during the holidays!