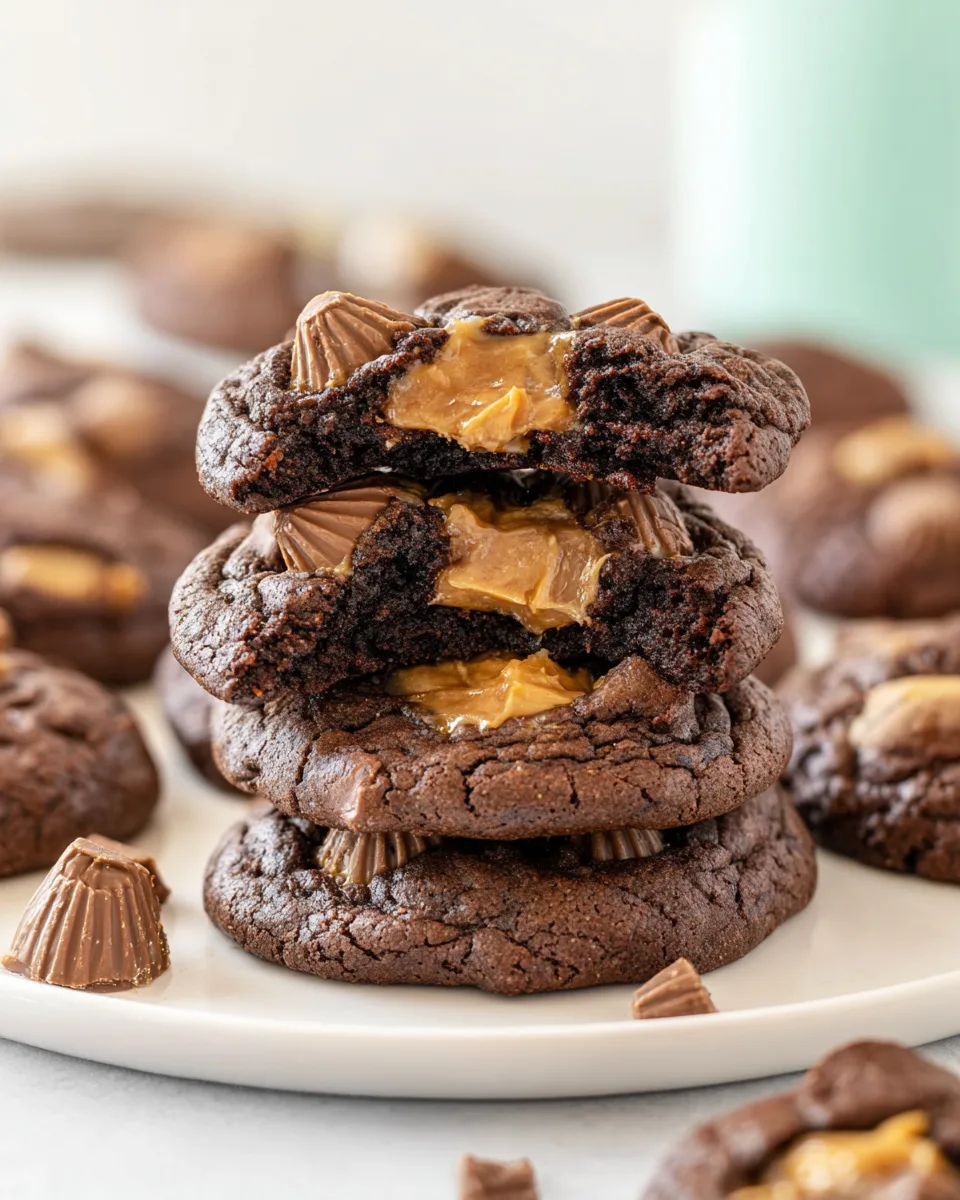
Ever dreamt of a cookie that perfectly marries the deep, decadent richness of chocolate with the salty-sweet allure of peanut butter? Stop dreaming, because these Chocolate Peanut Butter Cup Cookies are here to make your culinary fantasies a delicious reality! Imagine biting into a wonderfully fudgy, chewy chocolate cookie, studded generously with melty, creamy peanut butter cups. It’s not just a cookie; it’s a hug for your taste buds, a symphony of flavors that will have you reaching for seconds (and thirds!). Get ready to bake a batch of pure bliss that’s surprisingly simple to create but utterly unforgettable.
Why You’ll Love This Recipe
Prepare to fall head over heels for these incredible Chocolate Peanut Butter Cup Cookies! Here are four irresistible reasons why this recipe is about to become your new favorite:
- The Ultimate Flavor Fusion: This isn’t just a cookie; it’s a celebration of the legendary chocolate and peanut butter duo. The deep, intense cocoa flavor perfectly complements the sweet and slightly salty peanut butter cups, creating a taste sensation that’s pure heaven in every bite.
- Irresistible Texture Galore: Forget dry, crumbly cookies! These gems boast a wonderfully fudgy, chewy texture that melts in your mouth. With delightfully soft centers and slightly crisp edges, they offer a textural experience that will keep you coming back for more.
- Surprisingly Simple to Master: Don’t let their gourmet taste fool you – these Chocolate Peanut Butter Cup Cookies are remarkably straightforward to make. With clear, step-by-step instructions, even novice bakers can whip up a batch of these impressive treats with confidence and ease.
- A Guaranteed Crowd-Pleaser: Hosting a party? Need a pick-me-up? Or just craving something sweet? These cookies are universally loved! They’re perfect for sharing, gifting, or simply indulging yourself. Prepare for rave reviews and empty cookie jars!
Ingredients for Your Chocolate Peanut Butter Cup Cookies Adventure
Gather your magic potion ingredients to conjure up the most divine Chocolate Peanut Butter Cup Cookies!
- 2 cups (approximately 10 ounces or 285g) all-purpose flour
- ½ cup (1 ½ ounces or 42g) Dutch-processed cocoa powder
- 2 teaspoons baking powder
- ½ teaspoon table salt
- 16 ounces (455g) semisweet chocolate, roughly chopped
- 4 large eggs
- 2 teaspoons pure vanilla extract
- 1 ½ teaspoons espresso powder (for an extra depth of chocolate flavor!)
- 10 tablespoons (5 ounces or 139g) unsalted butter, softened but still cool
- 1 ½ cups packed (10 ½ ounces or 300g) light brown sugar
- ½ cup (3 ½ ounces or 102g) granulated sugar
- 16 ounces (453g) mini peanut butter cups (or chopped larger ones)
Crafting Your Chocolate Peanut Butter Cup Cookies: A Step-by-Step Journey
Let’s get baking! Follow these detailed, fun steps to create your perfect batch of Chocolate Peanut Butter Cup Cookies.
- The Dry Mix Magic: Grab a medium bowl and become a whisking wizard! Simply combine your all-purpose flour, rich Dutch-processed cocoa powder, baking powder, and a pinch of table salt. Give it a good whisk until everything is perfectly blended and lump-free. Set this delightful dry mixture aside for its grand entrance later.
- Melting & Mingling Moments: Now for the chocolatey heart of our cookies! Gently melt your roughly chopped semisweet chocolate in a heatproof bowl. The microwave is your friend here – use 30-second bursts, stirring like a pro between each, until it’s a gloriously smooth and luscious liquid. In a separate, smaller bowl, lightly beat your eggs with the pure vanilla extract. Sprinkle the instant espresso powder over this egg mixture and let it sit for just a moment; it’s doing its secret work to dissolve and deepen that chocolate flavor!
- Creamy Concoctions: Time to bring out the electric mixer! Fit it with a paddle attachment and beat your softened (but still cool!) unsalted butter on medium speed for about 15 seconds until it’s wonderfully smooth and creamy. Next, introduce both the light brown sugar and granulated sugar, mixing until they are fully combined and beautifully granular (about 45 seconds). Reduce your mixer speed to low, then gradually beat in the egg mixture until it’s perfectly incorporated (about 45 seconds). Finally, slowly stream in your melted chocolate, continuing to beat until everything is beautifully blended and a uniform color (about 40 seconds). Don’t forget to scrape down the sides of the bowl with a rubber spatula to ensure every last bit is thoroughly mixed!
- Bringing it All Together (The Dough’s Debut!): With your mixer still on low speed, gradually add the dry ingredients to your wet chocolatey mixture. Mix just until they are barely incorporated – remember, overmixing is a no-no for tender cookies! Now for the star: gently stir in half of your glorious mini peanut butter cups until the dough just comes together. Again, be careful not to overmix! Cover this magnificent dough bowl with plastic wrap and let it chill out at room temperature for about 30 minutes. This crucial resting step allows the chocolate to cool and the dough to firm up, making it perfectly scoopable and ensuring beautifully structured Chocolate Peanut Butter Cup Cookies.
- Prepping for Perfection: While your dough takes its well-deserved rest, preheat your oven to a cozy 350°F (175°C) and line two baking sheets with parchment paper. Once the dough is ready, grab a 1 ¾-inch cookie scoop (or just use two spoons) to place uniform dough balls onto your prepared baking sheets, leaving about 1 ½ inches between each for happy spreading. Here’s a pro tip for extra deliciousness and visual appeal: gently press a few more mini peanut butter cups into the top of each dough ball before baking. They’ll melt into gooey perfection!
- Baking Bliss: Slide your baking sheets into the preheated oven. Bake the cookies for 10-12 minutes. You’ll know your Chocolate Peanut Butter Cup Cookies are ready when the edges are just beginning to set, but the centers still look delightfully soft and slightly underdone. This is the secret to a wonderfully chewy and fudgy cookie! Make sure to rotate the sheets halfway through baking for even results. Once baked, let the cookies cool on the baking sheets for about 10 minutes to firm up before carefully transferring them to wire racks to cool completely. Try to resist eating them all immediately!
Presenting & Serving Your Chocolate Peanut Butter Cup Cookies
You’ve baked these incredible Chocolate Peanut Butter Cup Cookies, now let’s make them shine! Here are some delightful ways to present and serve your masterpieces:
- The Classic Warm & Gooey: Nothing beats a warm cookie straight from the cooling rack. The peanut butter cups will still be wonderfully melty. Serve with a tall glass of cold milk or your favorite dairy-free alternative for the ultimate comfort treat.
- A La Mode Indulgence: Elevate your cookie game by serving a warm cookie alongside a scoop of vanilla bean ice cream. The contrast of warm fudgy cookie and cold creamy ice cream is simply divine! A drizzle of chocolate or caramel sauce wouldn’t hurt either.
- Dust of Elegance: For a sophisticated touch, lightly dust cooled cookies with a sprinkle of powdered sugar or a touch more cocoa powder using a fine mesh sieve. It adds visual appeal and a hint of extra sweetness.
- Coffee Break Companion: These rich cookies are the perfect partner for your morning coffee or an afternoon espresso. The espresso powder in the cookie dough makes this pairing exceptionally harmonious.
- Gift of Deliciousness: Stack a few cookies in a pretty cellophane bag, tie with a ribbon, and you’ve got a homemade gift that everyone will adore. They make fantastic hostess gifts, thank-you treats, or holiday goodies.
- Cookie Platter Perfection: If you’re creating a dessert spread, arrange these cookies artfully on a platter with other contrasting treats. Their dark, rich color and visible peanut butter cups will make them a standout!
Storing Your Chocolate Peanut Butter Cup Cookies
Once you’ve managed to resist eating the entire batch of Chocolate Peanut Butter Cup Cookies, here’s how to keep them fresh and delicious for as long as possible:
- Room Temperature: Store cooled cookies in an airtight container at room temperature for up to 3-4 days. To maintain their softness, you can even place a slice of bread in the container; the cookies will absorb moisture from the bread.
- Refrigeration: While not strictly necessary for freshness, if you live in a very warm climate or prefer a slightly chewier, firmer cookie, you can store them in an airtight container in the refrigerator for up to a week. Let them come to room temperature or warm slightly before serving for the best texture.
- Freezing Baked Cookies: These cookies freeze beautifully! Once completely cooled, place them in a single layer on a baking sheet and freeze until solid (about 1-2 hours). Transfer the frozen cookies to a freezer-safe airtight container or heavy-duty freezer bag, separating layers with parchment paper. They will keep well for up to 3 months. Thaw at room temperature or warm briefly in the microwave for a fresh-baked taste.
- Freezing Dough: You can also freeze the raw dough! Scoop the dough balls as directed, place them on a parchment-lined baking sheet, and freeze until solid. Transfer the frozen dough balls to a freezer-safe bag. When you’re ready to bake, place frozen dough balls on a baking sheet and add an extra 2-4 minutes to the baking time. This is perfect for fresh-baked cookies whenever a craving strikes!
FAQs About Your Chocolate Peanut Butter Cup Cookies
- Can I use regular cocoa powder instead of Dutch-processed?
Yes, you can, but Dutch-processed cocoa powder is recommended for its darker color and milder, less bitter chocolate flavor, which complements the peanut butter cups beautifully. Regular cocoa powder is more acidic and can react differently with the baking powder, potentially affecting the final texture and rise slightly. - What if I don’t have espresso powder?
No problem! The espresso powder is there to deepen the chocolate flavor without making the cookies taste like coffee. You can omit it entirely, and your cookies will still be delicious. - Can I use natural peanut butter cups?
Most commercial mini peanut butter cups work well. If you’re using homemade or specialty natural peanut butter cups, just ensure they hold their shape reasonably well when heated. - Is the dough resting step really necessary?
Yes, it’s crucial! Resting the dough allows the melted chocolate to cool and firm up, making the dough less sticky and easier to scoop. It also gives the flour time to fully hydrate, which contributes to a chewier, more tender cookie. - How do I know when the cookies are perfectly baked?
Look for edges that are just set and very lightly golden, while the centers still appear soft and slightly underdone. The cookies will continue to cook and firm up as they cool on the baking sheet, ensuring a perfectly fudgy and chewy result. - Can I substitute the semisweet chocolate for a different type?
You can, but it will change the flavor profile. Milk chocolate will make them sweeter, while dark chocolate will result in a more intense, less sweet cookie. Semisweet provides a balanced chocolate base. - My cookies spread too much! What happened?
Common culprits for excessive spreading include: butter being too warm (it should be softened but still cool), not chilling the dough sufficiently, or your oven temperature being too low (an inaccurate oven thermometer can cause this). Ensure your butter isn’t melted or greasy. - Can I make these gluten-free?
While this recipe uses all-purpose flour, many bakers have success substituting it with a 1:1 gluten-free baking flour blend (make sure it contains xanthan gum). Results may vary slightly in texture. - What’s the best way to chop larger peanut butter cups if I don’t have minis?
Place them in the freezer for about 15-20 minutes before chopping. This makes them less sticky and easier to cut cleanly without smearing. - How can I make sure the peanut butter cups don’t sink to the bottom?
Ensure your dough is sufficiently firm from the resting step. Also, gently folding them in at the end (rather than overmixing) helps them stay suspended. Pressing extra ones on top right before baking is also a great trick!
Chocolate Peanut Butter Cup Cookies
Equipment
- Electric Mixer
- Paddle attachment
- Rubber Spatula
- Heatproof Bowl
- Baking Sheets
- Parchment Paper
- Cookie Scoop
- Wire racks
Ingredients
Dry Ingredients
- 2 cups all-purpose flour approximately 10 ounces or 285g
- 1/2 cup Dutch-processed cocoa powder 1 ½ ounces or 42g
- 2 teaspoons baking powder
- 1/2 teaspoon table salt
Wet Ingredients & Add-ins
- 16 ounces semisweet chocolate 455g, roughly chopped
- 4 large eggs
- 2 teaspoons pure vanilla extract
- 1 1/2 teaspoons espresso powder for an extra depth of chocolate flavor!
- 10 tablespoons unsalted butter 5 ounces or 139g, softened but still cool
- 1 1/2 cups light brown sugar packed, 10 ½ ounces or 300g
- 1/2 cup granulated sugar 3 ½ ounces or 102g
- 16 ounces mini peanut butter cups 453g, or chopped larger ones
Instructions
- In a medium bowl, simply whisk together the flour, cocoa powder, baking powder, and salt. Set this dry mixture aside.
- Gently melt the chopped semisweet chocolate in a heatproof bowl. You can use a microwave in 30-second intervals, stirring well between each, until it's smooth and luscious. In a separate small bowl, lightly beat the eggs with the vanilla. Sprinkle the instant espresso powder over this egg mixture and let it sit for a moment to dissolve.
- Using an electric mixer fitted with a paddle attachment, beat the softened butter on medium speed until it's wonderfully smooth and creamy (about 15 seconds). Add both the light brown sugar and granulated sugar, mixing until they are fully combined and granular (about 45 seconds). Reduce the mixer speed to low, then gradually beat in the egg mixture until it's well incorporated (about 45 seconds). Finally, stream in the melted chocolate and continue beating until everything is beautifully blended (about 40 seconds), scraping down the sides of the bowl with a rubber spatula to ensure thorough mixing.
- With the mixer still on low speed, add the dry ingredients to the wet mixture, mixing just until they are barely incorporated. Stir in half of the mini peanut butter cups until the dough just comes together, being careful not to overmix. Cover the bowl with plastic wrap and let the dough rest at room temperature for about 30 minutes. This crucial step allows the chocolate to cool and the dough to firm up, making it perfectly scoopable!
- While the dough rests, preheat your oven to 350°F (175°C) and line two baking sheets with parchment paper. Use a 1 ¾-inch cookie scoop to place dough balls onto the prepared baking sheets, leaving about 1 ½ inches between each. For an extra touch of deliciousness, gently press a few more mini peanut butter cups into the top of each dough ball.
- Bake the cookies for 10-12 minutes. You'll know they're ready when the edges are just beginning to set, but the centers still look delightfully soft. This ensures a wonderfully chewy and fudgy cookie! Make sure to rotate the sheets halfway through baking for even results. Let the cookies cool on the baking sheets for about 10 minutes before carefully transferring them to wire racks to cool completely.
Notes
Cook Time: 11 minutes
Total Time: 56 minutes
Servings: 36 cookies
Nutrition Information (per cookie, estimated):
- Calories: 240 kcal
- Total Carbs: 28g
- Net Carbs: 25g
- Fats: 18g
- Protein: 2.5g