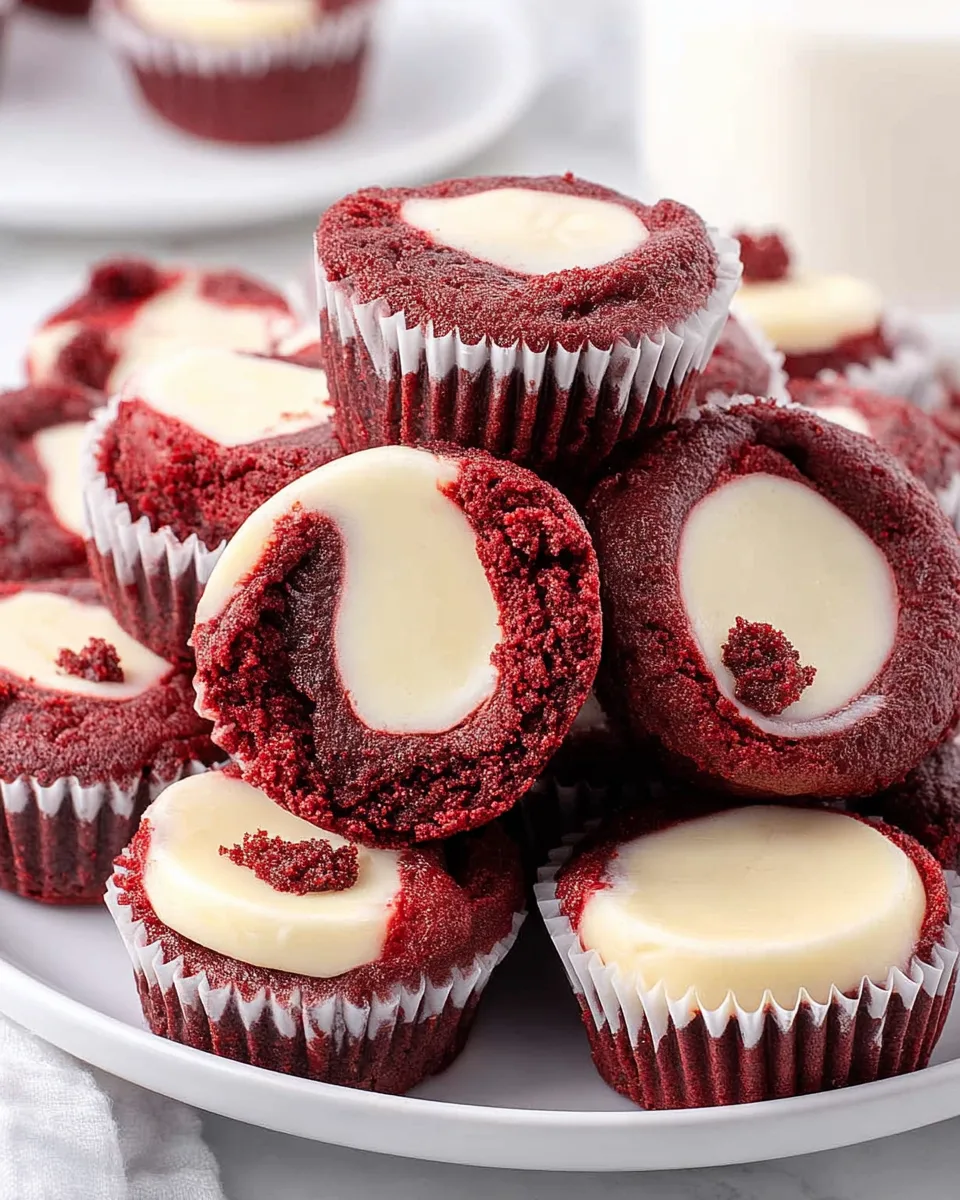
Get ready to fall head over heels for a dessert that’s as charming as it is delicious! Imagine the rich, subtle cocoa flavor of red velvet cake, perfectly paired with a creamy, tangy cheesecake swirl, all wrapped up in an adorable, bite-sized package. That’s exactly what you get with these delightful Mini Red Velvet Cheesecakes. They’re not just a treat for your taste buds; they’re a feast for your eyes and an absolute joy to bake. Forget complicated desserts – these mini wonders bring elegance and incredible flavor with surprising ease, making them perfect for any occasion, or just because you deserve something sweet.
Why You’ll Love These Mini Red Velvet Cheesecakes
There are countless reasons to adore these little gems, but here are four compelling ones that will have you preheating your oven in no time:
- Irresistibly Bite-Sized Perfection: Say goodbye to guilt and hello to ultimate portion control! Each of these Mini Red Velvet Cheesecakes is a perfectly sized treat, offering just enough indulgence without going overboard. They’re ideal for satisfying a sweet craving or for impressing guests with individual servings.
- Classic Red Velvet, Elevated: You love red velvet cake, and you love cheesecake. This recipe ingeniously combines the best of both worlds! The moist, subtly chocolatey red velvet base provides a fantastic contrast to the smooth, creamy cheesecake filling, creating a harmonious symphony of textures and flavors.
- Surprisingly Simple to Make: Don’t let their fancy appearance fool you! These Mini Red Velvet Cheesecakes are incredibly straightforward to prepare. With clear, easy-to-follow steps, even novice bakers can achieve stunning results, making them a fantastic go-to recipe for any occasion.
- Party-Ready & Crowd-Pleasing: Looking for the perfect dessert to bring to a potluck, celebrate a birthday, or simply host a memorable get-together? These mini cheesecakes are designed for sharing! Their individual size makes serving a breeze, and their vibrant color and incredible taste guarantee they’ll be the star of any dessert table.
Ingredients You’ll Need
Gather your ingredients to create these delightful Mini Red Velvet Cheesecakes. Precision is key for perfect results!
For the Red Velvet Base:
- 1 cup all-purpose flour
- ¼ cup + 1 tablespoon unsweetened cocoa powder
- ¾ cup salted sweet cream butter, melted and cooled
- 1¼ cups granulated sugar
- 1 tablespoon red gel food color
- 2 teaspoons pure vanilla extract
- 2 large eggs, room temperature and beaten
For the Cheesecake Filling:
- 8 ounces cream cheese, softened
- ¼ cup granulated sugar
- 1 teaspoon pure vanilla extract
- 1 large egg yolk
Step-by-Step Directions to Heavenly Bites
Follow these detailed instructions to create your batch of irresistible Mini Red Velvet Cheesecakes. Get ready for some baking fun!
- Prep Your Oven and Pan: First things first, preheat your oven to a cozy 350°F (175°C). Then, grab a mini muffin pan and lightly spray each cup with nonstick cooking spray. This ensures your mini cheesecakes will pop out easily!
- Combine Dry Ingredients: In a small mixing bowl, whisk together the all-purpose flour and cocoa powder until they’re perfectly combined. Set this dry mixture aside for a moment.
- Whisk Wet Ingredients: Now, in a medium-sized bowl, whisk together the melted butter, the larger portion of granulated sugar (1¼ cups), the vibrant red gel food coloring, 2 teaspoons of pure vanilla extract, and the beaten eggs until the mixture is smooth and beautifully uniform.
- Create the Red Velvet Base: Gently pour the dry flour mixture into the wet butter mixture. Stir everything together just until all the ingredients are combined and you don’t see any streaks of flour. Be careful not to overmix; overmixing can make your base tough. This is your luscious red velvet base!
- Prepare the Cheesecake Filling – Cream Cheese: For the star swirl, place the softened cream cheese in a separate medium bowl. Using a handheld mixer, beat the cream cheese on medium-high speed for about 1 minute until it’s wonderfully smooth and lump-free.
- Add Sugar and Vanilla to Filling: To the cream cheese, add the smaller portion of granulated sugar (¼ cup) and 1 teaspoon of pure vanilla extract. Continue mixing for another 1 to 1½ minutes, ensuring everything is fully incorporated and creamy.
- Stir in Egg Yolk: Finally, stir in the single egg yolk to the cheesecake mixture. Mix just until no yellow streaks are visible. This adds richness and helps with texture.
- Transfer Filling to Piping Bag: Spoon this creamy cheesecake mixture into a disposable piping bag or, for a simpler option, a quart-size ziplock bag.
- Fill the Muffin Pan – Red Velvet Base: Spoon approximately 1 tablespoon of your delicious red velvet base into each cup of your prepared mini muffin pan.
- Add Cheesecake Swirl: Snip off a small corner from your piping bag (or ziplock bag). Carefully squeeze about 2 teaspoons of the cheesecake filling right into the center of each red velvet base. This creates that beautiful swirled effect.
- Bake to Perfection: Pop your filled mini muffin pan into the preheated oven. Bake your Mini Red Velvet Cheesecakes for a quick 8-9 minutes. They should be just set.
- Cool and Enjoy: Once baked, remove them from the oven and let these cute bites cool in the pan for 20-30 minutes. This allows them to firm up slightly. Then, carefully transfer them to a wire rack to cool completely before enjoying every single bite!
Creative Ways to Present and Serve
These Mini Red Velvet Cheesecakes are already gorgeous, but with a few extra touches, you can elevate their presentation to make them truly unforgettable. They’re perfect for any occasion!
- Elegant Dusting: A simple dusting of powdered sugar or a light sprinkle of cocoa powder over the top can add a refined touch and highlight their vibrant color.
- Fresh Berry Burst: Garnish each mini cheesecake with a fresh raspberry, a slice of strawberry, or a few tiny blueberries for a pop of color and fresh flavor that beautifully complements the red velvet and cheesecake.
- Whipped Cream Dollop: A small dollop of freshly whipped cream or a swirl of cream cheese frosting on top of each treat is a classic pairing that adds an extra layer of decadence.
- Chocolate Shavings: For the ultimate chocolate lover, sprinkle some delicate chocolate shavings (white, milk, or dark) over the cream cheese swirl.
- Mini Liners: While baked directly in the pan, you can place them into mini paper cupcake liners once cooled for easier handling and an even more “cupcake-like” appearance, especially for parties.
- Serving Platters: Arrange them artfully on a tiered dessert stand or a beautiful serving platter for a stunning centerpiece at any gathering. They make fantastic individual desserts for dinner parties, brunches, or baby showers.
- Gift Boxes: Package a few Mini Red Velvet Cheesecakes in small, decorative boxes or cellophane bags tied with a ribbon for charming edible gifts or party favors.
- Coffee & Tea Companion: Serve them alongside a freshly brewed cup of coffee, espresso, or a comforting tea for an exquisite afternoon treat or after-dinner indulgence.
Storage and Shelf Life
Ensuring your delicious Mini Red Velvet Cheesecakes stay fresh is simple, allowing you to enjoy them for days!
Once your cheesecakes have completely cooled, transfer them to an airtight container. Store this container in the refrigerator. Due to the cream cheese and egg content, refrigeration is essential to maintain their freshness and safety. When stored properly in the fridge, your Mini Red Velvet Cheesecakes will last wonderfully for up to 3-5 days. For the best taste and texture, we recommend enjoying them within the first 3 days.
If you’ve baked a large batch and want to save some for later, these mini cheesecakes freeze well! To freeze, place the cooled cheesecakes on a baking sheet and freeze until firm (about an hour). Once firm, transfer them to a freezer-safe airtight container, separating layers with parchment paper, or wrap each cheesecake individually in plastic wrap before placing them in a container. They can be frozen for up to 1-2 months. When you’re ready to enjoy, simply thaw them in the refrigerator overnight or for several hours at room temperature.
FAQs About Mini Red Velvet Cheesecakes
- What makes these “Mini Red Velvet Cheesecakes” so special?
They combine the best of both worlds: the rich, subtly chocolatey flavor and vibrant color of classic red velvet with the creamy, tangy indulgence of cheesecake, all in a convenient, perfectly portioned bite-sized treat. - Can I make these ahead of time?
Absolutely! These Mini Red Velvet Cheesecakes are excellent for making ahead. You can bake them a day or two in advance and store them in an airtight container in the refrigerator. This makes them perfect for parties and entertaining. - Do I have to use gel food coloring, or can I use liquid?
Gel food coloring is highly recommended for these Mini Red Velvet Cheesecakes. It provides a much more vibrant and consistent red color with less liquid, which helps maintain the proper batter consistency. Liquid food coloring might thin the batter too much and result in a less intense hue. - What’s the best way to get them out of the mini muffin pan?
After cooling in the pan for 20-30 minutes, gently run a thin knife or a small offset spatula around the edges of each cheesecake. They should then pop out easily, especially if the pan was well-greased. - Can I substitute ingredients (e.g., butter, sugar type)?
For best results, stick to the specified ingredients. Salted sweet cream butter adds a lovely richness. Substituting different types of sugar or butter can alter the texture and flavor significantly. However, you can experiment with flavor extracts if you wish (e.g., almond extract instead of some vanilla). - How do I know when the “Mini Red Velvet Cheesecakes” are baked perfectly?
The edges of the red velvet base should appear set, and the cheesecake filling in the center should look mostly set with a slight jiggle. Avoid overbaking, as this can lead to a dry red velvet base or cracked cheesecake tops. - Can I make these gluten-free?
Yes, you can! Substitute the all-purpose flour in the red velvet base with a good quality 1:1 gluten-free baking flour blend that contains xanthan gum. Ensure all other ingredients are naturally gluten-free. - Why is my cheesecake filling cracking?
Cracking in cheesecake filling often happens from overbaking or sudden temperature changes. To prevent this, ensure you don’t overmix the cheesecake batter (especially after adding the egg yolk) and avoid opening the oven door frequently. Also, letting them cool gradually in the pan helps. - Can I make a full-sized cheesecake with this recipe?
While the base and filling are delicious, this recipe is specifically scaled and designed for mini cheesecakes. Adapting it to a full-sized cheesecake would require adjusting baking times, temperatures, and potentially ingredient ratios to ensure it bakes evenly without cracking. We recommend finding a recipe specifically for a full-sized red velvet cheesecake. - What’s the best way to transport these “Mini Red Velvet Cheesecakes” for a party?
Once fully cooled and ideally chilled, place them in an airtight container with a flat bottom. If stacking, use parchment paper between layers. Keep them refrigerated until just before serving. A cooler with ice packs is recommended for longer transport durations.
Mini Red Velvet Cheesecakes
Equipment
- Mini Muffin Pan
- Handheld Mixer
- Disposable Piping Bag or Ziplock Bag
Ingredients
Red Velvet Base
- 1 cup all-purpose flour
- 5 tablespoons unsweetened cocoa powder
- 0.75 cup salted sweet cream butter melted and cooled
- 1.25 cups granulated sugar
- 1 tablespoon red gel food color
- 2 teaspoons pure vanilla extract
- 2 large eggs room temperature and beaten
Cheesecake Filling
- 8 ounces cream cheese softened
- 0.25 cup granulated sugar
- 1 teaspoon pure vanilla extract
- 1 large egg yolk
Instructions
- Get your oven ready! Preheat it to 350°F (175°C) and lightly spray a mini muffin pan with nonstick cooking spray.
- In a small mixing bowl, whisk together the all-purpose flour and cocoa powder until well combined. Set this dry mixture aside.
- Now, in a medium-sized bowl, whisk together the melted butter, 1¼ cups sugar, red food coloring, 2 teaspoons vanilla, and the beaten eggs until smooth.
- Gently stir the dry flour mixture into the wet butter mixture. Mix just until everything is combined and no streaks of flour remain; avoid overmixing. This is your delicious red velvet base!
- For the cheesecake filling, place the softened cream cheese in a separate medium bowl. Use a handheld mixer to beat it on medium-high speed for about 1 minute until it's wonderfully smooth.
- Add ¼ cup sugar and 1 teaspoon vanilla to the cream cheese. Continue mixing for another 1 to 1½ minutes until fully incorporated.
- Stir in the egg yolk just until no yellow streaks are visible.
- Transfer this creamy cheesecake mixture into a disposable piping bag or a quart-size ziplock bag.
- Spoon about 1 tablespoon of the red velvet base into each cup of your prepared mini muffin pan.
- Snip off the end of your piping bag (or ziplock bag corner). Squeeze about 2 teaspoons of the cheesecake filling right into the center of each red velvet base.
- Pop your mini cheesecakes into the preheated oven and bake for a quick 8-9 minutes.
- Once baked, remove them from the oven and let these cute bites cool in the pan for 20-30 minutes. Then, carefully transfer them to a wire rack to cool completely before enjoying!
Notes
- Calories: 93 kcal
- Total Carbs: 10g
- Net Carbs: 9.7g
- Fats: 6g
- Protein: 1g