Ever dreamt of crafting a dessert that looks like it belongs in a high-end patisserie, yet tastes even better? Get ready to unlock the magic with our "Pistachio & Meyer Lemon Mousse Cakes with Mirror Glaze" recipe! Imagine a symphony of vibrant citrus cutting through the rich, nutty notes of pistachio, all enrobed in a breathtakingly shiny mirror glaze. This isn’t just a dessert; it’s an edible work of art, designed to dazzle your taste buds and impress every single guest. While it has a few steps, we’ve broken it down into a delightful multi-day baking adventure, making gourmet achievable right in your kitchen. Prepare for oohs and aahs!
Why You’ll Love This Recipe
There are countless reasons to fall head over heels for these exquisite Pistachio & Meyer Lemon Mousse Cakes with Mirror Glaze. Here are just four to get you started on your culinary journey:
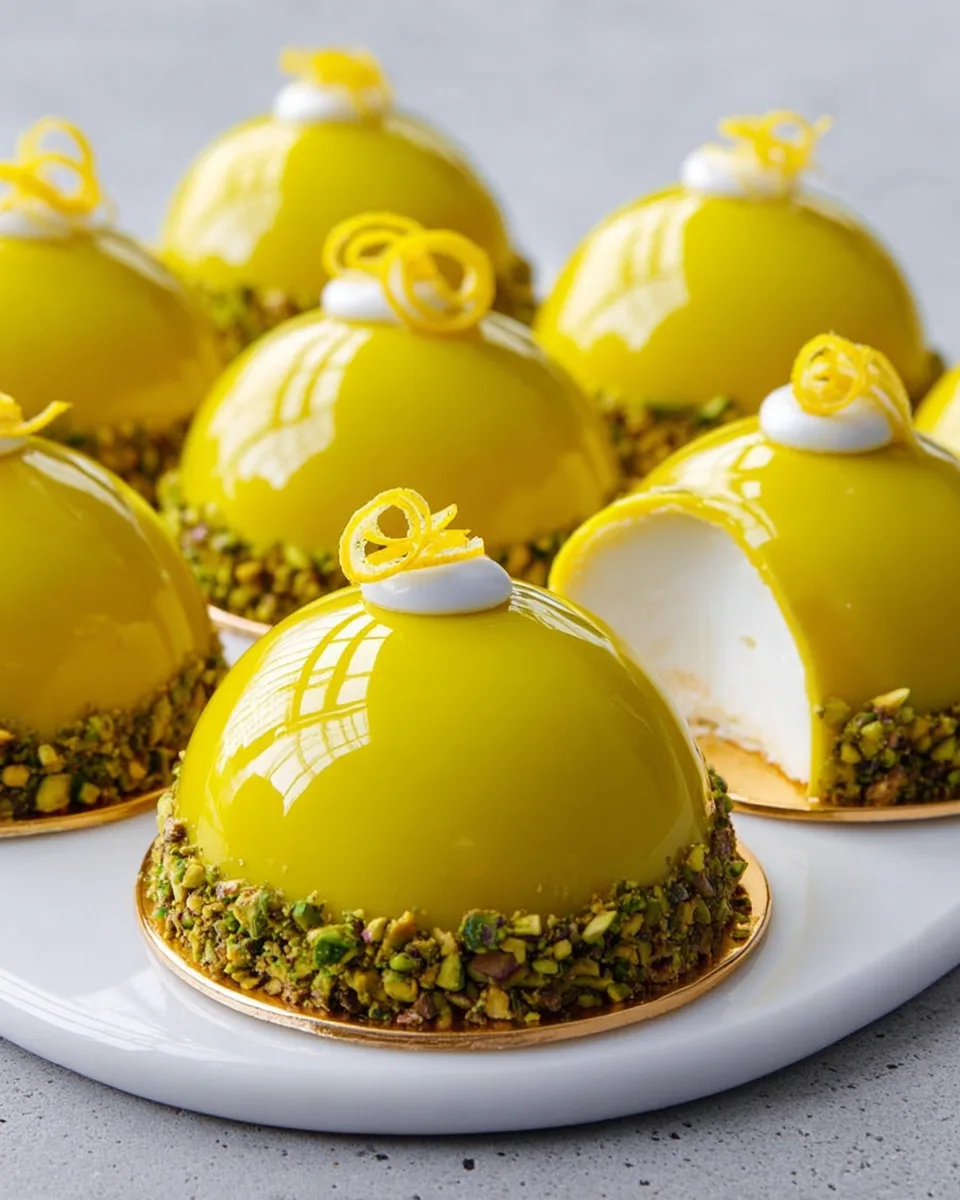
- Jaw-Dropping Presentation: Let’s be honest, the mirror glaze is the star of the show! These cakes are visually stunning, promising a "wow" factor that makes them perfect for special occasions, dinner parties, or simply treating yourself to something extraordinary.
- Harmonious Flavor Profile: The delicate sweetness and unique tartness of Meyer lemon perfectly complement the earthy, nutty richness of pistachio. Each bite offers a delightful balance of textures – from the creamy mousse to the crunchy dacquoise and the smooth glaze.
- Achievable Gourmet (Seriously!): While these look intimidating, our step-by-step guide breaks the process into manageable, spread-out tasks. You can tackle a section each day, transforming a complex recipe into a relaxing, enjoyable baking project without feeling rushed.
- Ultimate Make-Ahead Dessert: The freezing steps aren’t just for setting; they’re your secret weapon for stress-free entertaining. Prepare components days in advance, then simply glaze and garnish on the day you plan to serve. Freshly made, perfectly set, and ready to impress!
Ingredients with Measurements
For the Meyer Lemon Curd:
- 🍋 1 teaspoon Meyer Lemon Zest (from 1 lemon)
- 🍋 ⅓ cup Meyer Lemon Juice (about 3 lemons)
- 🍯 ¼ cup Granulated Sugar
- 🥄 1 ½ teaspoons Cornstarch
- 💧 1 tablespoon Water
- 🌿 ¾ sheet Leaf Gelatin (or ¾ tsp powdered gelatin)
- 🧈 2 tablespoons Salted Butter, cubed
- 🟡 Yellow Food Coloring (optional)
For the Pistachio Dacquoise:
- 💚 3.5 ounces Raw Shelled Pistachios (or 1.75 oz raw pistachios + 1.75 oz pistachio or almond flour)
- 🍚 ½ cup Powdered Sugar, plus more for dusting
- 🧂 Pinch of Salt
- 🥚 2 large Egg Whites
- 🥄 ¼ cup Granulated Sugar
- 🌿 ¼ teaspoon Pistachio Extract (optional)
For the Lemon Vanilla Mousse:
- 🌿 2 sheets Leaf Gelatin (or 2 tsp powdered gelatin)
- 🥚 4 large Egg Yolkss, at room temperature
- 🥛 6 tablespoons Heavy Cream
- 🥛 6 tablespoons Whole Milk
- 🍋 1 tablespoon Meyer Lemon Zest (from 2 large lemons)
- 🌿 ½ teaspoon Vanilla Paste or Extract
- 🥛 1 cup Cold Heavy Cream
For the Mirror Glaze:
- 🌿 6 sheets Leaf Gelatin (or 6 tsp powdered gelatin)
- 🍯 1 cup Granulated Sugar
- 🍯 ⅔ cup Corn Syrup
- 💧 ½ cup Water
- 🥛 ½ cup Sweetened Condensed Milk
- 🍫 7 ounces Good Quality White Chocolate, finely chopped
- 🌈 Food Coloring (gel or powder, as desired)
For Garnish:
- 💚 Chopped Pistachios
Detailed Step-by-Step Directions How to Make the Recipe
This beautiful dessert has a few steps, but you can spread them out over a few days to make it super easy!
Day 1: Prepare Lemon Curd & Pistachio Base
- For the Lemon Curd: Soften ¾ sheet of leaf gelatin in cold water for 5+ minutes. In a small saucepan, combine lemon juice, 1 tsp zest, and ¼ cup granulated sugar. Bring to a simmer over medium heat.
- Whisk 1 ½ tsp cornstarch with 1 tbsp water, then add to the saucepan. Simmer for 1 minute, stirring, until thickened.
- Squeeze water from gelatin and add to the warm lemon mixture, whisking until fully dissolved. Remove from heat, then whisk in butter until smooth. Add a tiny bit of yellow food coloring if you like a brighter color.
- Pour the curd into 1-inch silicone sphere molds. Freeze them overnight until completely set.
- For the Pistachio Dacquoise: Preheat your oven to 300°F (150°C). Line a baking sheet with parchment paper and trace twelve 2½-inch circles on it to guide your piping.
- In a food processor, pulse 3.5 oz pistachios (or 1.75 oz pistachios + 1.75 oz pistachio/almond flour) with ½ cup powdered sugar and a pinch of salt until finely ground.
- In a clean bowl, whip 2 large egg whites until frothy. Slowly add ¼ cup granulated sugar, spoonful by spoonful, while whipping. Increase speed to high and beat until stiff, glossy peaks form.
- Gently fold half of the ground pistachio mixture into the egg whites, then add the rest, folding until just combined.
- Transfer this mixture to a piping bag with a ½-inch round tip. Pipe inside the traced circles on your parchment. Sprinkle with a few chopped pistachios and lightly dust with powdered sugar.
- Bake for 8 minutes. Remove from oven, and while still soft, use a cookie cutter (one size larger than your original trace) to gently swirl around each meringue to refine its shape. Return to oven and bake for another 25-35 minutes, until crispy and lightly browned. Turn off the oven, crack the door, and let them cool inside to dry out further. Store cooled dacquoise in an airtight container.
Day 2: Create Mousse & Assemble Cakes
- For the Lemon Vanilla Mousse: Soften 2 sheets of leaf gelatin in cold water for 5+ minutes. In a bowl, whisk 4 large egg yolks with ¼ cup granulated sugar until light and creamy.
- In a saucepan, gently warm 6 tbsp heavy cream, 6 tbsp whole milk, 1 tbsp lemon zest, and ½ tsp vanilla until it just starts to steam.
- Slowly ladle some warm cream mixture into the egg yolks, whisking constantly to temper them. Then pour the egg yolk mixture back into the saucepan. Cook over low heat, stirring often, until it thickens slightly and coats the back of a spoon (should reach 165°F/74°C).
- Squeeze water from gelatin and add to the warm custard, whisking until smooth. Strain the custard through a fine-mesh sieve to remove zest. Let it cool for at least 15 minutes until lukewarm.
- In a separate clean bowl, whip 1 cup cold heavy cream until it holds soft peaks.
- Gently fold about a third of the whipped cream into the cooled custard to lighten it, then fold in the remaining whipped cream until everything is well combined and airy.
- To Assemble: Spoon or pipe the mousse into your 2½-inch silicone dome molds, filling them almost to the top.
- Carefully press a frozen lemon curd dome (curved side down) into the center of each mousse-filled mold. If they start to sink, chill the mousse in the molds for 15 minutes first.
- Finally, top each with a pistachio dacquoise round, pressing gently until the mousse just reaches the edges. Place the molds on a flat baking sheet and freeze for at least 3 hours or overnight until completely solid.
Day 3: Glaze & Garnish
- Prepare Cakes for Glazing: Once frozen solid, gently pop the cakes out of their molds. Invert them (dacquoise side down) onto a frozen, parchment-lined baking sheet. Return them to the freezer while you make the glaze.
- For the Mirror Glaze: Soften 6 sheets of leaf gelatin in cold water for 5+ minutes. Place 7 oz finely chopped white chocolate in a heat-proof bowl.
- In a saucepan, combine 1 cup granulated sugar, ⅔ cup corn syrup, and ½ cup water. Bring to a boil over medium heat, stirring until sugar is fully dissolved and the mixture is clear.
- Remove from heat. Squeeze water from gelatin and whisk into the hot syrup until dissolved. Whisk in ½ cup sweetened condensed milk.
- Pour this hot mixture over the chopped white chocolate. Let it sit for 30 seconds, then stir until the chocolate is completely melted and the glaze is smooth (an immersion blender works great here, but avoid creating air bubbles).
- Add food coloring as desired for a vibrant yellow hue.
- Let the glaze cool, stirring occasionally, until it reaches about 85-90°F (29-32°C) on an instant-read thermometer. This temperature is key for a perfect coat!
- Glaze the Cakes: Remove the frozen cakes from the freezer. Place them on small jars or cookie cutters, elevated over a baking sheet (to catch excess glaze). Work quickly, perhaps in batches.
- Generously pour the glaze over each frozen cake, ensuring it’s fully coated. Let the excess glaze drip off for 5-10 minutes.
- Gently scrape any drips from the bottom edges of the cakes. Carefully transfer them using a small offset spatula to individual cake rounds or parchment squares.
- Press chopped pistachios onto the bottom edges of each cake for a lovely finish. Garnish with a lemon twist if you wish.
- Glazed cakes are best served chilled or at cool room temperature. Store in the refrigerator for up to 2 days for best texture (the dacquoise can soften after that).
Detailed Different Ways You Can Present the Recipe and How to Serve It
The beauty of Pistachio & Meyer Lemon Mousse Cakes with Mirror Glaze extends beyond just their inherent elegance. Here are a few ideas to truly elevate their presentation and serving experience:
- Elegant Plating: Serve each cake individually on a small dessert plate. A delicate swipe of raspberry coulis or a scattering of fresh berries (like blueberries or raspberries) can add a contrasting pop of color and an extra layer of flavor.
- Garnish Galore: Beyond chopped pistachios and a lemon twist, consider edible gold leaf for a touch of luxury, a few tiny edible flowers (like violas or pansies) for a whimsical feel, or even a single candied Meyer lemon slice.
- Miniature Masterpieces: For larger gatherings or dessert buffets, you could use smaller silicone molds to create bite-sized versions. These would be perfect for guests to sample without commitment!
- Themed Decorations: If serving for a specific holiday or event, adapt your garnish. For example, a tiny sprig of fresh mint for a garden party, or a dusting of cocoa powder through a stencil for a more sophisticated touch.
- Serving Temperature: While the recipe suggests chilled or cool room temperature, allowing them to sit out for about 10-15 minutes before serving will slightly soften the mousse, enhancing its creamy texture and allowing the flavors to fully bloom.
- Beverage Pairings: These cakes pair wonderfully with a light sparkling wine, a crisp Prosecco, or even a delicate herbal tea. For coffee lovers, a light roast espresso would provide a nice contrast.
How You Can Store It and How Long Does It Last
Once glazed, your exquisite Pistachio & Meyer Lemon Mousse Cakes with Mirror Glaze are best stored in the refrigerator. Place them in an airtight container to protect the delicate glaze and prevent them from absorbing refrigerator odors. For the optimal texture, especially for the crispy dacquoise base, these cakes are best enjoyed within 2 days. After that, while still delicious, the dacquoise may begin to soften due to moisture, losing its signature crispness. Freezing the assembled cakes *before* glazing is an option for longer storage (up to 2-3 weeks), but once glazed, it’s generally not recommended to refreeze, as it can compromise the glaze’s perfect shine and texture upon thawing.
FAQs
- What is leaf gelatin, and can I use powdered gelatin instead?
Leaf gelatin (also called sheet gelatin) comes in thin sheets and needs to be bloomed in cold water. Yes, you can substitute powdered gelatin; the recipe provides the exact conversions for each component, ensuring you get the right consistency. - Can I make these cakes gluten-free?
Absolutely! The pistachio dacquoise base is naturally gluten-free as it uses ground nuts instead of wheat flour. Just ensure all your other ingredients are certified gluten-free if cross-contamination is a concern. - What if I don’t have Meyer lemons?
No Meyer lemons? No problem! You can achieve a similar flavor profile by using a mix of regular lemon juice (for tartness) and a tiny bit of orange juice or zest (for the subtle floral, sweeter notes that Meyer lemons naturally possess). - Why is the glaze temperature so important?
The glaze temperature is crucial for a perfectly smooth, even, and mirror-like finish. If it’s too hot, it will be too thin and run right off. If it’s too cold, it will be too thick and chunky, resulting in a dull, uneven coat. 85-90°F (29-32°C) is the sweet spot! - Can I make the mirror glaze ahead of time?
Yes, you can prepare the mirror glaze up to 2-3 days in advance. Store it in an airtight container in the refrigerator. When ready to use, gently reheat it over a double boiler or in the microwave on low power, stirring frequently, until it reaches the ideal pouring temperature of 85-90°F (29-32°C). - My mirror glaze has bubbles; what do I do?
Bubbles are common! To avoid them, stir gently when mixing. If using an immersion blender, tilt the bowl slightly to prevent incorporating air. If bubbles appear, gently tap the bowl on the counter, or carefully run a torch over the surface to pop them before pouring. You can also strain it. - What kind of food coloring is best for the glaze?
Gel or powder food colorings are ideal for mirror glaze as they are highly concentrated and won’t thin out the glaze. Liquid food coloring can add too much moisture and dilute the consistency. - Can I use pre-made pistachio flour instead of raw pistachios?
Yes, the recipe specifically accounts for using pre-made pistachio flour (or almond flour) as a partial substitute. It can save you a step in the food processor. - How do I temper egg yolks correctly for the mousse?
Tempering egg yolks prevents them from scrambling. Slowly ladle a small amount of warm cream mixture into your whisked egg yolks, whisking constantly. This gradually brings the yolks up to temperature. Once tempered, you can add them back to the saucepan with the rest of the warm liquid. - Can I make smaller or larger cakes using this recipe?
Yes, you can adjust the size! Simply use different sized silicone molds. You may need to adjust the quantities of ingredients slightly (especially for the mousse and curd inserts) and the baking time for the dacquoise. Ensure your curd sphere fits proportionally inside your mousse dome.
Pistachio & Meyer Lemon Mousse Cakes with Mirror Glaze ✨
Equipment
- 1-inch silicone sphere molds
- Small Saucepan
- Baking Sheet
- Parchment Paper
- Food Processor
- Piping bag with ½-inch round tip
- Cookie cutter (one size larger than 2½-inch)
- 2½-inch silicone dome molds
- Fine Mesh Sieve
- Immersion blender (optional)
Ingredients
Lemon Curd
- 1 tsp Meyer Lemon Zest from 1 lemon
- 0.33 cup Meyer Lemon Juice about 3 lemons
- 0.25 cup Granulated Sugar
- 1.5 tsp Cornstarch
- 1 tbsp Water
- 0.75 sheet Leaf Gelatin (or ¾ tsp powdered gelatin)
- 2 tbsp Salted Butter cubed
- Yellow Food Coloring optional
Pistachio Dacquoise
- 3.5 ounces Raw Shelled Pistachios (or 1.75 oz raw pistachios + 1.75 oz pistachio or almond flour)
- 0.5 cup Powdered Sugar plus more for dusting
- Salt Pinch
- 2 large Egg Whites
- 0.25 cup Granulated Sugar
- 0.25 tsp Pistachio Extract optional
Lemon Vanilla Mousse
- 2 sheets Leaf Gelatin (or 2 tsp powdered gelatin)
- 4 large Egg Yolks at room temperature
- 6 tbsp Heavy Cream
- 6 tbsp Whole Milk
- 1 tbsp Meyer Lemon Zest from 2 large lemons
- 0.5 tsp Vanilla Paste or Extract
- 1 cup Heavy Cream cold
Mirror Glaze
- 6 sheets Leaf Gelatin (or 6 tsp powdered gelatin)
- 1 cup Granulated Sugar
- 0.66 cup Corn Syrup
- 0.5 cup Water
- 0.5 cup Sweetened Condensed Milk
- 7 ounces Good Quality White Chocolate finely chopped
- Food Coloring gel or powder, as desired
Garnish
- Chopped Pistachios for garnish
Instructions
Day 1: Prepare Lemon Curd & Pistachio Base
- For the Lemon Curd: Soften ¾ sheet of leaf gelatin in cold water for 5+ minutes. In a small saucepan, combine lemon juice, 1 tsp zest, and ¼ cup granulated sugar. Bring to a simmer over medium heat.
- Whisk 1 ½ tsp cornstarch with 1 tbsp water, then add to the saucepan. Simmer for 1 minute, stirring, until thickened.
- Squeeze water from gelatin and add to the warm lemon mixture, whisking until fully dissolved. Remove from heat, then whisk in butter until smooth. Add a tiny bit of yellow food coloring if you like a brighter color.
- Pour the curd into 1-inch silicone sphere molds. Freeze them overnight until completely set.
- For the Pistachio Dacquoise: Preheat your oven to 300°F (150°C). Line a baking sheet with parchment paper and trace twelve 2½-inch circles on it to guide your piping.
- In a food processor, pulse 3.5 oz pistachios (or 1.75 oz pistachios + 1.75 oz pistachio/almond flour) with ½ cup powdered sugar and a pinch of salt until finely ground.
- In a clean bowl, whip 2 large egg whites until frothy. Slowly add ¼ cup granulated sugar, spoonful by spoonful, while whipping. Increase speed to high and beat until stiff, glossy peaks form.
- Gently fold half of the ground pistachio mixture into the egg whites, then add the rest, folding until just combined.
- Transfer this mixture to a piping bag with a ½-inch round tip. Pipe inside the traced circles on your parchment. Sprinkle with a few chopped pistachios and lightly dust with powdered sugar.
- Bake for 8 minutes. Remove from oven, and while still soft, use a cookie cutter (one size larger than your original trace) to gently swirl around each meringue to refine its shape. Return to oven and bake for another 25-35 minutes, until crispy and lightly browned. Turn off the oven, crack the door, and let them cool inside to dry out further. Store cooled dacquoise in an airtight container.
Day 2: Create Mousse & Assemble Cakes
- For the Lemon Vanilla Mousse: Soften 2 sheets of leaf gelatin in cold water for 5+ minutes. In a bowl, whisk 4 large egg yolks with ¼ cup granulated sugar until light and creamy.
- In a saucepan, gently warm 6 tbsp heavy cream, 6 tbsp whole milk, 1 tbsp lemon zest, and ½ tsp vanilla until it just starts to steam.
- Slowly ladle some warm cream mixture into the egg yolks, whisking constantly to temper them. Then pour the egg yolk mixture back into the saucepan. Cook over low heat, stirring often, until it thickens slightly and coats the back of a spoon (should reach 165°F/74°C).
- Squeeze water from gelatin and add to the warm custard, whisking until smooth. Strain the custard through a fine-mesh sieve to remove zest. Let it cool for at least 15 minutes until lukewarm.
- In a separate clean bowl, whip 1 cup cold heavy cream until it holds soft peaks.
- Gently fold about a third of the whipped cream into the cooled custard to lighten it, then fold in the remaining whipped cream until everything is well combined and airy.
- To Assemble: Spoon or pipe the mousse into your 2½-inch silicone dome molds, filling them almost to the top.
- Carefully press a frozen lemon curd dome (curved side down) into the center of each mousse-filled mold. If they start to sink, chill the mousse in the molds for 15 minutes first.
- Finally, top each with a pistachio dacquoise round, pressing gently until the mousse just reaches the edges. Place the molds on a flat baking sheet and freeze for at least 3 hours or overnight until completely solid.
Day 3: Glaze & Garnish
- Prepare Cakes for Glazing: Once frozen solid, gently pop the cakes out of their molds. Invert them (dacquoise side down) onto a frozen, parchment-lined baking sheet. Return them to the freezer while you make the glaze.
- For the Mirror Glaze: Soften 6 sheets of leaf gelatin in cold water for 5+ minutes. Place 7 oz finely chopped white chocolate in a heat-proof bowl.
- In a saucepan, combine 1 cup granulated sugar, ⅔ cup corn syrup, and ½ cup water. Bring to a boil over medium heat, stirring until sugar is fully dissolved and the mixture is clear.
- Remove from heat. Squeeze water from gelatin and whisk into the hot syrup until dissolved. Whisk in ½ cup sweetened condensed milk.
- Pour this hot mixture over the chopped white chocolate. Let it sit for 30 seconds, then stir until the chocolate is completely melted and the glaze is smooth (an immersion blender works great here, but avoid creating air bubbles).
- Add food coloring as desired for a vibrant yellow hue.
- Let the glaze cool, stirring occasionally, until it reaches about 85-90°F (29-32°C) on an instant-read thermometer. This temperature is key for a perfect coat!
- Glaze the Cakes: Remove the frozen cakes from the freezer. Place them on small jars or cookie cutters, elevated over a baking sheet (to catch excess glaze). Work quickly, perhaps in batches.
- Generously pour the glaze over each frozen cake, ensuring it's fully coated. Let the excess glaze drip off for 5-10 minutes.
- Gently scrape any drips from the bottom edges of the cakes. Carefully transfer them using a small offset spatula to individual cake rounds or parchment squares.
- Press chopped pistachios onto the bottom edges of each cake for a lovely finish. Garnish with a lemon twist if you wish.
- Glazed cakes are best served chilled or at cool room temperature. Store in the refrigerator for up to 2 days for best texture (the dacquoise can soften after that).
Notes
Nutrition Information (per serving):
- Calories: 275 kcal
- Total Carbohydrates: 32g
- Net Carbohydrates: 30g
- Fats: 20g
- Protein: 6g