Are you ready to sprinkle some serious holiday magic (and a dash of deliciousness!) into your life without breaking a sweat? Forget the fussy baking and the endless cleanup. We’re about to whisk you away to a peppermint paradise with a recipe so simple, so satisfying, it feels like cheating. Picture this: smooth, creamy fudge, bursting with cool peppermint crunch, all made with minimal effort. This isn’t just fudge; it’s a festive dream come true, designed for those who crave maximum flavor with minimum fuss. Get ready to impress your taste buds and everyone around you with the ultimate shortcut to holiday cheer: our incredibly Easy Peppermint Fudge!
Why You’ll Love This Recipe
This isn’t just another fudge recipe; it’s a game-changer for your holiday season (or any time you crave something sweet and minty!). Here are four irresistible reasons why our Easy Peppermint Fudge will become your new go-to treat:
- Seriously Easy, No-Bake Wonder! Ditch the oven and the stress! With just a few minutes of melting and stirring, you’re practically done. It’s perfect for beginners or anyone short on time but big on holiday spirit.
- Festive & Flavorful Perfection! The crisp, refreshing taste of peppermint combined with rich white chocolate creates a symphony of flavors that screams “holidays!” It’s a delightful balance of sweet and minty, making every bite a mini celebration.
- Perfect for Gifting & Sharing! This recipe yields a generous batch of beautiful, bite-sized pieces, making it ideal for holiday cookie platters, thoughtful homemade gifts, or sharing with friends and family. Everyone will be asking for the recipe!
- Minimal Ingredients, Maximum Impact! You only need a handful of common pantry staples to create this show-stopping treat. No obscure ingredients or complicated techniques – just pure, simple deliciousness that looks and tastes like you spent hours in the kitchen.
Ingredients You’ll Need
Gather your sweet arsenal! Making this incredible Easy Peppermint Fudge requires just a few key players. Precision matters here, so grab your measuring cups and spoons!
- 🍫 3 cups white chocolate chips or baking chips: The creamy base of our fudge. High-quality chips melt smoother!
- 🥛 14 ounces sweetened condensed milk: This magical ingredient gives our fudge its signature sweetness and velvety texture. Don’t confuse it with evaporated milk!
- 🧈 3 tablespoons unsalted butter, softened to room temperature: Adds richness and helps achieve that perfect melt-in-your-mouth consistency.
- 💧 1 teaspoon vanilla extract: A hint of vanilla enhances all the other flavors. Use clear vanilla for the brightest white fudge if aesthetics are key!
- 🍭 8 candy canes, crushed: The star of the show! These provide the vibrant peppermint flavor and delightful crunchy texture.
Step-by-Step Directions to Fudge Heaven
Ready to create some magic? Follow these simple steps to whip up your own batch of delightful Easy Peppermint Fudge. It’s so straightforward, you’ll wonder why you haven’t made it sooner!
- Step 1: Get Ready! First things first, prepare your pan. Grab an 8×8 inch square pan and line it with parchment paper or aluminum foil, making sure to leave some overhang on the sides – these will be your “handles” later! Give the paper or foil a light spritz with cooking spray. Now for the fun part: place your 8 candy canes into a sealed plastic bag (a sturdy freezer bag works best) and unleash your inner superhero! Gently crush them into small, irresistible pieces using a rolling pin.
- Step 2: Melt & Mix! In a microwave-safe bowl, combine your white chocolate chips, the entire can of sweetened condensed milk, and the softened butter. Pop it into the microwave and heat in short 30-second bursts. After each interval, stir the mixture thoroughly. Keep going until everything is gloriously smooth and fully melted – this usually takes a mere 2-3 minutes! Once silky, stir in the vanilla extract until it’s completely blended and fragrant.
- Step 3: Chill Out! Pour that dreamy, creamy fudge mixture evenly into your prepared pan. Use a spatula to smooth the top to perfection. Now, take half of your freshly crushed candy canes and sprinkle them generously over the surface. Cover the pan snugly with plastic wrap and usher it into the refrigerator for at least 2 hours, or until your fudge is beautifully firm and ready for its grand debut.
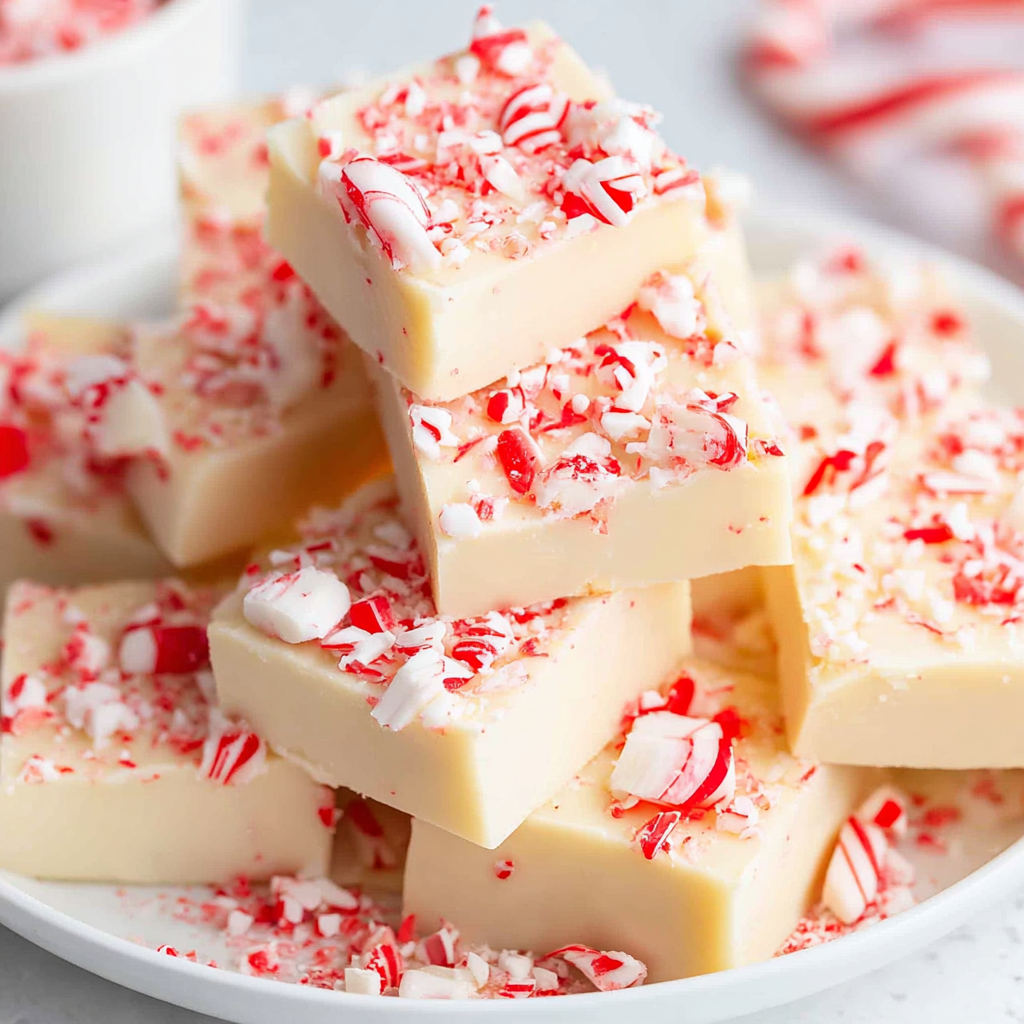
- Step 4: Slice & Serve! Once your fudge is perfectly chilled and firm, use those parchment paper “handles” to easily lift it out of the pan and onto a cutting board. Here’s a pro tip: place it upside down so the candy cane-sprinkled side is now on the bottom – this creates a beautiful, clean top for slicing. Grab a sharp knife and slice the fudge into your desired square sizes – you can get anywhere from 16 to 32 delightful pieces. Finally, flip your beautiful squares over and sprinkle the remaining crushed candy canes on top, gently pressing them in if you like. Serve at room temperature and watch them disappear!
Presentation & Serving Ideas
This Easy Peppermint Fudge isn’t just delicious; it’s also incredibly versatile when it comes to presentation! Elevate your serving game with these fun ideas:
- Classic Squares with a Twist: While squares are traditional, try cutting some into small triangles or even using mini cookie cutters for festive shapes like stars or trees before the fudge fully sets.
- Gift-Worthy Goodies: Package individual pieces in mini cupcake liners, stack them in clear cellophane bags tied with a festive ribbon, or arrange them neatly in a decorative tin. A small “handmade with love” tag adds a personal touch.
- Dessert Platter Star: Arrange your fudge on a platter alongside other holiday treats like cookies, brownies, or fresh berries for a stunning display. The vibrant red and white will truly pop!
- Coffee & Cocoa Companion: Serve a small piece of fudge alongside a warm cup of coffee, hot chocolate, or a peppermint tea. The flavors complement each other beautifully.
- A Drizzle of Decadence: For an extra touch of elegance, once the fudge is set and sliced, melt a small amount of dark chocolate or white chocolate and drizzle it over the top before the final candy cane sprinkle.
- Dust with Sparkle: A light dusting of edible glitter or powdered sugar just before serving can add a magical, snowy effect.
Storage & Shelf Life
So, you’ve made a batch of this amazing Easy Peppermint Fudge (or maybe there are a few pieces left!). Here’s how to store it to keep it fresh and delicious for as long as possible:
- Room Temperature: If your home is cool (around 68-70°F or 20-21°C), you can store the fudge in an airtight container on the counter for up to 3-4 days. Just make sure it’s away from direct sunlight or heat, as this can make it too soft.
- Refrigerator: For longer freshness, store your fudge in an airtight container in the refrigerator. It will last beautifully for up to 2-3 weeks. When you’re ready to enjoy a piece, let it come to room temperature for about 15-20 minutes for the best texture and flavor.
- Freezer (for longer storage): Yes, you can freeze fudge! Wrap individual pieces or blocks tightly in plastic wrap, then place them in a freezer-safe airtight container or heavy-duty freezer bag. It will keep well for up to 2-3 months. Thaw frozen fudge in the refrigerator overnight, then let it come to room temperature before serving.
Always ensure your container is airtight to prevent the fudge from drying out or absorbing any odors from the fridge/freezer.
Frequently Asked Questions (FAQs)
- Can I use dark or milk chocolate instead of white chocolate for this Easy Peppermint Fudge?
Absolutely! While white chocolate gives it a classic festive look, you can certainly experiment with dark or milk chocolate. The flavor profile will change, but it will still be delicious!
- My fudge isn’t setting. What went wrong?
Ensure you used sweetened condensed milk, not evaporated milk. Also, make sure you heated the mixture long enough for all the chocolate to fully melt and combine, and that it chilled for at least the recommended 2 hours (or longer if needed).
- Do I have to use butter? Can I skip it?
Butter adds richness and a smooth texture. While you could omit it, the fudge might be a bit firmer and less decadent. We recommend sticking to the recipe for the best results!
- Can I add other flavorings besides vanilla extract?
Yes! A tiny drop of peppermint extract (start with 1/4 teaspoon) can intensify the mint flavor if you love a strong peppermint kick, or try almond extract for a different twist.
- What’s the best way to crush candy canes?
A sealed plastic bag and a rolling pin work wonders! You can also use a food processor for a finer crush, but be careful not to turn it into powder.
- How many candy canes should I crush if I want more crunch?
The recipe calls for 8, but if you’re a crunch fanatic, feel free to crush 10-12 candy canes and sprinkle generously!
- Is this Easy Peppermint Fudge gluten-free?
Yes, as long as your white chocolate chips and candy canes are certified gluten-free, this recipe should be gluten-free.
- Can I make this fudge ahead of time for a party?
Definitely! This fudge is perfect for making ahead. Store it in an airtight container in the refrigerator for up to 2-3 weeks, or freeze it for longer periods.
- Why use clear vanilla extract?
Clear vanilla extract helps maintain the bright white color of the fudge, preventing any slight discoloration that regular brown vanilla extract might cause.
- What if I don’t have parchment paper?
Aluminum foil will also work for lining the pan, just be sure to lightly grease it with cooking spray or butter to prevent sticking.
Easy Peppermint Fudge 🍬
Equipment
- 8×8 inch square pan
- Parchment Paper
- Aluminum Foil
- Cooking Spray
- Plastic bag
- Rolling Pin
- Microwave-safe Bowl
- Spatula
- Plastic Wrap
- Sharp Knife
- Cutting Board
Ingredients
- 3 cups white chocolate chips or baking chips
- 14 ounces sweetened condensed milk
- 3 tablespoons unsalted butter softened to room temperature
- 1 teaspoon vanilla extract clear for a brighter white fudge
- 8 candy canes crushed
Instructions
- Prepare an 8×8 inch square pan by lining it with parchment paper or aluminum foil, making sure to leave some overhang on the sides. Lightly coat the paper or foil with cooking spray. Next, place your candy canes into a sealed plastic bag and gently crush them into small pieces using a rolling pin – it’s a great stress reliever!
- In a microwave-safe bowl, combine the white chocolate chips, sweetened condensed milk, and butter. Microwave the mixture in short 30-second intervals, stirring thoroughly after each one, until everything is smooth and fully melted. This usually takes just 2-3 minutes. Stir in the vanilla extract until it’s completely blended.
- Pour the creamy fudge mixture evenly into your prepared pan and smooth the top with a spatula. Sprinkle half of the crushed candy canes over the surface. Cover the pan with plastic wrap and place it in the refrigerator for at least 2 hours, or until the fudge is firm.
- Once chilled and firm, use the parchment paper overhang to easily lift the fudge out of the pan. Place it upside down on a cutting board (this means the sprinkled candy canes are now on the bottom). Use a sharp knife to slice the fudge into your desired square sizes, yielding between 16 to 32 pieces. Finally, sprinkle the remaining crushed candy canes on top of the fudge, gently pressing them in if you like. Serve and enjoy this festive treat at room temperature!
Notes
- Calories: 141 kcal
- Total Carbs: 17 g
- Net Carbs: 17 g
- Fats: 8 g
- Protein: 2 g