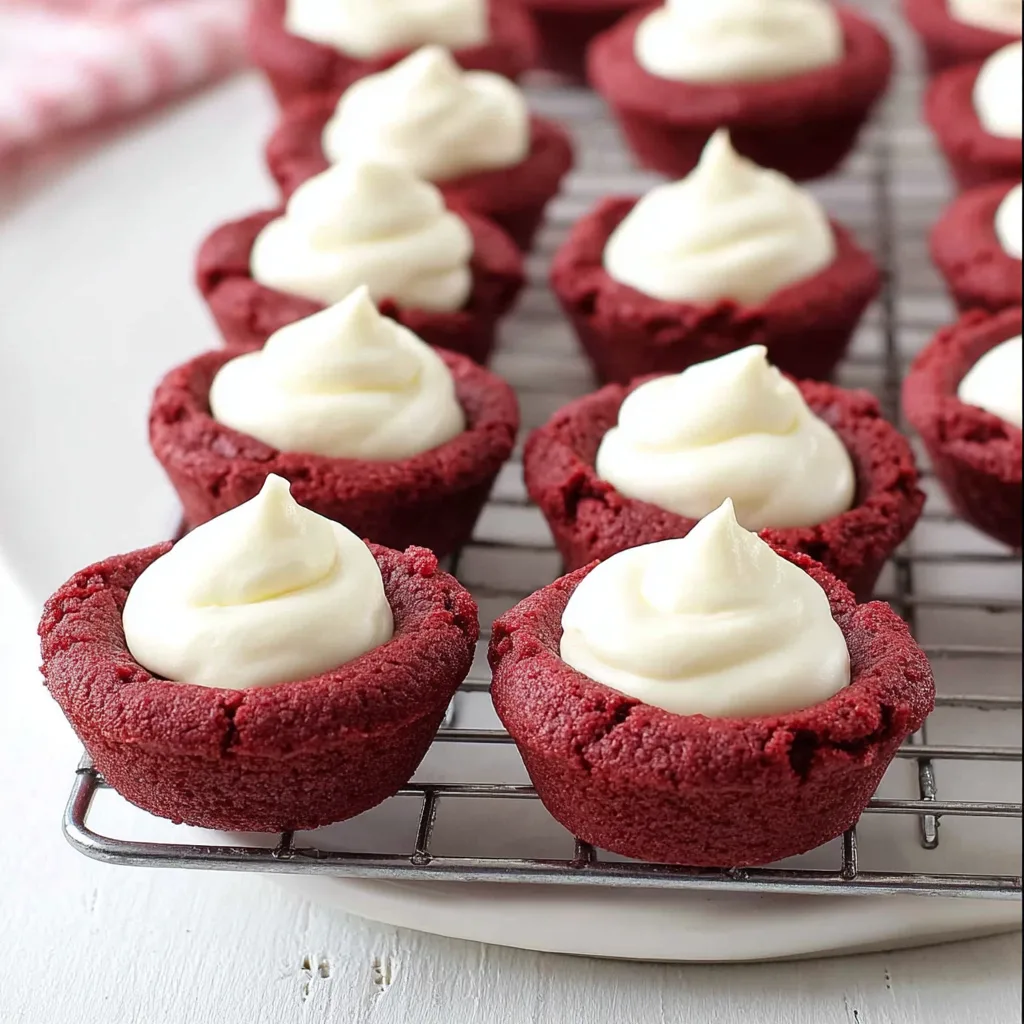
Tired of the same old dessert routine? Get ready to infuse some vibrant color and irresistible flavor into your baking with a treat that’s as beautiful as it is delicious! We’re talking about the utterly charming and incredibly tasty Lovely Red Velvet Cookie Cups with Cream Cheese Frosting. Imagine soft, chewy red velvet cookies, perfectly formed into a bite-sized cup, overflowing with a swirl of rich, tangy, and impossibly creamy cream cheese frosting. It’s the perfect blend of classic red velvet cake and a delightful cookie, all wrapped up in a convenient, utterly adorable package. Whether you’re celebrating a special occasion, looking for a show-stopping potluck contribution, or simply craving something sweet and spectacular, these cookie cups are your new go-to. Prepare for compliments, because these beauties are guaranteed to steal the show and capture hearts!
Why You’ll Love This Recipe
These Lovely Red Velvet Cookie Cups with Cream Cheese Frosting aren’t just another dessert; they’re an experience waiting to happen. Here are four fantastic reasons why you’ll absolutely adore making (and eating!) them:
- Irresistible Flavor Combination: The deep, subtle cocoa notes of the red velvet cookie perfectly complement the bright, tangy sweetness of the cream cheese frosting. It’s a match made in dessert heaven, delivering that classic red velvet flavor profile in a fun, new texture.
- Picture-Perfect Presentation: Forget messy cake slices! These individual cookie cups are miniature masterpieces, making them ideal for parties, dessert tables, or gifting. Their vibrant red hue topped with snowy white frosting is visually stunning and incredibly appealing.
- Surprisingly Easy to Make: Don’t let their elegant appearance fool you! This recipe for Lovely Red Velvet Cookie Cups with Cream Cheese Frosting is straightforward and doesn’t require advanced baking skills. From mixing the dough to piping the frosting, each step is designed for a delightful and stress-free baking experience.
- Perfect for Any Occasion: While they scream Valentine’s Day, these cookie cups are versatile enough for Christmas, birthdays, bridal showers, or just a regular Tuesday when you need a pick-me-up. They’re a guaranteed crowd-pleaser and a lovely way to show someone you care.
Ingredients with Measurements
To create your batch of exquisite Lovely Red Velvet Cookie Cups with Cream Cheese Frosting, gather these simple yet essential ingredients:
Red Velvet Cookie Cups
- 1 ½ cups all-purpose flour
- ¼ cup unsweetened cocoa powder
- ½ teaspoon kosher salt
- 1 teaspoon baking soda
- ¼ cup unsalted butter, softened
- ½ cup granulated sugar
- ½ cup light brown sugar, packed
- 1 large egg
- 1 tablespoon red food coloring
- ½ teaspoon vanilla extract
- 1 teaspoon white vinegar
Cream Cheese Frosting
- 16 ounces cream cheese, softened
- ½ cup unsalted butter, softened
- 2 cups powdered sugar
- 1 teaspoon vanilla extract
Detailed Step-by-Step on Direction How to Make the Recipe
Get ready to bake some magic! Follow these detailed steps to create your own batch of delightful Lovely Red Velvet Cookie Cups with Cream Cheese Frosting:
- Get Ready: Begin by preheating your oven to 350°F (175°C). Prepare your mini muffin tins by giving them a light spray with cooking oil. This essential step ensures your cookie cups release effortlessly.
- Mix Dry Ingredients: In a medium-sized bowl, use a whisk to thoroughly combine the all-purpose flour, unsweetened cocoa powder, kosher salt, and baking soda. Once mixed, set this bowl aside.
- Cream Wet Ingredients: In a separate, larger mixing bowl, use an electric mixer to beat the softened unsalted butter with both the granulated sugar and light brown sugar. Continue beating until the mixture is light, fluffy, and well combined.
- Add Flavor & Color: To the creamed butter and sugar mixture, stir in the large egg, vibrant red food coloring, vanilla extract, and white vinegar. Mix until all the wet ingredients are beautifully incorporated and the color is evenly distributed.
- Form the Dough: Gradually add your prepared dry ingredient mix to the wet ingredients in the large bowl. Mix on low speed, or by hand, just until a soft, consistent red velvet dough forms. Be careful not to overmix, as this can lead to tough cookies.
- Fill the Tins: Using a small spoon or a mini ice cream scoop, carefully spoon the delightful cookie dough into each prepared mini muffin cup. Fill them approximately ¾ full, allowing a little room for them to rise.
- Bake to Perfection: Gently place the muffin tins into your preheated oven. Bake for about 13 minutes, or until the edges of the cookie cups are lightly set and the centers look slightly puffed.
- Create the Cups: This is a crucial step for forming the cup shape! As soon as the cookie cups emerge from the oven, while they are still warm, use the back of a small spoon, a tart shaper, or even a shot glass to gently press an indentation into the center of each warm cookie. This creates the perfect little cavity for your frosting.
- Cool Down: Allow the newly formed cookie cups to cool in their tins for about 5 minutes. After this initial cooling, carefully transfer them to a wire rack to cool completely. They must be entirely cool before you add the frosting.
- Whip Up Frosting: While your cookie cups are cooling, prepare the luscious cream cheese frosting. In a large bowl, beat together the softened cream cheese, softened unsalted butter, powdered sugar, and vanilla extract. Beat until the mixture is wonderfully smooth, creamy, and free of lumps.
- Pipe with Love: Spoon your creamy, dreamy cream cheese frosting into a large Ziploc bag. Push the frosting towards one corner, then snip a tiny corner off the bag to create an instant piping tool.
- Decorate & Enjoy: Pipe a generous, beautiful dollop of frosting into the center of each completely cooled red velvet cookie cup. These lovely treats are now ready to be shared, admired, and devoured!
Detailed Different Ways You Can Present the Recipe and How to Serve It
The beauty of these Lovely Red Velvet Cookie Cups with Cream Cheese Frosting lies not just in their taste but also in their incredible versatility for presentation! Here are some creative ways to serve and decorate them:
- Classic Elegance: For a simple yet stunning look, pipe a perfect swirl of cream cheese frosting into each cup. A small dusting of cocoa powder or a single red sprinkle can add a touch of finesse.
- Holiday Cheer: Adapt them for any holiday! For Valentine’s Day, add tiny edible heart sprinkles. For Christmas, use green and red nonpareils or a dusting of edible glitter. For patriotic holidays, blue sprinkles can transform them.
- Chocolate Lover’s Dream: Garnish with mini chocolate chips, shaved dark chocolate, or a drizzle of melted white chocolate over the frosting. The contrast with the red velvet is divine.
- Berry Bliss: Top each frosted cookie cup with a fresh raspberry, a slice of strawberry, or a few mini cranberries. The fresh fruit adds a burst of flavor and a lovely visual appeal.
- Dessert Platter Perfection: Arrange the cookie cups on a large serving platter, perhaps alongside other small treats like mini brownies or fruit tarts, for an impressive dessert spread.
- Individual Delights: Place each cookie cup in a decorative paper liner or a small cupcake wrapper for easy handling and a professional touch, especially when serving at events.
- Gift Giving: Package a few cookie cups in a small bakery box or clear cellophane bags tied with a ribbon for a thoughtful homemade gift that’s sure to impress friends and family.
How You Can Store It and How Long Does It Last
Proper storage is key to keeping your Lovely Red Velvet Cookie Cups with Cream Cheese Frosting fresh and delicious. Here’s what you need to know:
- Room Temperature (Unfrosted): If you haven’t frosted the cookie cups yet, they can be stored in an airtight container at room temperature for up to 2-3 days. Make sure they are completely cooled before storing.
- Refrigeration (Frosted): Due to the cream cheese frosting, the finished cookie cups must be stored in the refrigerator. Place them in an airtight container to prevent them from drying out or absorbing odors from other foods. They will stay fresh for up to 3-4 days in the fridge.
- Freezing (Unfrosted Cookie Cups): You can freeze the unfrosted cookie cups for longer storage. Once completely cooled, arrange them in a single layer on a baking sheet and freeze until solid. Then transfer them to a freezer-safe airtight container or heavy-duty freezer bag, separating layers with parchment paper. They can be frozen for up to 1 month. Thaw at room temperature before frosting.
- Freezing (Frosted Cookie Cups): While possible, freezing frosted cookie cups isn’t ideal as the frosting’s texture can change slightly upon thawing. If you must, freeze them on a tray until the frosting is firm, then transfer to an airtight container. Thaw in the refrigerator overnight.
- Serving Tip: For the best flavor and texture, take your refrigerated Lovely Red Velvet Cookie Cups with Cream Cheese Frosting out of the fridge about 15-30 minutes before serving to allow the cookies to soften slightly and the frosting to become creamier.
FAQs Sections
Got questions about baking these delightful Lovely Red Velvet Cookie Cups with Cream Cheese Frosting? We’ve got answers!
- Why are my cookie cups spreading too much and losing their shape?
This often happens if your butter was too warm, or if you overmixed the dough, which develops too much gluten. Ensure your butter is softened but still cool to the touch, and mix the dry and wet ingredients just until combined. Chilling the dough for 15-30 minutes before baking can also help. - Can I make these gluten-free?
Yes, you can substitute the all-purpose flour with a 1:1 gluten-free baking flour blend that contains xanthan gum. The texture might be slightly different, but the flavor will still be fantastic. - Can I use less red food coloring or a natural alternative?
You can certainly reduce the amount of red food coloring for a paler red velvet, or omit it for a chocolate cookie cup. For natural coloring, beet powder can be used, but it might slightly alter the flavor and the vibrancy of the red. - How do I get perfect indentations for the cups?
The key is to press the indentation as soon as the cookies come out of the oven while they are still very warm and pliable. Use the back of a small spoon, a clean shot glass, or a tart tamper. Press gently but firmly, rotating slightly to create a smooth cup. - Can I make the cookie dough and/or frosting ahead of time?
Absolutely! You can prepare the cookie dough and store it tightly wrapped in the refrigerator for up to 2-3 days. Allow it to come to room temperature slightly before scooping. The cream cheese frosting can also be made ahead and stored in an airtight container in the fridge for up to 3 days. Re-whip it briefly before piping. - What if I don’t have mini muffin tins?
While mini muffin tins are best for the “cup” shape, you can bake these as regular cookies on a baking sheet, pressing the center with a spoon as they come out of the oven. They might be flatter but will still hold the frosting. Alternatively, you can use a regular muffin tin, but adjust baking time and filling quantity. - Can I freeze the baked cookie cups?
Yes, the unfrosted cookie cups freeze beautifully for up to a month. Freeze them in a single layer until solid, then transfer to an airtight freezer-safe container. Thaw at room temperature before frosting. Freezing frosted cups is possible but may slightly alter the frosting texture. - How do I avoid overmixing the dough?
Overmixing develops gluten, leading to tougher cookies. When adding dry ingredients to wet, mix on low speed or by hand just until no dry streaks of flour remain. A few small lumps are better than an overmixed, smooth dough. - Is white vinegar essential in red velvet recipes?
Yes, the white vinegar (along with baking soda and cocoa powder) creates a chemical reaction that contributes to the signature tender texture and slight tang of red velvet. It also helps to enhance the red color. Don’t skip it! - What’s the best way to pipe frosting if I don’t have a Ziploc bag or piping bag?
If you don’t have a Ziploc bag, you can use a small clean plastic sandwich bag and snip off the corner. For a rustic look, simply spoon the frosting onto the cookie cups and gently spread it with the back of a spoon. It will still taste amazing!
Lovely Red Velvet Cookie Cups with Cream Cheese Frosting
Equipment
- Mini Muffin Tins
- Wire Rack
- Large Ziploc Bag
Ingredients
Red Velvet Cookie Cups
- 1.5 cups all-purpose flour
- 0.25 cup unsweetened cocoa powder
- 0.5 tsp kosher salt
- 1 tsp baking soda
- 0.25 cup unsalted butter softened
- 0.5 cup granulated sugar
- 0.5 cup light brown sugar packed
- 1 large egg
- 1 tbsp red food coloring
- 0.5 tsp vanilla extract
- 1 tsp white vinegar
Cream Cheese Frosting
- 16 ounces cream cheese softened
- 0.5 cup unsalted butter softened
- 2 cups powdered sugar
- 1 tsp vanilla extract
Instructions
- Get Ready: Preheat your oven to 350°F (175°C). Grab your mini muffin tins and give them a light spray with cooking oil – this makes cleanup a breeze!
- Mix Dry Ingredients: In a small bowl, whisk together the flour, cocoa powder, salt, and baking soda. Set this aside for a moment.
- Cream Wet Ingredients: In a large bowl, beat the softened butter with both granulated and brown sugars until light and fluffy.
- Add Flavor & Color: Stir in the egg, vibrant red food coloring, vanilla extract, and white vinegar until everything is beautifully combined.
- Form the Dough: Gradually add your dry ingredient mix to the wet ingredients, mixing just until a soft, red velvet dough forms. Avoid overmixing to keep them tender!
- Fill the Tins: Spoon the delightful cookie dough into each mini muffin cup, filling them about ¾ full.
- Bake to Perfection: Pop them into your preheated oven and bake for about 13 minutes, or until the edges are lightly set.
- Create the Cups: As soon as they come out of the oven, use the back of a small spoon or spatula to gently press an indentation into the center of each warm cookie, forming a perfect little cup.
- Cool Down: Let the cookie cups cool in the tins for 5 minutes, then carefully transfer them to a wire rack to cool completely. This is crucial before frosting!
- Whip Up Frosting: While the cookies cool, beat together the softened cream cheese, butter, powdered sugar, and vanilla extract in a large bowl until it's wonderfully smooth and creamy.
- Pipe with Love: Spoon your luscious cream cheese frosting into a large Ziploc bag. Snip a tiny corner off the bag to create a piping tool.
- Decorate & Enjoy: Pipe a generous dollop of frosting into each cooled red velvet cookie cup. These lovely treats are ready to share and enjoy!
Notes
- Calories: 148 kcal
- Total Carbs: 17g
- Net Carbs: 16g
- Fats: 8g
- Protein: 2g