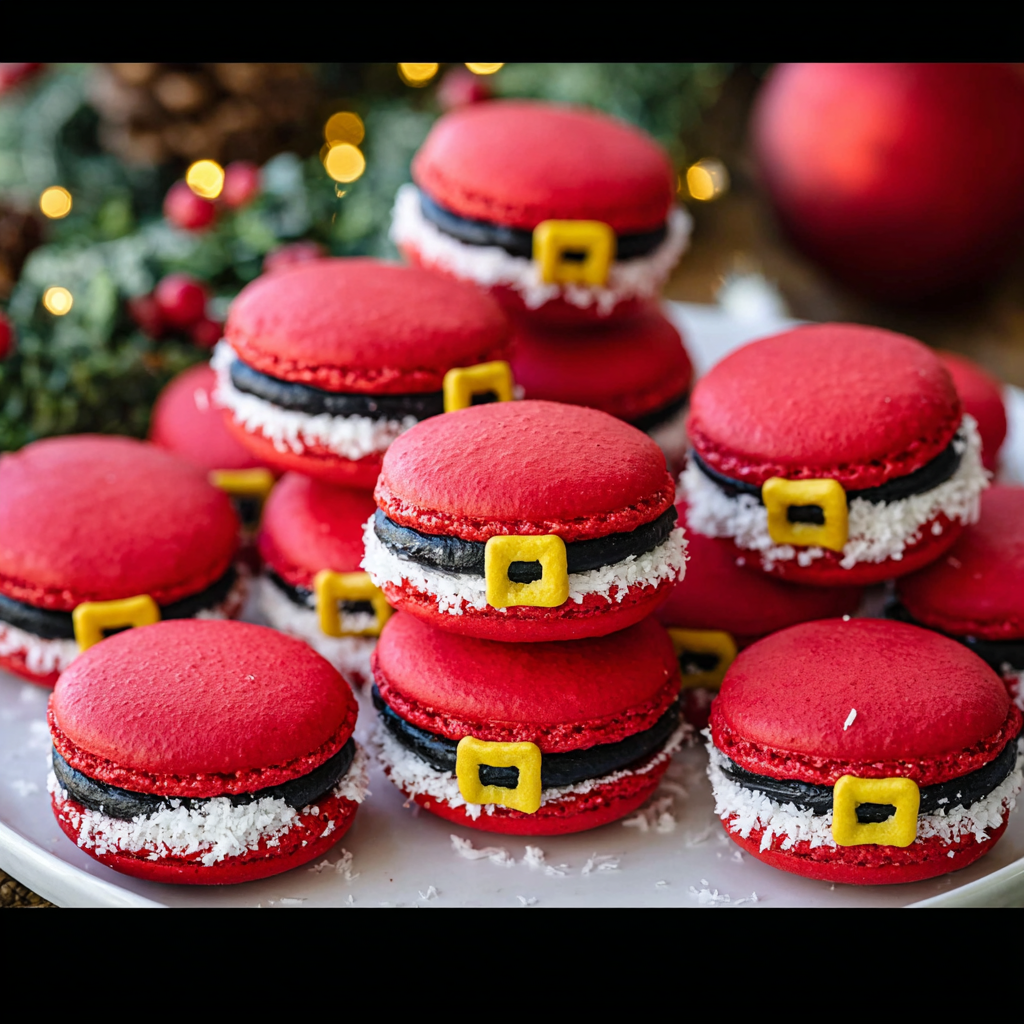
Ho ho ho, holiday bakers! Are you ready to sprinkle some serious magic into your festive season? Forget the usual cookies and cakes for a moment, because Santa himself has dropped off his secret recipe for the most enchanting, delicious, and utterly adorable treat imaginable: Santa’s Festive Macarons! These aren’t just any macarons; they’re vibrant red shells, adorned with tiny Santa belts, and filled with a dreamy sugar cookie buttercream that tastes like pure Christmas joy. Get ready to impress everyone on your nice list with these show-stopping delights!
Why You’ll Love This Recipe
Get ready to fall head over heels for these charming Santa’s Festive Macarons for so many wonderful reasons:
- Uniquely Festive & Absolutely Adorable: Let’s be honest, who can resist a macaron dressed up as Santa? The iconic red shells, complete with a tiny black belt and yellow buckle, make these an instant showstopper on any holiday dessert table. They’re almost too cute to eat!
- A Delightful Flavor Combination: Beyond their looks, these macarons offer a truly special taste experience. The delicate almond macaron shells perfectly complement the creamy, comforting sweetness of the sugar cookie buttercream. It’s like two classic Christmas treats in one perfect bite!
- Impressive, Yet Achievable: Macarons have a reputation for being tricky, but our detailed, step-by-step instructions break down the process, making it enjoyable and manageable even for ambitious beginners. You’ll feel like a professional patissier when you present these beauties!
- Perfect for Gifting & Gatherings: Whether you’re looking for the ultimate homemade gift, a star attraction for your holiday party, or a special treat for Santa himself, these Santa’s Festive Macarons are guaranteed to spread cheer and smiles. They travel well and keep beautifully, making them ideal for sharing.
Ingredients for Santa’s Festive Macarons
Gather your ingredients to create these delightful Santa’s Festive Macarons:
- Macaron Shells
- ✨ 1/2 cup light brown sugar (100g)
- 🥚 1 teaspoon egg white powder (optional, for humid climates)
- 🥚 3 large egg whites (about 100g)
- 🌰 1 cup plus 1 ½ tablespoons almond flour (105g)
- 🍚 3/4 cup plus 1 tablespoon powdered sugar (105g)
- 🔴 1 tablespoon red gel food coloring (for that iconic Santa shade!)
- Royal Icing
- 🍚 1 ½ cups powdered sugar (187g)
- 🤍 1 tablespoon meringue powder
- 💧 4 tablespoons water
- 🖤 2 drops black gel food coloring
- 💛 1 drop yellow gel food coloring
- Sugar Cookie Buttercream
- 🌾 1/2 cup all-purpose flour (63g), heat-treated
- 🧈 1 stick (1/2 cup) unsalted butter (113g), softened
- 🍯 1/4 cup light brown sugar (50g)
- 🍚 1 1/4 cups powdered sugar (156g)
- 🍦 1 teaspoon vanilla extract
- 🌰 1/8 teaspoon almond extract
- 🥛 1/2 tablespoon milk or heavy cream
- 🥥 1/4 cup shredded desiccated coconut (50g), for rolling
Detailed Step-by-Step Directions to Make Santa’s Festive Macarons
Follow these precise steps to create your own batch of magical Santa’s Festive Macarons:
Crafting Your Macaron Shells:
- Get Organized: Lay out all your ingredients and prep your baking area. Line two baking sheets with parchment paper or silicone mats (templates are super helpful here!).
- Sift Smoothness: Combine your powdered sugar and almond flour by sifting them together. This step is key for ultra-smooth macaron shells!
- Gentle Warm-Up: Place your egg whites in a heatproof bowl over a pan with gently simmering water. Add the light brown sugar and egg white powder (if you’re using it). Whisk continuously until the sugar has completely dissolved and the mixture feels smooth – no grainy bits! Ensure the bowl doesn’t touch the water.
- Whip to Perfection: Transfer the warm egg white mixture to your stand mixer. Start whipping on low for about 30 seconds, then increase to medium speed for 2 minutes. Finally, crank it up to medium-high and whip until the meringue is glossy and forms stiff peaks that hold their shape straight up with a slight curl at the very top. This usually takes 13-15 minutes, but focus on the visual cues!
- Fold in Flavor & Color: Gently pour the sifted almond flour and powdered sugar into your stiff meringue. Now, add that vibrant red gel food coloring! Carefully fold the mixture using a “J” motion, pressing lightly against the sides of the bowl to release any air.
- Master the “Macaronage”: Continue folding until your batter is glossy and flows like warm lava. When you lift your spatula, the batter should drip off slowly and continuously, allowing you to draw a figure “8” several times before it breaks. It should take about 10-15 seconds for the dripping batter to melt back into the bowl.
- Pipe Perfect Circles: Transfer your festive red batter into a piping bag fitted with a round tip (about 1/4-inch diameter). Pipe uniform circles onto your prepared baking sheets, following any templates if you have them.
- Tap & Rest: Firmly tap your baking sheets against the counter several times to release any hidden air bubbles. Use a toothpick to pop any tiny bubbles that remain on the surface. Now, let your piped shells rest in a dry, undisturbed spot for about 2 hours, or until they form a completely dry, firm skin. This resting period is essential for those iconic macaron “feet”!
- Bake Beautifully: Preheat your oven to 300°F (150°C). If you have a convection oven, try lowering the temperature to 270°F (130°C). Bake one tray at a time for 15-20 minutes. The macarons are done when they have developed lovely “feet” and no longer jiggle when gently touched. Let them cool completely on the baking sheet before moving.
Simple Royal Icing for Santa’s Belt:
- Mix & Whip: In a mixer bowl, combine the powdered sugar and meringue powder. While mixing on low, gradually add the water. Once combined, increase the speed to medium-high and whip for a few minutes until the icing becomes glossy, fluffy, and has a consistency similar to sweetened condensed milk. Adjust with more water if too stiff, or more powdered sugar if too runny.
- Color & Bag It: Divide the icing into two small bowls. Color one portion black and the other yellow (you’ll need less yellow). Transfer the black icing to a piping bag fitted with a size 3 tip, and the yellow icing to a bag with a size 2 tip. Keep any unused icing covered to prevent it from drying out.
- Decorate Santa’s Look: Pipe a neat black line horizontally across the middle of about half of your cooled red macaron shells to create Santa’s belt. Let the black icing dry for a few minutes (a quick chill in the fridge can speed this up!). Then, pipe a small yellow square in the center of the black belt to form the buckle.
Wholesome Sugar Cookie Buttercream:
- Heat-Treat Your Flour: To ensure your flour is safe to enjoy raw, spread the all-purpose flour on a parchment-lined baking tray and bake in an oven preheated to 350°F (175°C) for about 5 minutes, stirring once, until it’s warm to the touch. Let it cool completely before using.
- Creamy Base: In your mixer, beat the softened butter, light brown sugar, and powdered sugar for 4-5 minutes until the mixture is wonderfully creamy and smooth.
- Infuse Flavors: Add the cooled, heat-treated flour, vanilla extract, and almond extract. Mix on low until everything is just combined. If the frosting is a bit too thick, add the milk or heavy cream a little at a time until you reach your desired creamy consistency. If it’s too thin, a spoonful more powdered sugar will help!
Assemble Your Jolly Macarons:
- Fill ‘Em Up: Transfer your delicious sugar cookie buttercream to a piping bag fitted with a round tip. Pipe a generous dollop of buttercream onto the flat side of an undecorated macaron shell.
- Santa Sandwich: Gently place a decorated macaron shell on top, creating your adorable Santa’s Festive Macaron sandwich!
- Snowy Touch: For that extra festive “snow” effect, carefully roll the sides of each filled macaron in the shredded desiccated coconut.
- Chill & Enjoy: These delightful Santa’s Festive Macarons taste even better after chilling in the fridge for a few hours (or overnight) to allow the flavors to deepen and meld. Enjoy this festive treat in moderation!
Creative Ways to Present and Serve Your Santa’s Festive Macarons
Your beautifully crafted Santa’s Festive Macarons deserve a presentation that’s just as special as they are! Here are some fun and festive ideas:
- Tiered Dessert Display: Arrange your macarons on a tiered serving stand alongside other holiday treats like mini gingerbread cookies or chocolate truffles. Their vibrant red will pop beautifully!
- Individual Gift Boxes: Pack 2-3 macarons in small clear boxes, tie with a festive ribbon, and attach a personalized tag. These make perfect hostess gifts, neighbor presents, or stocking stuffers.
- Hot Cocoa Companion: Serve a few Santa’s Festive Macarons on a small plate next to mugs of steaming hot cocoa or a festive coffee beverage. The flavors complement each other wonderfully.
- Winter Wonderland Platter: Create a stunning dessert platter by scattering your coconut-rolled macarons amidst fresh cranberries, sprigs of rosemary, and a dusting of powdered sugar to mimic snow.
- Centerpiece Statement: Place a glass cloche or a clear cake dome over a stack of these macarons as the centerpiece for your holiday table. It protects them and makes for an eye-catching display.
Storage and Shelf Life
To keep your Santa’s Festive Macarons fresh and delicious:
- Refrigeration: Store any leftover macarons in an airtight container in the fridge for up to 5 days. The flavors will meld beautifully, often making them taste even better on day two!
- Freezing: For longer storage, you can freeze assembled macarons in an airtight container for 1-2 months. When ready to enjoy, simply transfer them to the fridge for several hours or let them thaw at room temperature for about 30 minutes before serving.
Frequently Asked Questions (FAQs) About Santa’s Festive Macarons
1. What if my macaron shells don’t have “feet”?
This is a common macaron challenge! “Feet” usually develop when the shells rest long enough to form a dry skin, allowing the heat in the oven to push the steam out the bottom. Ensure your resting period is sufficient (2 hours or until completely dry to the touch) and your oven temperature is accurate. Humidity can also play a role, so consider using egg white powder if you’re in a moist climate.
2. Can I make these Santa’s Festive Macarons ahead of time?
Absolutely! Macarons are fantastic for making ahead. The assembled macarons actually benefit from chilling in the fridge for 12-24 hours, allowing the filling to soften the shells and the flavors to meld beautifully. You can also bake the shells, decorate them, and store them unfilled in an airtight container for a few days before piping the buttercream.
3. Why is heat-treating flour important for the buttercream?
Heat-treating raw flour ensures that any potential bacteria are eliminated, making the flour safe to consume without cooking. It’s an important step for any buttercream or no-bake recipe that uses raw flour.
4. Can I use a different filling for Santa’s Festive Macarons?
Of course! While the sugar cookie buttercream is truly festive, feel free to experiment. A peppermint buttercream, cream cheese frosting, or even a simple vanilla bean buttercream would be delicious alternatives. Just make sure the filling isn’t too wet.
5. What’s the best way to get consistent macaron sizes?
Using a macaron template placed under your parchment paper or silicone mat is key for uniform sizes. You can print templates online or draw your own circles (about 1.5 inches in diameter). Pipe directly into the center of each circle.
6. How do I know if my “macaronage” is correct?
The perfect macaronage consistency is often described as “lava-like” or “ribbon stage.” When you lift your spatula, the batter should fall off in a continuous stream, forming a slow-moving ribbon that eventually melts back into the rest of the batter within 10-15 seconds. It should be able to form a figure “8” without breaking.
7. Can I freeze individual macaron shells before filling?
Yes, you can! Once fully cooled, place undecorated macaron shells in an airtight container, separated by parchment paper, and freeze for up to 1 month. Thaw at room temperature before filling and decorating.
8. What if my royal icing is too thick or too thin?
Royal icing consistency is crucial for piping. If it’s too thick, add water a few drops at a time, mixing well between additions, until you reach a sweetened condensed milk consistency. If it’s too thin, gradually add more powdered sugar until it thickens to the desired consistency.
9. Can I skip the coconut rolling for my Santa’s Festive Macarons?
Yes, the shredded desiccated coconut is optional. It adds a lovely “snowy” texture and extra flavor, but your Santa’s Festive Macarons will still be absolutely delicious without it. You could also try rolling them in festive sprinkles or finely crushed peppermint for a different look!
10. Are Santa’s Festive Macarons difficult for beginners?
Macarons are often considered an intermediate-level bake, but with patience and careful attention to the detailed instructions provided, beginners can definitely achieve success. The key is precise measurements, proper meringue whipping, and achieving the correct macaronage consistency. Don’t be discouraged if your first batch isn’t perfect; practice makes perfect with macarons!
Santa’s Festive Macarons 🎅
Equipment
- Stand Mixer
- Piping Bags
- Round Tip
- Baking Sheets
- Parchment Paper or Silicone Mats
Ingredients
Macaron Shells
- 1/2 cup light brown sugar
- 1 teaspoon egg white powder optional, for humid climates
- 3 large egg whites
- 1 cup plus 1 ½ tablespoons almond flour
- 3/4 cup plus 1 tablespoon powdered sugar
- 1 tablespoon red gel food coloring for that iconic Santa shade!
Royal Icing
- 1 1/2 cups powdered sugar
- 1 tablespoon meringue powder
- 4 tablespoons water
- 2 drops black gel food coloring
- 1 drop yellow gel food coloring
Sugar Cookie Buttercream
- 1/2 cup all-purpose flour heat-treated
- 1 stick unsalted butter (1/2 cup), softened
- 1/4 cup light brown sugar
- 1 1/4 cups powdered sugar
- 1 teaspoon vanilla extract
- 1/8 teaspoon almond extract
- 1/2 tablespoon milk or heavy cream
- 1/4 cup shredded desiccated coconut for rolling
Instructions
Crafting Your Macaron Shells:
Get Organized: Lay out all your ingredients and prep your baking area. Line two baking sheets with parchment paper or silicone mats (templates are super helpful here!).- Sift Smoothness: Combine your powdered sugar and almond flour by sifting them together. This step is key for ultra-smooth macaron shells!
- Gentle Warm-Up: Place your egg whites in a heatproof bowl over a pan with gently simmering water. Add the light brown sugar and egg white powder (if you’re using it). Whisk continuously until the sugar has completely dissolved and the mixture feels smooth – no grainy bits! Ensure the bowl doesn’t touch the water.
- Whip to Perfection: Transfer the warm egg white mixture to your stand mixer. Start whipping on low for about 30 seconds, then increase to medium speed for 2 minutes. Finally, crank it up to medium-high and whip until the meringue is glossy and forms stiff peaks that hold their shape straight up with a slight curl at the very top. This usually takes 13-15 minutes, but focus on the visual cues!
- Fold in Flavor & Color: Gently pour the sifted almond flour and powdered sugar into your stiff meringue. Now, add that vibrant red gel food coloring! Carefully fold the mixture using a “J” motion, pressing lightly against the sides of the bowl to release any air.
- Master the “Macaronage”: Continue folding until your batter is glossy and flows like warm lava. When you lift your spatula, the batter should drip off slowly and continuously, allowing you to draw a figure “8” several times before it breaks. It should take about 10-15 seconds for the dripping batter to melt back into the bowl.
- Pipe Perfect Circles: Transfer your festive red batter into a piping bag fitted with a round tip (about 1/4-inch diameter). Pipe uniform circles onto your prepared baking sheets, following any templates if you have them.
- Tap & Rest: Firmly tap your baking sheets against the counter several times to release any hidden air bubbles. Use a toothpick to pop any tiny bubbles that remain on the surface. Now, let your piped shells rest in a dry, undisturbed spot for about 2 hours, or until they form a completely dry, firm skin. This resting period is essential for those iconic macaron “feet”!
- Bake Beautifully: Preheat your oven to 300°F (150°C). If you have a convection oven, try lowering the temperature to 270°F (130°C). Bake one tray at a time for 15-20 minutes. The macarons are done when they have developed lovely “feet” and no longer jiggle when gently touched. Let them cool completely on the baking sheet before moving.
Simple Royal Icing for Santa’s Belt:
Mix & Whip: In a mixer bowl, combine the powdered sugar and meringue powder. While mixing on low, gradually add the water. Once combined, increase the speed to medium-high and whip for a few minutes until the icing becomes glossy, fluffy, and has a consistency similar to sweetened condensed milk. Adjust with more water if too stiff, or more powdered sugar if too runny.- Color & Bag It: Divide the icing into two small bowls. Color one portion black and the other yellow (you’ll need less yellow). Transfer the black icing to a piping bag fitted with a size 3 tip, and the yellow icing to a bag with a size 2 tip. Keep any unused icing covered to prevent it from drying out.
- Decorate Santa’s Look: Pipe a neat black line horizontally across the middle of about half of your cooled red macaron shells to create Santa’s belt. Let the black icing dry for a few minutes (a quick chill in the fridge can speed this up!). Then, pipe a small yellow square in the center of the black belt to form the buckle.
Wholesome Sugar Cookie Buttercream:
Heat-Treat Your Flour: To ensure your flour is safe to enjoy raw, spread the all-purpose flour on a parchment-lined baking tray and bake in an oven preheated to 350°F (175°C) for about 5 minutes, stirring once, until it’s warm to the touch. Let it cool completely before using.- Creamy Base: In your mixer, beat the softened butter, light brown sugar, and powdered sugar for 4-5 minutes until the mixture is wonderfully creamy and smooth.
- Infuse Flavors: Add the cooled, heat-treated flour, vanilla extract, and almond extract. Mix on low until everything is just combined. If the frosting is a bit too thick, add the milk or heavy cream a little at a time until you reach your desired creamy consistency. If it’s too thin, a spoonful more powdered sugar will help!
Assemble Your Jolly Macarons:
Fill ‘Em Up: Transfer your delicious sugar cookie buttercream to a piping bag fitted with a round tip. Pipe a generous dollop of buttercream onto the flat side of an undecorated macaron shell.- Santa Sandwich: Gently place a decorated macaron shell on top, creating your adorable Santa Macaron sandwich!
- Snowy Touch: For that extra festive “snow” effect, carefully roll the sides of each filled macaron in the shredded desiccated coconut.
- Chill & Enjoy: These delightful Santa Macarons taste even better after chilling in the fridge for a few hours (or overnight) to allow the flavors to deepen and meld. Enjoy this festive treat in moderation!
- Storage: Store any leftover macarons in an airtight container in the fridge for up to 5 days, or freeze them for 1-2 months to extend the holiday cheer!
Notes
Nutrition Information per macaron:
- Calories: 90 kcal
- Total Carbohydrates: 12g
- Net Carbs: 10g
- Fats: 4g
- Protein: 2g