Get ready to whisk yourself away to a world of pure indulgence with a recipe that’s more than just a dessert; it’s a loving embrace in a bowl! Imagine a dessert so rich, so creamy, so utterly delicious, yet surprisingly simple to create. We’re talking about the kind of treat that melts hearts and makes any day feel special. Prepare to fall head over heels for our Sweetheart Chocolate Dream Pudding – a confectionary masterpiece designed to delight your taste buds and warm your soul. Forget complicated baking; this is your ticket to effortless dessert stardom!
Why You’ll Love This Recipe
- A Healthier Indulgence: Who says decadent can’t be smart? Our Sweetheart Chocolate Dream Pudding embraces quality bittersweet chocolate (70%+ cocoa!) and offers dairy-free, sugar-reduced options. Enjoy the rich, authentic chocolate flavor without the guilt, making it a treat you can truly feel good about.
- Effortlessly Elegant: Don’t let its sophisticated taste fool you; this pudding is surprisingly easy to make! With clear, step-by-step instructions, even novice cooks can whip up this dreamy dessert. It’s perfect for impressing a special someone or simply treating yourself to a luxurious moment without spending hours in the kitchen.
- The Ultimate Romantic Treat: Whether it’s Valentine’s Day, an anniversary, or just a Tuesday evening you want to make magical, this pudding is the perfect culinary expression of love. Its silky texture and profound chocolate flavor make it an irresistible finish to any romantic meal.
- Customizable & Versatile: Adapt this recipe to suit your dietary needs or flavor preferences! Swap milk for a plant-based alternative, adjust sugar levels, or experiment with toppings. This pudding is a canvas for your culinary creativity, ensuring it’s always just right for you.
Ingredients with Measurements
- 🍫 4 ounces quality bittersweet chocolate (at least 70% cocoa for a richer, healthier flavor), finely chopped
- 🧈 2 tablespoons unsalted butter (or coconut oil for a dairy-free option)
- 🌿 1 ½ teaspoons pure vanilla extract
- 🥛 1 ¾ cups milk (feel free to use a lighter option like almond or oat milk)
- 🍚 ¾ cup granulated sugar (for a healthier twist, you can reduce this to ½ cup or use coconut sugar)
- 🌰 ¼ cup unsweetened cocoa powder
- ✨ 3 tablespoons cornstarch
- 🧂 ¼ teaspoon sea salt
- 🥚 3 large egg yolks
- ☁️ ½ cup light whipped cream or coconut cream (optional, for a dreamy topping)
- 🔪 2 tablespoons dark chocolate shavings (optional, for an elegant garnish)
Detailed Step-by-Step Directions How to Make the Recipe
- Melt & Prep: Begin your chocolate adventure by placing your finely chopped chocolate, butter (or coconut oil), and vanilla extract into a heatproof bowl. Set this bowl aside for a moment, ready for its big moment. In a medium saucepan, gently heat your milk until it just begins to shimmer with tiny bubbles, then immediately remove it from the heat. In a separate mixing bowl, whisk together the sugar, cocoa powder, cornstarch, and salt until they’re beautifully combined – no lumps allowed! Now, in another bowl, lightly beat the egg yolks with an electric mixer on medium speed for about a minute until they achieve a lovely, slightly lighter color.
- Combine & Temper: Lower your mixer speed to low, then gradually, like a gentle rain, add the dry sugar mixture to your fluffy beaten egg yolks. Continue beating until the mixture transforms into a delightful, moist, sandy goodness. Next, with a careful hand, slowly pour half of the warm milk into the egg yolk mixture, whisking constantly. This crucial step is called tempering, and it ensures everything is smoothly combined and prevents the eggs from scrambling.
- Thicken & Chill: Now, pour this perfectly tempered cocoa mixture back into the saucepan with the remaining milk. Cook over medium heat, continuing to whisk without interruption, for about 8 minutes. Watch as the magic happens and the pudding thickens beautifully, becoming lush and creamy. Immediately, and without delay, strain the hot pudding mixture into the bowl containing your waiting chocolate, butter, and vanilla. Let it sit undisturbed for a precious 3 minutes, allowing the residual heat to melt the chocolate perfectly. Then, with a trusty wooden spoon or whisk, stir until the pudding is wonderfully smooth, incredibly glossy, and utterly irresistible. To prevent that pesky skin from forming, press a sheet of plastic wrap directly onto the surface of the pudding. Chill this exquisite creation in the refrigerator for at least 2 hours, or until it’s perfectly set and wonderfully cold, before serving. Your Sweetheart Chocolate Dream Pudding is ready to enchant!
Detailed Different Ways You Can Present the Recipe and How to Serve It
Serving your Sweetheart Chocolate Dream Pudding is where you can truly let your creativity shine and make it an unforgettable experience!
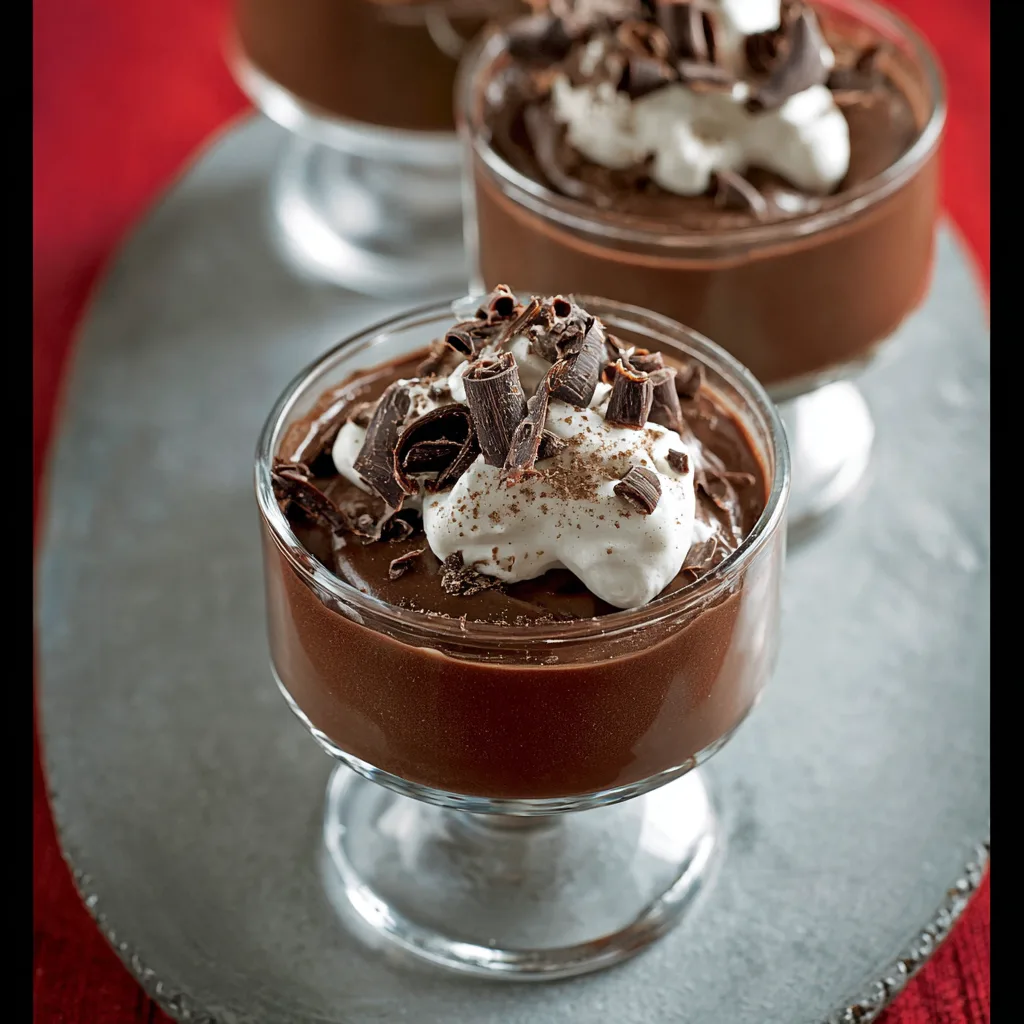
- Classic & Elegant: The simplest and often most stunning presentation is in individual clear glass ramekins or small dessert cups. This allows the beautiful dark color and creamy texture of the pudding to be appreciated. Top each serving with a generous dollop of light whipped cream (or coconut cream for a dairy-free option) and a sprinkle of dark chocolate shavings for that touch of sophistication.
- Berry Bliss: Pair the rich chocolate with the bright, tangy sweetness of fresh berries. A handful of raspberries, strawberries, or blueberries artfully arranged around the whipped cream can elevate both the visual appeal and the flavor profile.
- Nutty Crunch: For a delightful contrast in texture, sprinkle some toasted chopped nuts like pecans, almonds, or hazelnuts over your pudding. A light drizzle of caramel sauce can further enhance this nutty combination.
- Layered Parfait: Create a show-stopping dessert by layering the chilled pudding with whipped cream and crushed cookies (like shortbread or chocolate wafers) in a tall glass. Repeat layers for a dramatic effect, finishing with whipped cream and a garnish.
- Minty Fresh: A delicate sprig of fresh mint can add a pop of color and a refreshing aroma that beautifully complements the chocolate.
- Citrus Zest: A tiny grating of orange or clementine zest over the top can bring a surprising and delightful citrus note that brightens the rich chocolate.
Always serve your Sweetheart Chocolate Dream Pudding chilled. The cold temperature enhances its dense, velvety texture and allows the complex chocolate flavors to truly sing.
How You Can Store It and How Long Does It Last
Storing your Sweetheart Chocolate Dream Pudding correctly is key to enjoying its delightful texture and flavor for days!
Once your pudding is made and cooled, it’s essential to cover it properly. As mentioned in the recipe, pressing a sheet of plastic wrap directly onto the surface of the pudding prevents a “skin” from forming, which can ruin its smooth texture. If you’ve already divided it into individual servings, cover each ramekin or cup tightly with plastic wrap.
Store the pudding in the refrigerator. When properly stored in an airtight container or tightly wrapped, your Sweetheart Chocolate Dream Pudding will last beautifully for up to 3-4 days. It’s a fantastic make-ahead dessert, perfect for busy weeknights or entertaining, as its flavors often deepen and meld even more after a day in the fridge.
FAQs
-
Can I make this Sweetheart Chocolate Dream Pudding dairy-free?
Absolutely! The recipe already offers coconut oil as a butter alternative. For the milk, simply use your favorite unsweetened dairy-free milk like almond, oat, or soy milk. For the topping, opt for coconut cream instead of whipped cream.
-
Can I reduce the sugar even more?
Yes, you can! The recipe suggests reducing to ½ cup, but feel free to adjust to your taste preference. The quality bittersweet chocolate provides plenty of flavor, so you might find you need less sugar than expected.
-
What if I don’t have cornstarch? Are there alternatives?
Cornstarch is ideal for pudding as it provides a smooth, glossy finish without clouding the flavor. While you could technically use all-purpose flour, it might result in a slightly duller finish and a different texture. For best results, stick with cornstarch.
-
Why do I need to strain the pudding?
Straining is a crucial step for achieving that incredibly smooth, luxurious texture. It catches any small lumps of cocoa powder or tiny bits of cooked egg yolk, ensuring your Sweetheart Chocolate Dream Pudding is perfectly velvety.
-
How do I prevent a skin from forming on top of the pudding?
The trick is to press plastic wrap directly onto the surface of the hot pudding after straining it. This creates a barrier that prevents air from touching the surface, thus stopping a skin from forming as it cools.
-
Can I use a different type of chocolate, like milk chocolate?
While you can, using bittersweet chocolate (70% cocoa or higher) is highly recommended for this Sweetheart Chocolate Dream Pudding. It provides a deeper, richer chocolate flavor that balances the sweetness and gives the pudding its “dreamy” quality. Milk chocolate would make it significantly sweeter and less intense.
-
Can I make this pudding ahead of time for an event?
This recipe is perfect for making ahead! In fact, it needs at least 2 hours to chill and set, but its flavors often develop even further after a day in the refrigerator. It’s an ideal stress-free dessert for entertaining.
-
What kind of milk works best for this recipe?
Any milk will work! Whole milk will give a richer, creamier texture, while lighter options like almond or oat milk will still yield a delicious pudding with a slightly lighter feel. The choice is yours based on preference.
-
Is this recipe gluten-free?
Yes, as written, this Sweetheart Chocolate Dream Pudding recipe is naturally gluten-free, using cornstarch as the thickener instead of flour.
-
Can I freeze this pudding?
While technically possible, freezing is generally not recommended for egg-yolk-thickened puddings. The texture can become grainy or watery upon thawing, compromising the desired smooth and creamy consistency of this Sweetheart Chocolate Dream Pudding. It’s best enjoyed chilled from the refrigerator.
Sweetheart Chocolate Dream Pudding
Equipment
- Heatproof Bowl
- Medium Saucepan
- Mixing Bowls
- Whisk
- Electric Mixer
- Plastic Wrap
Ingredients
- 4 ounces quality bittersweet chocolate at least 70% cocoa, finely chopped
- 2 tablespoons unsalted butter or coconut oil for a dairy-free option
- 1.5 teaspoons pure vanilla extract
- 1.75 cups milk feel free to use almond or oat milk
- 0.75 cup granulated sugar can reduce to ½ cup or use coconut sugar
- 0.25 cup unsweetened cocoa powder
- 3 tablespoons cornstarch
- 0.25 teaspoon sea salt
- 3 large egg yolks
- 0.5 cup light whipped cream or coconut cream (optional, for topping)
- 2 tablespoons dark chocolate shavings optional, for garnish
Instructions
- Place your finely chopped chocolate, butter (or coconut oil), and vanilla extract into a heatproof bowl. Set this aside.
- In a medium saucepan, gently heat your milk until it just begins to simmer, then remove it from the heat.
- In a separate mixing bowl, whisk together the sugar, cocoa powder, cornstarch, and salt until well combined.
- In another bowl, lightly beat the egg yolks with an electric mixer on medium speed for about a minute until they're slightly lighter in color.
- Lower the mixer speed to low, then gradually add the dry sugar mixture to the beaten egg yolks. Continue beating until combined.
- Slowly pour half of the warm milk into the egg yolk mixture, whisking constantly until everything is smoothly combined and tempered.
- Pour this tempered cocoa mixture back into the saucepan with the remaining milk.
- Cook over medium heat, continuously whisking, for about 8 minutes, or until the pudding thickens beautifully.
- Immediately strain the hot pudding mixture into the bowl containing your chocolate, butter, and vanilla. Let it sit undisturbed for 3 minutes to allow the chocolate to melt perfectly.
- With a wooden spoon or whisk, stir until the pudding is wonderfully smooth and glossy.
- To prevent a skin from forming, press a sheet of plastic wrap directly onto the surface of the pudding.
- Chill in the refrigerator for at least 2 hours, or until perfectly set and cold, before serving. Serve chilled, optionally topped with a dollop of light whipped cream and a sprinkle of chocolate shavings!
Notes
Calories: 145
Total Carbs: 22g
Net Carbs: 19g
Fats: 7g
Protein: 4g