Get ready to fall head over heels for the most enchanting treat you’ll bake this season! We’re talking about a dessert so delightful, so vibrantly pink, and so incredibly tender, it’s practically a love letter in cake form. Forget those ordinary bakes; today, we’re diving into the wonderful world of Sweetheart Raspberry Lamingtons! Imagine a fluffy, vanilla-kissed sponge cake, dipped in a luscious, naturally sweet raspberry glaze, and then showered with delicate coconut flakes. It’s an Australian classic given a romantic, berry-filled twist that’s perfect for celebrating love, friendship, or simply treating yourself to something truly special. These bite-sized beauties aren’t just a dessert; they’re an experience – a symphony of textures and flavors that will have everyone asking for seconds. So, tie on your apron, cue up your favorite playlist, and let’s create some edible magic that’s as charming as it is delicious!
Why You’ll Love This Recipe
- Irresistibly Delicious Flavor: Each Sweetheart Raspberry Lamington offers a perfect harmony of sweet vanilla sponge, tangy fresh raspberry glaze, and the tropical whisper of coconut. It’s a flavor profile that’s both comforting and exciting, making every bite a pure delight.
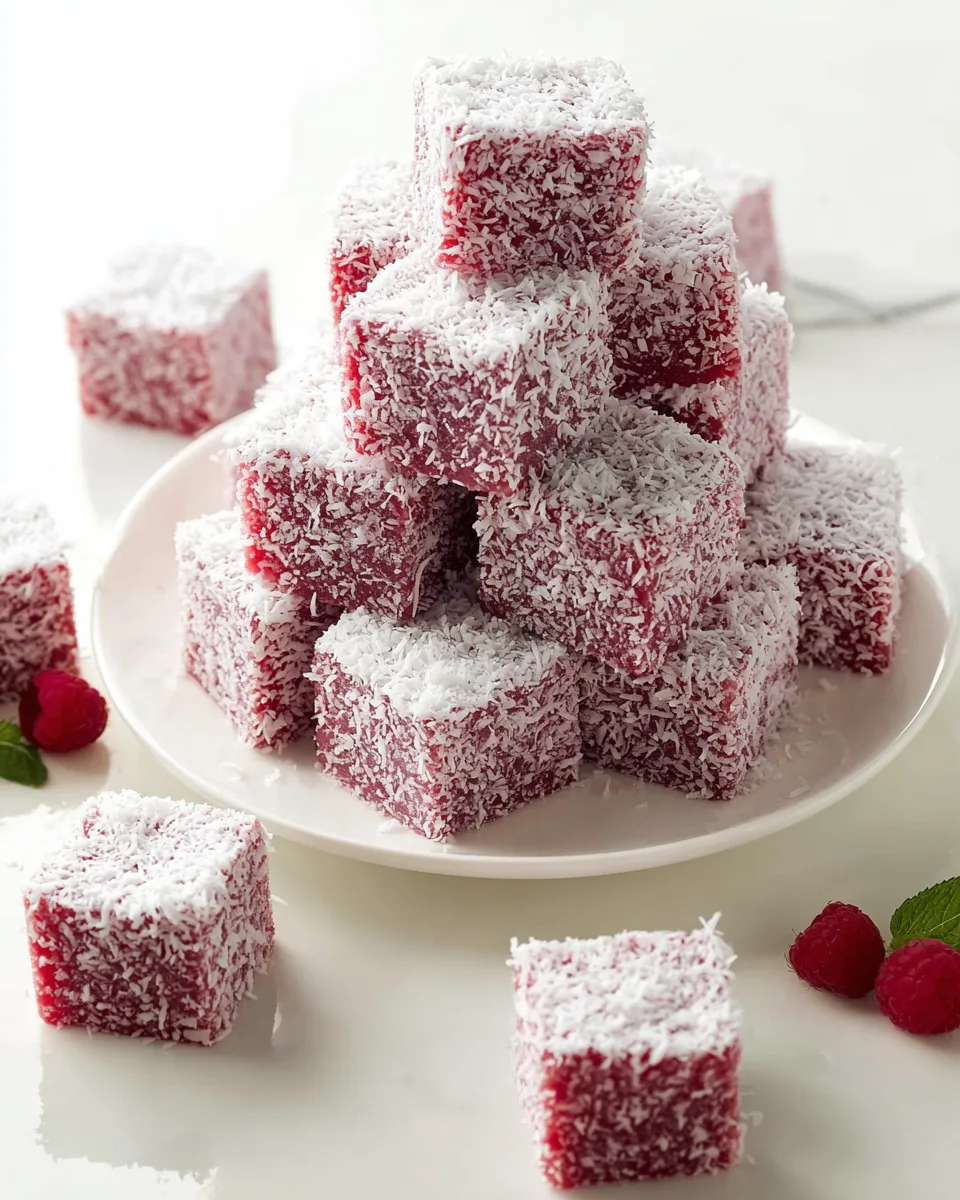
- Picture-Perfect Presentation: With their vibrant pink hue, fluffy coconut coating, and neat square shape, these lamingtons are absolute showstoppers! They’re incredibly photogenic and will add a touch of elegance and whimsy to any dessert table or special occasion.
- Surprisingly Simple to Make: Don’t let their gourmet appearance fool you! Our detailed, easy-to-follow instructions break down the process into manageable steps, making this recipe accessible for bakers of all skill levels. You’ll be amazed at what you can create!
- The Ultimate Sweetheart Treat: Whether it’s Valentine’s Day, an anniversary, or just a Tuesday when you want to show some love, these Sweetheart Raspberry Lamingtons are the perfect expression of affection. They’re a thoughtful, handmade gift that speaks volumes without saying a word.
Ingredients with measurements
Here’s what you’ll need to create your batch of delightful Sweetheart Raspberry Lamingtons:
For the Tender Sponge Cake:
- 🥚 5 large eggs, warmed
- 🥛 1 cup whole milk
- 🧈 6 tablespoons unsalted butter
- 🍚 2 cups granulated sugar
- 🌾 2 cups cake flour (or all-purpose flour for a slightly denser texture)
- 🥄 2 teaspoons baking powder
- 🧂 ½ teaspoon salt
- 🌿 1 tablespoon vanilla extract
For the Luscious Raspberry Glaze & Coconut Coating:
- ✨ 2 teaspoons unflavored gelatin powder
- 🍬 1 cup granulated sugar
- 💧 1¼ cups water, divided
- 🍓 10 ounces frozen raspberries, thawed
- 💖 2 cups powdered sugar (confectioners’ sugar)
- 🔴 ¼ teaspoon red food coloring, optional (for a vibrant pink hue)
- 🥥 2 cups desiccated coconut (fine shredded coconut)
Detailed step by step on direction how to make the recipe
Let’s get baking and create these incredible Sweetheart Raspberry Lamingtons!
Let’s Bake the Tender Cake:
- Prep for Perfection: Preheat your oven to 350°F (175°C). Lightly grease and flour two 8-inch square cake pans, then line the bottoms with parchment paper. Gently warm your eggs by letting them sit in warm water for about 5 minutes; this helps them get wonderfully fluffy!
- Warm the Goodness: In a small saucepan, gently heat the milk and butter over low heat until the butter melts. Keep this mixture warm while you prepare the eggs.
- Whip It Up: In a large mixing bowl, beat the warmed eggs with granulated sugar on high speed for 8-15 minutes. You’ll see this mixture transform into a pale yellow, incredibly fluffy foam that has nearly tripled in volume – this step is key for a light, airy cake!
- Fold in Dry Ingredients: Sift the cake flour, baking powder, and salt directly over the whipped egg mixture. Gently fold these dry ingredients in with a spatula until just barely combined, don’t worry if you see a few small streaks of flour.
- Combine Wet & Dry: Add the vanilla extract to your warm milk and butter mixture, then pour it into the batter. Stir gently by hand until everything is smoothly and evenly incorporated.
- Bake with Love: Divide the batter evenly between your prepped cake pans. Bake for 30-34 minutes, or until a toothpick inserted into the center comes out clean. Let the cakes cool completely in their pans on a wire rack.
Time for the Luscious Glaze & Coating:
- Soften Gelatin: In a small dish, sprinkle the unflavored gelatin powder evenly over ¼ cup of water and let it sit for 5 minutes to soften.
- Berry-licious Syrup: In a medium saucepan, heat 1 cup of water and 1 cup of granulated sugar, stirring until the sugar completely dissolves. Add the thawed raspberries and cook for 5-8 minutes, allowing them to break down and create a naturally flavored, vibrant syrup.
- Strain for Smoothness: Pour the raspberry mixture through a fine-mesh strainer set over a bowl, pressing down on the solids with the back of a spoon to extract all the delicious liquid. Discard the leftover seeds and pulp.
- Activate Gelatin: Briefly microwave the softened gelatin for about 10 seconds until it becomes syrupy and clear, then whisk it thoroughly into the warm raspberry syrup.
- Create the Glaze: Sift the powdered sugar into a clean bowl. Gradually pour the raspberry syrup over the sugar, whisking continuously until the glaze is wonderfully smooth and free of lumps. If you desire a brighter, more intense pink hue, stir in a tiny drop of red food coloring.
- Chill to Thicken: Transfer the prepared glaze to the refrigerator for 15-20 minutes. This allows it to thicken slightly, making it the perfect consistency for coating the cakes.
- Prep the Cake Squares: Once the cakes are completely cool, use a sharp knife to carefully trim the edges for a neat, uniform look. Cut the cakes into 2-inch squares. For easier handling and less mess during coating, place these cut squares on a plate and pop them into the freezer for 30 minutes to firm up.
- Coat with Care: Set up two separate bowls: one with your thickened raspberry glaze and the other with desiccated coconut. Remove a few cake squares from the freezer at a time. Using a fork to gently hold a cold cake square, spoon the raspberry glaze over it, turning to cover all sides completely and allowing any excess to drip back into the bowl.
- Coconut Kisses: While still on the fork, hold the glazed cake over the coconut bowl and spoon coconut generously over all sides, gently pressing to ensure it adheres nicely. Place the coated lamington on a wire rack set over a baking sheet to catch any drips.
- Set & Enjoy: Once all the cake squares have been coated with glaze and coconut, place the entire baking sheet into the refrigerator for another 20-30 minutes to allow the glaze to fully set. These delightful, bite-sized treats are now ready to share and impress!
Detailed different ways you can present the recipe and how to serve it
The beauty of Sweetheart Raspberry Lamingtons isn’t just in their taste, but also in their incredible versatility for presentation! Here are some creative ways to serve these lovely treats:
- Elegant Platter Display: Arrange your vibrant pink lamingtons on a pristine white or delicate pastel platter. Garnish with a few fresh raspberries and a sprig of mint for a pop of contrasting color and freshness.
- Individual Delights: For a more refined touch, place each lamington in a small paper cupcake liner or a delicate petit four cup. This makes them easy to pick up and adds a professional flourish for tea parties or dessert buffets.
- Charming Gift Boxes: Pack a selection of Sweetheart Raspberry Lamingtons into small decorative boxes lined with parchment paper. Tie with a pretty ribbon and add a personalized tag – they make an incredibly thoughtful and delicious handmade gift!
- Dessert Alongside: Serve them as part of a larger dessert spread. They pair beautifully with a scoop of vanilla bean ice cream, a dollop of whipped cream, or even a light raspberry coulis drizzled on the plate.
- Coffee & Tea Companion: These lamingtons are the perfect accompaniment to a warm cup of coffee, a fragrant herbal tea, or even a glass of sparkling rosé or prosecco for a special occasion.
- Stacked Pyramid: For a dramatic centerpiece, carefully stack the lamingtons into a pyramid shape on a cake stand. This creates a visually impressive display, perfect for celebrations.
How you can store it and how long does it last
To keep your delectable Sweetheart Raspberry Lamingtons fresh and delicious, proper storage is key. Once coated and set, it’s best to store these treats in an airtight container in the refrigerator. The glaze, made with fresh raspberries and gelatin, will remain stable and firm when chilled. Stored this way, they will stay wonderfully moist and flavorful for up to 3-4 days. While they are delightful served at room temperature, chilling them beforehand helps maintain their structure and the texture of the glaze. We generally don’t recommend freezing already-coated lamingtons, as the freezing and thawing process can sometimes alter the texture of the cake and the glaze, making them a bit watery or crumbly. For best results, enjoy them within a few days of baking!
FAQs
Have questions about making your Sweetheart Raspberry Lamingtons? We’ve got answers!
- Q1: Can I use fresh raspberries instead of frozen?
A1: Yes, absolutely! If using fresh raspberries, ensure they are ripe and sweet. The cooking time for the syrup might be slightly shorter as they’ll break down quicker. - Q2: What if I don’t have cake flour?
A2: You can substitute all-purpose flour, but your cake will be slightly denser. To mimic cake flour, remove 2 tablespoons of all-purpose flour from each cup and replace it with 2 tablespoons of cornstarch, then sift thoroughly. - Q3: Is the gelatin essential for the glaze?
A3: Yes, the gelatin is crucial! It gives the glaze its characteristic glossy finish and helps it set firmly around the cake, preventing it from dripping and making the lamingtons easier to handle. - Q4: Can I make these ahead of time?
A4: Yes, you can! The cakes can be baked a day in advance, cooled completely, wrapped tightly, and stored at room temperature. The glaze can be made, chilled, and applied the next day. Once coated, they last 3-4 days in the refrigerator. - Q5: Why warm the eggs for the cake?
A5: Warming the eggs helps them whip up to a much greater volume and creates a more stable foam, resulting in a lighter, airier, and more tender sponge cake. - Q6: My glaze is too thick/thin. What do I do?
A6: If your glaze is too thick after chilling, you can warm it gently over very low heat or briefly microwave it for a few seconds, stirring until it reaches the desired consistency. If it’s too thin, you can whisk in a little more sifted powdered sugar, a tablespoon at a time, until it thickens. - Q7: Can I use other fruit flavors for the glaze?
A7: While this recipe focuses on Sweetheart Raspberry Lamingtons, you can experiment! Other berries like strawberries or mixed berries could work, but you might need to adjust sweetness and food coloring. - Q8: How do I prevent the cake from being dry?
A8: Over-baking is the main culprit for dry cake. Ensure you only bake until a toothpick comes out clean. The warm milk and butter mixture in this recipe also helps keep the cake moist. - Q9: What’s the best way to cut the cake neatly into squares?
A9: Once the cake is completely cool, use a sharp, serrated knife. For the neatest cuts, wipe the blade clean between each cut, especially after trimming the edges. Freezing the cut squares slightly also helps maintain their shape during coating. - Q10: Can I skip the red food coloring?
A10: Absolutely! The natural raspberry syrup will provide a lovely, delicate pink hue on its own. The food coloring is purely optional, intended only to boost the vibrancy for a more intense “sweetheart” pink.
Sweetheart Raspberry Lamingtons ❤️
Equipment
- Two 8-inch square cake pans
- Parchment Paper
- Small Saucepan
- Large mixing bowl
- Fine-mesh strainer
- Wire Rack
- Baking Sheet
Ingredients
For the Tender Sponge Cake
- 5 large eggs warmed
- 1 cup whole milk
- 6 tablespoons unsalted butter
- 2 cups granulated sugar
- 2 cups cake flour (or all-purpose flour for a slightly denser texture)
- 2 teaspoons baking powder
- 0.5 teaspoon salt
- 1 tablespoon vanilla extract
For the Luscious Raspberry Glaze & Coconut Coating
- 2 teaspoons unflavored gelatin powder
- 1 cup granulated sugar
- 1.25 cups water divided
- 10 ounces frozen raspberries thawed
- 2 cups powdered sugar (confectioners' sugar)
- 0.25 teaspoon red food coloring optional (for a vibrant pink hue)
- 2 cups desiccated coconut (fine shredded coconut)
Instructions
- Let's Bake the Tender Cake: 1. Prep for Perfection: Preheat your oven to 350°F (175°C). Lightly grease and flour two 8-inch square cake pans, then line the bottoms with parchment paper. Gently warm your eggs by letting them sit in warm water for about 5 minutes; this helps them get wonderfully fluffy!
- 2. Warm the Goodness: In a small saucepan, gently heat the milk and butter over low heat until the butter melts. Keep this mixture warm while you prepare the eggs.
- 3. Whip It Up: In a large mixing bowl, beat the warmed eggs with granulated sugar on high speed for 8-15 minutes. You'll see this mixture transform into a pale yellow, incredibly fluffy foam that has nearly tripled in volume – this step is key for a light, airy cake!
- 4. Fold in Dry Ingredients: Sift the cake flour, baking powder, and salt directly over the whipped egg mixture. Gently fold these dry ingredients in with a spatula until just barely combined, don't worry if you see a few small streaks of flour.
- 5. Combine Wet & Dry: Add the vanilla extract to your warm milk and butter mixture, then pour it into the batter. Stir gently by hand until everything is smoothly and evenly incorporated.
- 6. Bake with Love: Divide the batter evenly between your prepped cake pans. Bake for 30-34 minutes, or until a toothpick inserted into the center comes out clean. Let the cakes cool completely in their pans on a wire rack.
- Time for the Luscious Glaze & Coating: 1. Soften Gelatin: In a small dish, sprinkle the unflavored gelatin powder evenly over ¼ cup of water and let it sit for 5 minutes to soften.
- 2. Berry-licious Syrup: In a medium saucepan, heat 1 cup of water and 1 cup of granulated sugar, stirring until the sugar completely dissolves. Add the thawed raspberries and cook for 5-8 minutes, allowing them to break down and create a naturally flavored, vibrant syrup.
- 3. Strain for Smoothness: Pour the raspberry mixture through a fine-mesh strainer set over a bowl, pressing down on the solids with the back of a spoon to extract all the delicious liquid. Discard the leftover seeds and pulp.
- 4. Activate Gelatin: Briefly microwave the softened gelatin for about 10 seconds until it becomes syrupy and clear, then whisk it thoroughly into the warm raspberry syrup.
- 5. Create the Glaze: Sift the powdered sugar into a clean bowl. Gradually pour the raspberry syrup over the sugar, whisking continuously until the glaze is wonderfully smooth and free of lumps. If you desire a brighter, more intense pink hue, stir in a tiny drop of red food coloring.
- 6. Chill to Thicken: Transfer the prepared glaze to the refrigerator for 15-20 minutes. This allows it to thicken slightly, making it the perfect consistency for coating the cakes.
- 7. Prep the Cake Squares: Once the cakes are completely cool, use a sharp knife to carefully trim the edges for a neat, uniform look. Cut the cakes into 2-inch squares. For easier handling and less mess during coating, place these cut squares on a plate and pop them into the freezer for 30 minutes to firm up.
- 8. Coat with Care: Set up two separate bowls: one with your thickened raspberry glaze and the other with desiccated coconut. Remove a few cake squares from the freezer at a time. Using a fork to gently hold a cold cake square, spoon the raspberry glaze over it, turning to cover all sides completely and allowing any excess to drip back into the bowl.
- 9. Coconut Kisses: While still on the fork, hold the glazed cake over the coconut bowl and spoon coconut generously over all sides, gently pressing to ensure it adheres nicely. Place the coated lamington on a wire rack set over a baking sheet to catch any drips.
- 10. Set & Enjoy: Once all the cake squares have been coated with glaze and coconut, place the entire baking sheet into the refrigerator for another 20-30 minutes to allow the glaze to fully set. These delightful, bite-sized treats are now ready to share and impress!