Step into a world of frosty magic and heartwarming holiday cheer with our enchanting recipe for Christmas Polar Bear Wonderland Cookies! Imagine tiny, edible polar bears, looking back at you with sweet chocolate chip noses and sprinkle eyes, all nestled in a blanket of snowy sanding sugar. These aren’t just cookies; they’re miniature masterpieces that bring smiles, spread joy, and create unforgettable festive memories. Whether you’re a seasoned baker or just starting your holiday traditions, these delightfully soft, cream cheese-infused treats are surprisingly easy to make and guaranteed to be the star of your Christmas cookie platter. Get ready to bake some winter wonderland magic!
Why You’ll Love These Christmas Polar Bear Wonderland Cookies
These adorable Christmas Polar Bear Wonderland Cookies aren’t just cute; they’re a dream come true for holiday bakers! Here are four reasons why they’ll become your new favorite tradition:
- Irresistibly Soft & Chewy: Thanks to the secret ingredient – cream cheese – these cookies boast an incredible soft-batch texture that melts in your mouth. No hard, crumbly cookies here, just pure, tender bliss in every bite!
- Charming & Adorable Design: Who can resist a cute polar bear? The simple decorating steps make these cookies look professionally made, yet they’re perfect for bakers of all skill levels. They’re guaranteed to be the cutest cookies on any holiday spread.
- Perfect for Holiday Gifting: Packaged in a festive box or tin, these Christmas Polar Bear Wonderland Cookies make heartwarming, homemade gifts for friends, family, and neighbors. They show you put thought and love into your holiday greetings.
- Fun for the Whole Family: From mixing the dough to pressing on the sprinkles, this recipe offers delightful opportunities for family bonding in the kitchen. Kids will especially love helping to decorate their very own polar bear friends!
Ingredients for Your Christmas Polar Bear Wonderland Cookies
Gather these simple ingredients to create your festive masterpieces:
For the Soft-Batch Cream Cheese Cookies:
- 🧈 3/4 cup (1 1/2 sticks) unsalted butter, softened
- 🧀 1/2 cup (4 oz.) full-fat cream cheese, softened
- 🍚 1 1/2 cups granulated sugar
- 🥚 1 large egg, at room temperature
- ✨ 2 teaspoons vanilla extract or vanilla bean paste
- 🌾 3 cups all-purpose flour
- 🌽 1 Tablespoon cornstarch
- 🥄 1/2 teaspoon baking powder
- 🧂 1/2 teaspoon fine salt
For the Homemade Buttercream Frosting:
- 🧈 1 cup unsalted butter, softened
- ✨ 1 Tablespoon vanilla extract or vanilla bean paste
- 🧂 1/2 teaspoon fine salt
- 🧁 3 1/2 cups powdered sugar
- 🥛 1/4 cup heavy whipping cream, at room temperature
For Decorating:
- 💫 1 cup coarse sanding sugar (or granulated sugar)
- 🍫 30 large chocolate chips (for noses)
- ⚫️ Round black sprinkles (for eyes)
- 🔴 Round red or pink sprinkles (for inner ears)
Detailed Step-by-Step Directions to Make Your Wonderland Cookies
Follow these instructions to bring your adorable Christmas Polar Bear Wonderland Cookies to life!
Making the Delightfully Soft Cookie Dough:
- Cream softened butter, cream cheese, and granulated sugar until fluffy.
- Beat in egg and vanilla.
- Whisk flour, cornstarch, baking powder, and salt in a separate bowl.
- Gradually add dry mix to wet, mixing on low until just combined. Dough will be sticky.
- Divide dough, flatten into rectangles, wrap, and chill for 2 hours (or 30 mins freezer).
Rolling and Cutting Your Adorable Bears:
- Preheat oven to 350°F (175°C) and line baking sheets.
- Lightly flour surface and dough, then roll to 1/3-inch thick.
- Cut 2 1/2-inch circles. Use a 3/4-inch cutter for smaller ear circles; make a tiny cut on each.
- Press two ears onto each large cookie head.
- Chill cut-out cookies for 15 minutes (or 5 mins freezer) before baking.
Baking to Golden Perfection:
- Bake one sheet at a time for 12-14 minutes, until edges just begin to brown.
- Cool on baking sheet for 15 minutes, then transfer to a wire rack to cool completely.
- Repeat with remaining dough, chilling scraps as needed.
Whipping Up the Dreamy Buttercream Frosting:
- Beat softened butter until smooth (30 seconds).
- Mix in vanilla and salt.
- Gradually add powdered sugar and heavy cream, beating on low until smooth and creamy. Adjust consistency if needed.
- Scoop frosting into a piping bag with a medium round tip or snipped opening.
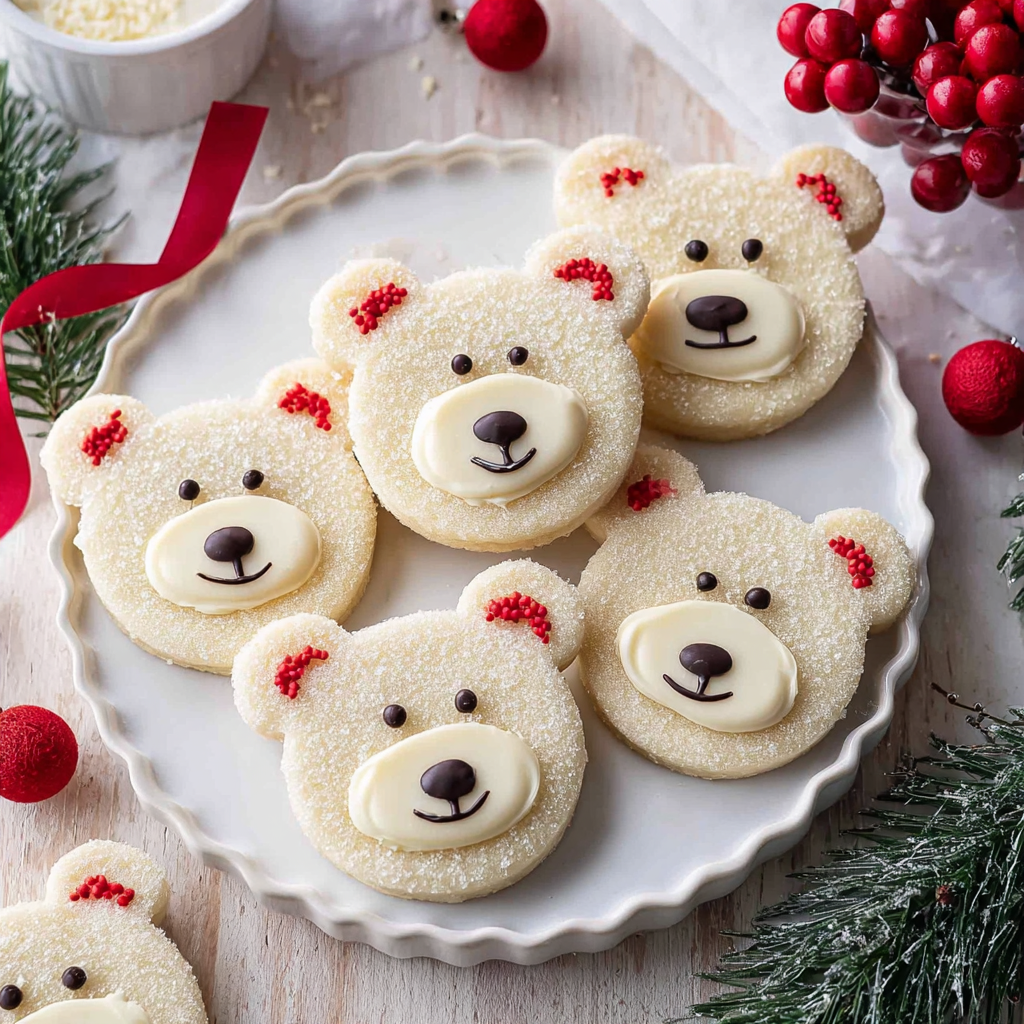
Decorating Your Charming Polar Bears:
- Pour sanding sugar into a shallow bowl.
- Once cookies are completely cool, pipe a thin frosting layer over one cookie.
- Gently press frosted cookie into sanding sugar to coat.
- Pipe a small oval for the muzzle near the bottom.
- Press a large chocolate chip for the nose.
- Place two black sprinkles for eyes and two red/pink sprinkles on the inner ears.
- Repeat and enjoy your adorable Christmas Polar Bear Wonderland Cookies!
Presenting and Serving Your Christmas Polar Bear Wonderland Cookies
These Christmas Polar Bear Wonderland Cookies are almost too cute to eat, but when you do, here are some delightful ways to present and serve them:
- Festive Platter Display: Arrange them artfully on a white platter, perhaps with some fresh cranberries or pine sprigs for a snowy, natural look. They make a stunning centerpiece for any holiday gathering.
- Cozy Hot Cocoa Companion: Serve a couple of these delightful polar bears alongside a steaming mug of hot chocolate or a glass of cold milk. It’s the ultimate cozy treat for a chilly winter evening.
- Thoughtful Gifting: Stack them in clear cellophane bags tied with a festive ribbon, or nestle them in a decorative cookie tin. They make perfect homemade gifts for teachers, neighbors, or as party favors.
- Cookie Exchange Star: Take your batch of Christmas Polar Bear Wonderland Cookies to your next cookie exchange and watch them disappear! Their unique charm is sure to impress.
- Dessert Table Delight: Add them to a holiday dessert buffet alongside other festive treats. Their whimsical appearance will be a conversation starter!
How to Store Your Christmas Polar Bear Wonderland Cookies
To keep your adorable Christmas Polar Bear Wonderland Cookies fresh and delicious, proper storage is key:
- At Room Temperature: Once fully decorated, store these cookies in an airtight container at room temperature for up to 3-4 days. Layer them gently between sheets of parchment paper to prevent the frosting and decorations from sticking or getting smudged.
- In the Refrigerator: If you need them to last a bit longer, or if your home is particularly warm, you can store them in an airtight container in the refrigerator for up to 1 week. Bring them to room temperature for about 15-20 minutes before serving for the best soft texture.
- Freezing Dough: You can freeze the unbaked cookie dough wrapped tightly in plastic wrap for up to 3 months. Thaw in the refrigerator overnight before rolling and baking.
- Freezing Baked, Unfrosted Cookies: Baked, unfrosted cookies can be frozen in an airtight container for up to 1 month. Thaw at room temperature and then frost as desired. Freezing frosted cookies can sometimes affect the frosting’s texture, so it’s best to frost them fresh if possible.
FAQs About Christmas Polar Bear Wonderland Cookies
Here are some frequently asked questions to help you perfect your Christmas Polar Bear Wonderland Cookies:
- Can I use margarine instead of butter?
While margarine can be used, butter yields a richer flavor and better texture, especially in the buttercream. For best results, stick with unsalted butter. - Why do I need to chill the dough twice?
Chilling the dough helps firm up the butter and cream cheese, preventing the cookies from spreading too much in the oven, ensuring your polar bear shapes stay defined. - What if my cookie dough is too sticky to roll?
If your dough is too sticky, add a very small amount of flour (1-2 tablespoons) at a time, mixing until it’s workable but still soft. Ensure it’s well chilled. - Can I make these gluten-free?
You can try substituting the all-purpose flour with a 1:1 gluten-free baking flour blend that contains xanthan gum. Results may vary slightly. - My cookies browned too much; how can I prevent this?
Over-baking causes browning. Pull them out when the edges are just set and the centers look slightly underdone – they’ll continue to cook on the hot baking sheet. - Can I use store-bought frosting?
Yes, for convenience, you can use a tub of store-bought vanilla frosting. However, homemade buttercream generally tastes better and pipes more smoothly. - What if I don’t have sanding sugar?
You can use regular granulated sugar for a similar effect, though sanding sugar provides a coarser, more sparkly “snowy” look. - Can I prepare the buttercream ahead of time?
Yes, the buttercream can be made 1-2 days in advance and stored in an airtight container in the refrigerator. Let it come to room temperature and re-whip before using. - What size cookie cutter should I use for the ears if I don’t have a 3/4-inch one?
A clean bottle cap, the wider end of a piping tip, or even a small round measuring spoon can work as a substitute for the smaller cutter. - How many cookies does this recipe make?
This recipe yields approximately 30 cookies, perfect for sharing or enjoying throughout the holiday season!
“`
Christmas Polar Bear Wonderland Cookies 🎄🐻❄️
Ingredients
For the Soft-Batch Cream Cheese Cookies
- 0.75 cup unsalted butter softened (1 1/2 sticks)
- 0.5 cup full-fat cream cheese softened (4 oz.)
- 1.5 cups granulated sugar
- 1 large egg at room temperature
- 2 teaspoons vanilla extract or vanilla bean paste
- 3 cups all-purpose flour
- 1 Tablespoon cornstarch
- 0.5 teaspoon baking powder
- 0.5 teaspoon fine salt
For the Homemade Buttercream Frosting
- 1 cup unsalted butter softened
- 1 Tablespoon vanilla extract or vanilla bean paste
- 0.5 teaspoon fine salt
- 3.5 cups powdered sugar
- 0.25 cup heavy whipping cream at room temperature
For Decorating
- 1 cup coarse sanding sugar (or granulated sugar)
- 30 large chocolate chips (for noses)
- Round black sprinkles (for eyes)
- Round red or pink sprinkles (for inner ears)
Instructions
Making the Delightfully Soft Cookie Dough:
- In a large bowl, cream together the softened butter and cream cheese until wonderfully smooth. Then, beat in the granulated sugar on medium-high speed for a couple of minutes until the mixture looks lighter and fluffy.
- Add the egg and vanilla extract, mixing on medium speed until everything is just combined.
- In a separate bowl, whisk together the flour, cornstarch, baking powder, and salt.
- Gradually add this flour mixture to your butter mixture in two steps, mixing on low speed until just combined. Be careful not to overmix! The dough will be a bit sticky.
- Divide the dough in half, flatten each portion into a rectangle (about 1/2 inch thick), wrap them in plastic wrap, and chill in the fridge for about 2 hours (or 30 minutes in the freezer). Chilling helps your cookies keep their lovely shape!
Rolling and Cutting Your Adorable Bears:
- About 30 minutes before you're ready to roll, preheat your oven to 350°F (175°C). Line two large baking sheets with silicone mats or parchment paper.
- Take one chilled dough portion from the fridge/freezer. Lightly flour your work surface, the dough, and your rolling pin.
- Roll the dough to an even 1/3-inch thickness. Use a 2 1/2-inch round cookie cutter (dusted with flour) to cut out as many circles as you can. Gently brush off any extra flour and place them about 1 inch apart on your prepared baking sheets.
- Now for the ears! Use a smaller 3/4-inch round cutter (or a clean bottle cap) to cut out smaller circles from the leftover dough. You'll need two small circles for each large cookie head.
- Make a tiny cut on the edge of each small circle (as shown in the recipe pictures) so they fit perfectly against the large cookie head. Gently press two "ears" onto the side of each large cookie.
- Chill your cut-out cookies again for 15 minutes in the fridge (or 5 minutes in the freezer). This crucial step helps them stay perfectly shaped while baking!
Baking to Golden Perfection:
- Bake one sheet of cookies at a time on the top oven rack for 12-14 minutes. Watch them closely and pull them out just before the edges start to brown – we want them soft and chewy!
- Let the baked cookies cool on the baking sheet for about 15 minutes, then gently transfer them to a wire rack to cool completely.
- While one batch bakes, gather any dough scraps, re-wrap, and chill. Repeat the rolling, cutting, and baking process with your remaining dough.
Whipping Up the Dreamy Buttercream Frosting:
- In a clean bowl, beat the softened butter on medium speed for 30 seconds until super smooth.
- Mix in the vanilla extract and salt on low speed.
- Gradually add the powdered sugar and heavy cream, beating on low until everything is well combined and the frosting is smooth and creamy. If it's too thick, add a tiny bit more cream; if too thin, a spoonful of powdered sugar will help.
- Scoop the frosting into a large piping bag fitted with a medium round piping tip (like a Wilton 10), or just snip a 1 cm opening at the base of the bag. Set aside.
Decorating Your Charming Polar Bears:
- Pour the sanding sugar into a small, shallow bowl.
- Once your cookies are completely cool (this is important!), pipe a thin layer of frosting evenly over the top of one cookie.
- Gently press the frosted cookie into the sanding sugar until the entire top is coated. This helps create a smooth, snowy texture.
- Pipe a small oval shape near the bottom of the cookie to create the polar bear's muzzle.
- Carefully press a large chocolate chip onto the top center of the muzzle for the nose.
- Place two black sprinkles for the eyes and two red or pink sprinkles on the "ears" for a pop of color. Feel free to get creative with whatever festive sprinkles you have!
- Repeat with all your cookies, then admire and enjoy your adorable Christmas polar bear treats!
Notes
- Calories: 265 kcal
- Total Carbs: 34g
- Net Carbs: 34g
- Fats: 14g
- Protein: 2g