Why You’ll Love These Sweetheart Red Velvet Cookies
Get ready to fall head over heels! These Sweetheart Red Velvet Cookies aren’t just a dessert; they’re a declaration of love in edible form. Here are four reasons why you’ll absolutely adore baking and devouring them:
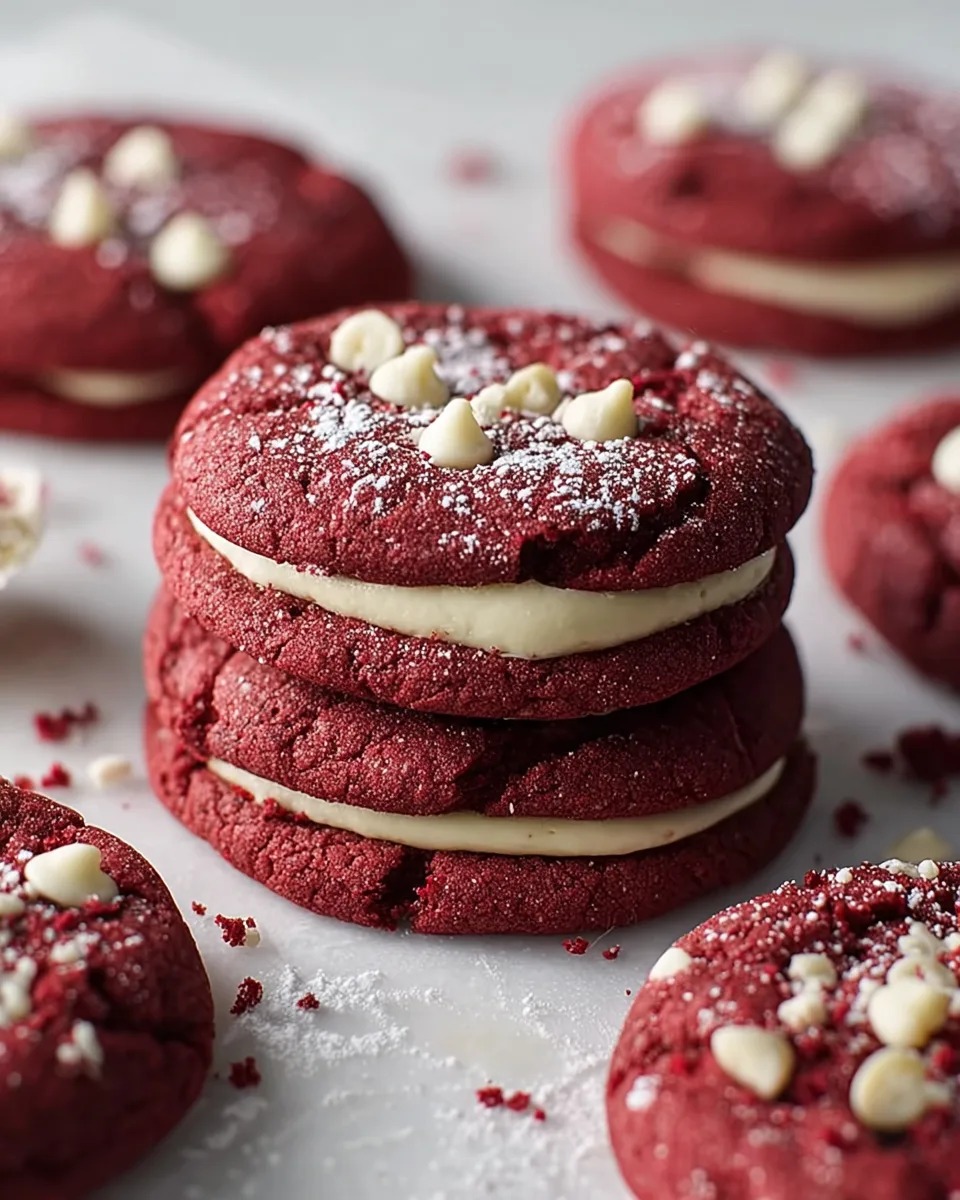
- Irresistible Classic Flavor: They capture the iconic rich, subtle cocoa tang of red velvet cake, perfectly translated into a chewy, soft cookie. Every bite is a delightful balance of sweet and slightly tart.
- Picture-Perfect Presentation: With their vibrant red hue and optional white chocolate chip freckles, these cookies are stunning! They’re ideal for special occasions, holiday gift-giving, or simply brightening someone’s day.
- Surprisingly Simple to Make: Don’t let their elegant appearance fool you. This recipe is straightforward, with easy-to-follow steps that even novice bakers can master, leading to impressive results every time.
- Pure Comfort in Every Bite: Warm, soft, and slightly chewy, these cookies offer a comforting indulgence. They’re perfect for cozy evenings, coffee breaks, or sharing sweet moments with loved ones.
Unleash Your Inner Cupid with Sweetheart Red Velvet Cookies!
Picture this: a rich, vibrant red cookie, kissed with the subtle tang of cocoa, studded with creamy white chocolate, and baked to soft, chewy perfection. Sounds like a dream, right? Well, wake up and smell the deliciousness, because these Sweetheart Red Velvet Cookies are here to turn your baking dreams into a mouth-watering reality! Whether you’re planning a romantic gesture for Valentine’s Day, looking for a show-stopping treat for a party, or simply craving something utterly delightful, these cookies are your go-to. They’re not just cookies; they’re little bites of love, designed to melt hearts and tantalize taste buds. Get ready to whisk, stir, and bake your way to pure joy!
Sweetheart Red Velvet Cookies: The Magical Ingredients
Gather your enchanted tools and ingredients, and let’s bring these charming Sweetheart Red Velvet Cookies to life! Precision is key for perfect treats, so make sure your measurements are spot on.
- Dry Goodies:
- 3 cups all-purpose flour
- 1/4 cup unsweetened cocoa powder
- 1 teaspoon baking soda
- 1/2 teaspoon salt
- Wet Wonders:
- 1 cup (2 sticks) unsalted butter, softened
- 1 1/2 cups granulated sugar
- 1/2 cup brown sugar, packed
- 2 large eggs
- 1 teaspoon vanilla extract
- 1 cup buttermilk
- 1 teaspoon white vinegar
- 2 tablespoons red gel food coloring
- Optional Sparkle:
- 1 cup white chocolate chips
Bake with Love: Your Step-by-Step Sweetheart Red Velvet Cookies Guide
Ready to transform simple ingredients into extraordinary Sweetheart Red Velvet Cookies? Follow these detailed steps, and you’ll be enjoying your delightful creations in no time!
- Get Ready for Magic: First things first, set your oven to a cozy 350°F (175°C). While it’s warming up, grab your baking sheets and line them with parchment paper. This little trick makes cleanup a breeze!
- Whisk the Dry Goodies: In a medium-sized bowl, take a whisk and combine your flour, cocoa powder, baking soda, and salt. Give them a good mix until they’re perfectly blended. Set aside.
- Cream the Sweet Base: Now, in a large bowl, it’s time for some serious creaming! Beat together the softened butter, granulated sugar, and brown sugar. Keep going until the mixture is beautifully light and fluffy – a sign of a great cookie to come!
- Eggs & Vanilla In: Crack in your eggs one at a time, beating well after each addition to ensure they’re fully incorporated. Then, stir in that lovely vanilla extract for a fragrant boost.
- Craft the Red Hues: In a separate, small bowl, combine the buttermilk, white vinegar, and the star of the show – your vibrant red gel food coloring. Whisk it until it’s a uniform, brilliant red.
- Gentle Blending Time: It’s time to bring it all together! Gradually add your colorful wet mixture to your dry ingredients. Mix gently until everything just comes together. Remember, overmixing is a no-no for tender cookies!
- Fold in Chips (If Using): If you’re going for that extra touch of sweetness, now’s the moment to gently fold in your white chocolate chips. They add a lovely contrast and creamy texture.
- Chill Out: Cover your glorious red dough and pop it into the refrigerator for at least 30 minutes. This chilling time is crucial – it helps the cookies hold their shape and bake up perfectly soft and chewy.
- Shape & Bake Your Hearts Out: Once chilled, roll the dough into cute 1-inch balls. Arrange them on your prepared baking sheets, giving them a little space to spread.
- The Golden Finish: Slide those baking sheets into the preheated oven and bake for 8-10 minutes. You’ll know they’re ready when the edges are set, but the centers still look wonderfully soft. Don’t overbake!
- Cool Down & Enjoy: Let your freshly baked cookies rest on the baking sheets for a few minutes. This helps them firm up without losing their softness. Then, transfer them to a wire rack to cool completely. Now, go on, indulge in these delightful Sweetheart Red Velvet Cookies!
Presenting & Serving Your Sweetheart Red Velvet Cookies
You’ve baked these beautiful Sweetheart Red Velvet Cookies, now let’s make them shine even brighter! Presentation is key to truly capturing hearts. Here are some enchanting ways to present and serve your delightful treats:
Charming Presentation Ideas:
- Simple & Sweet Stack: Arrange them artfully on a white plate or a rustic wooden board for a classic, inviting look.
- Dust of Elegance: For an extra touch of sophistication, lightly dust the cooled cookies with powdered sugar. It mimics snow on a winter’s day, or adds a beautiful contrast against the red.
- Chocolate Drizzle Magic: Melt some white or dark chocolate and drizzle it decoratively over the cooled cookies. A contrasting chocolate drizzle truly elevates their appeal.
- Gift of Love: Place a few cookies in a charming box, tie it with a satin ribbon, and add a handwritten tag. These make perfect edible gifts for Valentine’s Day, anniversaries, or just to say “I love you.”
- Cookie Jar Delight: Keep them fresh and visible in a clear glass cookie jar on your countertop, inviting everyone to grab a treat.
- Mini Sandwich Cookies: For an extra decadent treat, whip up a batch of cream cheese frosting (the traditional red velvet pairing!) and sandwich two cookies together.
How to Serve Them:
- Warm from the Oven: Nothing beats a slightly warm cookie with a gooey center. Serve them fresh for an ultimate comfort food experience.
- Classic Milk Pairing: A tall, cold glass of milk is the quintessential companion for any cookie, especially these.
- Coffee or Tea Time: Enjoy your Sweetheart Red Velvet Cookies alongside your morning coffee, afternoon tea, or as a delightful dessert with an after-dinner espresso.
- Dessert Platter Star: Include them on a dessert platter with other treats for gatherings, adding a vibrant pop of color.
- Ice Cream Sidekick: Serve a warm cookie with a scoop of vanilla bean ice cream for a delightful à la mode experience. The warm cookie and cold ice cream are a match made in heaven!
Storage & Shelf Life of Your Sweetheart Red Velvet Cookies
Want to enjoy your irresistible Sweetheart Red Velvet Cookies for as long as possible? Proper storage is key to keeping them fresh, soft, and delicious. Here’s how to store them and how long you can expect them to last:
Storing Baked Cookies:
- Room Temperature: Once completely cooled, store your cookies in an airtight container at room temperature. A cookie jar or a plastic container with a tight-fitting lid works perfectly. When stored correctly, these cookies will stay wonderfully fresh and soft for 3-5 days. To maintain softness, you can even place a slice of bread in the container; the cookies will absorb moisture from the bread.
- Freezing Baked Cookies: For longer storage, you can freeze baked cookies. Once completely cooled, arrange them in a single layer on a baking sheet and freeze until solid (about 1-2 hours). Then, transfer the frozen cookies to a freezer-safe airtight container or heavy-duty freezer bag, separating layers with parchment paper. They can be stored in the freezer for up to 1 month. Thaw at room temperature or gently warm in the microwave for a few seconds.
Storing Cookie Dough:
- Refrigeration: The dough for these Sweetheart Red Velvet Cookies can be made ahead of time and stored in the refrigerator. Wrap it tightly in plastic wrap or place it in an airtight container for up to 2-3 days. Remember to let it sit at room temperature for 10-15 minutes before rolling and baking if it’s too firm.
- Freezing Cookie Dough Balls: For ultimate convenience, roll the dough into 1-inch balls as instructed, then place them on a parchment-lined baking sheet and freeze until solid. Once frozen, transfer the dough balls to a freezer-safe airtight container or bag. They can be frozen for up to 3 months. When you’re ready to bake, you can bake them directly from frozen, adding an extra 2-4 minutes to the baking time.
Sweetheart Red Velvet Cookies: Your FAQs Answered!
- Q: What gives red velvet cookies their distinct red color and flavor?
A: The vibrant red color comes from red gel food coloring. The unique flavor is a blend of subtle cocoa powder and the slight tang from buttermilk and white vinegar, creating that signature red velvet taste. - Q: Can I skip the chilling time for the dough?
A: While you technically can, it’s highly recommended not to skip chilling. Chilling helps the butter solidify, preventing the cookies from spreading too much and resulting in a softer, chewier texture with better flavor development. - Q: I don’t have buttermilk. What can I use instead?
A: You can easily make your own! Add 1 tablespoon of white vinegar or lemon juice to a liquid measuring cup, then fill the rest of the cup with regular milk until it reaches 1 cup. Stir and let it sit for 5-10 minutes until it slightly curdles. - Q: Why are my cookies spreading too much and becoming thin?
A: This can happen if your butter was too soft/melted, the dough wasn’t chilled long enough (or at all), your oven temperature is too low, or you’re using too much baking soda. Ensure proper chilling and accurate measurements. - Q: Can I make these Sweetheart Red Velvet Cookies gluten-free?
A: Yes, you can substitute the all-purpose flour with a 1:1 gluten-free baking flour blend that contains xanthan gum. The texture might be slightly different, but they should still be delicious. - Q: Can I use a different type of chocolate chip?
A: Absolutely! While white chocolate chips offer a lovely contrast, feel free to use semi-sweet, milk chocolate, or even dark chocolate chips based on your preference. - Q: How do I know when the cookies are perfectly baked?
A: The cookies are ready when their edges look set and slightly firm, but the centers still appear wonderfully soft and might even look slightly underbaked. They will continue to set as they cool on the baking sheet. - Q: Can I halve or double this recipe?
A: Yes, this recipe is quite flexible! You can easily halve or double all the ingredients proportionally to adjust the yield. Just ensure you have enough space on your baking sheets. - Q: What’s the best way to get uniformly sized cookies?
A: A cookie scoop (about 1-inch in diameter for this recipe) is your best friend for consistent cookie sizes. This ensures even baking and a professional look. - Q: Can I add any other flavorings to the dough?
A: While vanilla is classic, a tiny hint of almond extract (1/4 teaspoon) can complement the red velvet flavor beautifully. You could also experiment with a touch of mint extract for a festive twist!
Sweetheart Red Velvet Cookies ❤️
Equipment
- Baking Sheets
- Parchment Paper
- Medium Bowl
- Large Bowl
- Small Bowl
- Wire Rack
Ingredients
Dry Goodies
- 3 cups all-purpose flour
- 1/4 cup unsweetened cocoa powder
- 1 teaspoon baking soda
- 1/2 teaspoon salt
Wet Base
- 1 cup unsalted butter softened (2 sticks)
- 1 1/2 cups granulated sugar
- 1/2 cup brown sugar packed
- 2 large eggs
- 1 teaspoon vanilla extract
- 1 cup buttermilk
- 1 teaspoon white vinegar
- 2 tablespoons red gel food coloring vibrant
Optional
- 1 cup white chocolate chips (optional)
Instructions
- Get Ready: Preheat your oven to 350°F (175°C). Line your baking sheets with parchment paper for easy cleanup.
- Combine Dry Goodies: In a medium bowl, simply whisk together the flour, cocoa powder, baking soda, and salt until they're well mixed.
- Cream the Wet Base: In a large bowl, beat together the softened butter, granulated sugar, and brown sugar until the mixture is wonderfully light and fluffy.
- Add Eggs & Vanilla: Incorporate the eggs one at a time, beating well after each, then stir in the vanilla extract.
- Mix the Red Hues: In a separate small bowl, whisk together the buttermilk, white vinegar, and vibrant red food coloring until fully combined.
- Gentle Blend: Gradually add the colorful wet mixture to your dry ingredients, mixing just until everything comes together. Be careful not to overmix!
- Fold in Chips (Optional): If you're using white chocolate chips, gently fold them into the dough now.
- Chill Time: Cover the dough and let it chill in the refrigerator for at least 30 minutes. This helps the cookies bake up perfectly!
- Shape & Bake: Roll the dough into small, 1-inch balls and arrange them on your prepared baking sheets.
- Golden Finish: Bake for 8-10 minutes. The cookies are ready when their edges look set but the centers are still wonderfully soft.
- Cool Down: Let the cookies rest on the baking sheets for a few minutes before moving them to a wire rack to cool completely. Enjoy these delightful treats!