The scent of pine, the twinkle of lights, and the joyous hum of holiday tunes – Christmas is a magical time, and nothing captures that magic quite like homemade treats. This year, move beyond the usual sugar cookies and gingerbread, and prepare to create something truly spectacular that will have everyone reaching for their cameras before their taste buds. We’re talking about the show-stopping, ethereal, and utterly delightful **Ultimate Meringue Christmas Tree Cookies That Wow Every Time**! These aren’t just cookies; they’re tiny edible works of art, guaranteed to bring a festive sparkle to any holiday gathering. Get ready to bake a batch of pure joy that’s as fun to make as it is to devour.
Why You’ll Love This Recipe
There are countless reasons to adore these festive confections, but here are four compelling ones that make the **Ultimate Meringue Christmas Tree Cookies That Wow Every Time** an absolute must-bake this season:
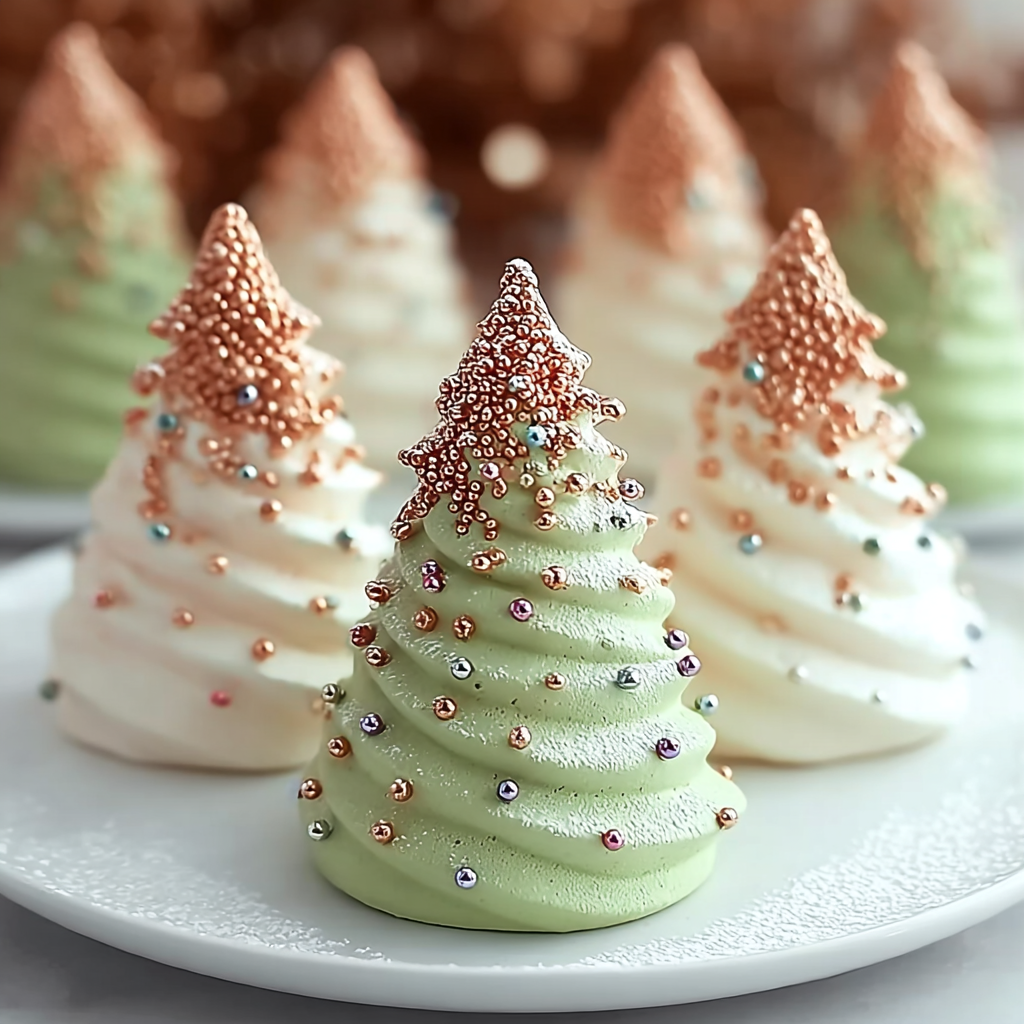
- Visually Stunning & Instagram-Worthy: Let’s be honest, half the fun of holiday baking is the presentation! These vibrant green, sprinkle-adorned Christmas trees are incredibly charming and instantly elevate your dessert spread. They’re designed to impress and are practically begging to be featured on your holiday photo reel.
- Delicately Light & Crisp: Unlike dense cookies, these meringues offer an exquisite melt-in-your-mouth texture. They’re airy, crisp, and surprisingly delicate, providing a delightful contrast to heavier holiday fare. Each bite is a whisper of sweetness that won’t leave you feeling overly full.
- Simple Ingredients, Spectacular Results: You don’t need a pantry full of exotic items to create this masterpiece. With just a handful of basic ingredients – eggs, sugar, and a few flavorings – you can whip up a treat that looks and tastes incredibly sophisticated, proving that sometimes, less is truly more.
- Fun & Festive for All Ages: This recipe is a fantastic way to get everyone involved in the holiday spirit. From piping the tree shapes to sprinkling on the glittery adornments, it’s a joyful activity that creates lasting memories and delicious results. Plus, the vibrant green color is just pure Christmas cheer!
Ingredients with Measurements
Gather your magical ingredients to craft these delightful **Ultimate Meringue Christmas Tree Cookies That Wow Every Time**:
- 🥚 4 large Eggs, at room temperature
- 🍚 1 cup Granulated Sugar
- 🤏 Pinch of Salt
- 🧪 ½ teaspoon Cream of Tartar
- 🍦 1 teaspoon Vanilla Extract OR Peppermint Extract
- 🟢 About 20 drops Green Food Coloring (gel food coloring recommended for best results)
- ✨ Tiny Sprinkles, of your choice
- ❄️ Powdered Sugar, for dusting before serving
Detailed Step-by-Step Directions How to Make the Recipe
Follow these easy steps to bring your **Ultimate Meringue Christmas Tree Cookies That Wow Every Time** to life:
- Get Ready for Magic: Begin by preheating your oven to a very low 200°F (93°C). Line two large baking sheets with parchment paper. This parchment is essential for preventing sticking and ensuring easy removal of your delicate meringue trees.
- Separate Eggs Simply: Carefully crack and separate your 4 large eggs. Place the whites into a meticulously clean mixing bowl (even a speck of yolk or grease can prevent your meringue from forming). Save the yolks for another delicious recipe!
- Whip to Foamy Clouds: Using an electric mixer, beat the egg whites on medium speed until they transform into a light, airy, and wonderfully foamy consistency. Now, add the cream of tartar; this little secret ingredient helps stabilize your meringue. Continue beating until you start seeing soft, cloud-like peaks form when you lift the beater – this is your beautiful meringue base beginning to take shape!
- Sweeten Slowly & Smoothly: With your mixer still running on medium speed, gradually, almost hypnotically, add the granulated sugar. Spoon it in, one tablespoon at a time, allowing each addition to fully incorporate before adding the next. This slow process is absolutely crucial for achieving that super glossy, thick, and stable meringue. Toss in your pinch of salt with the very last spoonful of sugar.
- Achieve Stiff Peaks & Flavor: Keep beating, patiently, until your meringue mixture is incredibly shiny, remarkably thick, and holds firm, stiff peaks. When you lift the beater, the peaks should stand straight up without flopping over. Now, gently fold in your chosen extract – vanilla for classic sweetness or peppermint for a festive zing – mixing just until it’s evenly blended.
- Add Festive Color Gently: With the care of an artist, gently fold in the green food coloring. Use a spatula to incorporate the color, mixing just enough to achieve an even, festive green hue. Be careful not to overmix, as you want to preserve all that beautiful air you just whipped into your meringue!
- Pipe Your Charming Trees: Transfer your vibrant green meringue into a piping bag fitted with a star tip (or a round tip for a simpler look). Pipe charming small Christmas tree shapes onto your prepared parchment paper. Leave about an inch of space between each tree to allow for air circulation. Immediately after piping each cookie, shower them with your tiny festive sprinkles for that extra sparkle and holiday cheer!
- Bake & Dry to Perfection: Gently place your baking sheets into the preheated oven and bake for 1 hour. After the hour is up, this next step is key: turn off the oven completely. Do not open the oven door! Leave the meringue trees inside for a minimum of 2 more hours, or even better, overnight. This long drying period in the cooling oven is what makes them wonderfully crisp and delicate.
- Store & Serve with a Flourish: Once your meringues are completely cool and dry, gently lift them from the parchment paper. Store them in an airtight container in a cool, dry spot. Humidity is their enemy! Just before serving these **Ultimate Meringue Christmas Tree Cookies That Wow Every Time**, dust them with a light cloud of powdered sugar for an elegant, magical, snow-kissed finish!
Detailed Different Ways You Can Present the Recipe and How to Serve It
These **Ultimate Meringue Christmas Tree Cookies That Wow Every Time** are not just delicious; they’re incredibly versatile for presentation! Here are some creative ways to serve and present your delightful creations:
- The Classic Holiday Platter: Arrange your meringue trees artfully on a festive serving platter alongside other holiday cookies like shortbread, gingerbread men, and sugar cookies. Their height and vibrant color will make them stand out beautifully.
- Edible Tree Decorations: Before baking, if you’re using a strong piping tip, you can carefully create a small hole near the top of some trees using a skewer. Once baked and cooled, thread a thin ribbon through them to hang directly on your Christmas tree for a charming, edible decoration (just make sure they’re out of reach of curious pets!).
- Hot Chocolate Toppers: Serve a piping hot mug of hot chocolate and crown it with a small meringue tree. The warmth will slightly soften the meringue, creating a delightful contrast in temperature and texture.
- Dessert Garnish: Use them as a whimsical garnish for other holiday desserts. Place a small meringue tree next to a slice of chocolate cake, a scoop of vanilla ice cream, or on top of a festive trifle for an instant festive upgrade.
- Mini Gift Bags: Package a few meringue trees in clear cellophane bags tied with a festive ribbon. They make adorable and thoughtful homemade gifts for neighbors, teachers, or as party favors.
- “Forest” Display: Arrange multiple trees of slightly varying sizes on a bed of powdered sugar (your “snow”) to create a charming meringue forest scene on a large plate or cake stand.
- Vary Your Sprinkles: Experiment with different types of sprinkles! Gold stars, silver balls, white nonpareils, or even tiny edible glitter can give each batch a unique look.
- Add a “Star”: Before baking, press a tiny yellow star sprinkle onto the very tip of each tree to act as its guiding star, adding an extra layer of detail.
How You Can Store It and How Long Does It Last
Proper storage is paramount for maintaining the crisp, delicate texture of your **Ultimate Meringue Christmas Tree Cookies That Wow Every Time**. Meringues are extremely sensitive to moisture, which can quickly turn them sticky and chewy. Once completely cool and dry, gently lift the meringue trees from the parchment paper. Store them in an airtight container at room temperature, in a cool, dry spot away from direct sunlight or humidity. Avoid storing them in the refrigerator, as the moisture inside can ruin their texture. When stored correctly, these beautiful meringue cookies will last for up to 2 weeks, making them a fantastic make-ahead treat for your holiday entertaining. Just be sure the container is truly airtight to keep out any ambient moisture, and they will retain their delightful crunch and flavor.
FAQs Sections
- What if my meringue isn’t forming stiff peaks?
This is often due to grease! Ensure your mixing bowl and beaters are sparkling clean and completely free of any fat (even a tiny speck of egg yolk can prevent stiff peaks). Humidity can also play a role; on very humid days, meringues can be trickier to whip.
- Can I use liquid food coloring instead of gel?
While possible, gel food coloring is highly recommended. Liquid food coloring can add too much moisture to the meringue, potentially weakening its structure and making it difficult to achieve stiff peaks and a crisp finish. Gel coloring provides vibrant color without affecting consistency.
- Why did my meringues crack or turn sticky?
Cracking usually occurs if the oven temperature is too high, causing the meringues to cook too quickly. Stickiness is almost always due to moisture – either they weren’t dried out long enough in the oven or they were exposed to humidity after baking. Ensure you follow the drying time precisely.
- Can I make these ahead of time for Christmas?
Absolutely! Meringues are perfect for making ahead. Stored in an airtight container in a cool, dry place, these **Ultimate Meringue Christmas Tree Cookies That Wow Every Time** will stay fresh and crisp for up to two weeks. This makes them ideal for busy holiday preparations.
- What’s the purpose of cream of tartar?
Cream of tartar is an acidic stabilizer. It helps the egg whites whip up faster, achieve a higher volume, and maintain a stable, stiff consistency. It also contributes to the meringue’s bright white color.
- Can I make different shapes with this meringue recipe?
Yes, certainly! While the Christmas tree shape is festive, you can use other piping tips to create stars, snowflakes, wreaths, or even simple round dollops. The baking and drying instructions will remain the same regardless of shape.
- How do I prevent the cookies from sticking to parchment paper?
Using parchment paper is the best way to prevent sticking. The most common reason for sticking is not allowing the meringues to cool and dry completely inside the oven. Resist the urge to open the oven door or remove them prematurely.
- Are these cookies suitable for gifting?
They are absolutely perfect for gifting! Their stunning appearance and delicate taste make them a thoughtful and impressive homemade present. Package them in clear bags or small boxes lined with tissue paper for a beautiful presentation.
- Can I add other flavorings besides vanilla or peppermint?
Yes, feel free to get creative! A few drops of almond extract, a touch of lemon zest, or even a hint of gingerbread spice (cinnamon, nutmeg, ginger) can be wonderful additions. Just be mindful not to add too much liquid if using extracts.
- What’s the best way to separate eggs without yolk getting in?
A good technique is the “three-bowl method”: crack each egg into a small bowl, separate the yolk from the white, then transfer the clean white to your main mixing bowl. This way, if a yolk breaks, it only contaminates one egg white, not your entire batch.
Ultimate Meringue Christmas Tree Cookies That Wow Every Time 🎄
Equipment
- Mixing Bowl
- Baking Sheets
- Parchment Paper
- Electric Mixer
- Piping bag
Ingredients
- 4 large Eggs at room temperature
- 1 cup Granulated Sugar
- Pinch Salt
- ½ teaspoon Cream of Tartar
- 1 teaspoon Vanilla Extract OR Peppermint Extract
- About 20 drops Green Food Coloring
- Tiny Sprinkles of your choice
- Powdered Sugar for dusting before serving
Instructions
- Preheat your oven to a low 200°F (93°C). Line two baking sheets with parchment paper to ensure your delightful cookies don’t stick.
- Carefully separate 4 large eggs, putting the whites into a sparkling clean mixing bowl. It’s easy, just make sure no yolk sneaks in!
- Beat the egg whites on medium speed until they’re light, airy, and wonderfully foamy. Add the cream of tartar and continue beating until you start seeing soft, cloud-like peaks form – this is your meringue base!
- While your mixer is still running, gradually add the granulated sugar, one tablespoon at a time. This slow addition is key for a super glossy, thick meringue. Pop in a pinch of salt with your last spoon of sugar.
- Keep beating until the meringue is super shiny, thick, and holds firm, stiff peaks when you lift the beater. Stir in your chosen extract (vanilla or peppermint) briefly to blend the flavors.
- Carefully fold in the green food coloring. Mix just enough to get an even, festive green without squishing the air out of your beautiful meringue.
- Transfer the colorful meringue to a piping bag. Pipe charming small Christmas tree shapes onto your prepared parchment paper, leaving about an inch between each one. Immediately sprinkle them with tiny festive sprinkles for extra sparkle!
- Bake the cookies for 1 hour. After baking, turn off the oven completely but leave the meringues inside for 2 more hours (or even overnight for the best crispness) to dry out fully and become perfectly delicate.
- Once completely cool, gently lift the meringue trees from the parchment paper. Store them in an airtight container in a cool, dry spot. Just before serving, dust with a little powdered sugar for an elegant, magical finish!
Notes
- Calories: 28 kcal
- Total Carbs: 7g
- Net Carbs: 7g
- Fats: N/A
- Protein: N/A