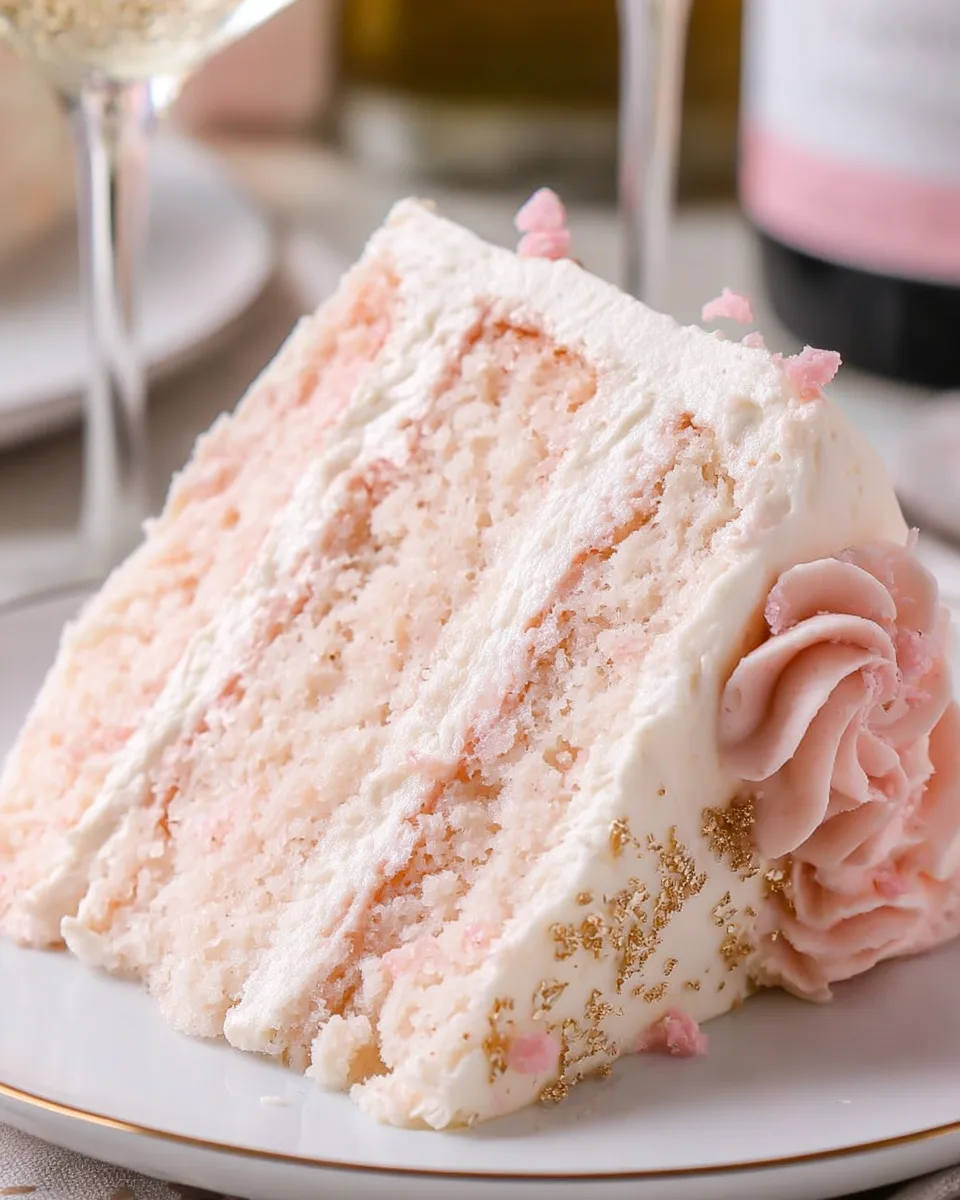
This Valentine’s Day, are you ready to bake up some serious love? Forget the usual chocolates and predictable roses! This year, ignite the spark with a dessert that’s as enchanting and delightful as your affection: our show-stopping Valentine’s Day Pink Sparkle Cake. Imagine layers of tender, subtly champagne-infused pink cake, crowned with a cloud of irresistible pink champagne frosting, all shimmering with a touch of magic. It’s not just a cake; it’s an edible declaration of love, a centerpiece that whispers romance, and a dessert that promises pure bliss with every single forkful. Get ready to sprinkle some serious sparkle on your celebration!
Why You’ll Love This Recipe
Prepare to fall head over heels for the Valentine’s Day Pink Sparkle Cake for more reasons than one. Here’s why this recipe is about to become your new favorite romantic bake:
- Pure Romance in Every Bite: The delicate hint of pink champagne woven into both the cake and frosting creates an elegant, sophisticated flavor profile that’s simply divine and perfectly suited for a romantic occasion.
- A Vision in Pink: With its gorgeous pink hue and potential for dazzling edible glitter, this cake isn’t just delicious – it’s a visual masterpiece. It’s tailor-made to capture hearts and be the star of your Valentine’s Day table.
- Easier Than You Think: Don’t let its grandeur fool you! While it looks incredibly impressive, our detailed instructions break down the process into simple, manageable steps, making it achievable for bakers of all levels.
- The Ultimate Love Language: What says “I love you” more than a homemade, beautiful dessert crafted with care? Baking this Valentine’s Day Pink Sparkle Cake is a heartfelt gesture that will surely be cherished.
Ingredients with Measurements
Here’s everything you’ll need to create your magical Valentine’s Day Pink Sparkle Cake:
For the Cake Layers:
- 🎂 6 Tablespoons unsalted butter, softened
- 💖 2 cups granulated sugar
- 💧 ⅔ cup neutral cooking oil (like avocado or canola)
- 🍯 ¾ teaspoon vanilla extract
- 🍚 2 ¾ cups all-purpose flour
- ⬆️ 1 Tablespoon baking powder
- 🧂 1 teaspoon salt
- 🥛 ½ cup buttermilk
- 🍾 ½ cup pink champagne (or sparkling rosé)
- 🥚 6 large egg whites, at room temperature
- 🌸 A drop of pink food coloring (optional)
For the Pink Champagne Frosting:
- 🍾 2 ¼ cups pink champagne (for reduction)
- 🧈 1 ½ cups salted butter, softened
- 🍬 6 cups powdered sugar
- 💫 ¼ teaspoon vanilla extract
Detailed Step-by-Step Directions on How to Make the Recipe
Get ready to whisk, mix, and bake your way to the most romantic dessert of the year – your very own Valentine’s Day Pink Sparkle Cake!
For the Cake Layers:
- Prep Pans & Oven: Get your oven ready by preheating it to 350°F (175°C). Lightly grease and flour three 8-inch round cake pans, then line the bottoms with parchment paper for easy removal.
- Cream Wet Ingredients: In a large bowl (or stand mixer), beat the softened butter until it’s light and fluffy. Add the granulated sugar, cooking oil, and vanilla extract, mixing until everything is smooth and beautifully combined.
- Mix Dry Ingredients: Grab a separate medium bowl and whisk together the flour, baking powder, and salt. This ensures they’re evenly distributed.
- Combine Batter (Part 1): With your mixer on low speed, slowly add about half of the dry flour mixture to your wet ingredients until just mixed. Follow this with half of the buttermilk. Repeat with another portion of flour and the remaining buttermilk, mixing gently after each addition.
- Combine Batter (Part 2): Now, stir in another portion of the flour mixture, then half of the pink champagne. Continue with more flour, the rest of the champagne, and finally the last bit of flour. Mix just until combined; don’t overdo it!
- Add Color (Optional): If you desire a pretty pink cake, gently stir in a small drop of pink food coloring. Set this lovely batter aside.
- Whip Egg Whites: In a very clean, dry, and grease-free bowl, beat the egg whites with an electric mixer. Start on low speed until they’re foamy, then gradually increase to high speed. Beat until they form stiff, glossy peaks that hold their shape when you lift the beaters. This adds wonderful lightness!
- Fold Gently: Using a spatula (not your electric mixer!), very carefully fold the whipped egg whites into your cake batter. Be super gentle to keep the batter light and airy, making sure the egg whites are evenly blended throughout.
- Bake: Divide the batter equally among your prepared cake pans (about 470 grams per pan if you’re using a scale). Bake for 25-28 minutes, or until a toothpick inserted into the center comes out clean or with only a few moist crumbs.
- Cool: Let the cakes cool in their pans for 10-15 minutes. Then, gently run a knife along the edges, invert them onto a wire rack, and let them cool completely. Patience ensures perfect layers!
For the Pink Champagne Frosting:
- Reduce Champagne: Pour the 2 ¼ cups of pink champagne into a small skillet. Cook it over medium heat, letting it simmer gently until it reduces to about 6 Tablespoons (this usually takes around 10 minutes). Let this concentrated champagne cool completely; you can even pop it in the fridge to speed things up.
- Make Buttercream Base: In a large bowl, beat the softened salted butter until it’s wonderfully smooth and creamy.
- Add Sugar & Vanilla: Gradually add the powdered sugar, about a cup at a time, beating well after each addition until it’s fully incorporated and fluffy. Stir in the vanilla extract.
- Finish Frosting: Slowly, adding just a tablespoon at a time, beat in the cooled champagne reduction until the frosting is smooth, light, and perfectly flavored. This gradual addition helps keep the frosting creamy.
To Assemble:
- Layer & Decorate: Once your cake layers are completely cool, gently level the tops if needed for a beautiful, flat surface. Place the first cake layer on your serving platter, spread an even layer of frosting over it, and repeat with the remaining layers. Frost the sides of the cake smoothly. For an extra romantic touch, use any leftover frosting to pipe pretty swirls or rosettes on top. Enjoy your homemade, heartfelt celebration cake!
Detailed Different Ways You Can Present the Recipe and How to Serve It
The beauty of the Valentine’s Day Pink Sparkle Cake is how stunning it is on its own, but you can elevate its presentation even further to truly dazzle!
- Sparkle & Shine: For that “sparkle” factor, generously sprinkle edible glitter (preferably in pink, silver, or iridescent) over the finished cake. This simple touch transforms it into a magical confection.
- Fresh Berry Cascade: Arrange fresh raspberries, strawberries, or a mix of red berries around the base and on top of the cake. The vibrant red against the pink is incredibly romantic and adds a burst of freshness.
- Chocolate Drizzle & Shavings: A delicate drizzle of melted white chocolate or dark chocolate over the top, followed by some elegant chocolate shavings, can add texture and a complementary flavor.
- Piped Perfection: Use a piping bag with a star tip to create beautiful rosettes, swirls, or shell borders with any leftover frosting. This adds a professional, decorative touch.
- Personalized Topper: A small “Happy Valentine’s Day” or “Love You” cake topper can be a sweet, personalized addition.
Serve slices of your magnificent Valentine’s Day Pink Sparkle Cake on pretty dessert plates. It pairs wonderfully with a glass of extra pink champagne, sparkling rosé, a warm cup of coffee, or a delicate herbal tea. It’s the perfect sweet ending to a romantic dinner or a delightful centerpiece for a Valentine’s brunch.
How You Can Store It and How Long Does It Last
So, you’ve created your stunning Valentine’s Day Pink Sparkle Cake, and now you’re wondering how to keep it fresh and delicious? Here’s the scoop on storage:
- Room Temperature: If your home is cool (below 70°F/21°C), the frosted cake can be stored in an airtight cake carrier or under a dome for up to 2 days. The butter in the frosting keeps it stable, but avoid warm environments.
- Refrigeration: For longer storage, or if your home is warmer, cover the cake loosely with plastic wrap or place it in an airtight container and refrigerate for up to 5 days. Be sure to let it come to room temperature for about 30-60 minutes before serving for the best flavor and texture.
- Freezing (Frosted Cake): To freeze the entire cake, place it in the freezer uncovered for about an hour until the frosting is firm. Then, wrap it tightly in several layers of plastic wrap, followed by a layer of aluminum foil. It can be frozen for up to 2-3 months. Thaw overnight in the refrigerator, then bring to room temperature before serving.
- Freezing (Unfrosted Layers): You can also bake the cake layers ahead of time and freeze them. Once cooled, wrap each individual layer tightly in plastic wrap, then foil. Freeze for up to 3 months. Thaw in the refrigerator, then proceed with frosting.
FAQs Sections
Got questions about baking your perfect Valentine’s Day Pink Sparkle Cake? We’ve got answers!
- Can I use regular milk instead of buttermilk?
Yes, you can make a buttermilk substitute! For ½ cup, combine ½ cup regular milk with ½ Tablespoon lemon juice or white vinegar. Let it sit for 5-10 minutes until it curdles slightly, then use as directed. - What if I don’t have pink champagne?
You can use any sparkling rosé or even a non-alcoholic sparkling cider for a similar effect, especially if you’re adding pink food coloring for the hue. For the frosting reduction, a sparkling grape juice can work for a non-alcoholic version. - Why do I need to reduce the champagne for the frosting?
Reducing the champagne concentrates its flavor without adding too much liquid to the buttercream, which could make it runny. It ensures a strong champagne taste in the frosting. - Can I make this cake gluten-free?
While not tested, you can likely substitute the all-purpose flour with a 1:1 gluten-free baking blend that contains xanthan gum. Ensure all other ingredients are certified gluten-free. - How can I ensure my cake layers are level?
Using cake strips around your pans can help the cakes bake more evenly. Alternatively, you can level cooled cakes with a serrated knife or a cake leveling tool before frosting. - My egg whites aren’t forming stiff peaks. What went wrong?
Ensure your bowl and beaters are completely clean and grease-free, as any fat can prevent the egg whites from whipping properly. Also, make sure the egg whites are at room temperature. - Can I make this into cupcakes?
Absolutely! Divide the batter into cupcake liners, filling each about two-thirds full. Bake for a shorter time, usually around 18-22 minutes, or until a toothpick comes out clean. - How do I get the “sparkle” effect?
The easiest way is to sprinkle edible glitter (available at most craft or baking stores) over the frosted cake right before serving. - Can I prepare the cake layers ahead of time?
Yes, you can bake the layers a day or two in advance. Once completely cooled, wrap them tightly in plastic wrap and store at room temperature, or freeze them as described in the storage section. - Is the pink food coloring necessary?
No, it’s optional! The cake will still be delicious without it, but adding a drop of pink coloring gives it that festive, romantic Valentine’s Day look.
Valentine's Day Pink Sparkle Cake ✨💖
Equipment
- Three 8-inch round cake pans
- Parchment Paper
- Large Bowl
- Stand Mixer (optional)
- Medium Bowl
- Whisk
- Electric Mixer
- Spatula
- Small Skillet
- Wire Rack
- Toothpick
- Serving platter
Ingredients
For the Cake Layers
- 6 Tablespoons unsalted butter softened
- 2 cups granulated sugar
- ⅔ cup neutral cooking oil (like avocado or canola)
- ¾ teaspoon vanilla extract
- 2 ¾ cups all-purpose flour
- 1 Tablespoon baking powder
- 1 teaspoon salt
- ½ cup buttermilk
- ½ cup pink champagne (or sparkling rosé)
- 6 large egg whites at room temperature
- A drop pink food coloring (optional)
For the Pink Champagne Frosting
- 2 ¼ cups pink champagne (for reduction)
- 1 ½ cups salted butter softened
- 6 cups powdered sugar
- ¼ teaspoon vanilla extract
Instructions
- 1. Prep Pans & Oven: Get your oven ready by preheating it to 350°F (175°C). Lightly grease and flour three 8-inch round cake pans, then line the bottoms with parchment paper for easy removal.
- 2. Cream Wet Ingredients: In a large bowl (or stand mixer), beat the softened butter until it's light and fluffy. Add the granulated sugar, cooking oil, and vanilla extract, mixing until everything is smooth and beautifully combined.
- 3. Mix Dry Ingredients: Grab a separate medium bowl and whisk together the flour, baking powder, and salt. This ensures they're evenly distributed.
- 4. Combine Batter (Part 1): With your mixer on low speed, slowly add about half of the dry flour mixture to your wet ingredients until just mixed. Follow this with half of the buttermilk. Repeat with another portion of flour and the remaining buttermilk, mixing gently after each addition.
- 5. Combine Batter (Part 2): Now, stir in another portion of the flour mixture, then half of the pink champagne. Continue with more flour, the rest of the champagne, and finally the last bit of flour. Mix just until combined; don't overdo it!
- 6. Add Color (Optional): If you desire a pretty pink cake, gently stir in a small drop of pink food coloring. Set this lovely batter aside.
- 7. Whip Egg Whites: In a very clean, dry, and grease-free bowl, beat the egg whites with an electric mixer. Start on low speed until they're foamy, then gradually increase to high speed. Beat until they form stiff, glossy peaks that hold their shape when you lift the beaters. This adds wonderful lightness!
- 8. Fold Gently: Using a spatula (not your electric mixer!), very carefully fold the whipped egg whites into your cake batter. Be super gentle to keep the batter light and airy, making sure the egg whites are evenly blended throughout.
- 9. Bake: Divide the batter equally among your prepared cake pans (about 470 grams per pan if you're using a scale). Bake for 25-28 minutes, or until a toothpick inserted into the center comes out clean or with only a few moist crumbs.
- 10. Cool: Let the cakes cool in their pans for 10-15 minutes. Then, gently run a knife along the edges, invert them onto a wire rack, and let them cool completely. Patience ensures perfect layers!
- 11. Reduce Champagne: Pour the 2 ¼ cups of pink champagne into a small skillet. Cook it over medium heat, letting it simmer gently until it reduces to about 6 Tablespoons (this usually takes around 10 minutes). Let this concentrated champagne cool completely; you can even pop it in the fridge to speed things up.
- 12. Make Buttercream Base: In a large bowl, beat the softened salted butter until it's wonderfully smooth and creamy.
- 13. Add Sugar & Vanilla: Gradually add the powdered sugar, about a cup at a time, beating well after each addition until it's fully incorporated and fluffy. Stir in the vanilla extract.
- 14. Finish Frosting: Slowly, adding just a tablespoon at a time, beat in the cooled champagne reduction until the frosting is smooth, light, and perfectly flavored. This gradual addition helps keep the frosting creamy.
- 15. Layer & Decorate: Once your cake layers are completely cool, gently level the tops if needed for a beautiful, flat surface. Place the first cake layer on your serving platter, spread an even layer of frosting over it, and repeat with the remaining layers. Frost the sides of the cake smoothly. For an extra romantic touch, use any leftover frosting to pipe pretty swirls or rosettes on top. Enjoy your homemade, heartfelt celebration cake!
Notes
Calories: 872kcal
Total Carbs: 116g
Net Carbs: 115g
Fats: 42g
Protein: 5g