Why You’ll Love These Velvet Kiss Valentine Blossoms
Get ready to fall head over heels for your new favorite Valentine’s Day cookie! These Velvet Kiss Valentine Blossoms aren’t just a treat; they’re a love letter in cookie form. Here are four irresistible reasons why you absolutely HAVE to make them:
- Seriously Speedy & Simple: With a prep time of just 15 minutes and a bake time of 10, you can whip up these gorgeous cookies from start to finish in less than half an hour. Perfect for last-minute romantic gestures or when a sudden sweet craving strikes!
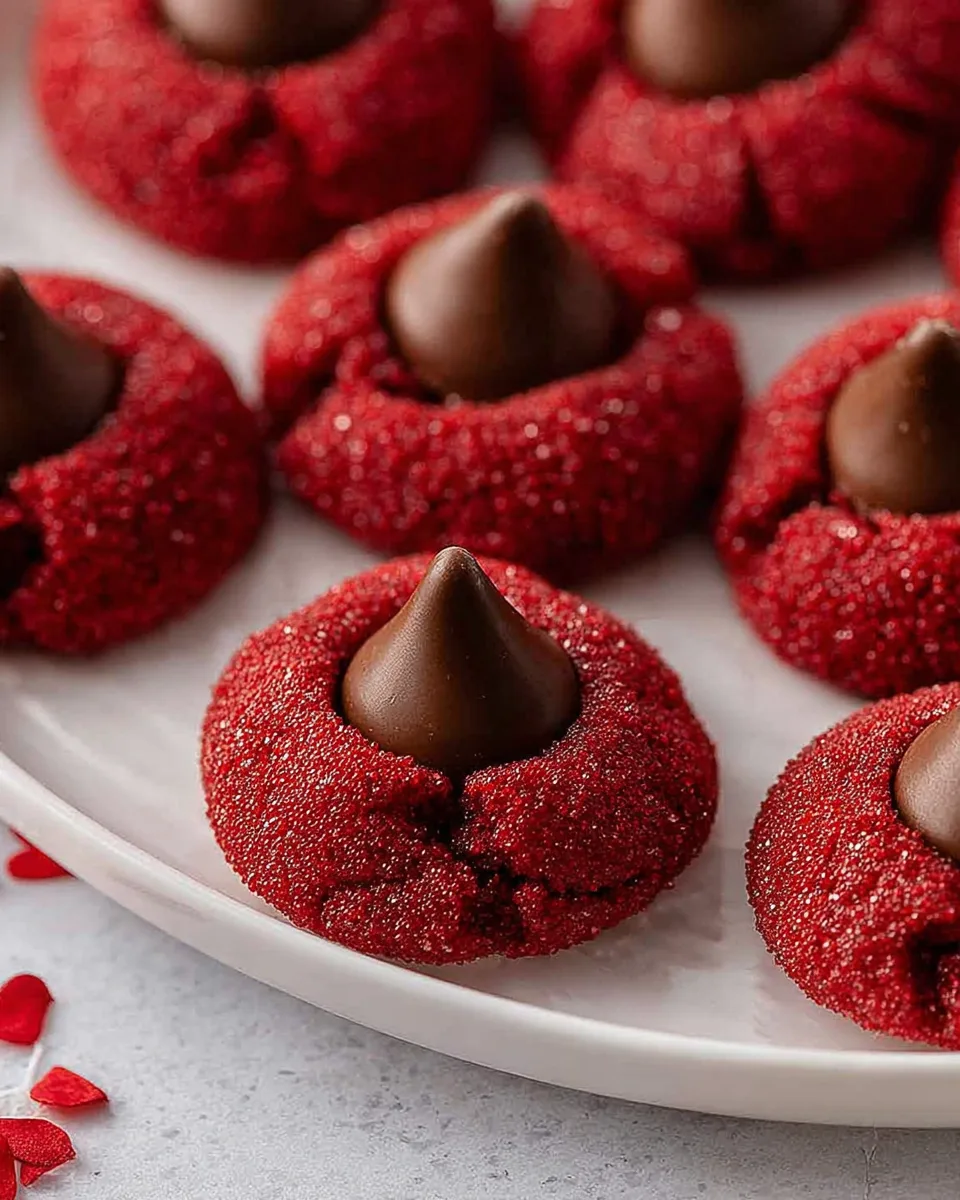
- Stunning Visual Appeal: Imagine vibrant red cookies, sparkling with sanding sugar, each crowned with a perfectly melted Hershey’s Kiss. These Velvet Kiss Valentine Blossoms are showstoppers that will impress everyone who sees (and tastes!) them.
- Irresistibly Delicious Flavor: They combine the rich, tender crumb of a red velvet cookie with a hint of cocoa, perfectly complemented by the creamy, melty chocolate of a Hershey’s Kiss. It’s a flavor symphony that screams “happy Valentine’s Day!”
- The Ultimate Heartfelt Gift: Homemade cookies made with love are always the best gifts. Package these beautiful Velvet Kiss Valentine Blossoms in a pretty box or cellophane bag, and you’ve got a thoughtful, delicious present for friends, family, or your special someone.
Unwrap Love: Dive into the Magic of Velvet Kiss Valentine Blossoms!
Oh, hello there, sweet tooth! Is your heart fluttering for a dessert that’s as enchanting as a first kiss and as vibrant as a blooming rose? Well, prepare to be swept off your feet because we’re about to introduce you to the ultimate Valentine’s Day sensation: our Velvet Kiss Valentine Blossoms! Forget complicated desserts and endless hours in the kitchen. These cookies are your ticket to baking bliss, combining stunning visual appeal with a melt-in-your-mouth flavor that will make Cupid himself blush.
Picture this: a rich, tender red velvet cookie, kissed with cocoa, rolled in dazzling red sanding sugar, and then crowned with a luscious, perfectly softened Hershey’s Kiss. They’re quick, they’re easy, and they promise to bring a burst of joy and a touch of romance to any occasion. Whether you’re baking for your sweetheart, celebrating with friends, or simply treating yourself (you deserve it!), these Velvet Kiss Valentine Blossoms are about to become your go-to recipe. Let’s get baking and spread some love!
Gather Your Love Potion: Ingredients for Velvet Kiss Valentine Blossoms
Ready to create some magic? Here’s everything you’ll need to whip up a batch of these enchanting Velvet Kiss Valentine Blossoms. Make sure your butter is softened – it’s key to that wonderfully smooth texture!
- 🧈 7 tablespoons unsalted butter, softened
- 🍯 1/2 cup brown sugar, packed
- 🍚 2 tablespoons granulated sugar
- ✨ 1 teaspoon vanilla extract
- 🥚 1 large egg yolk
- 🍓 1/4 teaspoon red food coloring gel (Wilton brand recommended for best color)
- 🌾 1 cup all-purpose flour
- 🍫 1 tablespoon unsweetened cocoa powder
- ⬆️ 1/2 teaspoon baking powder
- 🧂 1/4 teaspoon salt
- 💖 1/4 cup red sanding sugar (for coating)
- 💋 18 Hershey’s chocolate kisses, unwrapped
Your Path to Sweetness: Step-by-Step Directions for Velvet Kiss Valentine Blossoms
Let’s turn these simple ingredients into extraordinary Velvet Kiss Valentine Blossoms! Follow these easy steps, and you’ll be enjoying homemade bliss in no time.
- Get Ready: Preheat your oven to a cozy 350°F (175°C). Line a large baking sheet with parchment paper to prevent sticking, and set it aside. This ensures your beautiful cookies lift off easily!
- Cream It Up: In a stand mixer fitted with the paddle attachment, or a large bowl with a hand mixer, beat the softened butter with the brown sugar and granulated sugar. Mix on medium speed until the mixture is wonderfully smooth, light, and fluffy – typically about 2-3 minutes.
- Add Wet Goodies: Now, mix in the egg yolk, that delightful vanilla extract, and the vibrant red food coloring gel. Continue to mix until everything is beautifully combined and boasts a uniform, bright red hue. Don’t be shy; ensure that color pops!
- Combine Dry: In a separate small bowl, whisk together the all-purpose flour, cocoa powder, baking powder, and salt. Gently add these dry ingredients to the wet mixture. Mix on low speed just until the dry ingredients are fully incorporated and the flour streaks disappear. Remember, overmixing can lead to tough cookies, so stop as soon as it’s combined!
- Roll into Sparkle: Using a tablespoon or a small cookie scoop, portion out about 18 equally sized mounds of cookie dough. Roll each portion between your palms to form a smooth, round ball. Next, pour the red sanding sugar into a shallow dish. Roll each cookie dough ball generously in the red sanding sugar until it’s completely coated and shimmering.
- Bake to Perfection: Place the glistening cookie balls onto your prepared baking sheet, leaving a little space (about 2 inches) between each for even baking. Bake for 10 minutes, or until the edges are just set and the centers look slightly soft. They will continue to set as they cool.
- Add the Kiss: This is the fun part! As soon as you pull the hot cookies out of the oven, immediately place one unwrapped Hershey’s Kiss into the center of each warm cookie. Press down gently so it settles nicely into the warm dough and begins to melt, creating that signature “blossom” look.
- Cool Down: Let your beautiful Velvet Kiss Valentine Blossoms cool on the baking sheet for about 10 minutes. This allows them to firm up before moving. Then, carefully transfer them to a wire rack to cool completely. Once fully cooled, the chocolate will re-solidify, giving you perfect, ready-to-enjoy treats!
Presenting & Serving Your Velvet Kiss Valentine Blossoms with Panache
Once your exquisite Velvet Kiss Valentine Blossoms are cooled, it’s time to show them off! Their vibrant color and charming chocolate centers make them naturally photogenic, but a little extra flair can make them truly unforgettable.
Presentation Ideas:
- Elegant Platter: Arrange your cookies on a beautiful white or silver platter. The red will pop against a neutral background. You can add a few fresh rose petals or sprigs of mint for an extra touch of sophistication.
- Gift Boxes: For a heartfelt present, place the cookies in small, food-safe bakery boxes, perhaps tied with a festive ribbon. Individual cupcake liners or mini parchment paper squares can keep them separate and neat inside the box.
- Tiered Stand: If you’re serving them at a party, a tiered dessert stand elevates their visual appeal, making them a focal point on your dessert table.
- Individual Wraps: For party favors or grab-and-go treats, wrap each cookie individually in a clear cello bag tied with a cute bow.
Serving Suggestions:
- Classic Milk Pairing: There’s nothing quite like a cold glass of milk with a soft, chocolatey cookie. It’s a nostalgic and comforting combination.
- Coffee or Tea Break: Serve these cookies alongside a freshly brewed cup of coffee, espresso, or your favorite herbal tea for a delightful afternoon pick-me-up.
- Hot Cocoa Extravaganza: For the ultimate cozy treat, enjoy your Velvet Kiss Valentine Blossoms with a mug of rich hot cocoa, perhaps topped with whipped cream and a sprinkle of cocoa powder.
- Romantic Dessert: These are perfect for a romantic dinner dessert. Serve them with a scoop of vanilla bean ice cream or a dollop of fresh whipped cream for an indulgent finish.
- Valentine’s Day Brunch: Add them to a brunch spread for a sweet, festive touch that will charm your guests.
Keeping Your Velvet Kiss Valentine Blossoms Fresh & Fabulous
So, you’ve baked a batch of irresistible Velvet Kiss Valentine Blossoms – now how do you keep them tasting as amazing as they look? Proper storage ensures they stay fresh and delicious for as long as possible.
Storage Instructions:
- At Room Temperature: Once completely cooled, store your cookies in an airtight container at room temperature. A cookie jar with a tight-fitting lid works perfectly. Placing a slice of bread in the container can sometimes help keep them soft, but these cookies are pretty moist on their own! They will stay fresh and soft for 3-4 days.
- In the Refrigerator: If you want to extend their shelf life slightly, you can store them in an airtight container in the refrigerator for up to a week. The texture might become a little firmer, but warming them slightly in the microwave for 10-15 seconds can bring back some of their softness.
- Freezing for Longer Enjoyment: To truly maximize their lifespan, these Velvet Kiss Valentine Blossoms freeze beautifully!
- Allow the cookies to cool completely, and ensure the chocolate kisses are fully set.
- Place the cookies in a single layer on a baking sheet and freeze for about 30 minutes until firm. This prevents them from sticking together.
- Transfer the firm cookies to a freezer-safe airtight container or heavy-duty freezer bag, layering them with parchment paper if needed.
- They can be stored in the freezer for up to 2-3 months.
Thawing Frozen Cookies:
When you’re ready to enjoy your frozen Velvet Kiss Valentine Blossoms, simply remove them from the freezer and let them thaw at room temperature for about 30 minutes to an hour. For a “freshly baked” feel, you can warm them briefly in a preheated oven (about 300°F/150°C for 5-7 minutes) or microwave (15-20 seconds) until just warm and soft.
FAQs About Your Velvet Kiss Valentine Blossoms
- Can I use liquid red food coloring instead of gel?
While liquid food coloring can work, gel food coloring is highly recommended for achieving that vibrant, deep red hue without adding too much moisture to the dough. If using liquid, you might need a bit more and it could slightly alter the dough’s consistency. - What if I don’t have a stand mixer?
No problem! You can easily make these Velvet Kiss Valentine Blossoms with a hand mixer. Just ensure you beat the butter and sugars until light and fluffy, and combine the dry ingredients until just incorporated to avoid overmixing. - Can I substitute granulated sugar for brown sugar?
Brown sugar provides moisture and a lovely, slightly chewy texture, which is key to a soft red velvet cookie. While you could substitute with all granulated sugar, the texture and flavor of your Velvet Kiss Valentine Blossoms might be less rich and tender. - How do I prevent the Hershey’s Kisses from melting completely into a puddle?
Place the kisses immediately after removing the cookies from the oven. The residual heat will soften them to a perfect “kiss” texture without completely melting. If your kitchen is very warm, you can even pop the cookies (with kisses) into the fridge for a few minutes to help them set faster. - Can I make the cookie dough ahead of time?
Absolutely! You can prepare the dough, wrap it tightly in plastic wrap, and refrigerate it for up to 2-3 days. Let it sit at room temperature for about 15-20 minutes before rolling and baking, as it will be quite firm. - Are there any gluten-free alternatives for this recipe?
You can try substituting the all-purpose flour with a 1:1 gluten-free baking flour blend that contains xanthan gum. Results can vary, but many blends work well in cookie recipes like these Velvet Kiss Valentine Blossoms. - Can I use different types of chocolate kisses or candies?
Yes, get creative! While Hershey’s Kisses are classic, you could experiment with white chocolate kisses, dark chocolate kisses, or even other small, soft-centered candies that melt nicely. - Why are my cookies spreading too much during baking?
Common reasons include butter that’s too soft (or melted), too little flour, or an oven that’s not hot enough. Ensure your butter is softened but still cool to the touch, and measure your flour accurately. You can also try chilling the dough balls for 15-30 minutes before baking. - Can I double the recipe for a larger batch?
Certainly! This recipe doubles easily. Just ensure you have a large enough mixer bowl and baking sheets to accommodate the increased volume of ingredients and cookies. - What’s the best way to get a vibrant red color for my Velvet Kiss Valentine Blossoms?
Using a good quality red gel food coloring (like Wilton or AmeriColor) is key. Start with the recommended amount and add a tiny bit more if you desire an even deeper hue. Gel color is more concentrated and provides a better result than liquid food coloring.
Velvet Kiss Valentine Blossoms
Equipment
- Stand Mixer
- Baking Sheet
- Parchment Paper
Ingredients
- 7 tbsp unsalted butter softened
- 0.5 cup brown sugar packed
- 2 tbsp granulated sugar
- 1 tsp vanilla extract
- 1 large egg yolk
- 0.25 tsp red food coloring gel (Wilton brand recommended for best color)
- 1 cup all-purpose flour
- 1 tbsp unsweetened cocoa powder
- 0.5 tsp baking powder
- 0.25 tsp salt
- 0.25 cup red sanding sugar (for coating)
- 18 Hershey's chocolate kisses unwrapped
Instructions
- Get Ready: Preheat your oven to a cozy 350°F (175°C). Line a large baking sheet with parchment paper to prevent sticking, and set it aside.
- Cream It Up: In a stand mixer or a large bowl with a hand mixer, beat the softened butter with the brown sugar and granulated sugar until the mixture is wonderfully smooth and light.
- Add Wet Goodies: Mix in the egg yolk, vanilla extract, and that vibrant red food coloring. Continue to mix until everything is beautifully combined and boasts a uniform, bright red hue.
- Combine Dry: Gently add the all-purpose flour, cocoa powder, baking powder, and salt to the wet mixture. Mix on low speed just until the dry ingredients are fully incorporated and the flour streaks disappear. Be careful not to overmix!
- Roll into Sparkle: Using a tablespoon, scoop out about 18 equally sized portions of cookie dough. Roll each portion between your palms to form a smooth ball. Next, roll each cookie dough ball generously in the red sanding sugar until it's completely coated.
- Bake to Perfection: Place the glistening cookie balls onto your prepared baking sheet, leaving a little space between each for even baking. Bake for 10 minutes, or until the edges are just set and the centers look slightly soft.
- Add the Kiss: As soon as you pull the hot cookies out of the oven, immediately place one Hershey's Kiss into the center of each warm cookie. Press down gently so it settles nicely.
- Cool Down: Let your beautiful blossom cookies cool on the baking sheet for about 10 minutes to firm up. Then, carefully transfer them to a wire rack to cool completely. Enjoy your homemade, heartfelt treats!
Notes
Calories: 134
Total Carbs: 17g
Net Carbs: 16g
Fats: 7g
Protein: 2g Enjoy these homemade, heartfelt treats!