
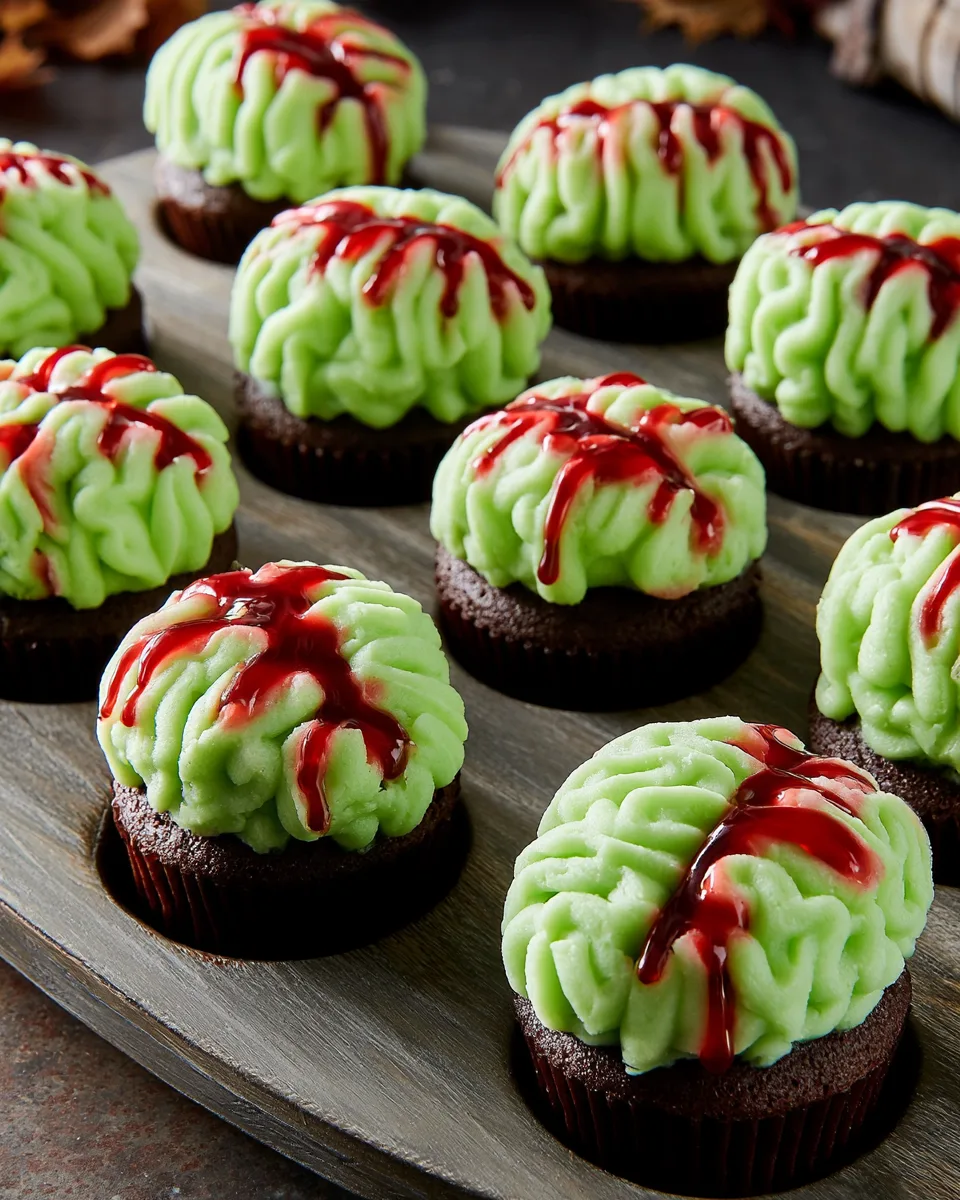
Imagine a Halloween party where the dessert table looks like a mad scientist’s laboratory. Zombie Brain Cupcakes are the star of the show – moist chocolate cupcakes topped with neon green buttercream that’s piped to look exactly like a zombie brain, complete with a drizzle of “blood” (red decorating gel). They’re creepy, delicious, and surprisingly easy to make. Whether you’re hosting a spooky bash or just want to freak out your family, these cupcakes deliver maximum fright with minimum effort. Ready to bake some brains? Let’s dig in!
Why You’ll Love This Recipe
- Totally Insta‑worthy – The brain‑shaped frosting and bloody drips make every cupcake a gory masterpiece. Your friends will scream (and then ask for seconds).
- Rich & Fudgy Base – A tender cocoa cake with a secret ingredient (boiling water) that makes it ultra‑moist. No dry brains here!
- Simple Piping Trick – You don’t need to be a pastry chef. The squiggly lines are forgiving and look exactly like brain folds – even messy piping adds to the zombie vibe.
- Customizable Scare Factor – Want it extra bloody? Add more gel. Prefer a pastel zombie? Use less green dye. It’s your undead creation.
Ingredients
For the Cupcakes
- 1 ¼ cups all‑purpose flour
- 1 cup granulated sugar
- ½ cup unsweetened cocoa powder
- 1 tsp baking powder
- ½ tsp baking soda
- ½ tsp kosher salt
- ½ cup buttermilk (or whole milk)
- ¼ cup neutral oil (vegetable or canola)
- 1 large egg, beaten
- ½ tsp pure vanilla extract
- ¼ cup boiling water
For the Zombie Brain Frosting
- 4 cups powdered sugar, sifted
- 1 ½ cups (3 sticks) unsalted butter, room temperature
- 1 tsp pure vanilla extract
- ¼ tsp kosher salt
- 2–3 drops neon green liquid food coloring
- Red decorating gel, for drizzling
Step‑by‑Step Instructions
- Preheat & Prep: Heat your oven to 350°F (175°C). Line a 12‑cup muffin tin with paper liners.
- Dry Ingredients: In a large bowl, whisk together flour, sugar, cocoa powder, baking powder, baking soda, and salt.
- Wet Ingredients: Add buttermilk, oil, beaten egg, and vanilla. Stir until smooth. Pour in the boiling water and mix until fully combined – the batter will be thin.
- Fill & Bake: Divide batter evenly among the liners (about ¼ cup each). Bake for 18–20 minutes, or until a toothpick inserted in the center comes out clean. Cool completely in the pan (about 1 hour).
- Make the Frosting: In a large bowl, beat powdered sugar, butter, vanilla, and salt with an electric mixer on medium‑high until light and fluffy (2–3 minutes). Add green food coloring and beat until even. Add more drops for a brighter brain shade.
- Pipe the Brains: Transfer frosting to a piping bag fitted with a small round tip. Pipe a small mound (quarter‑size) in the center of each cupcake. Then pipe two straight vertical lines side by side down the middle. Finish with squiggly lines on each side to resemble brain folds.
- Add the Blood: Drizzle red decorating gel over each cupcake, letting it settle into the creases. Refrigerate if not serving immediately.
Presentation & Serving Ideas
These Zombie Brain Cupcakes are terrifyingly versatile. Here are a few ways to up the fright factor:
- Blood Splatter Effect: For extra gruesome cupcakes, use a squeeze bottle to flick red gel over the entire tray – it looks like a zombie attack happened right in your kitchen.
- Edible Eyeballs: Place a candy eyeball on top of each brain before the red drizzle. Instant two‑eyed zombie brains!
- Graveyard Display: Arrange the cupcakes on a black platter with crushed chocolate cookie “dirt” and gummy worms crawling around.
- Brain Theme Tower: Stack them on a tiered stand with fake cobwebs and a plastic zombie head in the center. Perfect for a Halloween buffet.
- Individual Party Favors: Pack each cupcake in a clear treat box tied with orange or black ribbon. Guests can take a brain home – if they dare.
Serve at room temperature for the best texture. The green frosting and red gel look even more shocking under a dim candlelight setting!
Storage & Shelf Life
Room Temperature: Keep unfrosted cupcakes in an airtight container for up to 2 days. Frosted brain cupcakes are best eaten within 24 hours but can sit at room temp for a few hours during a party.
Refrigerator: Store frosted cupcakes in a sealed container in the fridge for up to 5 days. The buttercream will firm up – let them sit out for 15–20 minutes before serving to soften.
Freezer: Unfrosted cupcakes freeze beautifully for up to 3 months. Wrap each one individually in plastic wrap and place in a freezer bag. Frost after thawing. Frosted cupcakes can also be frozen (without red gel) for 1 month – thaw overnight in the fridge, then add fresh gel drizzle.
Frequently Asked Questions
1. Can I use a boxed cake mix instead?
Absolutely! Use any chocolate cake mix and follow package directions. The brain frosting is where the magic happens.
2. What can I substitute for buttermilk?
Add 1 teaspoon of lemon juice or white vinegar to ½ cup of whole milk. Let it sit 5 minutes before using – it works perfectly.
3. My frosting turned out too thick. What do I do?
Add 1 tablespoon of milk or cream and beat again. Add more until you reach a pipeable consistency.
4. Can I make these dairy‑free?
Yes! Use plant‑based butter (like Miyoko’s), a dairy‑free milk alternative, and vegan red gel. The taste will still be amazing.
5. Why is boiling water added to the batter?
The hot water intensifies the cocoa flavor and creates a silky, ultra‑moist crumb. Don’t skip it!
6. Can I use a different color for the brains?
Of course – purple, grey, or even bright pink work for different monster themes. Just swap the green coloring.
7. How do I get the squiggly lines to look like brain folds?
Pipe a continuous wavy line side to side, overlapping slightly. Don’t worry about perfection – messy brains are more authentic!
8. My red gel bled into the frosting. Is that okay?
It actually adds to the gory effect. For cleaner lines, refrigerate the frosted cupcakes for 15 minutes before adding the gel.
9. Can I make these gluten‑free?
Yes, use a 1:1 gluten‑free all‑purpose flour blend. The batter may be slightly thicker, but the results are still spooky and tasty.
10. How do I transport these without smashing the brains?
Place each cupcake in a standard baking cup inside a box with a tight lid. If stacking, use a cupcake carrier with individual wells. Refrigerate until just before you leave.
Get ready to sink your teeth into the most terrifyingly tasty Zombie Brain Cupcakes this Halloween. Happy (undead) baking! 🧠💀
“`
Zombie Brain Cupcakes
Equipment
- 12-cup muffin tin
- Piping bag
- Small round piping tip
Ingredients
Cupcake Batter
- 1 1/4 cups all-purpose flour
- 1 cup granulated sugar
- 1/2 cup unsweetened cocoa powder
- 1 tsp baking powder
- 1/2 tsp baking soda
- 1/2 tsp kosher salt
- 1/2 cup buttermilk or whole milk
- 1/4 cup neutral oil
- 1 large egg, beaten
- 1/2 tsp pure vanilla extract
- 1/4 cup boiling water
Brain Frosting & Decoration
- 4 cups powdered sugar, sifted
- 1 1/2 cups unsalted butter, room temperature
- 1 tsp pure vanilla extract
- 1/4 tsp kosher salt
- 2-3 drops neon green liquid food coloring
- Red decorating gel
Instructions
- Heat your oven to 350°F and line a 12-cup muffin tin with paper liners.
- In a big bowl, whisk together the flour, sugar, cocoa, baking powder, baking soda, and salt. Stir in the buttermilk, oil, egg, and vanilla until smooth. Finally, mix in the boiling water until fully combined.
- Divide the batter evenly among the liners, filling each about two-thirds full.
- Bake for 18 to 20 minutes, until a toothpick inserted in the center comes out clean. Let the cupcakes cool completely, about 1 hour.
- For the frosting, beat the powdered sugar, butter, vanilla, and salt until light and fluffy. Add the green food coloring and beat until the color is even. Transfer to a piping bag fitted with a small round tip.
- Pipe a small mound on the center of each cupcake. Pipe two straight vertical lines side by side down the middle, then pipe squiggly lines on either side to look like brain folds.
- Drizzle red decorating gel over each cupcake, letting it settle into the creases for a bloody effect.