Why You’ll Love This Juicy Skillet Chicken Breast Recipe
Are you ready to transform your weeknight dinners from drab to fab with minimal effort? This Juicy Skillet Chicken Breast recipe isn’t just a meal; it’s a revelation! Here are four fantastic reasons why it’s about to become your new kitchen MVP:
- Lightning-Fast & Fuss-Free: With a mere 7 minutes of prep and 10 minutes of cook time, you can have a gourmet-tasting meal on the table in under 20 minutes. Perfect for those busy evenings when you crave something homemade but just don’t have the time.
- Flavor Explosion in Every Bite: Forget dry, bland chicken! Our secret blend of aromatic herbs, zesty lemon, and a quick sear locks in incredible moisture and creates a burst of savory, tangy flavor that will have your taste buds singing.
- Super Healthy & Diet-Friendly: Looking for a low-carb, high-protein powerhouse? This recipe is your go-to! Lean chicken breast combined with healthy oils keeps it light on calories but heavy on essential nutrients, making it ideal for various dietary goals.
- Versatility is Its Middle Name: This isn’t just a stand-alone dish; it’s a culinary chameleon! Serve it with almost anything – from fresh salads to roasted veggies, or even slice it up for sandwiches. It’s a guaranteed crowd-pleaser that fits into any meal plan.
Say Goodbye to Boring Dinners: Hello, Juicy Skillet Chicken Breast!
Ever stare into your fridge on a Tuesday night, utterly stumped for dinner ideas that aren’t takeout or another sad, repetitive meal? We’ve all been there! But what if we told you that culinary salvation is just minutes away? Picture this: a golden, succulent chicken breast, infused with vibrant lemon and fragrant herbs, seared to perfection in your favorite skillet. No dry, rubbery chicken here, folks! We’re talking about a game-changing Juicy Skillet Chicken Breast that promises tenderness, flavor, and an unbelievably easy cooking experience. Get ready to impress your taste buds (and yourself!) because your weeknight dinner just got a major upgrade!
Gather Your Goodies: Ingredients with Measurements
Ready to whip up some magic? Here’s everything you’ll need for your perfectly cooked Juicy Skillet Chicken Breast. These simple ingredients combine to create something truly extraordinary:
- 🍗 2 boneless, skinless chicken breasts: The star of our show!
- 🧅 1 teaspoon onion powder: For a foundational savory note.
- 🧄 1 teaspoon garlic powder: The classic flavor enhancer.
- 🌿 1 teaspoon dried oregano: Aromatic goodness that complements chicken beautifully.
- 🧂 Freshly ground sea salt and black pepper, to taste: Don’t be shy with the seasoning!
- 🍋 1 teaspoon lemon zest: The secret weapon for that bright, zesty punch.
- 🌻 1 tablespoon sunflower, canola, or avocado oil: Your choice of healthy oil for searing.
- 🧈 Thin slices of butter (optional, for extra flavor): A decadent touch for a richer finish.
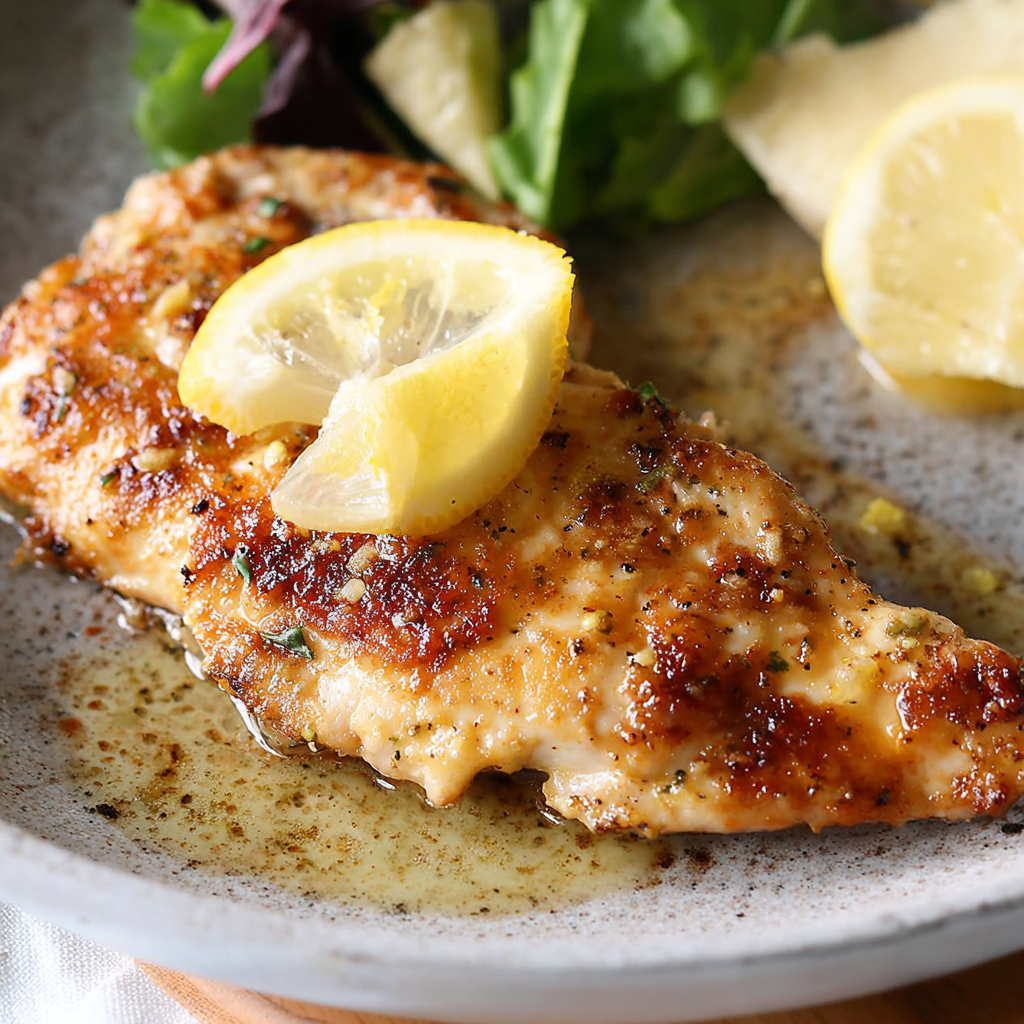
- 🍋 Thin lemon slices (for garnish): For that final visual flair.
Your Step-by-Step Guide to the Perfect Juicy Skillet Chicken Breast
Let’s get cooking! Follow these simple steps to create a show-stopping Juicy Skillet Chicken Breast that’s tender on the inside and beautifully golden on the outside.
- Pat It Dry, Seriously: Grab some paper towels and gently pat your chicken breasts absolutely dry. This isn’t a suggestion; it’s a crucial step! Removing surface moisture ensures a fantastic sear and a gorgeous golden-brown crust, rather than steaming the chicken.
- Butterfly for Brilliance: Place each chicken breast on a cutting board. Carefully slice each one horizontally through its thickest part, almost like opening a book. You’ll end up with two thinner, uniform cutlets from each breast. This ensures even cooking and helps keep them incredibly tender.
- Season Like a Pro: Now for the flavor fiesta! Sprinkle both sides of your chicken cutlets generously with onion powder, garlic powder, dried oregano, sea salt, and black pepper. Make sure every inch is covered for maximum taste.
- Zest for Success: Evenly sprinkle the fresh lemon zest over both sides of your seasoned chicken. The oils in the zest will infuse directly into the chicken as it cooks, giving you that incredible citrusy aroma and taste.
- Heat Things Up: Place a cast iron skillet (or any heavy-bottomed pan) over medium-high heat. Let it get nice and hot – you want to hear a sizzle when the chicken hits the pan. Once hot, add your chosen healthy oil.
- Sear to Perfection: Gently lay your seasoned chicken cutlets into the hot skillet. Listen to that glorious sizzle! Sear for approximately 5 minutes on each side. You’re looking for a beautiful golden-brown crust and for the chicken to be fully cooked through, with no pink remaining. If it’s browning too quickly, simply reduce the heat slightly.
- The Golden Rest Rule: Once cooked, transfer your gorgeous chicken from the skillet to a plate. Here’s another vital step: let it rest for 5 minutes. This allows the juices to redistribute throughout the meat, resulting in incredibly tender and moist chicken. For an extra touch of luxury and flavor, top with a thin slice of butter or a drizzle of olive oil, and finish with a squeeze of fresh lemon juice.
Serving Suggestions: Elevate Your Juicy Skillet Chicken Breast
The beauty of this Juicy Skillet Chicken Breast isn’t just in its flavor, but its incredible versatility! It pairs beautifully with a multitude of sides, making it a perfect centerpiece for any meal. Here are some delightful ways to present and serve your culinary masterpiece:
- Classic & Healthy: Serve alongside a vibrant green salad with a light vinaigrette, or a generous portion of steamed asparagus, broccoli, or green beans. A sprinkle of fresh parsley or chives makes it extra special.
- Comfort Carb Companion: Pair it with a fluffy mound of quinoa, brown rice, or even a creamy mashed cauliflower for a wholesome and satisfying meal. The chicken’s zesty flavor cuts through rich sides beautifully.
- Mediterranean Marvel: Slice the chicken and serve it over a bed of couscous mixed with diced tomatoes, cucumbers, and feta cheese. Drizzle with a little extra olive oil and a squeeze of lemon.
- Sandwich or Wrap Star: Let the chicken cool slightly, then slice it thinly. It makes a fantastic filling for sandwiches, pitas, or lettuce wraps, especially with a dollop of hummus or a tzatziki sauce.
- Power Bowl Protein: Chop the cooked chicken and add it to a customizable power bowl with your favorite grains, roasted vegetables, leafy greens, and a drizzle of a light dressing.
- Garnish Galore: Always finish with those thin lemon slices as a garnish – they add visual appeal and invite an extra squeeze of fresh juice. Fresh herbs like chopped parsley, dill, or a sprig of rosemary also elevate the presentation.
Store It Smart: Keeping Your Juicy Skillet Chicken Breast Fresh
Got leftovers of your delicious Juicy Skillet Chicken Breast? Lucky you! Storing it correctly ensures you can enjoy that tender, flavorful goodness for future meals. It’s super easy to keep it fresh and ready for when hunger strikes again.
Refrigeration:
Once your chicken has cooled down completely to room temperature (within two hours of cooking), transfer it to an airtight container. This helps prevent bacteria growth and keeps your chicken tasting great. Stored properly in the refrigerator, your cooked Juicy Skillet Chicken Breast will last for 3 to 4 days. It’s perfect for quick lunches or another easy dinner!
Freezing:
For longer storage, you can absolutely freeze your cooked chicken. Place the cooled chicken in an airtight freezer-safe container or a heavy-duty freezer bag. Squeeze out as much air as possible to prevent freezer burn. Your frozen Juicy Skillet Chicken Breast can be stored for up to 2 to 3 months. When you’re ready to enjoy it, thaw it overnight in the refrigerator before gently reheating.
Reheating Tips:
To keep your chicken juicy when reheating, it’s best to do so gently. You can warm it in a skillet over low-medium heat with a splash of water or chicken broth to create some steam. Alternatively, a quick zap in the microwave with a damp paper towel over it can work, but be careful not to overcook and dry it out!
FAQs About Your Juicy Skillet Chicken Breast
Here are some common questions to help you master this incredible Juicy Skillet Chicken Breast recipe and make it your own:
- Why do I need to pat the chicken dry before cooking?
Patting the chicken dry removes surface moisture. This is crucial for achieving a beautiful golden-brown sear and preventing the chicken from steaming in the pan, which can lead to a less desirable texture. - Can I use chicken thighs instead of breasts?
Absolutely! Chicken thighs are naturally more forgiving and flavorful. The cooking time will be slightly longer, around 6-8 minutes per side, depending on thickness, and they should reach an internal temperature of 175°F (80°C). - What kind of skillet is best for searing?
A cast iron skillet is highly recommended due to its excellent heat retention and even heating, which helps achieve that perfect sear. A heavy-bottomed stainless steel pan also works well. - How do I know when the chicken is fully cooked?
The safest way is to use an instant-read meat thermometer. The internal temperature of the thickest part of the chicken should reach 165°F (74°C). Visually, the chicken should be opaque throughout with no pink in the center. - Can I substitute the dried herbs with fresh ones?
Yes! If using fresh oregano (or other fresh herbs like thyme or rosemary), you’ll typically use about triple the amount. So, for 1 teaspoon of dried, use about 1 tablespoon of fresh, finely chopped. - Is this recipe genuinely low-carb friendly?
Yes, with only 1.5g total carbs and 1.1g net carbs per serving, this recipe is an excellent choice for low-carb and ketogenic diets, providing plenty of protein and healthy fats. - Can I prepare the chicken ahead of time?
You can season the chicken with the spices and lemon zest up to a few hours ahead of time and keep it refrigerated. For best results and juiciness, it’s best to sear it just before serving. - What if I don’t have fresh lemon zest?
If you don’t have fresh lemon zest, you can omit it from the seasoning step. Instead, ensure you finish the cooked chicken with a generous squeeze of fresh lemon juice after it has rested to still get that bright, zesty flavor. - Why is it important to let the chicken rest after cooking?
Resting the chicken allows the juices, which concentrate in the center during cooking, to redistribute throughout the meat. This results in a much juicier and more tender chicken breast. Don’t skip this step! - How can I make this recipe spicier?
To add a kick, sprinkle a pinch of red pepper flakes or a dash of cayenne pepper along with the other seasonings. You could also add a squeeze of hot sauce when serving.
“`
Juicy Skillet Chicken Breast
Equipment
- Cast Iron Skillet
Ingredients
- 2 boneless, skinless chicken breasts
- 1 teaspoon onion powder
- 1 teaspoon garlic powder
- 1 teaspoon dried oregano
- Freshly ground sea salt and black pepper to taste
- 1 teaspoon lemon zest
- 1 tablespoon sunflower, canola, or avocado oil
- Thin slices of butter optional, for extra flavor
- Thin lemon slices for garnish
Instructions
- Gently pat your chicken breasts completely dry with a paper towel; this helps them sear perfectly.
- Carefully slice each chicken breast horizontally through its center, creating two thinner cutlets from each.
- Season both sides generously with onion powder, garlic powder, dried oregano, sea salt, and black pepper.
- Evenly sprinkle the fresh lemon zest over both sides of the seasoned chicken.
- Warm a cast iron skillet over medium-high heat, then add your chosen healthy oil.
- Place the chicken breasts in the hot skillet and sear for about 5 minutes on each side until they are beautifully golden and fully cooked through. Reduce heat if browning too quickly.
- Transfer the cooked chicken from the skillet to a plate and let it rest for 5 minutes. For extra tenderness and flavor, top with a thin slice of butter or a drizzle of olive oil, and finish with a squeeze of fresh lemon juice.
Notes
Nutrition Information:
- Calories: 185 kcal
- Total Carbs: 1.5 g
- Net Carbs: 1.1 g
- Fats: 9.8 g
- Protein: 22 g