The holidays are here, and with them comes the joyous tradition of gathering around a beautifully set table, overflowing with delicious food. And what takes center stage more often than not? A magnificent ham, gleaming with a sweet and savory glaze. But we’re not just talking about *any* ham. We’re about to dive into the magic of creating a show-stopping Festive Glazed Christmas Ham with Roasted Root Veggies! that will have your guests asking for seconds (and the recipe!).
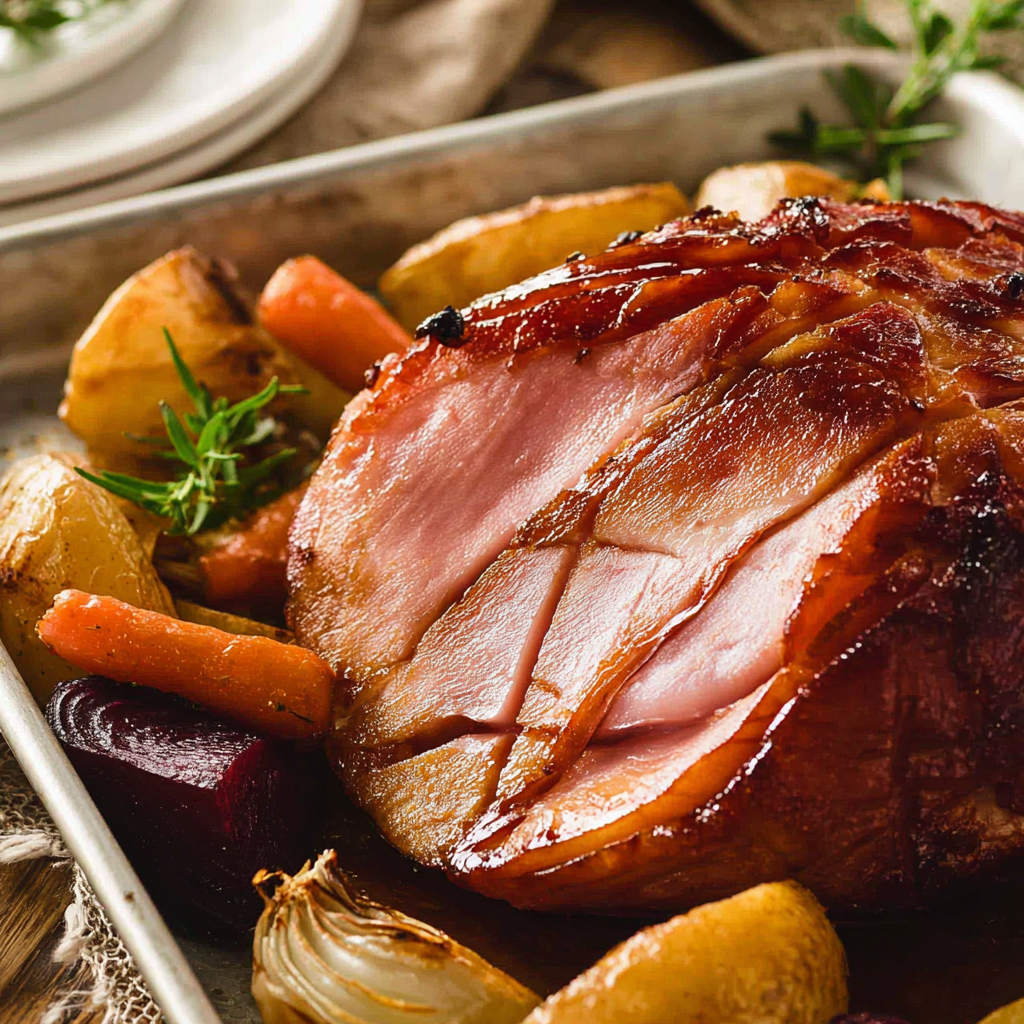
Imagine this: a glistening ham, perfectly caramelized, surrounded by tender, earthy root vegetables, all cooked together in one pan. It’s the kind of meal that feels luxurious yet is surprisingly simple to pull off. Forget the stress of multiple dishes and endless cleanup; this recipe is designed for maximum flavor and minimal fuss, leaving you more time to enjoy the festive cheer. Get ready to impress everyone with a holiday meal that’s as beautiful to look at as it is delicious to eat!
Why You’ll Love This Recipe
This isn’t just another holiday recipe; it’s a game-changer! Here are four fabulous reasons why you’ll absolutely adore making this Festive Glazed Christmas Ham with Roasted Root Veggies!:
- Effortlessly Elegant: You’ll achieve a stunning, centerpiece-worthy dish without breaking a sweat. The steps are straightforward, making it perfect for both seasoned chefs and holiday cooking newbies. Spend less time in the kitchen and more time making memories!
- Flavor Fiesta: Prepare your taste buds for a delightful dance! The sweet and tangy orange glaze perfectly complements the rich, savory ham, while the roasted root vegetables add earthy, caramelized notes. Every bite is a symphony of holiday flavors that will leave you wanting more.
- Wholesome & Balanced: Who says holiday meals can’t be good for you? This recipe packs a punch of lean protein from the ham and a vibrant array of nutrients from the colorful roasted potatoes, carrots, beets, and onion. It’s a satisfying meal that won’t leave you feeling overly stuffed.
- One-Pan Wonder: Yes, you read that right! Everything cooks together in one roasting pan. This means less cleanup, less juggling of multiple dishes, and more time enjoying the festivities. It’s the ultimate convenience for a stress-free holiday dinner.
Ingredients with Measurements
Gather your festive arsenal! Here’s everything you’ll need to create your magnificent Festive Glazed Christmas Ham with Roasted Root Veggies!:
- 🍖 1 (5-10 pound) bone-in or boneless ham
- 🥔 5 large potatoes, peeled and cut into chunks
- 🥕 5 large carrots, scrubbed and cut into large pieces
- 🍠 3 large beets, scrubbed and quartered
- 🧅 1 large onion, peeled and halved
- 🌿 1 fresh rosemary sprig (or 1 teaspoon dried)
- 🍃 3 fresh thyme sprigs (or 1 teaspoon dried)
- 🍂 3 bay leaves
- 🥄 2 tablespoons olive oil or avocado oil
- 🧂 1 teaspoon sea salt, plus more to taste
- 🌶️ 1 teaspoon black pepper, freshly cracked
For the Healthy Orange Glaze:
- 🍯 ¼ cup pure maple syrup or honey
- 🍊 1 large orange, juiced (about ¼ cup)
- 🍎 1 tablespoon apple cider vinegar
- 🍾 1 teaspoon Worcestershire sauce
Detailed Step-by-Step Directions How to Make the Recipe
Ready to bring this holiday masterpiece to life? Follow these simple, detailed steps to create your amazing Festive Glazed Christmas Ham with Roasted Root Veggies!:
- Get Ready & Preheat: First things first, preheat your oven to a cozy 325°F (165°C). While it’s warming up, get your veggies prepped! Wash and chop those potatoes, carrots, beets, and onion into similar-sized chunks. This ensures they all cook beautifully and evenly. Next, grab your ham and score its skin in a pretty criss-cross pattern – this isn’t just for looks, it helps that glorious glaze seep in! Finally, wrap your ham snugly in two layers of parchment paper (or foil if you prefer) to keep it moist during the initial roast.
- Prep the Veggies: In your largest roasting pan (the one you rarely use but is perfect for this!), spread out all those colorful chopped vegetables. Pour about ½ inch of water into the bottom of the pan – this creates a steamy environment that helps the veggies cook tenderly. Drizzle generously with olive oil, then toss with the fragrant rosemary, thyme, bay leaves, sea salt, and freshly cracked pepper. Give everything a good mix until the veggies are lightly coated and infused with those aromatic herbs.
- Whip up the Glaze: Now for the star of the show! In a small bowl, whisk together the pure maple syrup (or honey), the freshly squeezed juice from your large orange (a little zest can be added for an extra citrusy kick!), apple cider vinegar, and Worcestershire sauce. Give it a good whisk until it’s perfectly combined. Set this luscious, flavorful glaze aside – patience, young grasshopper!
- First Roast: Carefully place your wrapped ham directly on top of the seasoned vegetables in the roasting pan. This clever move allows the ham’s juices to mingle with the veggies, creating even more flavor! Pop the entire pan into your preheated 325°F (165°C) oven. Roast until the ham’s internal temperature reaches 140°F (60°C). As a general guide, this usually takes approximately 10 minutes per pound of ham, so a 5lb ham would be around 50 minutes, a 10lb ham about 1 hour 40 minutes. Use a meat thermometer for accuracy!
- Glaze & Finish: Once your ham hits that magical temperature, carefully (it’ll be hot!) take the roasting pan out of the oven. Increase the oven temperature to a toasty 425°F (220°C). Gently unwrap the ham, giving the vegetables a quick, gentle flip so they can start to caramelize. Now, baste the ham generously with your glorious prepared glaze. Don’t be shy – get every nook and cranny!
- Final Bake: Return the unwrapped, glistening ham and those eager veggies to the hot 425°F (220°C) oven. Roast for 10 minutes to let that first layer of glaze caramelize beautifully. Then, pull it out again, baste the ham once more with any remaining glaze to build up that irresistible sticky coating, and continue to bake for another 15 minutes. Keep a close eye on it during this final stage! You’re looking for a beautifully caramelized ham and tender-crisp vegetables. If the veggies look done sooner, don’t hesitate to remove them from the pan so they don’t overcook.
- Rest & Serve: The hardest part is waiting! Let your magnificent ham rest for 10-15 minutes before thinly slicing it. This crucial step allows the juices to redistribute, ensuring every slice is incredibly tender and flavorful. Serve it warm with the delicious roasted vegetables straight from the pan. And remember, don’t toss that ham bone – it’s liquid gold for a future healthy soup!
Detailed Different Ways You Can Present the Recipe and How to Serve It
Your Festive Glazed Christmas Ham with Roasted Root Veggies! is a work of art, and presentation is key to making it truly shine on your holiday table!
- Grand Centerpiece Platter: For a classic and impressive presentation, carve the ham (or a good portion of it) into elegant slices and arrange them fanned out on a large, beautiful serving platter. Artfully surround the ham slices with the colorful roasted root vegetables. Garnish with fresh sprigs of rosemary and thyme, perhaps some vibrant orange slices (from your glaze orange!), and a sprinkle of fresh cranberries for that extra festive pop.
- Rustic Family Style: If you’re going for a more relaxed, communal vibe, carve the ham and place the slices directly back into the roasting pan amidst the roasted veggies. This allows the ham to soak up any remaining pan juices and glaze, and it brings a charming, rustic feel to the table. Just be sure the pan is presentable!
- Individual Plate Perfection: For a more refined dining experience, plate each serving individually. Arrange a few slices of ham slightly overlapping, then spoon a generous portion of the roasted root vegetables beside them. A small drizzle of any leftover pan juices or glaze over the ham and veggies will tie it all together.
- Accompaniment Delights: While the ham and veggies are a complete meal, offering a few simple sides can elevate the experience. Consider a bowl of creamy mashed potatoes (if you want more carbs!), a fresh green salad with a light vinaigrette to cut through the richness, or a basket of crusty bread to soak up those delicious juices.
- Sauce It Up: Even though the ham is beautifully glazed, offering extra condiments is always a good idea. A small bowl of Dijon mustard, a tangy cranberry sauce, or even a homemade apple sauce can provide delightful contrasts and allow guests to customize their perfect bite.
No matter how you choose to present it, make sure the focus remains on the irresistible appeal of your gleaming, delicious ham and its vibrant vegetable companions!
How You Can Store It and How Long Does It Last
Once the feast is over, don’t let any of your delicious Festive Glazed Christmas Ham with Roasted Root Veggies! go to waste! Proper storage ensures you can enjoy the leftovers for days to come.
- Cooked Ham:
- Refrigerator: After the ham has cooled to room temperature (within 2 hours of cooking), transfer any remaining ham slices or chunks to an airtight container. It will keep well in the refrigerator for 3 to 4 days.
- Freezer: For longer storage, cooked ham can be frozen. Wrap individual portions tightly in plastic wrap, then place them in a freezer-safe bag or airtight container. It will last in the freezer for 1 to 2 months. Thaw overnight in the refrigerator before reheating.
- Roasted Root Vegetables:
- Refrigerator: Allow the roasted vegetables to cool completely. Store them in an airtight container in the refrigerator for 3 to 4 days.
- Freezer: While you can freeze roasted vegetables, their texture can become a bit softer upon thawing. Spread them in a single layer on a baking sheet to freeze solid, then transfer to a freezer-safe bag. They’ll last for about a month, best for adding to soups or stews.
- Reheating:
- Ham: For best results, reheat ham gently in the oven at a low temperature (around 275°F / 135°C), covered with foil, until warmed through. This prevents it from drying out. A microwave can also be used for quicker reheating of individual portions.
- Veggies: Reheat roasted vegetables in the oven to crisp them up again, or gently warm them in a pan on the stovetop. The microwave is also an option but might result in a softer texture.
Always ensure leftovers are reheated to an internal temperature of 165°F (74°C).
FAQs
Q1: Can I use a pre-cooked ham for this Festive Glazed Christmas Ham with Roasted Root Veggies! recipe?
A1: Absolutely! Most hams sold in stores are already pre-cooked. If using a pre-cooked ham, you’ll mainly be reheating it to the specified internal temperature (140°F/60°C) and then applying the glaze. The cooking time per pound will still be a good guide, but always rely on your meat thermometer for accuracy.
Q2: What if I don’t have all the specified root vegetables? Can I substitute?
A2: Yes, feel free to get creative! Parsnips, sweet potatoes, turnips, or even Brussels sprouts (added in the last 20-25 minutes of roasting) would be delicious additions or substitutions. The key is to cut them into similar sizes for even cooking.
Q3: Can I make the healthy orange glaze ahead of time?
A3: You certainly can! Whisk all the glaze ingredients together and store it in an airtight container in the refrigerator for up to 3-4 days. This makes prep even easier on the day of your holiday feast!
Q4: How do I know when the ham is fully cooked and safe to eat?
A4: For a pre-cooked ham (which most store-bought hams are), you are reheating it to a safe internal temperature of 140°F (60°C). For a fresh, uncooked ham, it needs to reach 145°F (63°C). Always use a reliable meat thermometer inserted into the thickest part of the ham, avoiding the bone.
Q5: Is it necessary to wrap the ham in parchment paper (or foil) for the first roast?
A5: Wrapping the ham helps keep it incredibly moist during the initial roasting period. It creates a steamy environment that prevents the ham from drying out before you apply the glaze and crisp up the exterior. While not strictly mandatory, it’s highly recommended for the best results!
Q6: What other herbs can I use for the roasted vegetables?
A6: Besides rosemary and thyme, sage, oregano, or a blend of “poultry seasoning” would also work wonderfully with the root vegetables and ham. Fresh herbs generally offer a more vibrant flavor, but dried herbs are perfectly fine too!
Q7: Is this recipe suitable for a smaller or larger crowd?
A7: This recipe is very adaptable! For a smaller crowd, you can choose a smaller ham (e.g., 3-5 pounds) and adjust the vegetable quantities accordingly. For a larger gathering, simply scale up the size of your ham and increase the amount of vegetables to fill your roasting pan, possibly using two pans if necessary.
Q8: Can I use different sweeteners for the glaze if I don’t have maple syrup or honey?
A8: Yes, while maple syrup and honey offer a lovely flavor, you could try brown sugar or even a combination of brown sugar and a touch of molasses for a deeper, richer glaze. Adjust the amount to your taste preference.
Q9: Why do I need to score the ham before glazing?
A9: Scoring the ham’s skin (making shallow diamond or criss-cross cuts) serves a couple of purposes. First, it allows the delicious glaze to penetrate deeper into the ham, infusing more flavor. Second, it helps the fat render and crisp up beautifully, creating that desirable caramelized exterior.
Q10: What can I do with the leftover ham bone after enjoying my Festive Glazed Christmas Ham with Roasted Root Veggies!?
A10: Don’t discard that ham bone! It’s packed with flavor and makes an incredible base for a future soup. You can freeze it in an airtight bag for a few months, then use it to make split pea soup, ham and bean soup, or a flavorful stock for other dishes.
Festive Glazed Christmas Ham with Roasted Root Veggies! 🎄
Equipment
- Roasting Pan
Ingredients
Main Ingredients
- 1 bone-in or boneless ham (5-10 pound)
- 5 large potatoes peeled and cut into chunks
- 5 large carrots scrubbed and cut into large pieces
- 3 large beets scrubbed and quartered
- 1 large onion peeled and halved
- 1 fresh rosemary sprig (or 1 teaspoon dried)
- 3 fresh thyme sprigs (or 1 teaspoon dried)
- 3 bay leaves
- 2 tablespoons olive oil or avocado oil
- 1 teaspoon sea salt plus more to taste
- 1 teaspoon black pepper freshly cracked
For the Healthy Orange Glaze
- 0.25 cup pure maple syrup or honey
- 1 large orange juiced (about ¼ cup)
- 1 tablespoon apple cider vinegar
- 1 teaspoon Worcestershire sauce
Instructions
- Get Ready: Preheat your oven to 325°F (165°C). Wash and chop your potatoes, carrots, beets, and onion into similar-sized pieces for even cooking. Score the ham's skin in a criss-cross pattern to help absorb the glaze, then wrap it securely in two layers of parchment paper (or foil).
- Prep the Veggies: In a large roasting pan, spread out the chopped vegetables. Add about ½ inch of water to the bottom. Drizzle with olive oil, then toss with rosemary, thyme, bay leaves, salt, and pepper until everything is lightly coated.
- Whip up the Glaze: In a small bowl, whisk together the maple syrup (or honey), fresh orange juice (and optional zest for extra flavor), apple cider vinegar, and Worcestershire sauce. Set this flavorful glaze aside.
- First Roast: Place the wrapped ham directly on top of the seasoned vegetables in the roasting pan. Bake at 325°F (165°C) until the ham's internal temperature reaches 140°F (60°C). This usually takes approximately 10 minutes per pound of ham.
- Glaze & Finish: Once the ham reaches temperature, carefully take the entire roasting pan out of the oven. Increase the oven temperature to 425°F (220°C). Carefully unwrap the ham, give the vegetables a gentle flip, and baste the ham generously with your prepared glaze.
- Final Bake: Return the unwrapped, glazed ham and veggies to the hot 425°F (220°C) oven. Roast for 10 minutes, then baste the ham again with any remaining glaze. Continue to bake for another 15 minutes, or until the ham is beautifully caramelized and the vegetables are tender-crisp. Keep an eye on the veggies and remove them if they're done sooner.
- Rest & Serve: Let the ham rest for 10-15 minutes before thinly slicing. Serve it warm with the delicious roasted vegetables right from the pan. Don't forget to save the ham bone for a future healthy soup!