Why You’ll Fall Head Over Heels for These Heartbeet Ravioli Kisses!
Prepare to fall in love – not just with your cooking skills, but with every vibrant bite of these exquisite Heartbeet Ravioli Kisses with Creamy Ricotta Filling. This isn’t just a meal; it’s an experience, a masterpiece, and a declaration of love to your taste buds. Here are four irresistible reasons why this recipe will become your new obsession:
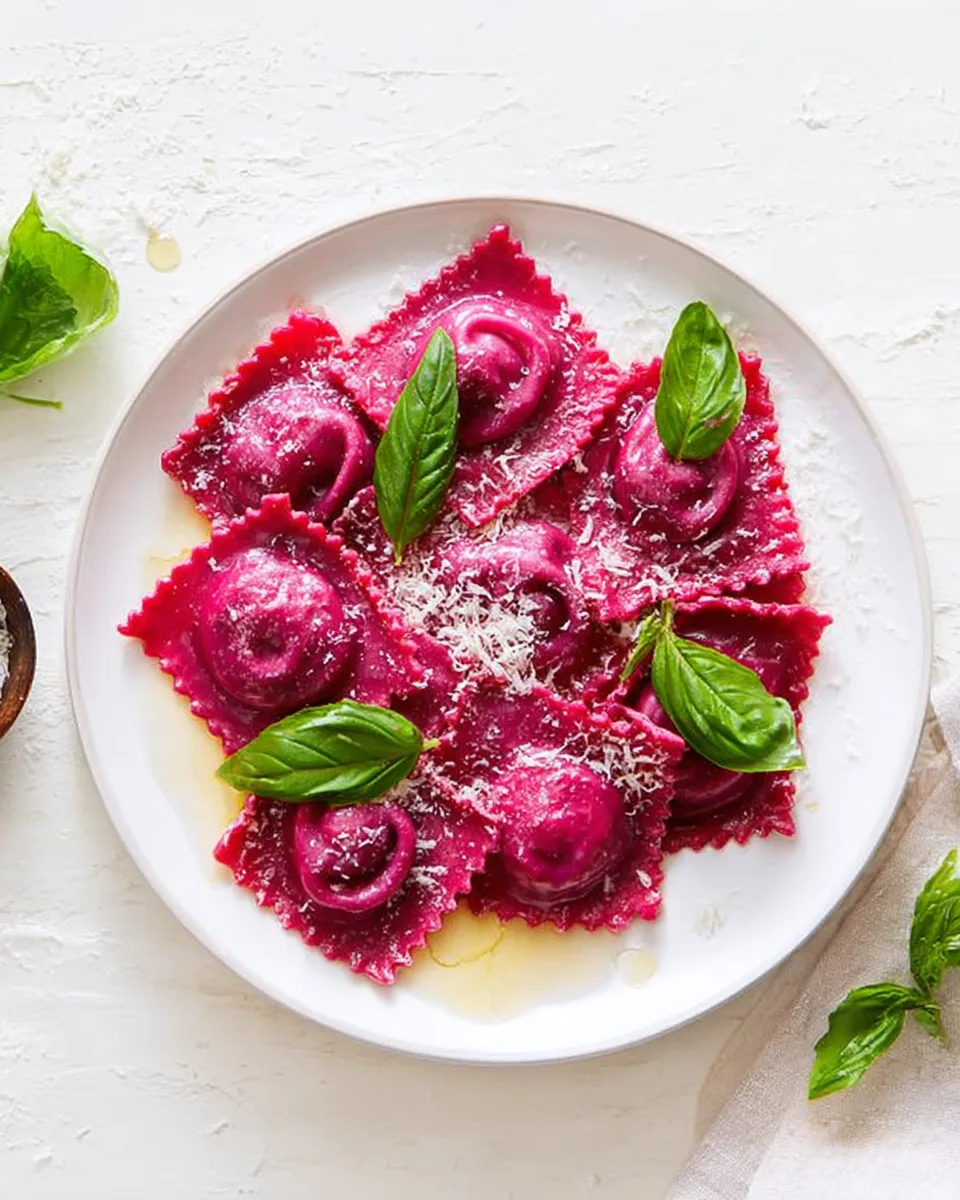
- A Feast for the Eyes (and Soul!): Imagine serving a plate of beautifully pink, heart-shaped pasta. The natural, stunning hue from fresh beets makes these ravioli visually breathtaking and utterly unique. It’s food art that tastes as good as it looks!
- Flavors That Sing a Love Song: Earthy, sweet beets perfectly complement the dreamy, creamy ricotta filling, brightened with a hint of lemon and savory Parmesan. Each “kiss” delivers a harmonious blend of textures and tastes that will enchant your palate.
- More Than Just a Meal – It’s an Event: Perfect for a romantic dinner, a special celebration, or simply to elevate an ordinary weeknight, making these ravioli is a joy. The process is meditative, and the result is profoundly rewarding, making you feel like a culinary wizard.
- Wholesome, Homemade Goodness: Ditch the store-bought stuff! Crafting these ravioli from scratch means you control every fresh, high-quality ingredient. It’s a healthy, satisfying meal packed with natural flavor and made with love.
So, get ready to roll up your sleeves and let your heart guide you to a truly unforgettable culinary adventure!
Unveiling the Magic of Heartbeet Ravioli Kisses
Are you ready to transform your kitchen into a haven of culinary enchantment? Forget those boring weeknight dinners and prepare for a dish that’s as romantic as it is delicious! We’re talking about homemade pasta that isn’t just incredibly tasty, but also boasts a show-stopping, naturally vibrant color. Get ready to create the most adorable and delectable Heartbeet Ravioli Kisses with Creamy Ricotta Filling that will melt hearts faster than a chocolate lava cake. This isn’t just food; it’s edible affection, a labor of love that results in delicate, beet-infused pasta “kisses” cradling a cloud-like ricotta embrace. Perfect for Valentine’s Day, anniversaries, or any occasion where you want to sprinkle a little extra magic, this recipe is surprisingly fun to make and guaranteed to impress. Let’s dive into a world where pasta is painted with nature’s finest hues!
Your Love Potion Ingredients: What You’ll Need
For the Vibrant Beet Pasta Dough:
- 💜 1/2 lb. Fresh Beets, peeled with tops and roots removed (about 1 large or 2 small)
- 🫒 2 teaspoons Olive Oil
- 🥚 2 Large Eggs
- 🌾 2 1/4 cups All-Purpose Flour, plus extra for dusting
- 💜 1/2 cup Beet Puree (made from your roasted beets)
- 🧂 A small pinch of Salt
For the Dreamy Ricotta Filling:
- 🧀 1 cup Part-Skim Ricotta Cheese
- 🧀 1/2 cup Finely Grated Parmesan Cheese
- 🧄 2 cloves Garlic, minced
- 🍋 1-2 teaspoons Fresh Lemon Juice
- 🧂 A dash of Salt and freshly ground Black Pepper to taste
- 🌿 Fresh Basil leaves, for a lovely garnish
Part 1: The Heart of the Beet – Roasting & Dough Prep
Step 1: Get Those Beets Roasting!
Preheat your oven to a warm 400°F (200°C). Gently rub the peeled beets with 2 teaspoons of olive oil. Wrap them up snugly in aluminum foil and place them on a baking sheet. Roast for about 50-60 minutes, or until they’re perfectly tender when poked with a fork. Once done, unwrap them and let them cool down completely. Transfer the cooled beets into a food processor and blend until you have a smooth, beautifully vibrant puree. Measure out 1/2 cup to use in your pasta dough.
Step 2: Craft Your Colorful Pasta Dough!
On a clean countertop, make a neat mound with 2 1/4 cups of all-purpose flour. Create a little “well” in the center of the flour pile. Crack in the two eggs, add a pinch of salt, and pour in your gorgeous beet puree into the well. Using a fork, gently whisk the liquid ingredients together, gradually drawing in flour from the edges until a shaggy, rough dough forms. Don’t worry if you don’t use all the flour – you just want it to come together!
Step 3: Knead and Let Your Dough Relax!
Now for the fun part! Gently knead the dough for about 10-15 minutes until it’s smooth, elastic, and feels wonderfully pliable. If it starts to get a bit sticky, just add a tiny bit more flour, one teaspoon at a time. Cover your beautiful dough with plastic wrap and let it rest on the counter for at least 30 minutes. This little break helps the dough become easier to roll.
Part 2: The Dreamy Filling & Pasta Rolling Art
Step 4: Prepare the Creamy Ricotta Filling!
In a mixing bowl, simply combine the ricotta cheese, grated Parmesan, minced garlic, and fresh lemon juice. Season with salt and pepper to your personal taste. Give it a good mix until everything is well combined and set it aside – a truly dreamy heart for your Heartbeet Ravioli Kisses with Creamy Ricotta Filling!
Step 5 (Part A): Rolling Your Vibrant Pasta!
Divide your rested dough into four equal pieces. Using a pasta roller (or a strong rolling pin!), roll each piece of dough gradually thinner. Start at a thicker setting (like 0 or 1) and progressively go thinner until you reach about a ‘size 5’ thickness. If a strip gets too long to manage, simply cut it in half and roll each section separately. You’re creating the canvas for your edible kisses!
Part 3: Assembling & Cooking Your Heartbeet Masterpiece
Step 5 (Part B): Assembling Your Hearty Ravioli Kisses!
Take two equally sized pasta strips, roughly 2.5 inches wide by 9 inches long. Place about five small spoonfuls of your ricotta filling evenly spaced along the center of one strip of dough. Lightly brush a little water around the filling mounds on the dough – this acts as your “glue.” Carefully place the second pasta strip on top, gently pressing down around each mound of filling to seal the edges and remove any trapped air. Use a ravioli cutter, a pretty cookie cutter (hearts are perfect for these Heartbeet Ravioli Kisses!), or even a sharp knife to separate your individual ravioli pieces. Place your freshly made ravioli on a lightly floured surface until you’re ready to cook them.
Step 6: Cook and Enjoy Your Creations!
You have two delightful options for cooking:
- Boil: Bring a large pot of salted water to a rolling boil. Gently drop in the ravioli and cook for just a few minutes until they float to the top and are tender.
- Pan-Fry (for a lovely golden edge): Heat 2 tablespoons of olive oil in a large skillet over medium heat. Carefully pan-fry the ravioli until they’re golden brown and cooked through.
Serve your beautiful, healthy Heartbeet Ravioli Kisses with Creamy Ricotta Filling with an extra drizzle of good quality olive oil, a sprinkle of fresh basil, a dusting of Parmesan cheese, and a grind of fresh black pepper. Enjoy your labor of love!
Presenting Your Heartbeet Ravioli Kisses: A Culinary Canvas
Once your beautiful Heartbeet Ravioli Kisses with Creamy Ricotta Filling are cooked, the fun of presentation truly begins! Beyond a simple drizzle of olive oil, here are enchanting ways to serve and elevate your dish:
- Classic Brown Butter & Sage: Melt butter gently until it browns and smells nutty. Add fresh sage leaves and let them crisp slightly. Toss the cooked ravioli in this aromatic sauce – pure heaven!
- Light Lemon Cream Sauce: Whisk together a splash of cream, a squeeze of lemon juice, a little Parmesan, and a touch of pasta water for a bright, decadent sauce that won’t overpower the beet flavor.
- Pesto Perfection: A light coating of homemade or good quality store-bought pesto adds a fresh, herbaceous counterpoint to the sweetness of the beets.
- Garnish Galore: Beyond basil and Parmesan, consider crumbled goat cheese for a tangy kick, toasted pistachios or pine nuts for crunch, or even a few microgreens for an elegant touch. For a truly romantic vibe, a tiny edible flower could be a charming addition.
- Plating with Panache: Arrange your vibrant ravioli artfully on a white or dark plate to make their color pop. A swirl or a neat stack can make a simple dish look restaurant-worthy.
- Wine Pairing: Complement the delicate flavors with a crisp, dry white wine like Pinot Grigio, a light-bodied Rosé, or even a sparkling Prosecco for a festive touch.
Remember, this dish is a celebration of flavor and beauty, so let your creativity shine in serving!
Storing Your Precious Heartbeet Ravioli Kisses
Made too many Heartbeet Ravioli Kisses with Creamy Ricotta Filling? Lucky you! Here’s how to ensure they stay fresh and delicious for future cravings:
- Uncooked Ravioli (Short Term): Arrange fresh, uncooked ravioli in a single layer on a lightly floured baking sheet (to prevent sticking). Cover loosely with plastic wrap and refrigerate for up to 24 hours. Cook directly from the fridge.
- Uncooked Ravioli (Long Term – Freezing): This is ideal! Place uncooked ravioli in a single layer on a floured baking sheet. Freeze until solid (about 1-2 hours). Once frozen, transfer them to an airtight freezer bag or container. They will last beautifully for up to 1-2 months. Cook directly from frozen in boiling water; they might take an extra minute or two.
- Cooked Ravioli: Store any leftover cooked ravioli in an airtight container in the refrigerator for up to 2-3 days. Reheat gently in a pan with a little butter or olive oil, or briefly in simmering water. Be careful not to overcook, as they can become mushy.
Proper storage means you can enjoy the magic of these beet-iful ravioli whenever the mood strikes!
Your Heartbeet Ravioli Kisses FAQs Answered!
- Can I use canned beets for the pasta dough?
For best vibrant color and fresh flavor, use fresh roasted beets. Canned beets won’t give the same quality. - Can I prepare the pasta dough ahead of time?
Yes, wrap tightly in plastic and refrigerate for up to 24 hours. Bring to room temperature before rolling. - What if my dough is too sticky or too dry?
Adjust with tiny amounts of flour (if sticky) or water (if dry), kneading until smooth and pliable. - How do I prevent the fresh ravioli from sticking together?
Generously dust your working surface and storage tray with flour or semolina. Avoid stacking until frozen. - Can I use a different filling for these ravioli?
Absolutely! Spinach and ricotta, pumpkin, or mushroom fillings are great alternatives. - What’s the best way to cook fresh homemade ravioli?
Boil gently in a large pot of salted water for 2-4 minutes until they float and are tender. - How do I know when the ravioli are perfectly cooked?
They will float to the surface; cook for an additional 30 seconds to 1 minute for tenderness. - Can I freeze the cooked ravioli?
It’s better to freeze uncooked. If freezing cooked, cool completely, lightly toss with oil, and freeze in a single layer before bagging. - What if I don’t have a pasta machine?
A rolling pin works! It requires more effort to roll the dough very thin (about 1/16th inch), but it’s achievable. - Is this Heartbeet Ravioli Kisses recipe healthy?
Yes! With fresh beets, part-skim ricotta, and quality ingredients, it’s a wholesome meal, especially with light sauces.
Heartbeet Ravioli Kisses with Creamy Ricotta Filling
Equipment
- Food Processor
- Baking Sheet
- Aluminum Foil
- Pasta Roller
- Ravioli Cutter
- Large Pot
- Large skillet
Ingredients
For the Vibrant Beet Pasta Dough
- 1/2 lb Fresh Beets peeled with tops and roots removed (about 1 large or 2 small)
- 2 teaspoons Olive Oil
- 2 Large Eggs
- 2 1/4 cups All-Purpose Flour plus extra for dusting
- 1/2 cup Beet Puree (made from your roasted beets)
- A small pinch Salt
For the Dreamy Ricotta Filling
- 1 cup Part-Skim Ricotta Cheese
- 1/2 cup Finely Grated Parmesan Cheese
- 2 cloves Garlic minced
- 1-2 teaspoons Fresh Lemon Juice
- A dash Salt and freshly ground Black Pepper to taste
- Fresh Basil leaves for a lovely garnish
Instructions
- Step 1: Get Those Beets Roasting! Preheat your oven to a warm 400°F (200°C). Gently rub the peeled beets with 2 teaspoons of olive oil. Wrap them up snugly in aluminum foil and place them on a baking sheet. Roast for about 50-60 minutes, or until they're perfectly tender when poked with a fork. Once done, unwrap them and let them cool down completely. Transfer the cooled beets into a food processor and blend until you have a smooth, beautifully vibrant puree. Measure out 1/2 cup to use in your pasta dough.
- Step 2: Craft Your Colorful Pasta Dough! On a clean countertop, make a neat mound with 2 1/4 cups of all-purpose flour. Create a little "well" in the center of the flour pile. Crack in the two eggs, add a pinch of salt, and pour in your gorgeous beet puree into the well. Using a fork, gently whisk the liquid ingredients together, gradually drawing in flour from the edges until a shaggy, rough dough forms. Don't worry if you don't use all the flour – you just want it to come together!
- Step 3: Knead and Let Your Dough Relax! Gently knead the dough for about 10-15 minutes until it's smooth, elastic, and feels wonderfully pliable. If it starts to get a bit sticky, just add a tiny bit more flour, one teaspoon at a time. Cover your beautiful dough with plastic wrap and let it rest on the counter for at least 30 minutes. This little break helps the dough become easier to roll.
- Step 4: Prepare the Creamy Ricotta Filling! In a mixing bowl, simply combine the ricotta cheese, grated Parmesan, minced garlic, and fresh lemon juice. Season with salt and pepper to your personal taste. Give it a good mix until everything is well combined and set it aside.
- Step 5: Assemble Your Hearty Ravioli! Divide your rested dough into four equal pieces. Using a pasta roller (or a strong rolling pin!), roll each piece of dough gradually thinner. Start at a thicker setting (like 0 or 1) and progressively go thinner until you reach about a 'size 5' thickness. If a strip gets too long to manage, simply cut it in half and roll each section separately. Take two equally sized pasta strips, roughly 2.5 inches wide by 9 inches long. Place about five small spoonfuls of your ricotta filling evenly spaced along the center of one strip of dough. Lightly brush a little water around the filling mounds on the dough – this acts as your "glue." Carefully place the second pasta strip on top, gently pressing down around each mound of filling to seal the edges and remove any trapped air. Use a ravioli cutter, a pretty cookie cutter, or even a sharp knife to separate your individual ravioli pieces. Place your freshly made ravioli on a lightly floured surface until you're ready to cook them.
- Step 6: Cook and Enjoy Your Creations! You have two delightful options for cooking:
- Boil: Bring a large pot of salted water to a rolling boil. Gently drop in the ravioli and cook for just a few minutes until they float to the top and are tender.
- Pan-Fry (for a lovely golden edge): Heat 2 tablespoons of olive oil in a large skillet over medium heat. Carefully pan-fry the ravioli until they're golden brown and cooked through.
Notes
- Calories: 500 kcal
- Total Carbs: 62g
- Net Carbs: 53g
- Fats: 18g
- Protein: 21g