Why You’ll Love These Perfectly Coddled Eggs
Prepare to fall head over heels for the magic that is a batch of Perfectly Coddled Eggs! This isn’t just another egg recipe; it’s a breakfast game-changer. Here are four irresistible reasons why this dish will become your new favorite:
- Lightning Fast & Effortless: Forget complicated techniques or endless flipping. With a mere 1 minute of prep and 5 minutes of cook time, you’ll have elegant, gourmet-level eggs ready in a flash. It’s the ultimate quick win for busy mornings!
- Healthy & Wholesome: Packing a punch with protein and healthy fats, while keeping carbs incredibly low, these Perfectly Coddled Eggs are a dream come true for anyone seeking a nutritious start. They’re keto-friendly and a fantastic way to fuel your day without weighing you down.
- Infinitely Customizable: Plain or fancy? Your choice! The beauty of coddled eggs lies in their versatility. Add a sprinkle of sharp cheddar, a dash of fresh chives, or experiment with your favorite herbs and spices. Every egg can be a new adventure, tailored exactly to your cravings.
- Elegant & Impressive: There’s something undeniably sophisticated about a perfectly cooked coddled egg with its dreamy, runny yolk. It feels luxurious, tastes divine, and looks stunning, making it perfect for a leisurely brunch or a simple, indulgent treat just for you. Get ready to impress yourself and anyone lucky enough to share!
Crack into Breakfast Bliss: Discover Perfectly Coddled Eggs!
Tired of the same old scrambled mess or the delicate dance of a poached egg that sometimes goes awry? What if we told you there’s an ancient, elegant, and incredibly easy way to achieve breakfast perfection, where the whites are set just right and the yolks remain a glorious, golden river? Enter the unsung hero of the morning meal: the Perfectly Coddled Eggs!
Imagine this: a whisper-soft egg, cooked gently in its own cozy cup, emerging with a creamy texture that’s simply unmatched. No fuss, no flip, just pure, unadulterated egg bliss. This isn’t just a recipe; it’s an invitation to elevate your breakfast routine from mundane to magnificent in less than 10 minutes. Get ready to discover your new favorite way to enjoy eggs – a method so simple, yet so utterly delicious, you’ll wonder where it’s been all your life!
Ingredients for Your Perfectly Coddled Eggs
Gather your simple treasures; the beauty of Perfectly Coddled Eggs lies in their humble yet powerful ingredients. You don’t need a pantry full of exotic spices, just a few fresh components to create culinary magic.
- 🥚 6 large Eggs: (cold) – The star of our show! Cold eggs are key for controlled cooking.
- ✨ 3/4 teaspoon Sea salt: A crucial touch to enhance the egg’s natural flavor.
- ⚫ 3/8 teaspoon Black pepper: For that perfect peppery kick.
- 🧀 6 tablespoons Shredded cheddar cheese: (optional) – A savory, melt-in-your-mouth addition if you’re feeling cheesy!
- 🌿 6 teaspoons Chopped fresh chives: (optional) – For a burst of fresh, oniony brightness.
- 🧈 1 teaspoon Butter or cooking oil: (for greasing cups) – A tiny bit goes a long way to prevent sticking and ensure easy release.
That’s it! Simple, fresh, and ready to transform into delightful Perfectly Coddled Eggs.
Step-by-Step Directions to Your Perfectly Coddled Eggs
Ready to make some magic? Follow these simple steps, and you’ll be enjoying your Perfectly Coddled Eggs in no time. Precision is key for that ideal runny yolk, so pay close attention!
- Prep Your Coddler: First things first, grab your egg coddler pan. Take a tiny dab of butter or a drop of cooking oil and gently grease the inside of each individual egg cup. This crucial step ensures your beautiful eggs slide out without a fuss.
- Boil the Water: Pour about a 1/2 inch of water into the main coddler pan (ensure the egg cup section isn’t in yet!). Place it over medium-high heat and bring this water to a full boil. Once it’s bubbling nicely, reduce the heat to a gentle, consistent simmer.
- Crack & Season: Now, carefully place the top section with your greased egg cups into their holders in the coddler. Gently crack one cold egg into each cup. Take your sea salt and black pepper and season each egg generously with a pinch of both.
- Add Optional Goodies: If you’re opting for extra flavor, now’s the time! Evenly sprinkle your shredded cheddar cheese and/or chopped fresh chives over each egg. These will melt and infuse beautifully.
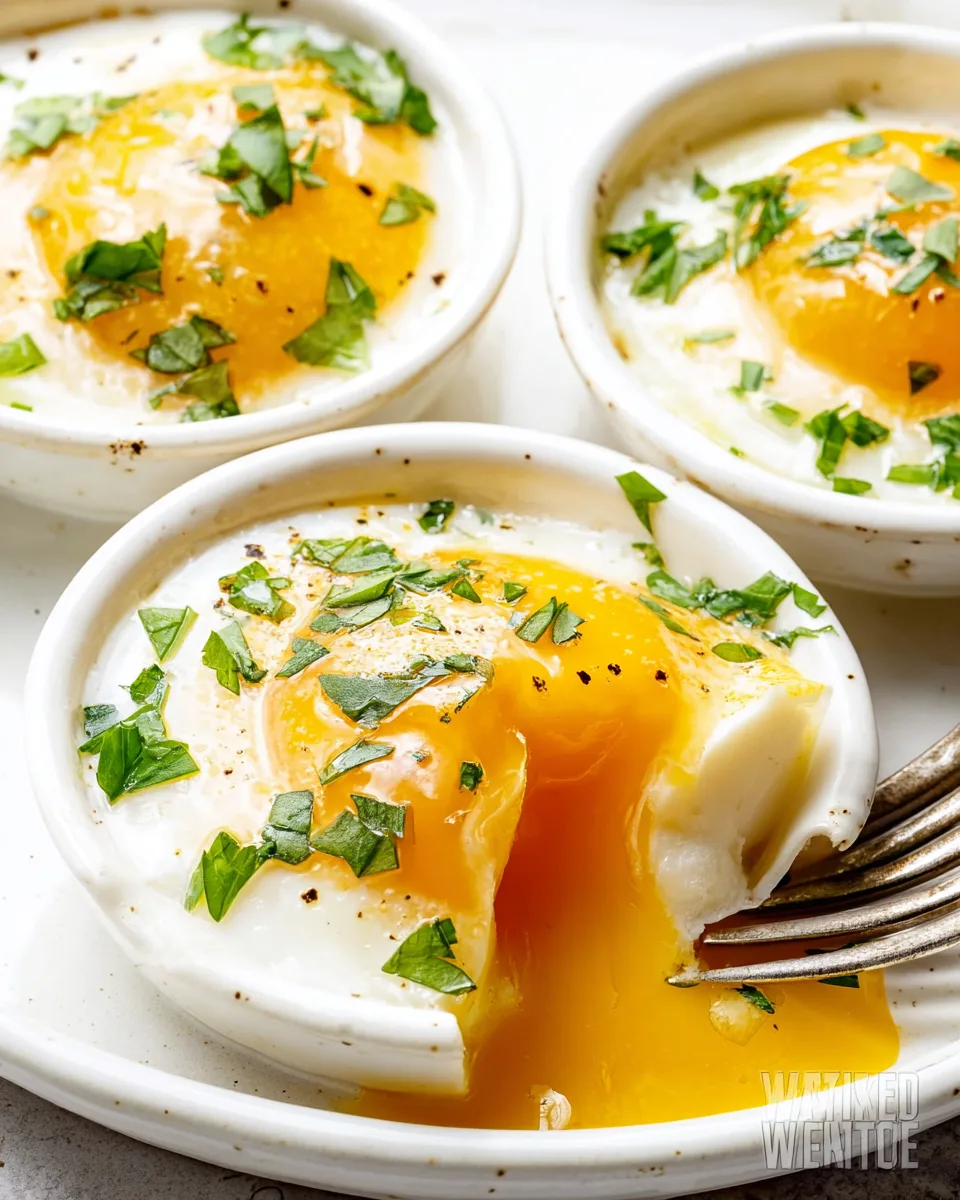
- Coddle to Perfection: Secure the lid onto your coddler. Let your eggs cook for exactly 4-5 minutes. This timeframe is the secret to achieving beautifully set whites and those wonderfully runny, golden yolks that make Perfectly Coddled Eggs so desirable. If you prefer your yolks a little firmer, simply add an extra 1-2 minutes to the cooking time.
- Serve Immediately: Turn off the heat. Using heatproof gloves or oven mitts, carefully lift the hot egg cups out of the coddler. A small silicone spatula can be your best friend here; gently slide it around the edge of each egg to release it, then transfer your glorious Perfectly Coddled Eggs to a serving plate. Don’t wait – enjoy them immediately!
Presenting and Serving Your Perfectly Coddled Eggs
The beauty of Perfectly Coddled Eggs isn’t just in their taste, but also in their elegant simplicity, making them a joy to present. Here are some delightful ways to serve and enjoy your culinary creation:
- The Classic Dipper: This is arguably the most iconic way! Serve your coddled egg in a small bowl or even directly from its individual coddler cup (if it’s presentable) with an army of “toast soldiers” – thinly sliced pieces of buttered toast, perfect for dipping into that luscious, runny yolk. Baguettes or sourdough are also fantastic.
- On a Bed of Greens: For a lighter, fresher take, nestle your perfectly coddled egg atop a small bed of lightly dressed arugula or spinach. A drizzle of olive oil and a squeeze of lemon juice will complement the richness of the yolk beautifully.
- Avocado Toast’s Best Friend: Elevate your avocado toast! Spread creamy avocado on your favorite toasted bread, then gently place a coddled egg on top. A sprinkle of chili flakes or everything bagel seasoning will make it an Instagram-worthy masterpiece.
- Brunch Board Brilliance: If you’re hosting, Perfectly Coddled Eggs are a sophisticated addition to any brunch spread. Serve them in small ramekins alongside bacon, sausage, fruit, and pastries. They add a touch of gourmet flair without demanding extra effort.
- Garnish Galore: Before serving, consider a final flourish! A sprinkle of paprika, extra fresh chives, a pinch of flaky sea salt, or a tiny dollop of crème fraîche can enhance both the visual appeal and the flavor profile of your Perfectly Coddled Eggs.
No matter how you choose to present them, remember that the star is that silky, runny yolk – so make sure your serving method encourages maximum dipping and savoring!
Storing and Shelf Life of Your Perfectly Coddled Eggs
While the absolute magic of Perfectly Coddled Eggs truly shines when enjoyed fresh from the coddler, sometimes you might find yourself with an extra or want to consider prep. Let’s talk storage and shelf life:
Best Enjoyed Fresh: It’s important to note that coddled eggs, particularly those with beautifully runny yolks, are truly best consumed immediately after cooking. The delicate texture and warmth are what make them so special.
Short-Term Storage: If you do have leftovers, allow the coddled eggs to cool completely. Gently transfer them to an airtight container and store them in the refrigerator. They will last for about 1-2 days. Be aware that the texture of the yolk will firm up significantly upon cooling, and reheating can be tricky without overcooking.
Reheating (with Caution): Reheating coddled eggs is generally not recommended if you want to maintain that perfect runny yolk. The gentle cooking method is hard to replicate. However, if you must, you can try placing them in a warm water bath (not boiling) for a few minutes until just warmed through. Avoid microwaving, as it will almost certainly overcook them and lead to a rubbery texture.
For the optimal experience of Perfectly Coddled Eggs, we always recommend making them fresh for each serving!
FAQs About Perfectly Coddled Eggs
- 1. What exactly is an egg coddler?
- An egg coddler is a specialized kitchen utensil, typically a small porcelain or ceramic cup with a lid, designed to cook eggs gently in a hot water bath. It allows for slow, even cooking, resulting in a unique creamy texture for Perfectly Coddled Eggs.
- 2. Why are they called “coddled” eggs?
- The term “coddle” means to treat with extreme care or indulgence, or to cook food gently just below boiling point. This perfectly describes the gentle cooking method used for these eggs, where they are delicately cooked in their individual cups in simmering water.
- 3. Can I make coddled eggs without an actual egg coddler?
- Yes! While an egg coddler is ideal, you can achieve similar results using small ramekins or heatproof custard cups. Simply grease the ramekins, crack in your eggs, cover them with foil or a small plate, and place them in a larger pan with about 1/2 inch of simmering water, ensuring the water doesn’t boil over the sides.
- 4. What’s the difference between poached and coddled eggs?
- Both involve gentle cooking, but poached eggs are cooked directly in simmering water without a shell, while coddled eggs are cooked in their shell or a small covered cup in a water bath. Coddling typically results in a slightly creamier texture and a more contained, often richer, yolk.
- 5. Can I use room temperature eggs for this recipe?
- The recipe specifically calls for cold eggs. Cold eggs allow for a more controlled cooking process, giving you that ideal contrast between set whites and runny yolks. Room temperature eggs might cook a bit faster and could lead to firmer yolks than desired.
- 6. How do I know when my coddled eggs are done?
- For Perfectly Coddled Eggs with runny yolks, 4-5 minutes is the sweet spot. The whites should be set but still tender, and the yolk should be warm and liquid. If you prefer firmer yolks, cook for an additional 1-2 minutes. Practice makes perfect!
- 7. What other ingredients can I add to my coddled eggs?
- The possibilities are endless! Besides cheese and chives, try a dash of hot sauce, a spoonful of salsa, crumbled cooked bacon or ham, a pinch of smoked paprika, truffle oil, or even a tiny bit of cream for extra richness. Experiment and find your favorite combination!
- 8. Are coddled eggs safe to eat with runny yolks?
- For most healthy individuals, eating eggs with runny yolks is considered safe, especially when using fresh, high-quality eggs. If you are pregnant, elderly, or have a compromised immune system, you might prefer to cook your yolks until they are firmer or opt for pasteurized eggs.
- 9. Can I make these Perfectly Coddled Eggs ahead of time?
- While you can store cooked coddled eggs in the fridge for a day or two, they truly lose their unique appeal when not served fresh. The delicate texture and warmth are best experienced immediately. We recommend cooking them just before serving.
- 10. What kind of bread pairs best with Perfectly Coddled Eggs?
- Anything that’s good for dipping! Classic choices include white toast (cut into “soldiers”), sourdough, crusty baguette, or even a soft brioche. The goal is to have something absorbent and sturdy enough to scoop up every last bit of that luscious, runny yolk.
Perfectly Coddled Eggs 🍳
Equipment
- Egg Coddler Pan
Ingredients
- 6 large Eggs cold
- 3/4 teaspoon Sea salt
- 3/8 teaspoon Black pepper
- 6 tablespoons Shredded cheddar cheese optional
- 6 teaspoons Chopped fresh chives optional
- 1 teaspoon Butter or cooking oil for greasing cups
Instructions
- Gently grease the inside of each egg cup in your egg coddler pan with a tiny bit of butter or cooking oil to prevent sticking.
- Pour about a 1/2 inch of water into the main coddler pan (make sure the egg cup section isn't in yet!). Bring this water to a boil over medium-high heat, then reduce the heat to a gentle, rolling simmer.
- Once the water is simmering, carefully place the top section with the greased egg cups into their holders. Crack one cold egg into each cup. Season each egg with a pinch of sea salt and black pepper.
- If you're using them, sprinkle the shredded cheddar cheese and/or chopped fresh chives evenly over the eggs.
- Cover the coddler with its lid and let the eggs cook for 4-5 minutes. This timing gives you beautifully set whites and wonderfully runny yolks. If you prefer your yolks a bit firmer, simply cook for an additional 1-2 minutes.
- Turn off the heat. Using heatproof gloves or oven mitts, carefully lift the hot egg cups out of the coddler. Use a small silicone spatula to gently slide around the edge of each egg to release it, then transfer them to a serving plate. Enjoy your delicious coddled eggs immediately!