
👻 The Cutest (and Creepiest) Apple Snack of the Season
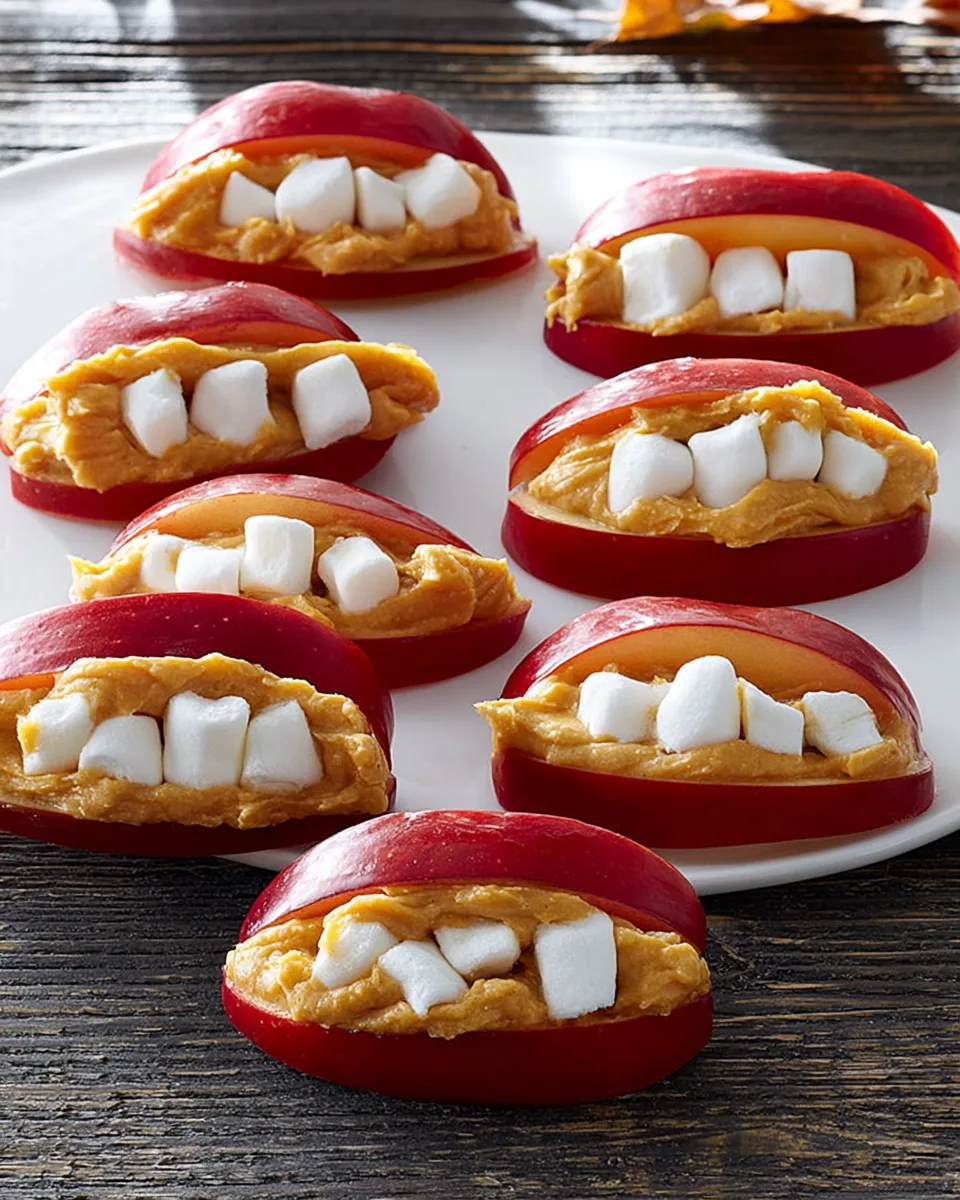
Ghosts and goblins aren’t the only spooky things lurking around this Halloween — these 🍏 Spooky Li’l Lips 👻 are ready to steal the show! Imagine a platter full of glossy red apple “lips” with creamy peanut butter smiles… and maybe a few marshmallow teeth if you’re feeling brave.
They’re healthy enough to eat before trick-or-treating, cute enough to make your kids gasp, and so ridiculously easy that you’ll whip them up in just 20 minutes. No oven, no stress, just a little bit of Halloween magic. Let’s make some lips! 💋
💀 Why You’ll Love This Recipe
- 1. No-Bake & Lightning Fast: Zero oven time. You just slice, mix, and press. Perfect for last-minute Halloween parties or classroom treats.
- 2. Guilt-Free Indulgence: At only 64 calories and 3g net carbs per serving, these little lips won’t break your healthy streak. Protein from peanut butter + fiber from apples = a snack that actually satisfies.
- 3. Kid-Approved & Interactive: Kids love helping to press the “lips” together and adding marshmallow teeth. It’s a craft you can eat!
- 4. Totally Customizable: Swap nut butters, use green apples for zombie lips, or add a drizzle of caramel. The base recipe is just the beginning.
🧾 Ingredients (with measurements)
- 🍎 1 medium red apple
- 🍋 1 teaspoon lemon juice
- 🥜 ¼ cup chunky peanut butter
- 🧀 2 tablespoons reduced-fat cream cheese
- 🌿 ⅛ teaspoon ground cinnamon
- ☁️ Miniature marshmallows (optional, for “teeth”)
🔪 How to Make 🍏 Spooky Li’l Lips 👻 (Step-by-Step)
- Prep the apple: Slice the apple into 16 thin wedges. Toss them immediately with the lemon juice to stop them from turning brown — you want these lips looking fresh!
- Make the filling: In a small bowl, combine the chunky peanut butter, reduced-fat cream cheese, and ground cinnamon. Stir until perfectly smooth and creamy.
- Spread & assemble: Take half of the apple slices (8 wedges) and spread about 2 teaspoons of the peanut butter mixture onto the flat side of each.
- Form the “lips”: Top each with another apple slice (skin side out) and press gently. The red apple skin creates the lipstick effect!
- Add teeth (optional): For a spooky smile, press a few mini marshmallows into the peanut butter filling along the edge so they peek out like little teeth.
- Chill until ready: Pop the assembled lips in the fridge for 10–15 minutes. This helps the cream cheese set so they hold together perfectly.
📌 Pro tip: Slice the apples just before serving for maximum crunch. If you’re making them ahead, a quick spritz of lemon water keeps them fresh!
🎃 How to Serve & Present Your Spooky Lips
These little guys are seriously photogenic. Here’s how to make them the star of your Halloween table:
- 🖤 The Graveyard Platter: Arrange the lips on a black plate with “eyeballs” (mozzarella balls + black olive slices) and pretzel stick “bones.” Serve with a bowl of dark chocolate “dirt” pudding.
- 🎒 Lunchbox Surprise: Pack 2–3 lips in a small container for a school treat. They’ll be the envy of the cafeteria!
- 🥜 Dip & Dunk: Serve with a side of vanilla Greek yogurt or caramel dip for an extra layer of sweetness.
- 🍏 Zombie Variation: Use Granny Smith apples for green “zombie lips” — equally spooky and tangy!
- 🧀 Dairy-Free Twist: Swap cream cheese with dairy-free cream cheese or extra peanut butter. Works like a charm!
🧊 How to Store & How Long It Lasts
Store your 🍏 Spooky Li’l Lips 👻 in an airtight container in the refrigerator. To keep the apples crisp, add a slightly damp paper towel to the container (don’t let it touch the filling directly).
Shelf life: These are best enjoyed within 24 hours of assembly. The apples stay crunchy for about a day, after which the cream cheese softens the texture. You can prep the filling 2 days ahead and slice the apples the day you serve them for the best results.
❓ Frequently Asked Questions
1. Can I use regular cream cheese instead of reduced-fat?
Absolutely! Full-fat cream cheese will make the filling even richer. Just note that the calorie count will be slightly higher.
2. Can I substitute almond butter or sunflower seed butter?
Yes! Almond butter or SunButter work great. SunButter is perfect for nut-free schools — just check the label for added sugar.
3. My apples turned brown even with lemon juice. Help!
Make sure you toss the slices gently right after cutting. You can also use a solution of 1 cup water + 1 tablespoon lemon juice for a more thorough soak.
4. Can I make these dairy-free?
Yes! Use a dairy-free cream cheese alternative or simply omit the cream cheese and use 100% peanut butter. The texture will be slightly drier but still delicious.
5. Are these suitable for nut-free classrooms?
Only if you use a nut-free spread like SunButter (sunflower seed butter) and confirm that your other ingredients are nut-free.
6. Can I use honeycrisp, gala, or fuji apples?
Yes, any crisp apple works! Red apples give a brighter “lipstick” look, but green or yellow apples are fun for monster variations.
7. The peanut butter mixture feels too stiff. Can I thin it out?
Add 1–2 teaspoons of milk (dairy or plant-based) or a tiny drizzle of honey and stir again. This will soften the “frosting” perfectly.
8. How far in advance can I prep the apple slices?
You can slice and store the apples in lemon water in the fridge for up to 4 hours. Pat them dry before assembling.
9. Can I add food coloring to the filling?
Sure! A drop of black or orange food coloring makes the filling extra spooky. Gel colors work better than liquid to keep the texture thick.
10. What if I don’t have cinnamon?
No problem! The cinnamon adds warmth, but it’s totally optional. You can replace it with a pinch of nutmeg or just leave it out.
🎃 Boo! 🎃 Thanks for stopping by. These 🍏 Spooky Li’l Lips 👻 are guaranteed to make your Halloween healthier, cuter, and way more fun!
“`
Spooky Li'l Lips
Equipment
- Mixing Bowl
- Knife
Ingredients
- 1 medium red apple
- 1 tsp lemon juice
- 1/4 cup chunky peanut butter
- 2 tbsp reduced-fat cream cheese
- 1/8 tsp ground cinnamon
- miniature marshmallows optional, for teeth
Instructions
- Slice the apple into 16 thin wedges and toss them with the lemon juice to keep them fresh.
- In a small bowl, stir together the peanut butter, cream cheese, and cinnamon until smooth.
- Spread about 2 teaspoons of the peanut butter mixture onto the flat side of half the apple slices.
- Top each with another apple slice, pressing gently to form little “lips.”
- If you want a spooky smile, press a few mini marshmallows into the peanut butter to look like teeth.
- Place the lips in the fridge until you’re ready to serve – they stay crisp and tasty!