
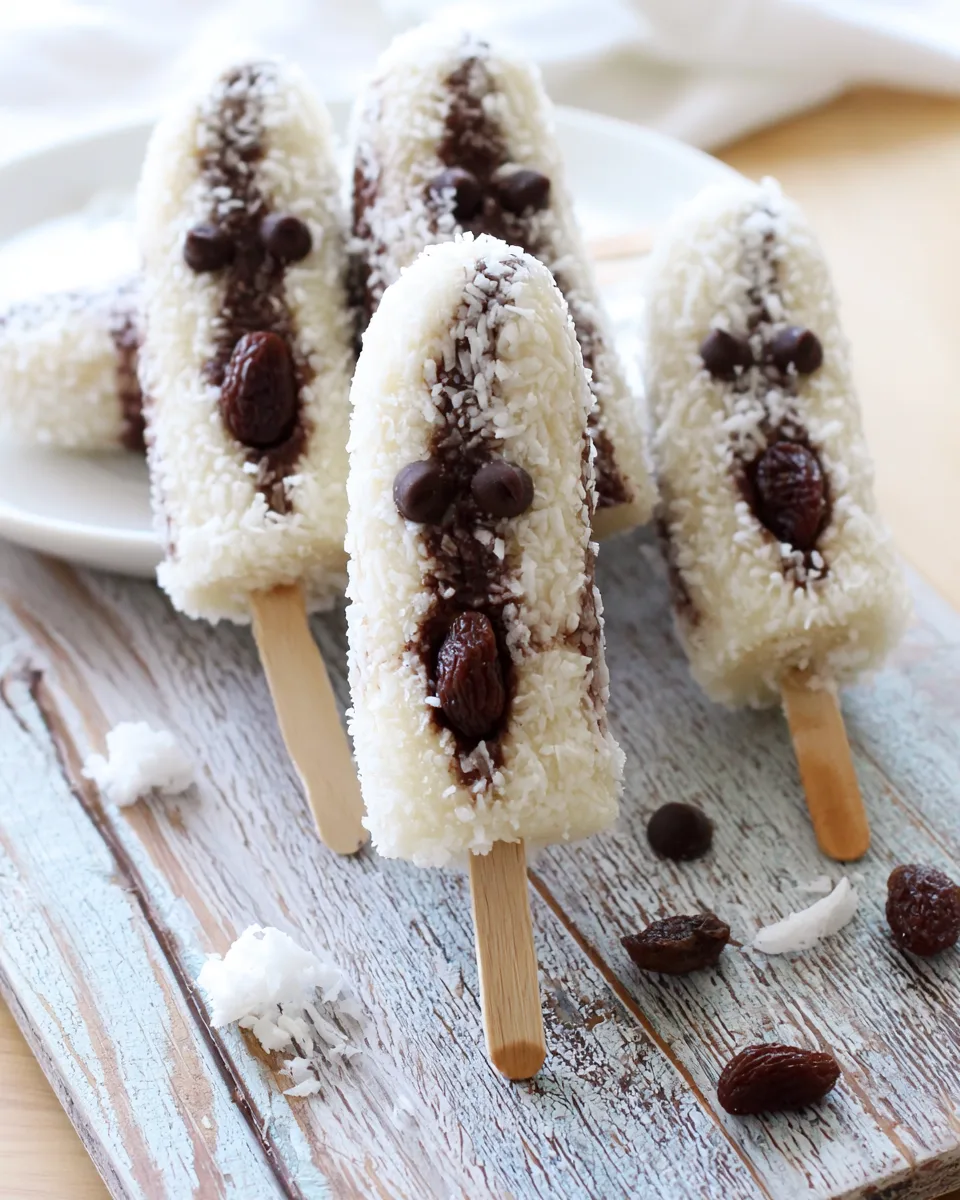
Ghosts, goblins and… frozen bananas? Yes please! Meet your new spooky‑season MVP: 🎃 Frozen Coconut Banana Pops. These little pops are creepy‑cute, ridiculously easy, and made with just a handful of clean ingredients. Think creamy banana, a silky coconut‑honey glaze, crunchy shredded coconut, and a face that will make you smile (or shriek with delight). They’re healthy enough for a weekday snack, festive enough for a Halloween party, and gluten‑free by nature. Ready to make a treat that actually treats your body right? Let’s freeze some fun.
Why You’ll Love This Recipe
- Healthier than candy: No refined sugar, no weird additives. Just fruit, coconut oil, a drizzle of honey, and chocolate chips for eyes.
- Super simple – 15 minutes of hands‑on work: Peel, stick, freeze, glaze, decorate. Even little helpers can join in (they’ll love making ghost faces).
- Totally gluten‑free & dairy‑free: Coconut oil, shredded coconut, and bananas keep it safe for almost every diet. No gluten, no lactose, no stress.
- Customisable & adorable: Turn them into ghosts, monsters, pumpkins – you name it. Each pop is a tiny canvas for Halloween creativity.
Ingredients
- 🍌 3–4 ripe bananas (peeled)
- 🥢 6–8 popsicle sticks
- 🍫 ¼ cup chocolate chips
- 🫘 ¼ cup raisins
- 🥥 ¼ cup coconut oil
- 🍯 2 tablespoons honey
- 🥥 ½ cup unsweetened shredded coconut
- (Optional: 1–2 tbsp cocoa powder for a chocolate twist)
How to Make Frozen Coconut Banana Pops
- Prep the bananas: Peel 3–4 ripe bananas and slice each in half crosswise. Gently push a popsicle stick into the flat end of each half.
- First freeze: Place the banana pops on a parchment‑lined tray and freeze for at least 1 hour, until solid.
- Make the glaze: In a small bowl, melt ¼ cup coconut oil with 2 tablespoons honey. Whisk until smooth and glossy.
- Glaze the frozen bananas: Take the pops out of the freezer. Using a spoon, drizzle the coconut‑honey glaze evenly over each pop, turning to coat all sides.
- Add the coconut coating: Immediately roll the glazed pop in ½ cup shredded coconut, pressing lightly so it sticks. Return to the parchment paper.
- Create spooky faces: Press two chocolate chips into the top half for eyes and a raisin right below for the mouth. (Dip the chips in a little glaze if they don’t stick easily.)
- Final freeze: Place the decorated pops back in the freezer for at least another hour, until completely firm. Then enjoy your creepy‑cute masterpiece! 🎃
💡 Pro tip: Work quickly when glazing – the colder the banana, the easier the coconut sticks. If the glaze thickens, re‑warm it for a few seconds.
Ways to Present & Serve
🎃 Ghost pops: Classic white coconut ghosts with chocolate‑chip eyes and raisin mouths. Serve upright in a small pumpkin or a foam block covered in fall leaves.
🕸️ Monster pops: Mix cocoa powder into the glaze for a chocolate base, then roll in toasted coconut or crushed nuts. Use candy eyes and a licorice string mouth.
🎃 Pumpkin pops: Before freezing, press a small green raisin or dried cranberry onto the top as a stem. Use a dab of orange food colouring in the glaze (natural, from turmeric) for a pumpkin hue.
🥥 Party platter: Arrange pops on a black platter with a dusting of shredded coconut “snow.” Add mini pumpkins and bat‑shaped napkins for instant Halloween vibes.
🍦 As a dessert board: Serve alongside dark chocolate dip, extra shredded coconut, and sprinkles so guests can customise their own.
How to Store & Shelf Life
Freezer storage: Place the fully frozen pops in a single layer inside an airtight container or a zip‑top bag. Separate layers with parchment paper so the faces don’t get squished. They stay perfect for up to 2 weeks – though they’ll likely vanish much sooner.
When to serve: For the best texture, enjoy within the first week. The bananas won’t develop ice crystals if well sealed. If you’re prepping for a party, you can make them 3–4 days ahead and keep them in the freezer until showtime.
❄️ Note: Don’t refreeze after thawing. Once thawed, they become mushy. Serve straight from the freezer – they’ll soften slightly within 2–3 minutes, which is perfect for creamy bites.
FAQs – Frozen Coconut Banana Pops
Yes, as long as they are ripe and whole. Thaw them slightly until soft enough to insert the stick, then refreeze as directed. Fresh ripe bananas yield the creamiest result.
Absolutely! Skip the honey and use a sugar‑free syrup (like monk fruit or allulose) to mix with the coconut oil. The raisins and chocolate chips add a little natural sweetness too.
The glaze needs to be warm enough to flow but not hot. Also, make sure the bananas are thoroughly frozen – a colder surface makes the glaze set on contact and holds the flakes better.
Short wooden skewers, pretzel sticks (for a salty crunch), or even sturdy cinnamon sticks work. Just ensure they are food‑safe and sturdy enough to hold the weight.
Yes, but supervise if using chocolate chips (choking hazard for very young children). For toddlers under 3, you can replace the chips with small banana slices or raisins cut in half.
Sure – mix a scoop of unflavoured protein powder or ground flax into the shredded coconut before rolling. The glaze will help it adhere. Keep the mix dry to avoid clumping.
Coconut oil and honey can separate if not whisked enough or if the oil is too hot. Warm them gently together, then whisk vigorously. If it splits, add a pinch of lecithin or simply re‑emulsify with a mini immersion blender.
They are already dairy‑free – coconut oil and shredded coconut replace butter or cream. Double check your chocolate chips (many are dairy‑free, but some contain milk solids).
No – this is a no‑bake, frozen recipe. Baking would turn the bananas into mush and melt the decorations. Keep them in the freezer for the iconic creamy‑frozen texture.
Use finely chopped nuts (almonds, pecans), crushed freeze‑dried strawberries, or even crushed graham crackers (gluten‑free if needed). The glaze will help any coating stick.
Enjoy your 🎃 Frozen Coconut Banana Pops – healthy, spooky, and absolutely delicious! Share them with your favourite little ghouls.
“`
Frozen Coconut Banana Pops
Equipment
- Popsicle Sticks
- Small tray
- Parchment Paper
Ingredients
Base
- 3-4 ripe bananas, peeled and halved
Glaze & Decoration
- 1/4 cup coconut oil
- 2 tbsp honey
- 1/2 cup unsweetened shredded coconut
- 1/4 cup chocolate chips for eyes
- 1/4 cup raisins for mouths
Instructions
- Peel the bananas and slice each one in half crosswise. Gently push a popsicle stick into the flat end of each half.
- Place the banana pops on a small tray lined with parchment paper. Freeze for at least 1 hour until solid.
- In a small bowl, melt the coconut oil and honey together. Whisk until smooth and well combined.
- Take the frozen bananas out of the freezer. Using a spoon, drizzle the coconut-honey glaze evenly over each pop, making sure they are well coated.
- Immediately roll the glazed banana in shredded coconut flakes, pressing lightly so the coconut sticks. Return to the parchment paper.
- To make spooky ghost faces, press two chocolate chips into the top half for eyes and a raisin below for the mouth. (If needed, dip the chips in a little glaze first to help them stick.)
- Place the decorated pops back in the freezer for at least another hour to firm up completely.