Why You’ll Love These Delightful No-Bake Grasshopper Mini Cheesecakes
Prepare to fall head over heels for these individual servings of pure bliss! Here are four irresistible reasons why these Delightful No-Bake Grasshopper Mini Cheesecakes will become your new go-to dessert:
- Effortlessly Easy & No Oven Required: Ditch the baking sheets and preheating! This recipe is a dream for anyone who loves desserts but hates turning on the oven, especially during warmer months. It’s perfect for beginners and seasoned dessert enthusiasts alike.
- Irresistible Mint-Chocolate Fusion: The classic Grasshopper flavor combination of cool mint and rich chocolate comes alive in every bite. The vibrant mint filling paired with the crunchy OREO crust is a match made in dessert heaven, offering a refreshing twist on a beloved classic.
- Perfectly Portioned & Party-Ready: These mini cheesecakes are designed for convenience and charm. Their individual size makes them ideal for entertaining, potlucks, or simply portion control (if you can resist having just one!). No slicing, no mess – just grab and enjoy!
- Kid-Friendly Options Available: Want to share the minty joy with the whole family? We’ve included an easy substitution for the liqueur, ensuring everyone can enjoy these vibrant treats. Add a touch of green food coloring, and watch little eyes light up!
Are you ready for a dessert that’s as refreshing as a cool breeze on a summer day and as indulgent as your favorite chocolate bar? Look no further! Get ready to whisk, chill, and delight in the magic of our Delightful No-Bake Grasshopper Mini Cheesecakes. Imagine: a rich, crunchy OREO crust providing the perfect foundation for a cloud-like, intensely minty, and wonderfully creamy cheesecake filling. It’s like a bite of mint chocolate heaven, but without ever having to turn on your oven!
These mini marvels are not just incredibly simple to make; they’re also showstoppers, perfect for any gathering, holiday spread, or simply a treat to brighten your day. Whether you’re a mint chocolate fanatic or just looking for an easy, impressive dessert, these Grasshopper Mini Cheesecakes are about to become your new obsession. Let’s dive into how to create these little cups of joy!
Ingredients You’ll Need for These Delightful No-Bake Grasshopper Mini Cheesecakes
Gather your ingredients to create these scrumptious no-bake treats:
For the Crunchy OREO Crust:
- 🍪 2 cups OREO cookie crumbs (about 24 cookies)
- 🍚 ¼ cup granulated sugar
- 🧈 8 tablespoons (1 stick) salted butter, melted
For the Creamy Mint Filling:
- 🥛 1 ½ cups cold heavy whipping cream
- 🧀 16 ounces full-fat cream cheese, softened
- 🍚 ¼ cup granulated sugar
- 🌿 3 ounces creme de menthe liqueur OR 1 ½ teaspoons mint extract (for a kid-friendly version, add a few drops of green food coloring if desired for that vibrant color!)
- 🌰 1 teaspoon vanilla extract
Step-by-Step Directions to Create Your Delightful No-Bake Grasshopper Mini Cheesecakes
Follow these easy steps to bring your Delightful No-Bake Grasshopper Mini Cheesecakes to life:
- Prep Your Pan: First things first, line a 12-cup muffin pan with paper liners. This simple step is your secret weapon for making serving an absolute breeze!
- Whip Up the Easy Crust: In a medium bowl, combine the crushed OREO cookie crumbs, sugar, and the irresistible melted butter. Stir everything together until it’s thoroughly mixed and looks like wet sand.
- Form the Firm Base: Divide this crumb mixture evenly among the 12 muffin cups. Take the bottom of a small cup or a measuring cup and use it to firmly press the crust mixture into the bottom of each liner. Once all crusts are formed, place the muffin pan into the freezer to chill while you prepare the filling.
- Whip the Cream: Using a stand mixer fitted with a whisk attachment (or a trusty hand mixer), beat the cold heavy whipping cream on medium-high speed until beautiful, stiff peaks form. Be careful not to over-whip! Set this cloud of whipped cream aside gently.
- Create the Dreamy Filling: In the same mixer bowl (no need to wash it yet – yay for fewer dishes!), switch to the paddle attachment. Add the softened cream cheese, sugar, creme de menthe (or your mint extract and optional green food coloring for that vibrant hue), and vanilla extract. Mix on low speed until the mixture is wonderfully smooth and creamy, making sure to scrape down the sides of the bowl as needed to ensure everything is perfectly incorporated.
- Fold it Together: Now for the magic! Gently fold the whipped cream into the mint cream cheese mixture until just combined. Be careful not to overmix, as you want to keep that light, airy, and fluffy texture!
- Fill and Chill: Spoon the delightful mint cheesecake filling evenly over your chilled OREO crusts. Transfer the entire muffin pan to the refrigerator and let these mini cheesecakes chill for at least 4 hours, or ideally until they are perfectly firm and set. Patience is a virtue, and it will be rewarded!
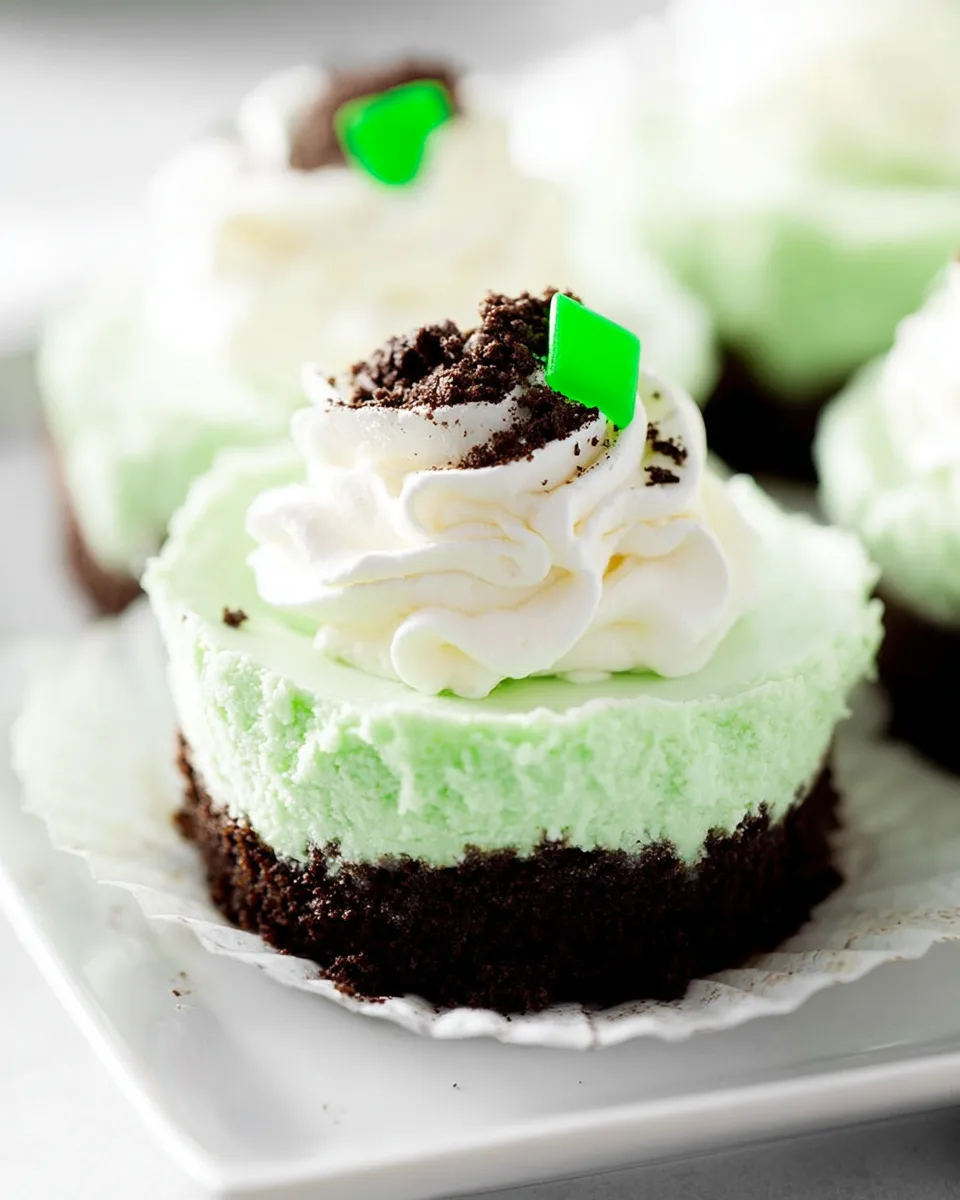
- Garnish and Enjoy: Once thoroughly firm, carefully remove them from the muffin pan and gently peel off the liners. Now for the fun part – feel free to garnish with a fresh mint leaf, a dollop of extra whipped cream, a sprinkle of OREO crumbs, or a piece of Andes mint for that extra special touch! Then, prepare to be delighted!
Presenting and Serving Your Delightful No-Bake Grasshopper Mini Cheesecakes
These Delightful No-Bake Grasshopper Mini Cheesecakes are not just delicious; they’re also incredibly versatile when it comes to presentation and serving! Their individual size makes them perfect for a variety of occasions:
- Classic Garnish: As suggested in the recipe, a fresh mint leaf offers a beautiful pop of color and a subtle aromatic touch. A dollop of freshly whipped cream adds extra indulgence, and a sprinkle of leftover OREO crumbs or a piece of chopped Andes mint enhances both flavor and texture.
- Festive Flair: Thinking holidays? These green beauties are perfect for St. Patrick’s Day celebrations or adding a vibrant touch to your Christmas dessert spread. Consider adding a small candy cane shard for a festive winter look!
- Dessert Platter Perfection: Arrange them on a large platter alongside other mini desserts for an impressive spread. Their individual portions mean no fuss with cutting or serving spoons – guests can simply pick their favorite.
- Party & Potluck Powerhouse: Thanks to their no-bake nature and sturdy individual servings, these cheesecakes are ideal for taking to gatherings. Pack them in a container and they’re ready to impress without any last-minute fuss.
- Coffee & Tea Companion: These mini cheesecakes pair wonderfully with a hot cup of coffee, a refreshing iced tea, or even a glass of milk for a delightful afternoon treat.
- Serve Chilled: Always ensure they are thoroughly chilled before serving. This not only guarantees the best firm texture but also enhances the refreshing mint flavor, making each bite truly delightful.
Storage and Shelf Life for Your Delightful No-Bake Grasshopper Mini Cheesecakes
So, you’ve made a batch of these glorious Delightful No-Bake Grasshopper Mini Cheesecakes, and if by some miracle there are any left, here’s how to store them to keep them tasting their best:
- Refrigeration is Key: These cheesecakes absolutely need to be stored in the refrigerator due to their dairy-based filling. Place them in an airtight container to prevent them from absorbing any unwanted odors from other foods in your fridge and to maintain their freshness.
- How Long Do They Last? When stored properly in an airtight container in the refrigerator, your mini cheesecakes will stay wonderfully fresh and delicious for about 3 to 5 days. The crust might soften slightly over time, but the filling should remain creamy and flavorful.
- Can You Freeze Them? While you technically *can* freeze these cheesecakes, the texture might change slightly upon thawing. The OREO crust can become a bit soggy, and the creamy filling might lose some of its original airy consistency. If you choose to freeze, place them in a single layer on a baking sheet until solid, then transfer to an airtight freezer-safe container or bag for up to 1 month. Thaw in the refrigerator for several hours before serving. For the absolute best texture and flavor, we highly recommend enjoying them fresh from the fridge.
FAQs About These Delightful No-Bake Grasshopper Mini Cheesecakes
Got questions about whipping up these fantastic Delightful No-Bake Grasshopper Mini Cheesecakes? We’ve got answers!
- Q1: Can I make these ahead of time for a party?
Absolutely! These cheesecakes are perfect for making ahead. You can prepare them 1-2 days in advance and keep them chilled in an airtight container in the refrigerator. - Q2: What if I don’t have a stand mixer?
No problem! A hand mixer will work perfectly for both whipping the cream and mixing the cream cheese filling. Just be sure to use a bowl large enough to prevent splatters. - Q3: Can I use different cookies for the crust?
Yes, you can! While OREOs provide that classic mint-chocolate base, you could experiment with graham cracker crumbs, chocolate wafer cookies, or even shortbread cookies for a different flavor profile. - Q4: How do I ensure these cheesecakes are kid-friendly?
For a kid-friendly version, simply use 1 ½ teaspoons of mint extract instead of the creme de menthe liqueur. For that signature green color, add a few drops of green food coloring to the cream cheese mixture until you reach your desired shade. - Q5: Why did my filling not set properly?
There could be a few reasons: insufficient chilling time (they need at least 4 hours, ideally longer), overmixing the whipped cream (which can cause it to break down), or not having your cream cheese softened enough before mixing, which can lead to lumps and an inconsistent texture. - Q6: Can I make this recipe as a full-sized cheesecake?
Yes, you can! You would need to increase the quantities slightly (e.g., 2.5-3 cups of OREO crumbs for the crust, and 24 oz cream cheese for the filling) and use a 9-inch springform pan. The chilling time would also need to be extended, likely to 6-8 hours or overnight. - Q7: What’s the best way to get them out of the muffin pan and liners cleanly?
Ensure they are thoroughly chilled and firm. Gently lift the cheesecakes out of the muffin pan by the paper liners. To remove the liner, peel it downwards and away from the cheesecake carefully. A thin, offset spatula can sometimes help if they’re a bit sticky. - Q8: Can I add mini chocolate chips to the filling?
Absolutely! Mini chocolate chips would be a fantastic addition, adding another layer of chocolatey goodness and texture to the creamy mint filling. Fold them in gently at the very end when combining the whipped cream and cream cheese mixture. - Q9: What does “softened cream cheese” mean?
Softened cream cheese means it should be at room temperature. This allows it to mix smoothly with the other ingredients, preventing lumps and ensuring a beautifully creamy, consistent filling. Take it out of the fridge at least 30-60 minutes before you plan to use it. - Q10: What is the minimum chill time for these cheesecakes?
The minimum chill time is 4 hours, but for the firmest and best-set cheesecakes, we recommend chilling them for at least 6 hours or even overnight. This allows all the ingredients to fully set and marry their flavors.
Delightful No-Bake Grasshopper Mini Cheesecakes 🍀
Equipment
- 12-cup muffin pan
- Paper Liners
- Stand Mixer
- Whisk Attachment
- Paddle attachment
Ingredients
For the Crunchy OREO Crust:
- 2 cups OREO cookie crumbs (about 24 cookies)
- 0.25 cup granulated sugar
- 8 tablespoons salted butter (1 stick), melted
For the Creamy Mint Filling:
- 1.5 cups cold heavy whipping cream
- 16 ounces full-fat cream cheese softened
- 0.25 cup granulated sugar
- 3 ounces creme de menthe liqueur OR 1 ½ teaspoons mint extract (for a kid-friendly version, add a few drops of green food coloring if desired for that vibrant color!)
- 1 teaspoon vanilla extract
Instructions
- 1. Prep Your Pan: First, line a 12-cup muffin pan with paper liners. This simple step makes serving a breeze!
- 2. Whip Up the Easy Crust: In a medium bowl, combine the crushed OREO cookie crumbs, sugar, and melted butter. Stir everything together until it’s thoroughly mixed.
- 3. Form the Firm Base: Divide this crumb mixture evenly among the 12 muffin cups. Use the bottom of a small cup or a measuring cup to firmly press the crust mixture into each liner. Place the muffin pan into the freezer while you prepare the filling.
- 4. Whip the Cream: Using a stand mixer fitted with a whisk attachment (or a hand mixer), beat the cold heavy whipping cream on medium-high speed until beautiful, stiff peaks form. Set this aside gently.
- 5. Create the Dreamy Filling: In the same mixer bowl (no need to wash it yet!), switch to the paddle attachment. Add the softened cream cheese, sugar, creme de menthe (or mint extract and optional green food coloring), and vanilla extract. Mix on low speed until the mixture is wonderfully smooth and creamy, making sure to scrape down the sides of the bowl as needed.
- 6. Fold it Together: Gently fold the whipped cream into the mint cream cheese mixture until just combined. Be careful not to overmix, as you want to keep that light, airy texture!
- 7. Fill and Chill: Spoon the delightful mint cheesecake filling evenly over your chilled OREO crusts. Transfer the entire muffin pan to the refrigerator and let these mini cheesecakes chill for at least 4 hours, or until they are perfectly firm and set.
- 8. Garnish and Enjoy: Once firm, carefully remove them from the muffin pan and peel off the liners. Feel free to garnish with a fresh mint leaf, a dollop of extra whipped cream, a sprinkle of OREO crumbs, or a piece of Andes mint for that extra special touch!
Notes
Nutrition Information (per serving):
- Calories: 362kcal
- Total Carbs: 22g
- Net Carbs: 21g
- Fats: 28g
- Protein: 3g