
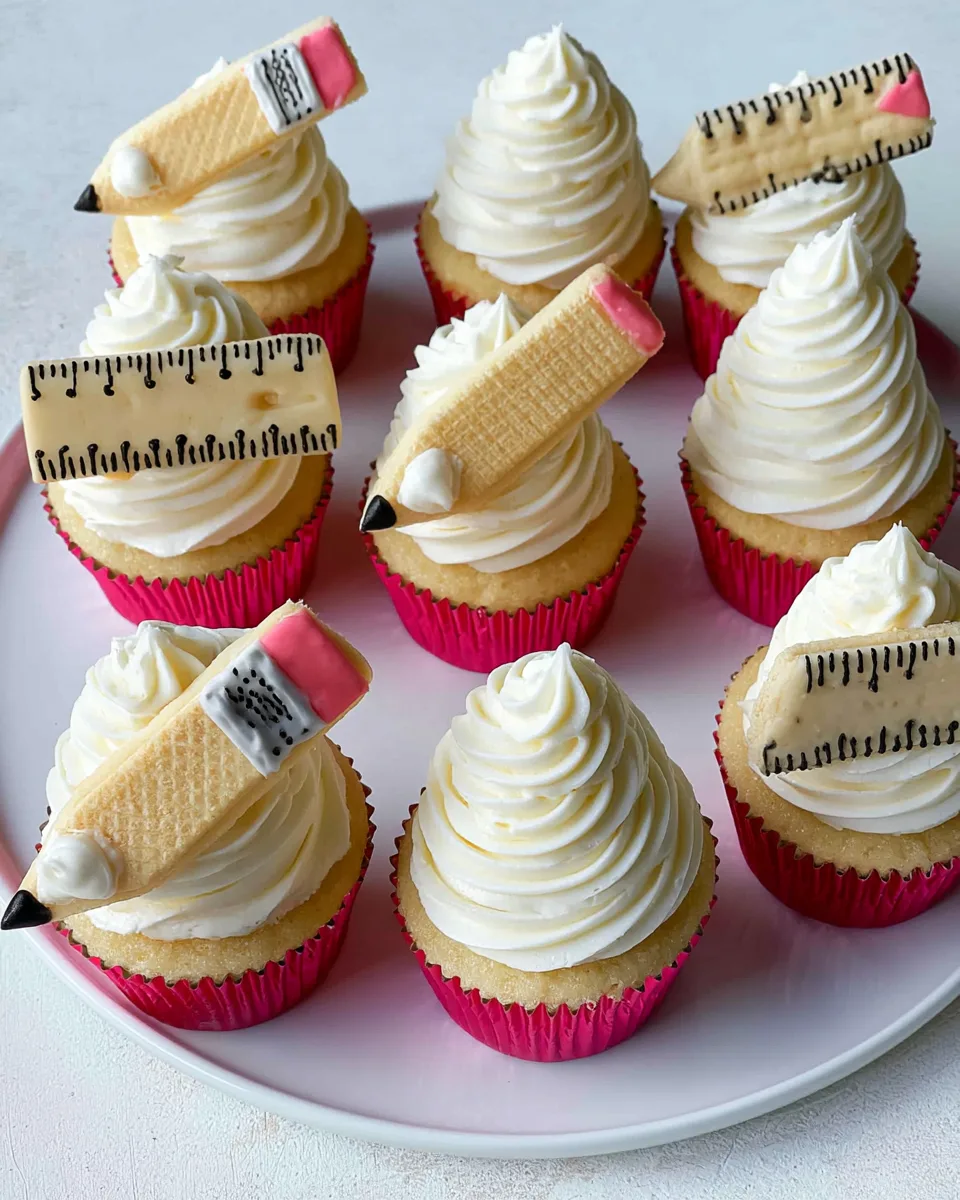
✏️ Get Ready for the Best Classroom Treat Ever!
Imagine pulling a tray of cupcakes out of the oven that look exactly like tiny pencils and rulers – seriously, your kids will think you’re a magician. 📚 Back-to-School Pencil & Ruler Cupcakes aren’t just desserts; they’re edible school supplies! The vanilla wafer “pencil” has a pink eraser, a chocolate‑chip lead, and a buttercream wood tip, while the “ruler” wafer comes with black graduation lines. Stacked on a fluffy vanilla buttercream swirl and baked in pink foil liners, these cupcakes scream “first day of school” fun. Whether you’re sending them in a lunchbox, surprising the classroom, or just celebrating the end of summer, this recipe makes everyone smile. Ready to craft your own adorable stationery treats? Let’s get started!
🌟 Why You’ll Love This Recipe
- Super‑creative, minimal effort: The “pencil” and “ruler” are made from store‑bought vanilla wafers – no special baking skills needed. You just pipe, dip, and press!
- Kid‑friendly & lunchbox‑approved: These cupcakes are a hit at class parties, after‑school snacks, and even in lunchboxes. They stay fresh and travel well (see storage tips below).
- Customizable in a snap: Switch up wafer colors, use different candy melts, or add sprinkles. Want a “chalkboard” theme? Swap pink for gray melts – the ideas are endless.
- Perfect for back‑to‑school gifting: Wrap each cupcake in a clear bag with a ribbon; they make adorable teacher gifts, party favors, or “happy first day” surprises for your own kids.
🧑🍳 Ingredients – Makes 12 Cupcakes
- 🧁 1 box vanilla cake mix (plus ingredients called for on the box – usually eggs, oil, water)
- 🧈 2 batches easy vanilla buttercream (homemade or store‑bought – you need about 4 cups total)
- 🍪 12 vanilla wafer cookies (such as Nilla wafers)
- 🌸 ½ cup pink candy melts (or pink food coloring + ½ cup white frosting)
- 🖤 2 tablespoons black frosting (store‑bought tube works great for piping thin lines)
- 🍫 6 mini chocolate chips (for pencil “leads”)
- 🍦 Extra white frosting or buttercream (about 2 tablespoons, for pencil “wood”)
📝 Step‑by‑Step: How to Make 📚 Back‑to‑School Pencil & Ruler Cupcakes
- Bake the cupcakes: Prepare the vanilla cake mix according to the box instructions. Line a 12‑cup muffin tin with pink foil liners and fill each ⅔ full. Bake at 350°F (175°C) for 18–22 minutes or until a toothpick comes out clean. Cool completely on a wire rack.
- Make the pencil cookies (6 wafers): Take 6 vanilla wafers. Using a sharp knife, carefully cut the narrow end of each cookie into a point – like sharpening a pencil. Melt the pink candy melts in a small bowl (microwave in 20‑second bursts, stirring). Spread a tiny dab of melted pink on the flat, squared‑off end of each cookie to form the “eraser.” Let set for 2 minutes. Then spread a tiny bit of plain white frosting on the pointed end for the “wood.” Press one mini chocolate chip (tip pointing outward) onto the frosting to create the lead. Let the frosting firm up.
- Make the ruler cookies (6 wafers): Fill a small piping bag (or a ziplock bag with a tiny snipped corner) with the black frosting. On the remaining 6 wafers, pipe short, even lines across one side – space them about ¼ inch apart. Make a few lines longer at the “1,” “5,” and “10” marks to look like a real ruler. Let the icing dry for 10 minutes.
- Assemble the cupcakes: Fit a piping bag with a large star tip (like Wilton 1M) and fill with vanilla buttercream. Pipe a generous swirl onto each cooled cupcake. Gently press one decorated wafer (pencil or ruler) into the buttercream on top, standing upright or at a slight angle. Repeat for all 12 cupcakes – you’ll have 6 pencil cupcakes and 6 ruler cupcakes.
- Final touch (optional): For extra fun, sprinkle a few rainbow jimmies or edible glitter over the buttercream before adding the wafer. Serve immediately or store (see below).
🎨 Creative Ways to Present & Serve
These cupcakes are begging to be styled! Here are a few ideas:
- Lunchbox surprise: Wrap each cupcake tightly in plastic wrap or a reusable silicone cupcake container. Place it inside the lunchbox with an apple and a juice box – your kid will feel like the coolest student in the cafeteria.
- Classroom party platter: Arrange 12 cupcakes on a large chalkboard‑style serving board. Write “Welcome Back!” with chalk markers around the edges. Let each child pick their own “pencil” or “ruler” cupcake.
- Teacher gift box: Place 4–6 cupcakes in a clear bakery box tied with a red ribbon and a tag that says “Thanks for sharpening our minds!” Pair with a mini hand sanitizer or a cute pencil – adorable and heartfelt.
- Individual goody bags: Slip each cupcake into a cellophane bag, secure with a twist tie, and attach a label that reads “You’ve got this school year!” Perfect for after‑school carpool treats.
- The “ruler” twist: For a math‑themed party, use only ruler cookies and pipe tiny numbers (1, 2, 3…) on the wafers. Add a mini calculator on top for a STEM‑inspired dessert table.
🧊 How to Store & How Long Do They Last?
Room temperature: Place the assembled cupcakes in an airtight container (if you stack them, use parchment paper between layers). They stay fresh for 2 days at room temperature – the buttercream will hold its shape, and the wafers will stay crisp.
Refrigerator: If you need to prep ahead, you can refrigerate the cupcakes (un‑decorated) for up to 3 days, then pipe buttercream and add wafers on the day you serve. Once decorated, refrigeration is fine for 1–2 days, but the wafers may soften slightly. Pro tip: Let refrigerated cupcakes sit out for 15 minutes before eating so the buttercream softens and the wafer regains some crunch.
Freezer: You can freeze the plain, unfrosted cupcakes for up to 2 months. Thaw overnight in the fridge, then bring to room temperature before frosting and decorating. Do not freeze the assembled cupcakes – the wafers will get soggy.
❓ Frequently Asked Questions
- Can I use homemade cake batter instead of a box mix? Absolutely! Use your favorite vanilla cupcake recipe – enough for 12 cupcakes. Just make sure they cool completely before frosting.
- Where can I find pink candy melts? Most craft stores (Michaels, Jo‑Ann), grocery stores with baking aisles, or online retailers. If you can’t find them, mix ½ cup white frosting with a drop of pink food coloring.
- What if I don’t have a star piping tip? No problem – use a zip‑top bag with a corner snipped off, or simply spread the buttercream with a knife in a swirl shape. The wafer will hide any imperfections!
- Can I make the pencil cookies ahead of time? Yes! Store the decorated wafers (pencils and rulers) in an airtight container at room temperature for up to 5 days. Assemble with buttercream only when you’re ready to serve.
- How do I pipe ruler lines without a piping bag? Dip a toothpick into black frosting and draw thin lines onto the wafer. It takes a little more time but works beautifully.
- Are these safe for kids with nut allergies? Most vanilla wafers and cake mixes are nut‑free, but always check labels. The candy melts may be processed on shared equipment – use nut‑free chocolate chips if needed.
- Can I use chocolate cake mix instead of vanilla? Sure! The contrast of a dark cupcake with the white buttercream and bright wafers looks striking. It will taste like a double‑chocolate treat.
- My buttercream is too soft – what do I do? Chill it in the fridge for 15 minutes, then re‑whip. If it’s still loose, add a spoonful of powdered sugar until it holds a stiff peak.
- How can I make the eraser “pink” without candy melts? Tint a small amount of white frosting with red food coloring to make pink, then spread it on the wafer. It works perfectly.
- What if kids don’t like buttercream? Swap the buttercream for stabilized whipped cream (use gelatin or cream cheese) or a cream cheese frosting. Just note that whipped cream will need refrigeration.
🎉 Enjoy your 📚 Back‑to‑School Pencil & Ruler Cupcakes – the yummiest way to say goodbye to summer! 🖍️
“`
Back-to-School Pencil & Ruler Cupcakes
Equipment
- Cupcake tin
- Piping bag
- Star piping tip
Ingredients
Cupcakes
- 1 box vanilla cake mix (prepared as directed on box)
- 2 batches easy vanilla buttercream
Decorations
- 12 vanilla wafer cookies
- 0.5 cup pink candy melts or pink food coloring + white frosting
- 2 tbsp black frosting for ruler lines
- 6 mini chocolate chips
- white frosting for pencil wood
Instructions
- Bake the cake mix into 12 cupcakes using pink foil liners. Let them cool completely.
- Make Pencil Cookies: Take 6 vanilla wafers. Using a sharp knife, cut the narrow end of each cookie into a point. Melt pink candy melts and spread a little on the flat end for the eraser. Spread a tiny bit of white frosting on the pointed end for the "wood," then press one mini chocolate chip onto the tip for the "lead." Let set.
- Make Ruler Cookies: For the other 6 wafers, use a piping bag to pipe short, even lines across one side of each cookie, making a few lines longer at the "1," "5," and "10" marks. Let the icing dry.
- Assemble: Once the cupcakes are cool, pipe a big swirl of vanilla buttercream on each. Gently press one decorated wafer cookie into the frosting.