Picture this: the sun is shining, the air is warm, and you’re craving something incredibly delicious, refreshingly cool, and utterly guilt-free. But turning on the oven? No thanks! Good news, sunshine seeker! We’ve got the perfect no-bake solution that will make your taste buds sing and keep your kitchen cool. Get ready to dive into the world of our spectacular Chilled Summer Peanut Butter Dream Bars. These aren’t just dessert; they’re a mini-vacation for your palate, blending rich peanut butter, creamy chocolate, and a delightfully crumbly crust into one unforgettable, easy-to-make treat.
Why You’ll Love These Chilled Summer Peanut Butter Dream Bars
- No-Bake Bliss: Keep your kitchen cool and your energy levels high! These bars require zero oven time, making them the ultimate summer dessert for those sweltering days.
- Keto & Low-Carb Friendly: Indulge without the guilt! Crafted with sugar substitutes and low-carb flours, these bars fit perfectly into your keto or low-carb lifestyle, proving that healthy can still be incredibly delicious.
- Peanut Butter & Chocolate Paradise: It’s a classic for a reason! The harmonious blend of creamy peanut butter and smooth chocolate is pure magic, creating a dessert that’s rich, satisfying, and utterly decadent.
- Effortlessly Easy: With simple ingredients and straightforward steps, even novice bakers (or non-bakers!) can whip up these dream bars in no time. Minimal effort for maximum deliciousness – what’s not to love?
Ingredients for Your Chilled Summer Peanut Butter Dream Bars
Crust:
- 🌰 1 1/4 cups Almond Flour
- 🥥 1/3 cup Coconut Flour
- sweetener 1/3 cup Powdered Sugar Substitute
- 🧈 6 tablespoons Melted Butter
Peanut Butter Cheesecake Layer:
- 🧀 8 ounces Softened Cream Cheese
- 🥜 1/2 cup Creamy Peanut Butter
- 🍦 1/2 teaspoon Vanilla Extract
- sweetener 1/3 cup Powdered Sugar Substitute
Chocolate Topping:
- 🍫 2/3 cup Sugar-Free Chocolate Chips
- 🥛 1/4 cup Heavy Whipping Cream
- 🧀 8 ounces Softened Cream Cheese
- 🍦 1 teaspoon Vanilla Extract
- sweetener 1/3 cup Powdered Sugar Substitute
Optional Garnish:
- 🌰 2 tablespoons Chopped Peanuts
Detailed Directions: How to Make Your Chilled Summer Peanut Butter Dream Bars
- Craft the Simple Crust: In a mixing bowl, combine the almond flour, coconut flour, your powdered sugar substitute (1/3 cup), and the melted butter. Stir everything well until the mixture becomes wonderfully crumbly. Gently press this mixture firmly into the bottom of an 8×8 inch pan that’s been lined with parchment paper, making sure it forms an even, flat base. Pop the pan into your freezer to firm up while you get started on the next delicious layer.
- Whip Up the Peanut Butter Bliss: In a separate bowl, blend together the softened cream cheese, creamy peanut butter, vanilla extract (1/2 teaspoon), and powdered sugar substitute (1/3 cup) until it’s perfectly smooth and lusciously creamy. Carefully spread this delightful peanut butter layer evenly over your chilled crust. Place the pan back into the freezer.
- Prepare the Smooth Chocolate Topping: First, in a bowl, mix the 8 ounces of softened cream cheese with the remaining vanilla extract (1 teaspoon) and powdered sugar substitute (1/3 cup); set this aside. Next, grab a microwave-safe bowl and gently heat the sugar-free chocolate chips and heavy whipping cream in short 30-second bursts, stirring after each, until the chocolate is fully melted and beautifully smooth. Now, pour this melted chocolate goodness into your reserved cream cheese mixture and stir until it’s completely combined and velvety smooth.
- Assemble & Chill to Perfection: Carefully spread the smooth chocolate topping evenly over the peanut butter cheesecake layer. If you desire an extra crunch, sprinkle the chopped peanuts over the top. Return the pan to the freezer for 1 to 2 hours, or until the bars are wonderfully firm.
- Slice and Savor! Once fully set, simply remove the pan from the freezer, lift the entire block out using the parchment paper, and slice into your desired portions. Serve these delightful, easy, and healthy chilled treats! Enjoy every bite!
Presenting and Serving Your Chilled Summer Peanut Butter Dream Bars
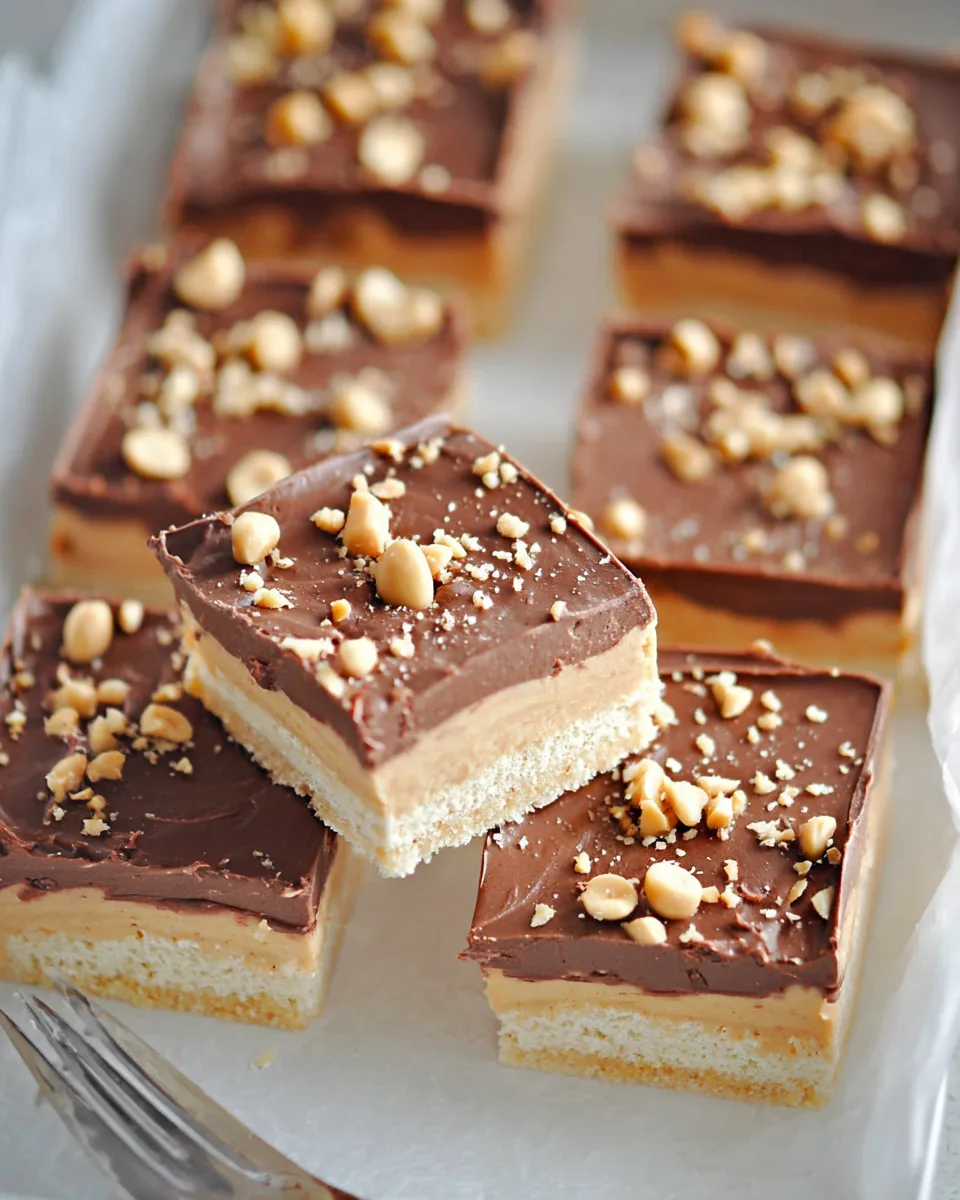
These incredible Chilled Summer Peanut Butter Dream Bars are not just delicious; they’re also a feast for the eyes! For a picture-perfect presentation, ensure your bars are fully chilled, making for clean, precise cuts. Lift the entire slab out of the pan using the parchment paper and place it on a cutting board. Use a sharp knife, wiping it clean between slices, to achieve those perfect squares or rectangles.
Here are a few ways to serve and elevate your dream bars:
- Classic & Simple: Serve them as is, a perfect individual treat for any time of day.
- Dessert Platter Star: Arrange a few bars on a platter with fresh berries like raspberries or strawberries for a pop of color and natural sweetness.
- Coffee Companion: Pair a bar with a hot or iced coffee for an indulgent afternoon pick-me-up.
- Whipped Cream Dollop: A dollop of sugar-free whipped cream on the side adds an extra layer of creamy delight.
- Nutty Crunch: Don’t forget that optional sprinkle of chopped peanuts right before the final chill for an added texture and visual appeal.
Storing Your Chilled Summer Peanut Butter Dream Bars
Once you’ve made these sensational Chilled Summer Peanut Butter Dream Bars, you’ll want to make sure they stay fresh and delicious for as long as possible. The good news is, they store beautifully!
- In the Refrigerator: Store any leftover bars in an airtight container in the refrigerator. They will maintain their fresh taste and texture for up to 5-7 days. Enjoy them straight from the fridge for that perfect chilled experience.
- In the Freezer: For longer storage, you can freeze the bars! Place them in a single layer in an airtight freezer-safe container, separating layers with parchment paper if stacking. They will keep well in the freezer for up to 1-2 months. When you’re ready to enjoy, simply remove a bar (or a few!) from the freezer and let it thaw in the refrigerator for about 30 minutes, or at room temperature for 10-15 minutes, until it reaches your desired texture. This makes them perfect for meal prepping your desserts!
Always keep these bars covered to prevent them from absorbing other odors in your fridge or freezer, ensuring every bite is as delicious as the first.
FAQs About Chilled Summer Peanut Butter Dream Bars
- Is this recipe really keto-friendly?
Yes, absolutely! This recipe is specifically designed to be low in net carbs, using almond and coconut flours for the crust and powdered sugar substitutes for sweetness, making it perfect for a keto or low-carb diet. - Can I use regular sugar instead of a sugar substitute?
You can, but it will significantly change the nutritional profile, especially the carb count, making it no longer keto-friendly. If you prefer regular sugar, use the same measurements for powdered sugar. - What if I don’t have coconut flour?
Coconut flour is unique in its absorbency. It’s difficult to substitute directly. If you omit it, you would need to increase almond flour and potentially reduce butter, which might alter the crust’s texture. It’s best to stick to the recipe for optimal results. - Can I make these bars in a different size pan?
An 8×8 inch pan works best for the thickness described. You could try a 9×9 inch pan for thinner bars, or halve the recipe for a smaller batch in a loaf pan, but adjust chilling times accordingly. - How do I get clean slices?
Ensure the bars are completely firm from chilling in the freezer. Use a sharp, hot knife (run it under hot water and wipe dry) and clean the blade between each slice for the cleanest cuts. - Can I use a different nut butter?
While peanut butter is key to the “Peanut Butter Dream Bars” name, you could experiment with almond butter or cashew butter for a different flavor profile, ensuring it’s creamy and unsweetened. - Are these bars very sweet?
The sweetness level is moderate, designed to be satisfying without being overwhelming, especially for those accustomed to sugar substitutes. You can slightly adjust the amount of powdered sugar substitute to your preference. - How long does it take for the bars to firm up completely?
The recipe suggests 1 to 2 hours in the freezer. This time is crucial for both the crust and the layers to set properly, making them easy to slice and enjoy. - Can I skip the chocolate topping?
Yes, if you prefer a pure peanut butter cheesecake experience, you can omit the chocolate topping. Simply spread the peanut butter layer and chill. - What kind of sugar substitute should I use?
Any powdered erythritol-based or monk fruit-based powdered sugar substitute will work well. Brands like Swerve, Lakanto, or Erythritol Blend are popular choices and provide excellent texture and sweetness without a strong aftertaste.
Chilled Summer Peanut Butter Dream Bars ☀️
Equipment
- 8x8-inch Pan
- Mixing Bowls
- Parchment Paper
Ingredients
Crust
- 1 1/4 cups Almond Flour
- 1/3 cup Coconut Flour
- 1/3 cup Powdered Sugar Substitute
- 6 tablespoons Melted Butter
Peanut Butter Cheesecake Layer
- 8 ounces Softened Cream Cheese
- 1/2 cup Creamy Peanut Butter
- 1/2 teaspoon Vanilla Extract
- 1/3 cup Powdered Sugar Substitute
Chocolate Topping
- 2/3 cup Sugar-Free Chocolate Chips
- 1/4 cup Heavy Whipping Cream
- 8 ounces Softened Cream Cheese
- 1 teaspoon Vanilla Extract
- 1/3 cup Powdered Sugar Substitute
Optional Garnish
- 2 tablespoons Chopped Peanuts
Instructions
- Step 1: Craft the Simple Crust. In a mixing bowl, combine the almond flour, coconut flour, your powdered sugar substitute (1/3 cup), and the melted butter. Stir everything well until the mixture becomes wonderfully crumbly. Gently press this mixture firmly into the bottom of an 8x8 inch pan that’s been lined with parchment paper, making sure it forms an even, flat base. Pop the pan into your freezer to firm up while you get started on the next delicious layer.
- Step 2: Whip Up the Peanut Butter Bliss. In a separate bowl, blend together the softened cream cheese, creamy peanut butter, vanilla extract (1/2 teaspoon), and powdered sugar substitute (1/3 cup) until it’s perfectly smooth and lusciously creamy. Carefully spread this delightful peanut butter layer evenly over your chilled crust. Place the pan back into the freezer.
- Step 3: Prepare the Smooth Chocolate Topping. First, in a bowl, mix the 8 ounces of softened cream cheese with the remaining vanilla extract (1 teaspoon) and powdered sugar substitute (1/3 cup); set this aside. Next, grab a microwave-safe bowl and gently heat the sugar-free chocolate chips and heavy whipping cream in short 30-second bursts, stirring after each, until the chocolate is fully melted and beautifully smooth. Now, pour this melted chocolate goodness into your reserved cream cheese mixture and stir until it’s completely combined and velvety smooth.
- Step 4: Assemble & Chill to Perfection. Carefully spread the smooth chocolate topping evenly over the peanut butter cheesecake layer. If you desire an extra crunch, sprinkle the chopped peanuts over the top. Return the pan to the freezer for 1 to 2 hours, or until the bars are wonderfully firm.
- Step 5: Slice and Savor! Once fully set, simply remove the pan from the freezer, lift the entire block out using the parchment paper, and slice into your desired portions. Serve these delightful, easy, and healthy chilled treats! Enjoy every bite!
Notes
- Calories: 417 kcal
- Total Carbs: 10g
- Net Carbs: 5g
- Fats: 38g
- Protein: 12g