Why You’ll Love These Christmas Chocolate Peppermint Dreams!
Get ready to fall head over heels for a cookie that truly embodies the spirit of the holidays! Our Christmas Chocolate Peppermint Dreams! aren’t just a treat; they’re an experience. Here are four irresistible reasons why this recipe will become your new festive favorite:
- A Symphony of Holiday Flavors: Imagine rich, deep chocolate mingling with cool, refreshing peppermint – it’s the iconic taste of Christmas in every bite! The optional espresso powder deepens the chocolate, making it an absolute dream.
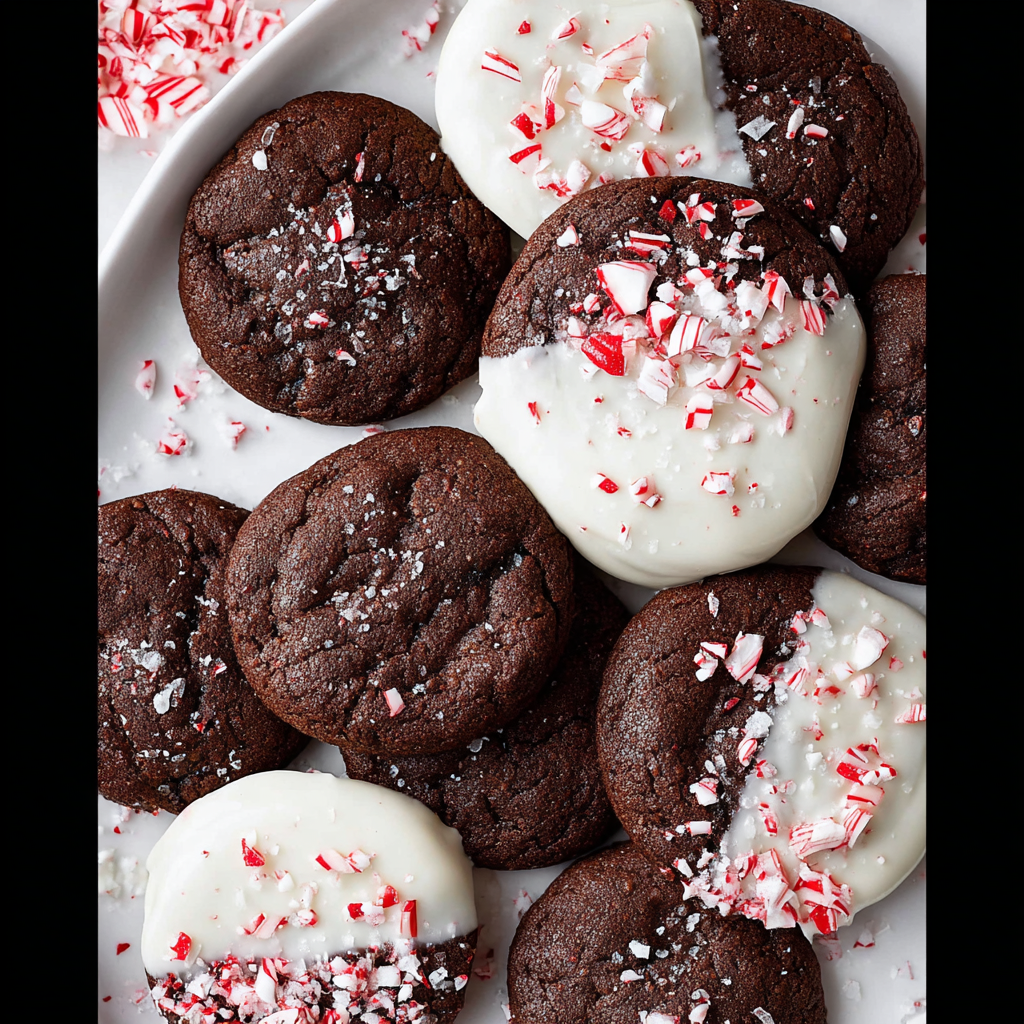
- Effortlessly Elegant & Festive: While these cookies look like they came straight from a gourmet bakery, they’re surprisingly simple to make. The beautiful white chocolate dip and festive crushed candy cane sprinkle make them visually stunning without requiring expert decorating skills.
- Perfectly Chewy and Decadent: Thanks to the clever addition of cornstarch, these cookies boast an incredible chewiness that you’ll adore. Paired with the melted chocolate base, they’re wonderfully rich and satisfying, yet light enough to keep you reaching for another.
- The Ultimate Crowd-Pleaser & Gift: Whether you’re baking for a holiday party, preparing a plate for Santa, or gifting homemade treats to loved ones, these Christmas Chocolate Peppermint Dreams! are guaranteed to bring smiles. They’re universally loved and always a hit!
Unwrap the Magic of Christmas Chocolate Peppermint Dreams!
Picture this: the twinkling lights, the cozy fireplace, the scent of fresh pine, and then – a waft of warm chocolate and invigorating peppermint filling your home. That’s the magic we’re inviting you to create with our spectacular recipe for Christmas Chocolate Peppermint Dreams! Forget bland cookies; this isn’t just a dessert, it’s a festive fantasy come to life. These aren’t your average sugar cookies; they’re rich, fudgy chocolate cookies infused with the cool kiss of peppermint, dipped in luxurious white chocolate, and crowned with a delightful crunch of candy canes and a hint of flaky sea salt. Get ready to bake a batch of pure holiday joy that will have everyone exclaiming, “These are the dreams I never knew I had!” Let’s dive into creating the most enchanting treat of the season!
Ingredients for Your Christmas Chocolate Peppermint Dreams!
Gather your festive arsenal! Here’s everything you’ll need to whip up a batch of these dreamy holiday cookies:
- 1 ¾ cups All-Purpose Flour (spooned & leveled)
- ¼ cup Cocoa Powder
- 2 tsp Espresso Powder (optional, for deeper chocolate flavor)
- 1 tsp Baking Powder
- 1 tsp Cornstarch
- ½ tsp Salt
- 8 Tbsp Unsalted Butter
- 1 cup Chocolate Chips (milk, semi-sweet, or dark)
- 1 tsp Vanilla Extract
- 1 tsp Peppermint Extract
- 2 large Eggs (room temperature)
- ¾ cup Brown Sugar (packed, dark or light)
- ¼ cup White Sugar
- 1 cup White Chocolate Chips or Melting Wafers
- 1 Tbsp Coconut Oil (melted)
- ⅓ cup Crushed Candy Canes (for garnish)
- Flaky Sea Salt (optional, for garnish)
Your Step-by-Step Guide to Christmas Chocolate Peppermint Dreams!
Ready to bake some holiday magic? Follow these simple steps to create your irresistible Christmas Chocolate Peppermint Dreams!:
- Gather Dry INGREDIENTS: In a medium bowl, gently whisk together your flour, cocoa powder, espresso powder (if using), baking powder, cornstarch, and salt. Set this aside.
- Melt Chocolate Goodness: In a small saucepan over low to medium heat, melt the unsalted butter with your chosen chocolate chips. Stir just until everything is smooth and melted, then take it off the heat. Stir in the vanilla and peppermint extracts and let it cool down a bit.
- Whip Eggs & Sugars: Using a stand mixer, beat the room-temperature eggs with both the brown sugar and white sugar for about 3-4 minutes. You’ll know it’s ready when the mixture looks thick and pale.
- Combine Wet Mixtures: With a rubber spatula, carefully fold the cooled chocolate-butter mixture into the whipped egg and sugar mix until they are nicely combined.
- Add Dry to Wet: Gradually add the dry flour mixture to the wet ingredients. Fold them together gently until just combined, being careful not to overmix. The dough will have a lovely shiny look.
- Chill & Preheat: Pop your cookie dough into the fridge to chill for at least 10 minutes. This helps the dough firm up. While it’s chilling, preheat your oven to 350°F (175°C).
- Scoop & Bake: Scoop out even portions of dough (using a 2 Tbsp scoop works great) and place them onto a baking sheet lined with parchment paper. Bake for 10-12 minutes. Don’t worry if they look a little soft; they’ll firm up perfectly as they cool.
- Cool Down: Let the baked cookies cool on the baking sheet for 5 minutes before moving them to a wire rack to cool completely.
- Decorate & Enjoy: Once the cookies are fully cool, melt the white chocolate chips with the coconut oil in a microwave-safe bowl (heat in 30-second bursts, stirring each time, until smooth). Dip one side of each cookie into the melted white chocolate, then sprinkle generously with crushed candy canes and a touch of flaky sea salt if you like.
Presenting and Serving Your Christmas Chocolate Peppermint Dreams!
Once your Christmas Chocolate Peppermint Dreams! are baked and decorated, the fun isn’t over! How you present and serve them can elevate the entire holiday experience. Here are some detailed ideas to make them shine:
Creative Presentation Ideas:
- The Classic Dip: As described in the recipe, a generous half-dip in white chocolate with crushed candy canes is timeless. For an extra artistic touch, create a diagonal dip instead of a straight line.
- Elegant Drizzle: Instead of dipping, use a fork or a piping bag with a very small hole to drizzle the melted white chocolate artistically across the top of the cookies. This creates a more delicate look.
- Full Festive Coating: For the ultimate indulgence, fully coat the cookies in white chocolate before sprinkling with candy canes. This creates a dramatic, snow-covered effect.
- Sparkle and Shine: In addition to crushed candy canes, consider adding a sprinkle of edible glitter or finely chopped pistachios for a contrasting green pop. Dark chocolate shavings can also add elegance.
- Stacked Delight: Arrange your cookies on a beautiful holiday platter, stacking them artfully. Use a tiered tray for a truly impressive display at your holiday gathering.
Serving Suggestions:
- Hot Cocoa Companion: Serve these cookies alongside steaming mugs of hot cocoa, whipped cream, and a mini candy cane stir stick. It’s a match made in heaven!
- Coffee Break Bliss: They pair wonderfully with a festive coffee, a peppermint mocha, or even a simple espresso.
- Cookie Exchange Star: Bring these to any cookie exchange, and prepare for them to be the first to disappear!
- Gift of Joy: Pack them into decorative tins or clear cellophane bags tied with a festive ribbon. They make thoughtful, delicious homemade gifts for neighbors, teachers, and friends.
- Santa’s Favorite: Don’t forget to leave a few out for Santa Claus on Christmas Eve – he’s sure to appreciate these dreamy treats!
Storing Your Christmas Chocolate Peppermint Dreams!
So you’ve baked a glorious batch of Christmas Chocolate Peppermint Dreams! – now, how do you keep them fresh and delicious for as long as possible? Proper storage is key to extending their holiday magic!
- At Room Temperature: Once fully cooled and the white chocolate has set, store the cookies in an airtight container at room temperature. They will stay wonderfully fresh and chewy for 3-5 days. To prevent the white chocolate and candy cane topping from sticking, you can place a piece of parchment paper between layers of cookies if stacking.
- In the Refrigerator: If you want them to last a bit longer, especially if your home is particularly warm, you can store them in an airtight container in the refrigerator for up to a week. Just be aware that refrigeration can sometimes alter the texture slightly, making them a little firmer. Bring them to room temperature for about 15-20 minutes before serving for the best texture.
- Freezing for Future Feasts: These cookies freeze beautifully! For best results, freeze the undecorated chocolate peppermint cookies first. Once frozen solid, transfer them to a freezer-safe bag or airtight container, separated by parchment paper, for up to 1-2 months. When ready to enjoy, thaw them at room temperature, then proceed with the white chocolate dipping and candy cane garnish. If you’ve already decorated them, you can still freeze them, but the white chocolate and candy canes might get a little condensation upon thawing. Freeze them in a single layer on a baking sheet until solid, then transfer to an airtight container with parchment between layers.
Always ensure your cookies are completely cool before storing to prevent condensation, which can make them soggy.
FAQs About Christmas Chocolate Peppermint Dreams!
1. Can I use regular unsweetened cocoa powder instead of Dutch-processed?
Yes, you can use regular unsweetened cocoa powder. The primary difference is in acidity and color. Dutch-processed cocoa is less acidic and darker. Using regular cocoa won’t significantly alter the taste of these Christmas Chocolate Peppermint Dreams!, but your cookies might be a slightly lighter shade of brown and have a hint more chocolate tang.
2. Is espresso powder really necessary for Christmas Chocolate Peppermint Dreams!?
The espresso powder is optional but highly recommended! It doesn’t make the cookies taste like coffee; instead, it deepens and enhances the chocolate flavor, making it richer and more intense. If you don’t have it, your cookies will still be delicious, just with a slightly less complex chocolate profile.
3. Why do I need to chill the cookie dough?
Chilling the dough helps solidify the butter, which prevents the cookies from spreading too much in the oven. It also allows the flavors to meld, resulting in a more flavorful and chewy cookie. Even a quick 10-minute chill makes a difference for your Christmas Chocolate Peppermint Dreams!.
4. Can I make these Christmas Chocolate Peppermint Dreams! gluten-free?
While this recipe hasn’t been tested with gluten-free flour, you can often substitute all-purpose flour with a 1:1 gluten-free baking flour blend that contains xanthan gum. Results may vary slightly in texture, but it’s worth a try!
5. Can I substitute the peppermint extract for another flavor?
While peppermint is key to the “Peppermint Dreams” in Christmas Chocolate Peppermint Dreams!, you could experiment! Orange extract (chocolate orange cookies) or almond extract (chocolate almond cookies) could be delicious for a different holiday twist. Just ensure the flavor pairs well with chocolate.
6. What if I don’t have cornstarch?
Cornstarch is included to give these cookies an extra soft and chewy texture. If you don’t have it, you can omit it. Your cookies will still be good, but they might be slightly less tender and chewy. You could also try substituting with arrowroot powder if you have that on hand.
7. How do I prevent my cookies from spreading too much?
Ensure your butter isn’t too warm when mixing, don’t skip the dough chilling step, and use parchment paper on your baking sheets. Also, avoid overmixing the dough once the flour is added, as this can develop too much gluten and lead to spreading.
8. Can I freeze the cookie dough?
Absolutely! You can scoop the dough onto a parchment-lined baking sheet and freeze the dough balls until solid. Once frozen, transfer them to a freezer-safe bag or container. You can bake them directly from frozen, adding a minute or two to the bake time. This is a great way to have fresh Christmas Chocolate Peppermint Dreams! on demand!
9. My white chocolate for dipping is clumping, what went wrong?
White chocolate can be finicky. Clumping usually happens if it gets too hot too quickly, or if even a tiny bit of water or steam gets into it. Ensure your bowl is completely dry, melt in short bursts, and stir frequently. Adding the coconut oil helps keep it smooth and fluid, but be gentle with the heat.
10. Can I use different types of chocolate chips in the cookie base?
Yes, absolutely! The recipe suggests milk, semi-sweet, or dark chocolate chips, and any of these will work beautifully. You can even use a mix of your favorites to create a custom chocolate flavor profile for your Christmas Chocolate Peppermint Dreams!.
Christmas Chocolate Peppermint Dreams! 🎅
Equipment
- Medium Bowl
- Small Saucepan
- Stand Mixer
- Rubber Spatula
- Baking Sheet
- Parchment Paper
- Wire Rack
- Microwave-safe Bowl
Ingredients
Cookie Dough
- 1 3/4 cups All-Purpose Flour spooned & leveled
- 1/4 cup Cocoa Powder
- 2 tsp Espresso Powder optional, for deeper chocolate flavor
- 1 tsp Baking Powder
- 1 tsp Cornstarch
- 1/2 tsp Salt
- 8 Tbsp Unsalted Butter
- 1 cup Chocolate Chips milk, semi-sweet, or dark
- 1 tsp Vanilla Extract
- 1 tsp Peppermint Extract
- 2 large Eggs room temperature
- 3/4 cup Brown Sugar packed, dark or light
- 1/4 cup White Sugar
For Decorating
- 1 cup White Chocolate Chips or Melting Wafers
- 1 Tbsp Coconut Oil melted
- 1/3 cup Crushed Candy Canes for garnish
- Flaky Sea Salt optional, for garnish
Instructions
- In a medium bowl, gently whisk together your flour, cocoa powder, espresso powder (if using), baking powder, cornstarch, and salt. Set this aside.
- In a small saucepan over low to medium heat, melt the unsalted butter with your chosen chocolate chips. Stir just until everything is smooth and melted, then take it off the heat. Stir in the vanilla and peppermint extracts and let it cool down a bit.
- Using a stand mixer, beat the room-temperature eggs with both the brown sugar and white sugar for about 3-4 minutes. You'll know it's ready when the mixture looks thick and pale.
- With a rubber spatula, carefully fold the cooled chocolate-butter mixture into the whipped egg and sugar mix until they are nicely combined.
- Gradually add the dry flour mixture to the wet ingredients. Fold them together gently until just combined, being careful not to overmix. The dough will have a lovely shiny look.
- Pop your cookie dough into the fridge to chill for at least 10 minutes. This helps the dough firm up. While it's chilling, preheat your oven to 350°F (175°C).
- Scoop out even portions of dough (using a 2 Tbsp scoop works great) and place them onto a baking sheet lined with parchment paper. Bake for 10-12 minutes. Don't worry if they look a little soft; they'll firm up perfectly as they cool.
- Let the baked cookies cool on the baking sheet for 5 minutes before moving them to a wire rack to cool completely.
- Once the cookies are fully cool, melt the white chocolate chips with the coconut oil in a microwave-safe bowl (heat in 30-second bursts, stirring each time, until smooth). Dip one side of each cookie into the melted white chocolate, then sprinkle generously with crushed candy canes and a touch of flaky sea salt if you like.
Notes
Nutrition Information (per serving):
Calories: 449 kcalTotal Carbohydrates: 60 g
Net Carbs: 59 g
Fats: 22 g
Protein: 5 g