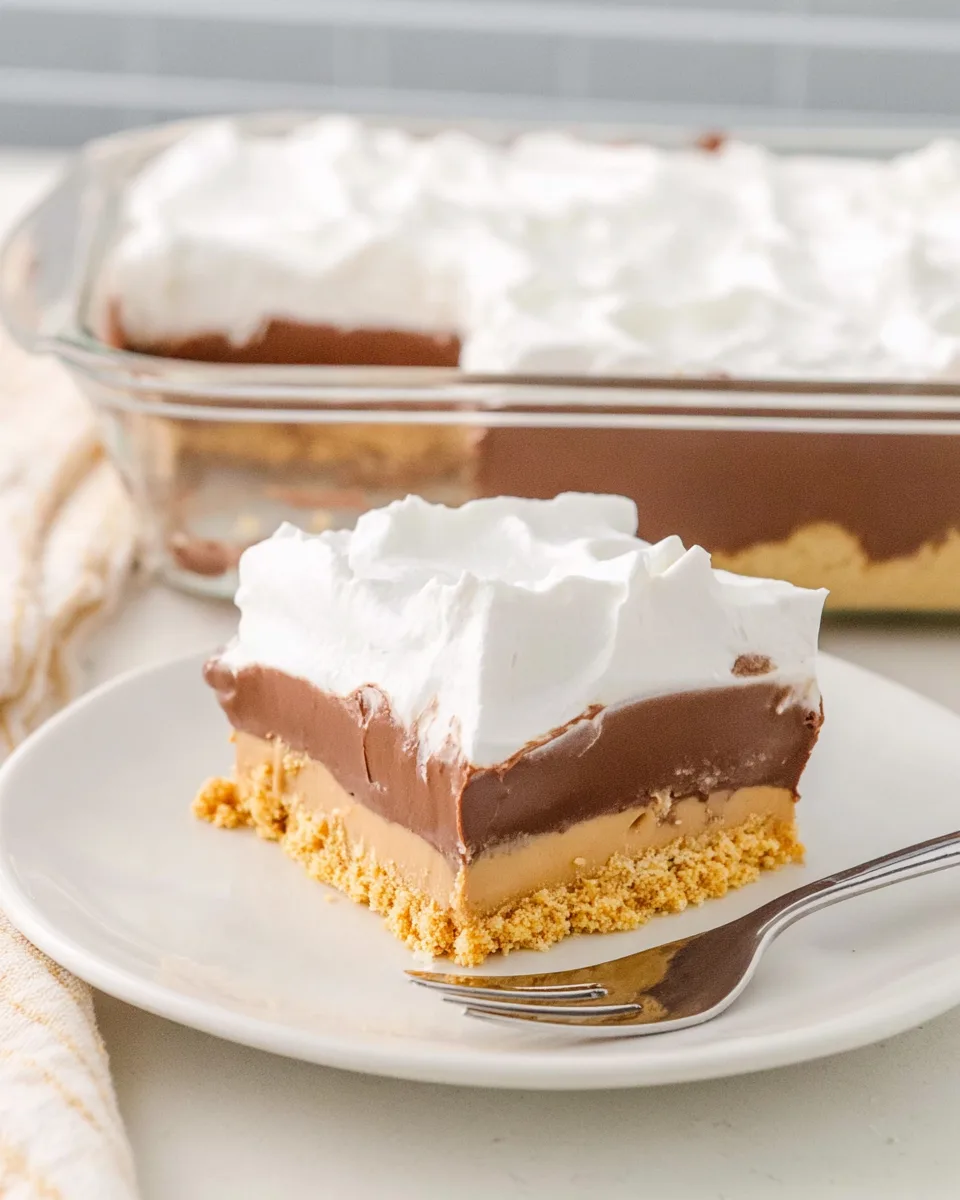
Get ready to meet your new favorite dessert obsession! Imagine layers of crunchy, buttery crust, a cloud-like peanut butter dream, rich, velvety chocolate, all topped with fluffy whipped goodness. This isn’t just a dessert; it’s an experience. If you’re a fan of that iconic duo – chocolate and peanut butter – prepare to have your mind (and taste buds) absolutely blown by this incredible Creamy Chocolate Peanut Butter Lush Dessert. It’s shockingly easy to make, but tastes like it came straight from a gourmet bakery. So, grab your apron and let’s dive into making some magic!
Why You’ll Love This Recipe
Prepare to fall head over heels for the Creamy Chocolate Peanut Butter Lush Dessert for more than just its irresistible taste. Here are four undeniable reasons why this will become your go-to treat:
- The Ultimate Flavor Power Couple: It’s no secret that chocolate and peanut butter are a match made in heaven. This dessert takes that classic combination to epic new heights, delivering a perfect balance of sweet, salty, and utterly decadent flavors in every single bite.
- Effortlessly Impressive: Despite looking like a showstopper, this lush dessert is surprisingly simple to put together. With easy-to-follow steps and layers that come together beautifully, you’ll be a dessert superstar without spending hours in the kitchen.
- Perfect for Any Occasion: Whether it’s a casual family dinner, a potluck with friends, or a special holiday gathering, this dessert is always a crowd-pleaser. Its generous serving size means there’s enough deliciousness for everyone to enjoy.
- Cool & Refreshing: Served chilled, this lush dessert is incredibly refreshing, making it perfect for warmer months or as a delightful end to a rich meal. The light, creamy textures are a welcome contrast to heavier baked goods.
Ingredients with Measurements
To whip up this irresistible Creamy Chocolate Peanut Butter Lush Dessert, gather these simple yet powerful ingredients:
- 🍪 60 Nilla Wafers
- 🥜 ⅔ cup salted peanuts
- 🧈 ⅓ cup unsalted butter, melted
- 🧀 8 ounces cream cheese, softened
- 🍚 1 cup powdered sugar
- 🥜 ½ cup creamy peanut butter
- ☁️ 16 ounces whipped topping (like Cool Whip), divided
- 🥛 3 cups cold milk
- 🍫 Two 3.9-ounce packages instant chocolate pudding mix
Detailed Step-by-Step Directions How to Make the Recipe
Let’s get cooking! Follow these fun and detailed steps to create your spectacular Creamy Chocolate Peanut Butter Lush Dessert:
- Crust First Fiesta: Preheat your oven to a cozy 350°F (175°C). Grab your food processor and toss in the Nilla wafers and salted peanuts. Pulse, pulse, pulse until they transform into beautiful, coarse crumbs – think textured sand. Now, pour in that lovely melted butter and mix until all those crumbs are perfectly moistened and glistening. Press this flavorful mixture firmly and evenly into the bottom of a 9×13-inch pan. Pop it into the oven for just 8-10 minutes, or until it’s lightly golden and smells heavenly. Once baked, set it aside on a wire rack to cool down completely. Patience, young grasshopper, it’s worth it!
- Peanut Butter Dream Layer Delight: While your crust chills, let’s create the magic! In a large mixing bowl (or using your trusty stand mixer), combine the softened cream cheese, powdered sugar, and that glorious creamy peanut butter. Beat them together until the mixture is utterly smooth, light, and fluffy – no lumps allowed! Now, with a gentle hand, fold in 2 cups of the whipped topping. Be delicate, we want to keep that airy texture! Once fully combined, lovingly spread this dreamy peanut butter layer evenly over your completely cooled crust.
- Velvety Chocolate Layer Extravaganza: Time for chocolate! In a separate bowl, whisk together the cold milk and both packages of instant chocolate pudding mix. Whisk vigorously for about 2 minutes. Watch as it magically thickens before your eyes! Next, carefully fold in 1 cup of the whipped topping into the pudding mixture. Continue folding until you see no more white streaks – just pure, luscious chocolatey goodness. Spread this magnificent chocolate layer gently over the peanut butter layer in your pan.
- Finish & Chill Out: Almost there! Take the remaining whipped topping and spread it smoothly and evenly over your chocolate layer. Cover your masterpiece with plastic wrap (or a lid if your pan has one) and banish it to the refrigerator for at least 4-6 hours. If you can resist, leaving it overnight is even better, as it allows all those sensational layers to set perfectly and for the flavors to truly meld.
Detailed Different Ways You Can Present the Recipe and How to Serve It
Serving your magnificent Creamy Chocolate Peanut Butter Lush Dessert is almost as much fun as eating it! Here are some creative ways to present and serve your masterpiece:
- Classic Slices with a Flourish: The simplest and often most elegant way is to cut generous squares directly from the pan. For extra flair, dust each slice lightly with cocoa powder, sprinkle with a few extra chopped salted peanuts, or add a miniature Nilla wafer on top for a nod to the crust.
- Drizzle and Swirl: Before serving, melt a tablespoon of creamy peanut butter and drizzle it in a zig-zag pattern across the top of the entire dessert or individually over each slice. You can do the same with a little melted chocolate for a stunning visual and flavor boost.
- Chocolate Shavings & Curls: Garnish the top of the dessert or individual servings with delicate chocolate shavings or curls. A vegetable peeler works wonders on a block of chocolate for this!
- Individual Parfaits (Pre-Assembly): While designed for a pan, for a truly fancy presentation, you could layer the cooled crust crumbs, peanut butter filling, chocolate pudding, and whipped topping in clear parfait glasses or small jars. This makes for beautiful, individual servings perfect for parties.
- Edible Cup Enhancements: Serve each slice on a small decorative plate. A dollop of extra whipped cream on the side, perhaps with a sprinkle of mini chocolate chips, always adds a touch of indulgence.
- Themed Toppings: For a holiday or specific event, consider themed sprinkles or tiny candy decorations on the final whipped topping layer.
How You Can Store It and How Long Does It Last
Proper storage is key to keeping your Creamy Chocolate Peanut Butter Lush Dessert fresh and delicious. Because of its dairy components (cream cheese, milk, whipped topping), it’s crucial to keep this dessert refrigerated.
- Refrigeration is Key: Always store your lush dessert in the refrigerator. Ensure it’s tightly covered with plastic wrap or foil, or transfer any leftovers to an airtight container. This prevents it from absorbing odors from other foods in the fridge and keeps the layers from drying out.
- How Long Does It Last? When stored correctly in the refrigerator, your Creamy Chocolate Peanut Butter Lush Dessert will stay delightfully fresh for 3 to 4 days. After this time, while it might still be safe to eat, the textures may start to change, and the flavors might not be as vibrant.
- Freezing? While technically possible, freezing this dessert isn’t highly recommended. The whipped topping and cream cheese layers can sometimes separate or become a bit watery upon thawing, affecting the smooth, lush texture you worked so hard to achieve. If you absolutely must freeze it, cover it very tightly and consume within a month for best quality. Thaw slowly in the refrigerator overnight.
- Keep it Cool: If serving at a party, try not to leave the dessert out at room temperature for more than 2 hours. It’s best enjoyed when perfectly chilled!
FAQs
Got questions about making your Creamy Chocolate Peanut Butter Lush Dessert? We’ve got answers!
- Can I use crunchy peanut butter instead of creamy?
Absolutely! Crunchy peanut butter will add an extra layer of texture to your peanut butter dream layer, which many people love. Go for it! - Can I make this dessert ahead of time for a party?
Yes, and it’s highly recommended! This dessert needs ample time to chill and set. Making it the day before (allowing it to chill overnight) is ideal for the best texture and flavor. - What if I don’t have a food processor for the crust?
No problem! You can place the Nilla wafers and peanuts in a large Ziploc bag and crush them with a rolling pin until they form coarse crumbs. It’s a great stress reliever! - Can I use sugar-free pudding mix?
You can definitely substitute sugar-free instant chocolate pudding mix if you’re looking to reduce sugar content. The texture should still be similar. - Can I use a different type of cookie for the crust?
Yes! Graham crackers, shortbread cookies, or even chocolate wafers would make fantastic substitutes for the Nilla wafers. Adjust the amount of butter as needed to get the right consistency. - How do I get clean slices?
For picture-perfect slices, use a sharp, thin knife. Wipe the knife clean with a warm, damp cloth between each cut. This prevents the layers from sticking and smearing. - Can I halve the recipe?
Yes, you can easily halve the recipe and bake it in an 8×8-inch pan. Just make sure to adjust all ingredient quantities accordingly. - What kind of whipped topping is best?
A frozen whipped topping like Cool Whip, thawed, works wonderfully for its stability. If you prefer to use homemade whipped cream, stabilize it with a little cream cheese or gelatin to prevent it from deflating. - My peanut butter layer is too thick, what happened?
Ensure your cream cheese is truly softened to room temperature before beating. This helps achieve a smooth, light texture. If it’s too cold, it will be lumpy and harder to mix. - Is this dessert truly “lush”?
Absolutely! The term “lush dessert” refers to its rich, multi-layered, creamy, and indulgent nature. One bite, and you’ll understand why it earned its name!
Creamy Chocolate Peanut Butter Lush Dessert
Equipment
- Food Processor
- 9x13-inch pan
- Large mixing bowl
- Whisk
- Stand Mixer (optional)
Ingredients
Crust
- 60 Nilla Wafers
- ⅔ cup salted peanuts
- ⅓ cup unsalted butter melted
Filling
- 8 ounces cream cheese softened
- 1 cup powdered sugar
- ½ cup creamy peanut butter
- 16 ounces whipped topping like Cool Whip, divided
- 3 cups cold milk
- 2 packages instant chocolate pudding mix 3.9-ounce each
Instructions
- Preheat your oven to 350°F (175°C). In a food processor, pulse the Nilla wafers and peanuts until they become coarse crumbs. Mix these crumbs with the melted butter until they're nicely moistened. Press this mixture firmly into a 9x13-inch pan, making a nice even crust. Bake for just 8-10 minutes until golden, then set it aside to cool completely.
- In a large mixing bowl (or using a stand mixer), beat the softened cream cheese, powdered sugar, and creamy peanut butter together until the mixture is smooth and light. Gently fold in 2 cups of the whipped topping until it's fully combined. Spread this creamy peanut butter layer evenly over your cooled crust.
- In another bowl, whisk the cold milk with both packages of instant chocolate pudding mix for about 2 minutes, allowing it to thicken up. Carefully fold in 1 cup of the whipped topping into the pudding mixture until no streaks remain. Spread this luscious chocolate layer over the peanut butter layer in your pan.
- Finally, spread the remaining whipped topping over the chocolate layer. Cover your dessert and refrigerate for at least 4-6 hours, or even overnight, to let all the delicious layers set perfectly. Slice and enjoy this delightful, easy-to-make treat!
Notes
- Calories: 313kcal
- Total Carbs: 29g
- Net Carbs: 28g
- Fats: 20g
- Protein: 6g